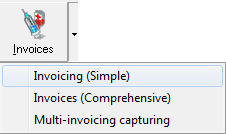
Click on the drop-down menu next to the Invoices icon and select Invoicing (Simple)
The Default Invoicing Method can be selected under User Preferences
Note: If the Default Invoicing Method has been selected under User Preferences for the Simple Invoice screen, you only need to click on the Invoices icon
The Simple Invoice screen will be displayed
Enter the Debtor number or Tab to select the Debtor from the Debtor Fixed data list. If you want to use your own file number system, you can insert a star * before your own file number and then press
tab to navigate to the correct debtor.
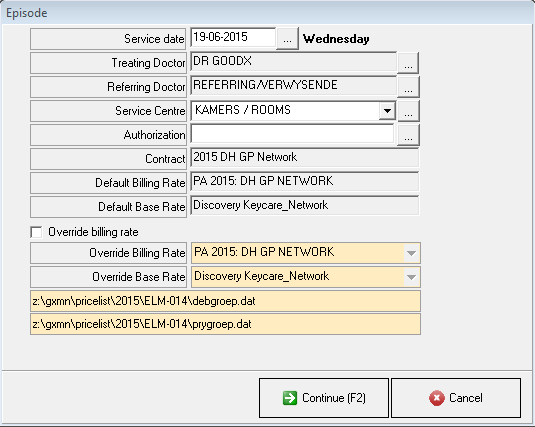
If selected under User Preferences, the Episode screen will display
The Service date and Treating Doctor and Referring Doctor can be changed by clicking on the corresponding ellipse boxes
Select the correct Service Centre by clicking on the drop down arrow
To add or edit a Service Centre, click on the ellipse (...)
Enter an Authorisation if required
The Default Billing Rate and Default Base Rate can also be changed by clicking the radio button next to Override billing rate, selecting the applicable rate from the drop-down arrows
Click on Continue (F2)
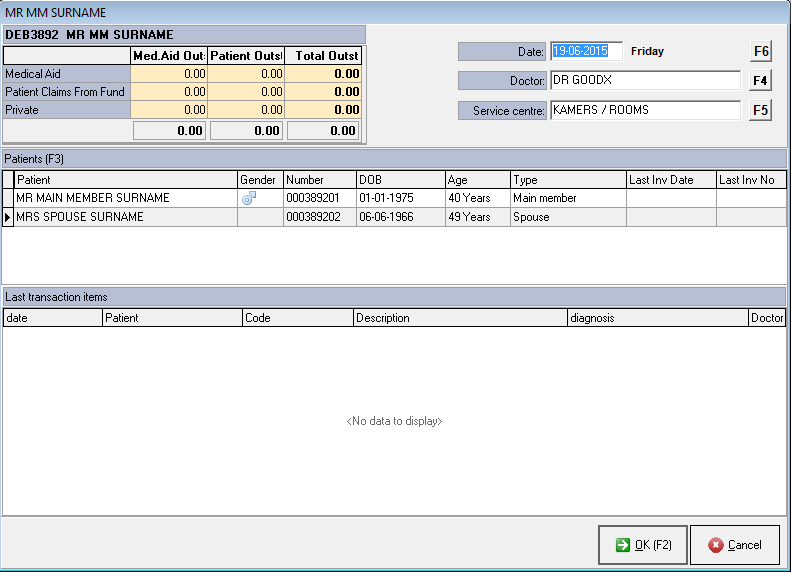
The following screen will display the Debtor's Account details, the Patients registered under the Debtor as well as the Last transaction items
Select the correct Patient
The Date, Doctor and Service Centre can be changed on this screen by clicking on the corresponding buttons or using the shortcut keys on your keyboard
Click on OK (F2)
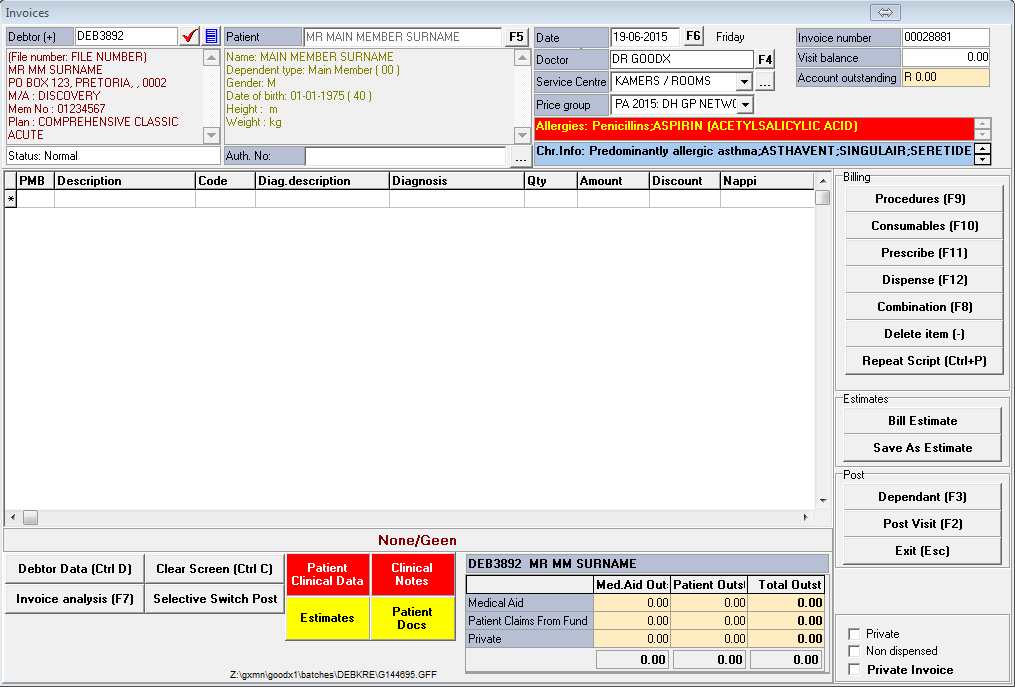
The top window of the Simple Invoice screen will be populated with the information of the selected Debtor and Patient
The Patient, Date, Doctor and Service Centre and Price group can also be changed on this screen by clicking on the corresponding buttons or using the shortcut keys on your keyboard
The Price group field will be populated by default with the information entered on the Medical Aid option of the debtor
The Invoice number, Visit balance and Account outstanding can be viewed on the screen after procedures has been billed
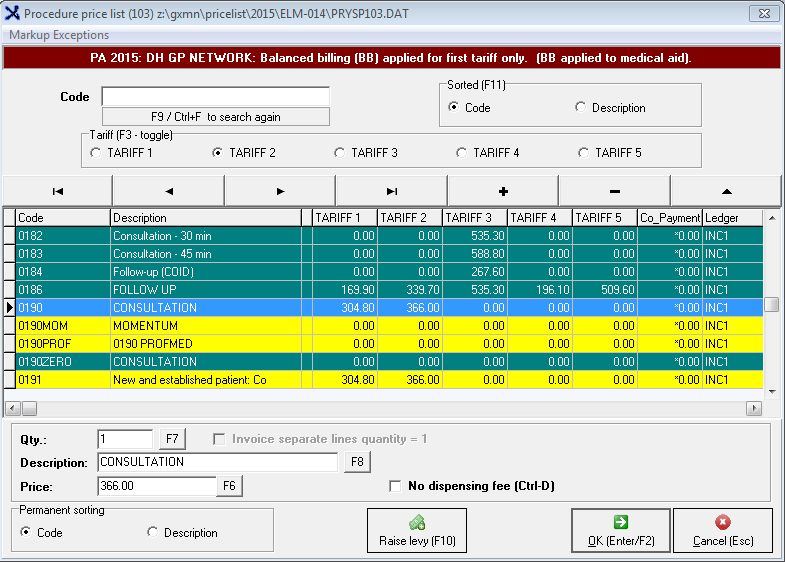
Procedures
Click on the button or use the shortcut key
The Procedure list of the relevant price list is displayed
The price of the Procedure will be determined by the Debtor's Medical Aid Scheme, Scheme Option, Billing Group and the Service Centre
The different prices for the procedures are displayed in the columns next to the Description of the codes
Search for the procedure code using the Code or the Description or the Shortcut key (F11)
Permanent sorting can be selected by clicking Code or Description (at the bottom left of the screen)
To change the Quantity of an item, click on the F7 button or use the shortcut key
The Description can also be changed by clicking of the F8 button or using the shortcut key
To change the Price, click on the F6 button or press the shortcut key
When the No dispensing fee (Ctrl-D) box is ticked, the item will display on the account but with a zero (R0.00) amount
On consecutive codes, the Change Diag (F12) button will display
Press this button if you want to change the Diagnosis
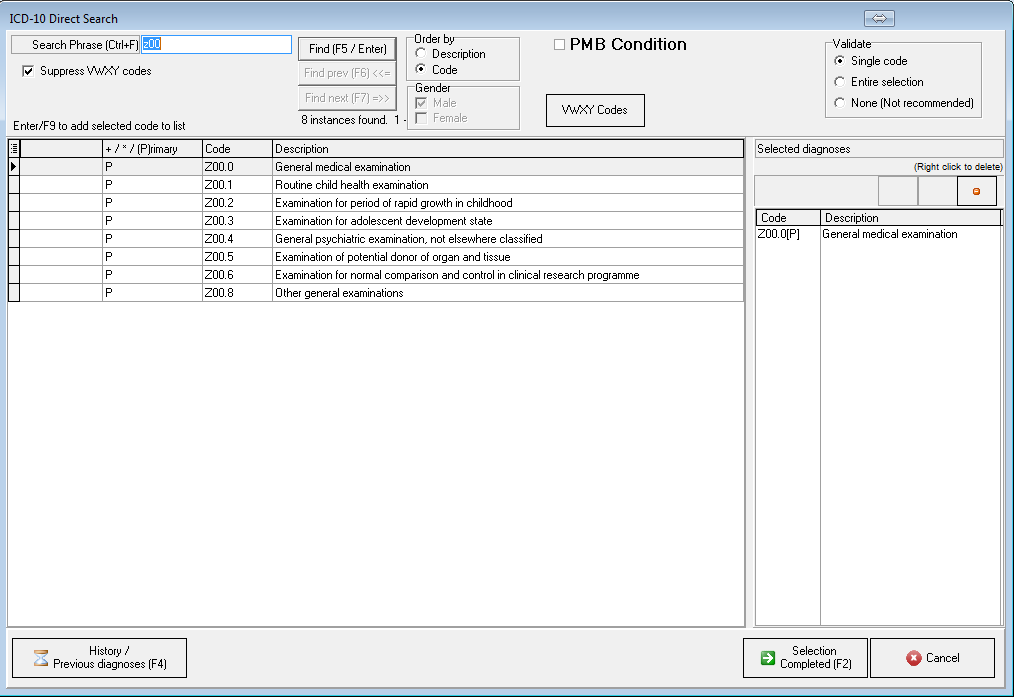
The ICD-10 list is displayed
Click on OK to continue
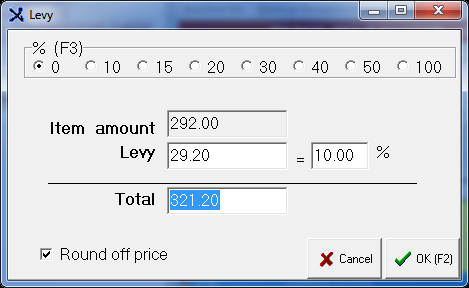
Click on the Raise Levy (F10) button to raise a levy on the item
Enter the Percentage or the Levy Amount
Click on OK or press the shortcut key F2
Click the OK (Enter/F2) button or press Enter or F2 to continue
ICD-10 Diagnosis Code:
The Diagnosis (ICD-10) screen is displayed
Enter the ICD-10 code or search for the Diagnosis by entering part of the Code or the Description
The ICD-10 list is based on International standards
Correct spelling is very important when searching for the Diagnosis
Press Enter to select the code or double click on the code
The code will be added to the panel on the right
Repeat the process for additional, multiple ICD-10 codes
If an incorrect diagnosis code was selected, right click on the code and click Delete Item
Click on Selection Completed (F2)
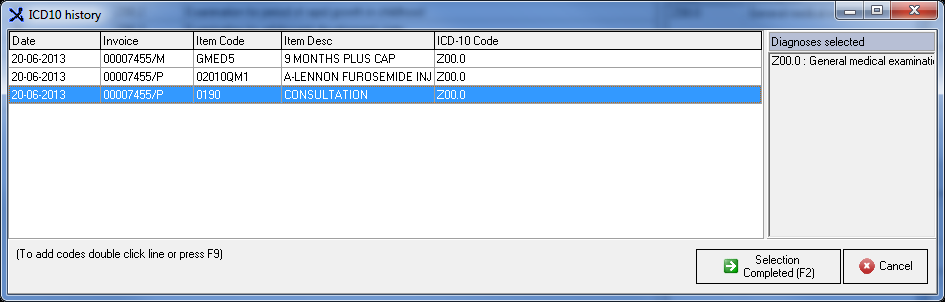
Previous Diagnosis:
On the ICD-10 Direct Search screen click on History/Previous Diagnosis or press (F4)
To add an ICD-10 History code, Double click on the line or press F9
The code will be added to the panel on the right
Click on Selection Completed (F2) or press F2
Consumables (F10) - Materials:
The price of the Material is determined by Medprax and the mark-up of the practice
To add a Consumable (Material) click on the button or use the shortcut key F10
The Materials Stock List is displayed
The items to Display can be selected by clicking on the relevant radio button Active, Active No Sales, Inactive or All
NOTE: An Inactive item cannot be invoiced
Search for the item using the different Sorting by options: Code, Description or Nappi (Shortcut key (F11))
In the Search phrase (Ctrl-F) enter the Description, CodeorNappi to search
Enter the Quantity or press the shortcut key F3
To award a discount, enter the amount in the Discount field or press F5 to set the focus of the cursor on the field
Enter an Authorization if applicable
Enter the Medication duration if necessary
The Calc. Price can be changed by entering the amount in the field provided or press F8 to set the focus of the cursor on the field
Pack Price : The price of the whole pack (Including the Units)
Pack size : The amount of units in the pack
Unit Price : The price of one unit before mark-up
Click on Ok (Enter/F2) or press Enter or F2
Repeat the process for additional items
Dispense (F12) - Medication:
The price of the Medicine is determined by Medprax and the mark-up of the practice
To dispense medication click on the button or use the shortcut key F12
The Medicine StockList is displayed
The items to Display can be selected by clicking on the relevant radio button Active, Active No Sales, Inactive or All
NOTE: An inactive item cannot be invoiced
Search for the item using the different Sorting by options: Code, Description or Nappi (Shortcut key (F11))
In the Search phrase (Ctrl-F) enter the Description, Code or Nappi to search
Enter the Quantity or press the shortcut key F3
To award a discount, enter the amount in the Discount field or press F5 to set the focus of the cursor on the field
Enter an Authorization if applicable
Enter the Medication duration if necessary
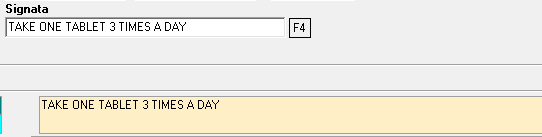
To enter a Signata (Ctrl-F4 new signata). There are two options using the Signata which can be setup in Supervisor:
Option 1 - Free Format Signata
The Free Format Signata option in Supervisor under the Debtor Transaction tab need to be ticked
In User Preferences, under the Medical/Paramedic tab, the Capture signata when invoicing medicines check box need to be ticked
Free Format Signata means the Medicine item is not linked to a permanent signata. You can enter your own signata description
Option 2 - Fixed Format Signata
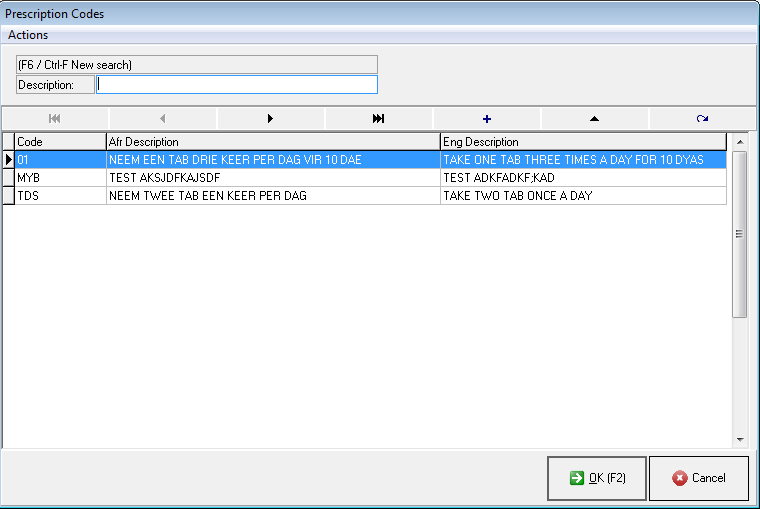
A Fixed Format list will be loaded on installation for Dispensing GP's under F4
When invoicing a Medicine the signata need to be selected form the Signata List (F4) and this signata will always be linked to that specific item until changed
A new signata can be added to the list by clicking on the +
The Calc. Price can be changed by entering the amount in the field provided or press F8 to set the focus of the cursor on the field
Pack Price: The price of the whole pack (Including the Units)
Pack size: The amount of units in the pack
Unit Price: The price of one unit before mark-up
Click on the Ok (Enter/F2) button or press Enter or F2
Repeat the process for additional items
Prescribe (F11)
Follow the same procedure as for the Dispense (F12) option
The only difference is that the amount displayed on the Invoice will be zero (R0.00)
Combination (F8)
This function will be discussed separately under the MedDebs: Invoicing heading
Delete Item (-)
Select this button to delete an item on the Invoice
Estimates
This function will be discussed separately under the MedDebs: Invoicing heading
Other functions
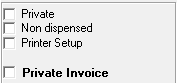
Private
Mark this box when only a specific line item(s) has to be processed as Private and not be claimed from the medical aid
Only this item(s) will display under the Patient liable column
Private Invoice
Mark this box if the whole invoice has to be processed as Private and not be claimed from the medical aid
The whole Invoice will display under the Patient liable column
Non Dispensed
The Medicine or Material item will reflect with a zero rand value - the same as with Prescribe (F11)
Debtor Data (Ctrl D)
Displays the Debtor Data where information can be updated
Clear screen(Ctrl C)
Clear the current Invoice screen
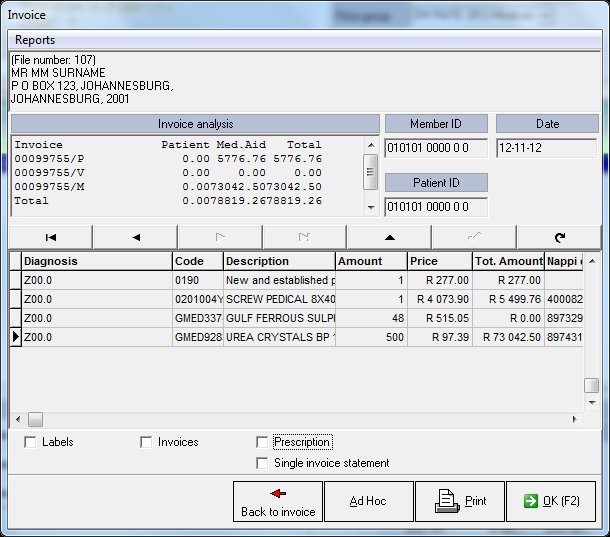
Invoice analysis (F7)
The shortcut key (F7) can also be used
This button displays the Invoice before posting
Patient Clinical Data
Select this button to access the Clinical data of a patient
Clinical Notes
This button gives the user access to the Clinical notes of the patient
Estimates
View the Estimates on a patient
Patient Docs
View patient documents
Posting of an Invoice
When all the necessary information have been captured press F2 or click on Post Visit (F2)
The Invoice screen is displayed if setup in User Preferences
On this screen you have the option to print the following after posting of the Invoice:
Invoice
Labels if you have dispensed Medication
Prescription
Single Invoice Statement
Click on OK (F2) to post the Invoice
There is also an option in User Preferences to print the Statement after posting