Stock Level List Screen: Navigation and Use
The Stock Level List screen plays a crucial role in enabling the Practice to maintain real-time awareness and comprehensive oversight of the stock levels across each warehouse, ensuring optimal inventory management and operational efficiency.
- The contents of this user manual will consist of the following information:
- Filters
- Column Options
- Columns
- Page Options
- Export
- This user manual will start on the Stock Setup screen.

- For more information regarding the Stock Setup screen, please refer to the user manual: Stock Setup Screen: Navigation and Use.
- Click on the desired Stock Item.
![]()
- Click on the Sidebar Expander button.
![]()
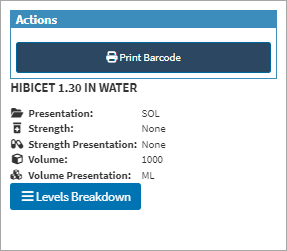
- The Stock Items sidebar will open.

- Click on the Levels Breakdown button.
![]()
- The Stock Level List screen will open.

Filters
Filters are tools or functionalities that allow you to narrow down or refine the results displayed on the Stock Level List screen.

- Click on the Description field to enter the details of the stock item you are searching for.
![]()
- Click on the Stock Identifier field to enter the identification number of the product or item.
![]()
- Click on the Stock Item Code field to enter the stock item code of the product or item.
![]()
Please Note: The Identifier and Code fields will contain the same information, as this is the number used when stock take was done and loaded onto the system.
- Click on the Stock Item Nappi field to enter the Naopi code of the product or item.
![]()
- Click on the Stock Warehouse Description field to enter the desired information.
![]()
- Enter the quantity information in the Quantity Less Than or Equal To field.
- Enter the value information in the Value Less Than or Equal To field.
![]()
- Click on the Exclude Zero Quantity slider to show all zero quantity stock items.
![]()
- Click on the Exclude Zero Quantity slider a second time to exclude all zero quantity stick items.
![]()
- Click on the Update Results button after all the filters have been set.
- Click on the Reset Filters button to empty all filter columns.
![]()
Column Options
Several additional Options are available for the Columns. These additional Options are to help the User adjust the Report, refine the Search and give more specific results.
![]()
- Click on the Select All Results button to Select All Results on the filtered list
![]()
- Click on the Expand Widths button to auto-fit the Column Width to the information within all columns.
![]()
- Click on the Reset Widths button to restore the original Widths after any modifications were made.
![]()
- Click on the Sort Columns button to sort the Columns in the order that you desire.
![]()
- For more information regarding how the Sort Columns feature works, please refer to the user manual: How to Sort Columns on Reports and List Screens.
- Click on the Choose Columns button to select the columns that will be displayed on the List.
![]()
- For more information regarding how the Choose Columns feature works, please refer to the user manual: How to Choose Columns on Reports and List Screens.
- Click on the Default Layout drop-down menu to select the type of layout that will be used for the screen.
![]()
Columns
All the information on the Stock Level List screen is divided into Columns to logically group related information together.
![]()
- An explanation will be given for each of the Columns:
- Stock Item Identifier: The Code entered when the stock item was received into the system.
- Stock Item Code: The Stock Item Code as supplied by MedPrax and IQest.
- Stock Item Description: The Name of the stock item.
- Stock Item Nappi: The Nappi Code of the stock item.
- Stock Warehouse Description: The Name of the Warehouse where the stock item is located.
- Quantity: The Quantity of the stock item
- Value: The Value of the stock item.
Page Options
All the additional options that are available for the page.
![]()
- Click on the Previous button to navigate to the Previous Page.
![]()
- Click on the Page Number button to navigate to the desired page.
![]()
- Click on the Next button to navigate to the Next Page.
![]()
- Click on the Items drop-up menu to select the Number of items that will be displayed on the screen.

Export
The Stock List Level can be exported to a PDF or CSV file.
- Once the desired stock items have been Selected, Click on the Export to PDF button to save the filtered results as a PDF file.
![]()
- Once the desired stock items have been Selected, Click on the Export to CSV button to save the filtered results in a CSV format.
![]()