Editing a Counting Location is important for keeping Stock records accurate and aligned with how your Practice operates. You may need to update the name, location, or Print Order when moving shelves, changing storage rooms, or reassigning responsibilities. The Print Order is especially important because items are usually arranged on shelves from left to right and top to bottom. By setting the correct order, the system can print lists that match the physical layout making it easy for anyone doing a stock take to know exactly which items should be in each position. Keeping this information accurate helps streamline inventory management, reduce errors, and support reliable billing and reporting.
The Contents of this User Manual:
Filters
Screen Columns Action Buttons
Columns
Counting Locations Sidebar
Page Options
This user manual will start on the Stock Setup, Stock Items screen.
Double-click on the desired Counting Location that you want to edit.
The Counting Location Edit screen will open.
Counting Location Information
The information as set up when the Counting Location was created.
?Please Note: This information can be adjusted or updated if the need arises, except for the Warehouse where the Counting Location was created.
For more information regarding how to create a Counting Location, please refer to the user manual: How to Create a Counting Location.
Stock Item Filters
Filters are tools or functionalities that allow you to narrow down or refine the results of Stock Items on the Counting Locations Edit screen.
Click on the Description field to enter the details of the Stock Item you are looking for.
Click on the Identifier field to enter the Stock Item identity number.
Click on the Nappi field to enter the Nappi code of the Stock Item.
Click on the Pack Size field to enter the desired pack size by which you want to filter the list.
Click on the Nappi field to enter the Nappi code of the Stock Item.
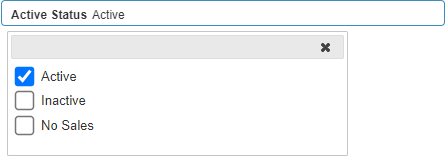
Click on the Active Status drop-down menu to select the statuses by which the list will be filtered from the options that become available.
Click on the Update Results button to refresh the Counting Locations after the Filters have been selected.
Click on the Reset Filters button to clear the Filters that have been set.
Screen Columns Action Buttons
Several additional Options are available for the Columns. These additional Options are to help the User adjust the List, refine the Search and give more specific results.
Click on the Enable/Disable Inline Editing button.
?Please Note: Once the Inline Editing is enabled the Save button on the Counting Location Edit screen will be disabled.
ThePrint Orderfield will become editable.
Clickon the field correlating to the desired item to enter the order that best suits your Practice.
The line will be highlighted once the Print Order has been entered.
?Please Note: A separate Save button will become available to save the data within the list.
Click on the Save button to save and close Inline Editing.
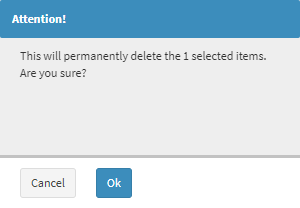
Click on the Delete button to remove the selected items from the Counting Location.
An Attention! pop-up will appear to ask if you are sure you want to permanently delete the selected items from the Counting Location.
Click on the Ok button to delete the selected item.
Click on the +Add New button to link Stock items to this specific counting Location.
Click on the Select All Results button to select all the entries on the list.
Click on the Expand Widths button to auto-fit the column widthto the information within all columns.
Click on the Reset Widths button to restore the original widths after any modifications are done.
Click on the Sort Columns button to sort the columns in the order that you desire.
Click on the Default Layout drop-down menu to select the type of layout that will be used for the screen.
?Please Note: The screen only has the option to be displayed using the Default Layout and no other options are available for the layout of thescreen.
Columns
All the information on the Counting Locations Edit screen is divided into Columns to logically group related information together.
Stock Item Identifier: The unique code that is used to identify the Stock item.
Stock Item Description: The name of the item.
Stock Item Nappi: The unique identifier given to ethicals and surgicals in a Hospital, or medicines and materials/consumables in a Medical Practice that enables the electronic transfer of information throughout the healthcare delivery chain.
Stock Item Pack Size: The number that indicates the amount of product in a pack or container
Stock Item Active Status: Advises the current status of the item.
Print Order: Determines the order in which the items will be printed on the Counting Sheets.
Counting Locations Edit Screen Sidebar
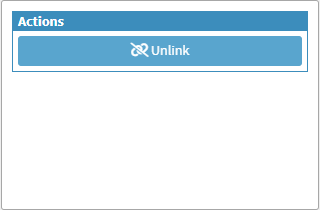
The Counting Locations Edit screen sidebar is located on the right-hand side of the Editing screen of a specific Counting Locations and contains additional options for the selected Counting Locations. From the sidebar, you are able to unlink the Items within the specific Counting Location. Bulk Actions are available where you are able to unlink several items at the same time.
Click on the Sidebar Expanderbutton to extend the Counting Locations: Edit Screen sidebar.
The Counting Locations: Edit Screen sidebar will open.
For more information regarding how the Counting Locations Edit screen sidebar works, please refer to the user manual: Counting Locations: Edit Screen Sidebar.
Page Options
All the additional options that are available for the page.
Click on the Previous button to navigateto the previous page.
Click on the Page Number button to navigate to the desired page.
Click on the Next button to navigate to the next page.
Click on the Items drop-down menu to select the number of items that will be displayed on the screen.
Click on the Export to PDF button to save a PDF file of all the data as a comprehensive report.
Click on the Export to PDF drop-up menu to access the Export Consolidated PDF option that allows you to generate a single document that combines all the data from multiple sources to provide an overview.
Click on the Export to CSV button to save the Report in a CSV format.