Hospital Round List Sidebar - Navigation and Use
The Hospital Round List Sidebar is an extended screen on the right-hand side where more functions and information is shown about the Patient that is currently in Hospital. With the Hospital Round List Sidebar, a User is able to view the Patient's information, Edit the Hospital Admission information, View the Debtor's Account Details, Invoice the Patient for services delivered and many more. The Hospital Round List Sidebar is mainly used to navigate to the different screens quickly via the buttons. The Hospital Round List Sidebar can be minimised when not in use.
- The contents of this user manual will consist of the following information:
- Patient Demographic Information
- Sidebar Action Buttons
- Edit Hospital Round
- Account Details
- Invoice
- Patient File
- Discharge Patient
- Mark Visit as Cancelled
- Last Missed Visit
- Quick Events
- This user manual will start on the Hospital Round List screen.

- For more information regarding how to navigate to the Hospital Round List screen, please refer to the user manual: Hospital Rounds List Screen - Navigation and Use.
- Click on the preferred Case.
![]()
- The Hospital Round List sidebar will open.

- An explanation of the Hospital Round List sidebar will be given below:
Patient Demographic Information
The top of the Hospital Round List sidebar contains the Patient's Demographic Information, such as their File number, ID Number, Contact Details and Medical Aid Information.

- An explanation will be given for the information that appears in the Patient Demographic section:
- Patient's Name (KIM LYNDON): The Full Name and Surname of the Patient.
- EMAIL Address (DOCSPANGOODX@GMAIL.COM): The Patient's Email Address.
- Cellphone Number (082065501): The Cellphone Number where the Patient can be reached.
- ID Number (8805198046500): The Identification Number of the Patient.
- PA (0,00): The Ammount Outstanding owed by the Patient.
- MA (0,00): The Ammount Outstanding owed by the Medical Aid.
- Account Status (Normal): Account Status of the Patient.
- File Number (GPD45): The File Number of the Patient.
- MA Provider (DISCOVERY): Name of the Medical Aid that the Patient belongs to.
- MA Option (PRIORITY CLASS ACCUTE): The Name of the Medical Aid Plan corresponding to the Medical Aid of the Patient.
- MA Number (689489235): The Medical Aid Membership Number associated with the account of the Patient.
Sidebar Action Buttons
Using the buttons on the sidebar, gives the User the ability to navigate to the most important screens regarding the Patient's Information on the system.Edit Hospital Round
- Click on the Edit Hospital Round button to access the Hospital Admission screen that allows the User to Edit the Information of the selected Case.
![]()
- For more information regarding Hospital Admission, please refer to the user manual: New Admissions (Hospital Rounds List).
Account Details
- Click on the Account Details button to access the Account Details screen, where the User can access the Patient's Account Details and can perform actions such as creating Invoices for the Patient, checking the Debtor's Account balance and seeing which invoices are billed.
![]()
- For more information regarding Account Details, please refer to the user manual: Navigating and Understanding the Account Details Screen.
Invoice
- Click on the Invoice button to access the Invoice screen that allows the user to open and create a new Invoice.
![]()
- For more information regarding the Invoice screen, please refer to the following user manual: The Invoice Screen: Navigating and Use.
Patient File
- Click on the Patient File button to access the Patient File screen that allows the user to access the Patient's Medical History.
![]()
- For more information regarding the Patient File screen, please refer to the following user manual: Patient File Screen: Navigation and Use.
Discharge Patient
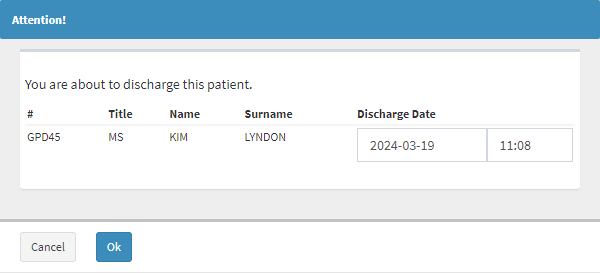
- Click on the Discharge Patient button to change the Case Status field and the Last Visited field to the Discharged status.
![]()
- An Attention! screen will open.

Please Note: A Discharged Hospital Round case will only be visible on the Hospital Round List screen if the Case Status filter is set to All or Discharged.
Mark Visit as Cancelled
- Click on the Mark Visit as Cancelled button to allow the User to keep a record that the Current Date's visit has been cancelled.
Please Note: This function will mark the current Date as a Cancelled Visit.
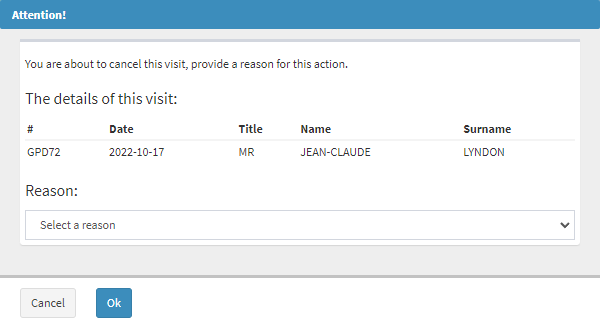
- The Attention! pop-up will appear.

- Click on the Select a Reason drop-down menu.
![]()
- The Reason drop-down menu will open.

- Select a relevant Reason why the visit has been cancelled.
Please Note: A Reason must be given to Mark a Visit as Cancelled.
- Click on the Cancel button to exit the Attention! pop-up without marking the visit as cancelled.
![]()
- Click on the Ok button to exit the Attention! pop-up and mark the visit as cancelled.
![]()
Last Missed Visit
- Click on the Last Missed Visit button, to allow the User to record a Missed Visit.
![]()
- The Last Missed Visit drop-down menu will appear.

- Click on the Capture Clinical Event button to capture a clinical event that will link to the selected Case.
![]()
- The Clinical Case screen will open.

- For more information regarding the Clinical Case screen, please refer to the user manual: Clinical Case Screen: Navigation and Use.
- Click on the Mark as Cancelled button to allow the User to keep a record that the current date's visit has been Cancelled.
Quick Events
- Click on the available Quick Event button to access your most used/favourite Clinical Workflow Events.
![]()
Please Note: The options that are available under the Quick Events section will be determined by the set-up of the Practice.
- For more information regarding the set-up and use of Quick Events, please refer to the following user manual: Easy Events