The General User Entity Settings include all the configurations linked directly to the User and how their Diary is displayed. You can customise the User’s access to features on the Diary sidebar and define what information is shown on the booking line. You can also configure their VoIP settings and specify whether they are allowed to receive incoming calls, etc.
All these settings apply specifically to what the User can access and manage on an Entity level.
💡Please Note:User Entity Settings will always override Entity and Diary settings for the specific User. If the User Entity Settings are not set up, the settings will default back to the Entity Settings.
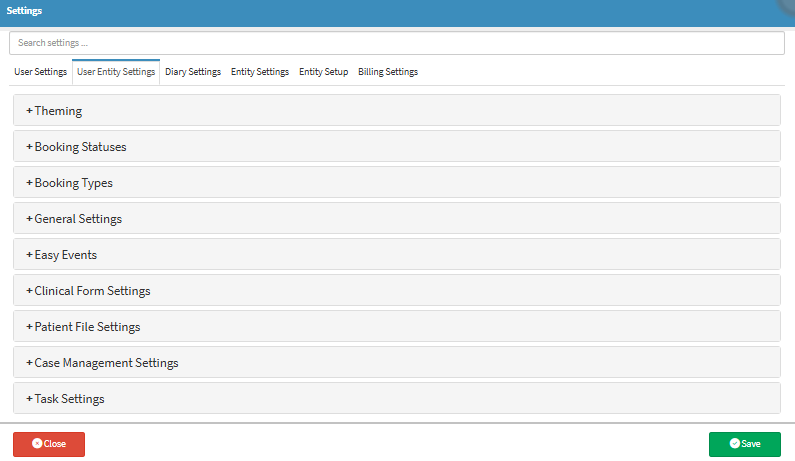
The Contents of This User Manual:
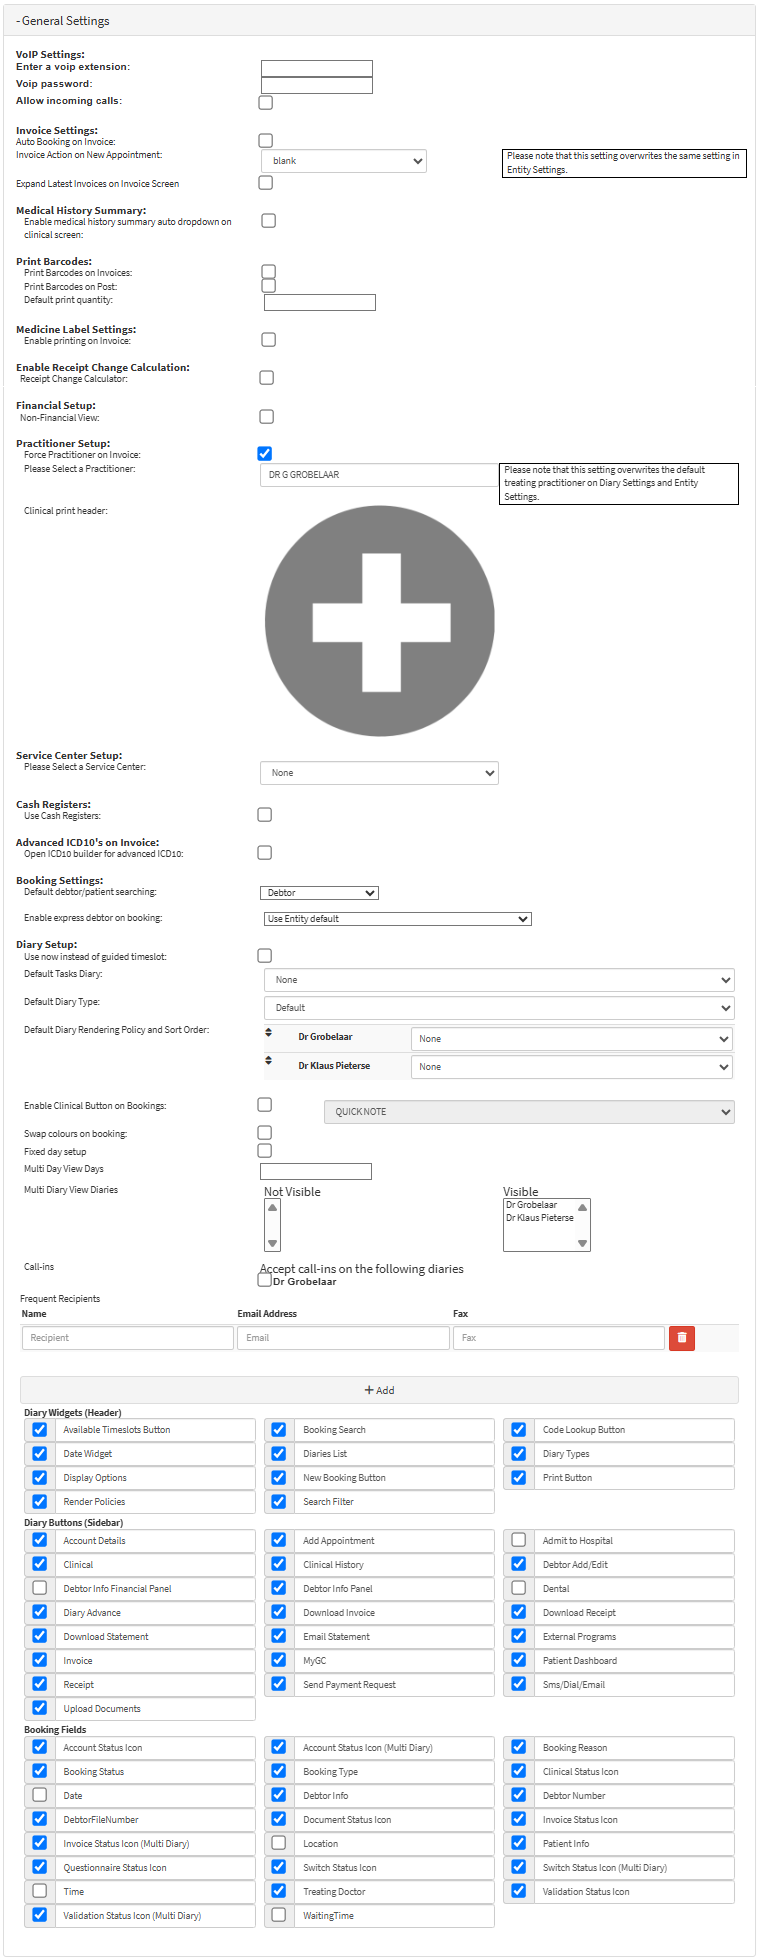
VoIP Settings
Invoice Settings
Medical History Summary
Print Barcodes
Medicine Label Settings
Enable Receipt Change Calculations
Financial Setup
Practitioner Setup
Service Centre Setup
Cash Registers
Advanced ICD10's on Invoice
Booking Settings
Diary Setup
Diary Widgets (Header)
Diary Buttons (Sidebar)
Booking Fields
This user manual will start on the Settings screen, User Settings tab.
The VOIP settings allow the system to manage call handling efficiently, ensuring that incoming calls are routed correctly and securely, which helps maintain smooth communication within the Practice.
Click on the Enter a VoIP Extension field to type in the extension number that will be used for calls.
Click on the VoIP Password field to type in the password linked to the VoIP Extension.
Tick the Allow Incoming Calls checkbox to enable the system to receive incoming calls.
Invoice Settings
Allows you to set up how the user will view the Invoice screen, and add Actions that are triggered on Invoices when new appointments are made on the Diary.
Tick the Auto Booking on Invoice checkbox to automatically create a new Invoice when an appointment is made on the Diary.
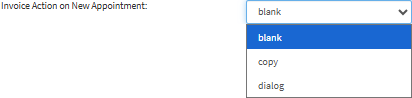
Click on the Invoice Action on the New Appointment drop-down menu to select how the Invoice screen will appear when opened from a New Appointment.
Tick the Expand Latest Invoices on Invoice Screen checkbox to display a history of previous Invoices created for the specific Debtor.
💡Please Note: These settings will overwrite the same settings that have been set up in Entity Settings.
Medical History Summary
A summary of the Patient's Medical History will automatically be expanded on the Clinical screen.
Tick the Enable Medical History Summary Auto Dropdown on Clinical Screen checkbox to automatically expand the Medical History panel when the Clinical screen is opened.
Print Bar Codes
Allows you to set up how Barcodes will print.
Tick the Print Barcodes on Invoices checkbox for stock items dispensed to be enabled on the Invoice screen.
Tick the Print Barcodes on Post checkbox for barcode stickers to be printed once the Invoice is Posted.
Click on the Default Print Quantity field to enter the number of barcode stickers that will print at once for each barcode.
Medicine Label Settings
Allows you to choose the settings for how Medicine Labels are printed.
Tick the Enable Printing on Invoices checkbox for Labels to be printed for Medicine items prescribed and billed on the Invoice.
Enable Receipt Change Calculations
Allows you to set whether or not Change will be calculated when Receipts are captured.
Tick the Receipt Change Calculator checkbox for a change calculator to be enabled on the Receipt screen.
Financial Setup
Allows you to set up the Non-Financial View.
Tick the Non-Financial View checkbox for Account Detail information to be removed from all sidebars, where applicable.
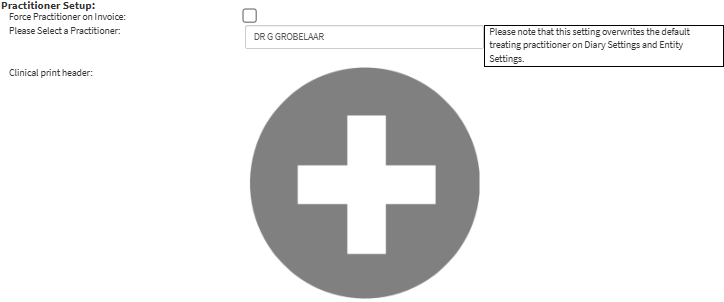
Practitioner Setup
Allows you to set specific settings regarding the Practitioner. EMGuidance can also be set up.
Tick the Force Practitioner on Invoice checkbox to require the selection of a specific Practitioner on all Invoices for this user, and then the EMGuidance can also be set up.
For more information regarding EMGuidance, please refer to the user manual: Invoicing: EMGuidance.
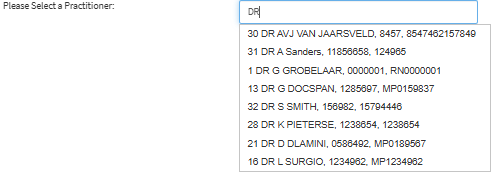
Click on the Please Select a Practitioner field to search for the desired Practitioner, where a list of Practitioners set up at the Practice will become available for selection.
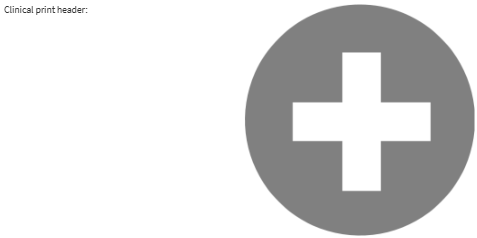
Click on the Add button to upload the Header that will be printed at the top of all Clinical documents.
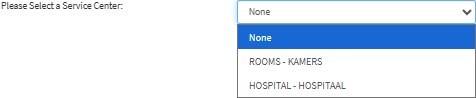
The default place of Service where the Patient is treated.
Click on the Please Select a Service Centre drop-down menu to choose the Service Centre where Patients are treated.
💡Please Note: The Service Centre options will vary from Practice to Practice because each Practice's Service Centres are set up to the needs of the specific Practice.
Cash Registers
Allows you to set if this user has access to the Cash Register.
Tick the Use Cash Registers checkbox to enable the use of the Cash Register in the Practice for this user.
Advanced IC10's on Invoice
Allows you to use the ICD-10 Builder on the Invoice screen
Tick the Open ICD-10 Builder for Advanced ICD-10 checkbox to enable the ICD-10 Builder screen for advanced diagnosis code searches.
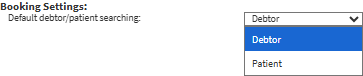
Booking Settings
Settings that relate to the Booking of an Appointment on the Diary.
Click on the Default Debtor/Patient Searching drop-down menu to select whether to search for Patients by Debtor or Patient when creating a Booking.
Click on the Enable Express Debtor on Booking drop-down menu to select an option for saving Patient details directly as a Debtor when creating a New Booking.
Use Entity Default: Uses the option that has been selected in the Entity Settings.
Off (Normal Operation): Disables the Express Debtoron Booking, and you will still have to manually open the Debtor file.
On (Auto Open Debtor on Booking Save. Not Normal Operation): Enables the Express Debtor on a Booking, and when the Booking is saved with the Patient's details, the Debtor file is created and saved on the system automatically.
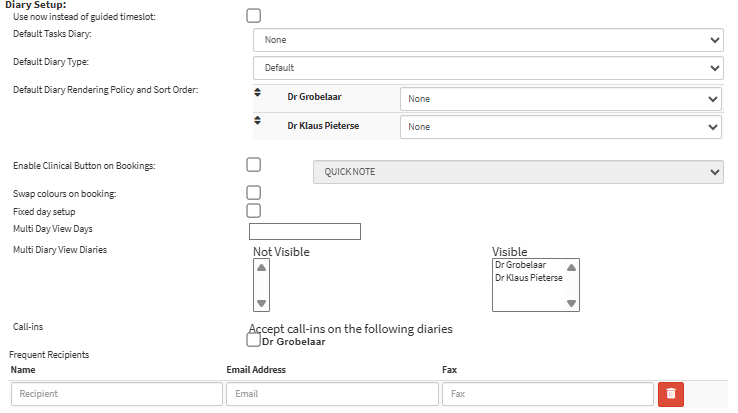
Diary Setup
All the settings that relate to the Diary of the User.
Tick the Use Now Instead of Guided Timeslot checkbox to make the Diary jump to the Current Date and Time whenever it is refreshed.
Click on the Default Tasks Diary drop-down menu to select the Diary that tasks will be linked to by default.
Click on the Default Diary Type drop-down menu to select the preferred display option from the list that becomes available.
Click on the Specific Diary drop-down to select how the Diary layout will be rendered and sorted.
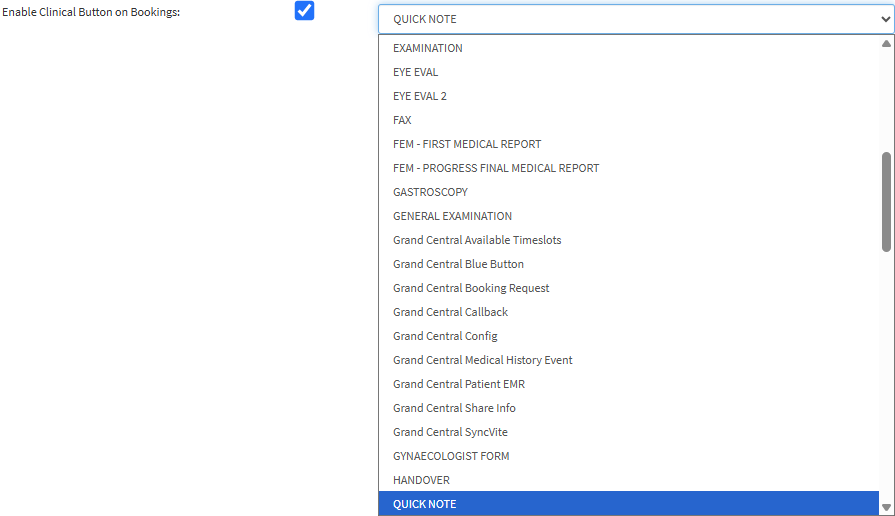
Tick the Enable Clinical Button on Bookings checkbox to activate the Clinical button on the booking sidebar to view bookings' clinical information.
Click on the Please Select a Default Event drop-down menu to choose the desired Clinical Event.
Tick the Swap Colours on Booking checkbox to change the main colour of the Booking to match the Booking Type instead of the default Booking Status colour.
Tick the Fixed Day Setup checkbox to enable selecting a specific day of the week for the Multi-day Diary View.
Click on the Day drop-down menu to select the desired start day for the view.
Click on the Multi-day View Days field to set the default number of days displayed when switching to the Multi-day Diary.
Click on the Practitioner to toggle their Diary between Visible and Not Visible on the Multi-Diary View for the specific user.
?Please Note: More than one Diary will need to be set up in order to use the Multi-Diary View Diaries setting.
Tick the relevant checkbox to select the Diaries that will receive Call-ins.
Click on the Add button to add a new frequently used mail recipient.
A Frequent Recipients field will be added, where you can add the name, email and fax number of a frequent recipient.
Click on the Delete button to delete the Frequent Recipient.
Diary Widgets (Header)
Available options that can be added to the Action bar of the Diary.
Available Timeslots Button: Shows the timeslots that are currently available on the Diary. Allowing you to quickly see what timeslots are available on a selected date or within a specific period.
Date Widget: Displays the current date and gives you access to a date picker that can be used to navigate to other dates.
Display Options: Allows you to change the display of the Diary to suit your personal preferences. For more information regarding the different Display Options, please refer to the user manual: Display Options.
Render Policies: Determines how the bookings that have been made are sorted on the Diary. For an extensive explanation of the Different Diary Views, please refer to the user manual: Diary: Different Views (Render Policies).
Booking Search: Search for a specific Debtor's booking by Name, Surname or ID Number. For more information regarding how to Search, please refer to the user manual: How to Search for a Booking.
Diaries List: Allows you to select to see all the available Diaries at the Practice, and navigate between them.
New Booking Button: Book a new appointment on the Diary to consult with a Practitioner. For more information on how to make a New Booking on the Diary, please refer to the user manuals: How to Book an Existing Patient and How to Book a New Patient.
Search Filter: Allows you to only display the bookings and tasks that meet the search criteria which has been set. You are able to filter using any information that is displayed on the booking or task. For more information on how to Filter, please refer to the user manual: How to Use the Diary Filter.
Code Lookup Button: Allows you to search for Billing Items (Procedure, Material, Medicine, Macro) and also gives you easy access to the ICD-10 Search page. For an extensive explanation of how to search for codes, please refer to the user manual: How to Look Up a Billing Item or ICD-10 Code.
Diary Types: View several Diaries at once. If the Practice has more than one Practitioner, they will be able to view multiple days on one screen, allowing them to see all the bookings in the coming days. For an extensive explanation of the different Diary Types, please refer to the user manual: Navigating the Different Diary Types.
Print Button: Print or download a copy of the Diary. Having hard copies of the Bookings on the Diary is useful during power outages or when there is an interruption of the users' internet connection. For an extensive explanation of how to Print the Diary, please refer to the user manual: Download/Print Diary.
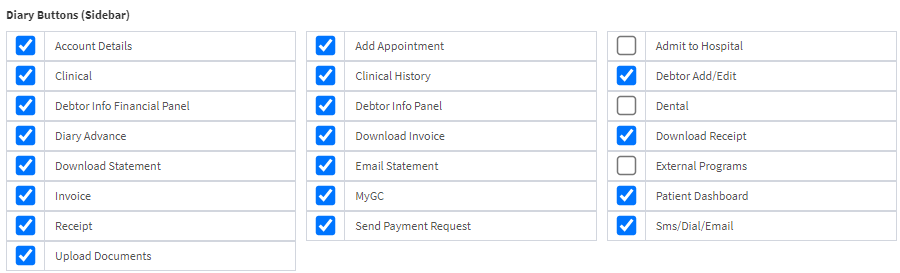
Diary Buttons (Sidebar)
Available options that can be added to the sidebar of the Diary.
Clinical: Access the Clinical screen of the Patient, where Clinical Eventscan be documented and the Medical History of the Patient can be viewed. For more information, please refer to the user manual: Clinical Screen: Navigation and Use.
Debtor Info Financial Panel: Shows the Debtor account and Patient Information.
Diary Advance: Allows you to Advance Patients to the next step in the Patient flow process. For more information regarding Advancing the Booking, please refer to the user manual: Advancing the Status of a Booking.
Download Statement: Allows you to download a current Statement for the selected Patient. For more information, please refer to the user manual: Download and Print Statement.
Invoice: Creates a new Invoice for the Patient, for services rendered to them. For more information, please refer to the user manual: The Invoice Screen: Navigation and Use.
Receipt: Creates a Receipt for a payment made, linked to a specific booking.
Add Appointment: Book anotherAppointment for the same Patient.
Clinical History: Accesses the Patient File, which contains the Clinical History of the Patient. For more information, please refer to the user manual: Patient File Screen: Navigation and Use.
Debtor Info Panel: Displays the information of the person responsible for the payment of the Patient's account.
Download Invoice: Gives you the option to download the latest Invoice for the specific Patient. For more information, please refer to the user manual: Download and Print Invoice.
Email Statement: Email the latest Statement to the Patient. For more information, please refer to the user manual: Send an Email.
myGC: Send and import information to and from the myGC app. For more information on this, please refer to the user manual: Debtor Demographic Syncvites.
Send Payment Request: Send the Patient a Payment Request with a link for easy payment. For more information, please refer to the user manual: Send Payment Request WebApp.
Admit to Hospital: Create a newHospital Case to admit the Patient.
Dental:Opens the Dental Charting screen for the Dentist (this option is only available for Dentist entities). Replaces the Clinical button.
Download Receipt: Downloads the receipt after payment has been made.
External Programs: Enables a shortcut to 3rd party integrations. These integrations are not part of GoodX and do not operate with GoodX Web, but as a separate software that can be accessed through GoodX. For example, X-ray machines.
Patient Dashboard: Shows a summary of the Patient, such as previous Scripts, Notes, Vitals History and Pathology Data. For more information, please refer to the user manual: The Patient Dashboard.
Sms/Dial/Email: Activates the Dial, Email and SMS buttons, allowing you to send Emails/SMSes and to make calls directly to the Patient.
Booking Fields
Available Options that can be added to the Booking line.
Account Status Icon: Displays the Account Statusicon on the booking line.
Booking Status: Shows the current Status of the Booking. Booking Statuses need to be set up. For more information, please refer to the user manual: Booking Status Setup.
Date: The Date the booking has been made for.
Debtor File Number: The file number that references back to the hardcopy file of the person responsible for the account.
Invoice Status Icon (Multi Diary): Displays the Invoice Statusicon on the booking line when the Diary is on Multi Diary View.
Questionnaire Status Icon: Displays the Questionnaire Status Icon on the booking line.
Time: The time the booking has been made for.
Validation Status Icon: Displays the Validation Status icon on the booking line.
Account Status Icon (Multi Diary): Displays the Account Statusicon on the booking line when the Diary is on Multi Diary View.
Booking Type: What type of booking is the Patient booked for. Booking Types can be set up to suit the needs of your Practice. For more information on how to set up your Booking Types, please refer to the user manual: Booking Type Setup.
Debtor Info: The details of the person who is responsible for the payment of the account.
Document Status Icon: Displays the Document Status icon on the booking line.
Location: Where the booking will take place within the Practice.
Switch Status Icon: Displays the Switch StatusIcon on the booking line.
Waiting Time: Displays the time in minutes that has lapsed from one specified Booking Status to another.
Treating Doctor: The Name of the Practitionerwho will treat the Patient.
Booking Reason: Indicates why the Patient would like to consult with the Practitioner.
Clinical Status Icon: Displays the Clinical Status icon on the booking line.
Debtor Number: The Account Numberof the person responsible for the account.
Invoice Status Icon: Displays the Invoice Status icon on the booking line.
Patient Info: The details of the Patient who will consult with the Practitioner.
Switch Status Icon (Multi Diary): Displays the Switch Statusicon on the booking line when the Diary is on Multi Diary View.
Validation Status Icon (Multi Diary): Displays the Validation Statusicon on the booking line when the Diary is on Multi Diary View.
Click on the Save button to save any changes made.