Diary Sidebar: Navigation and Use
Why Use This Function:
The Diary sidebar is an extended screen on the right-hand side, which contains more information about the Patient for whom the booking was made. The sidebar also contains buttons which lead to more actions that can be performed on the Patient's account or file. The Diary sidebar is mainly used to be able to navigate to the different screens quickly via the buttons. The Diary sidebar can be minimised when not in use.
💡Please Note: The information shown on the Diary sidebar is customisable and can be set up User Entity Settings. For more information regarding customising your Diary sidebar, please refer to the user manual: User Entity Settings: General Settings: Navigation and Use.
The Contents of This User Manual:
- Patient and Basic Account Information
- Smart Stickers
- Advance Status
- Time to Booking Start/ Time Since Booking Start
- Patient Wait Time
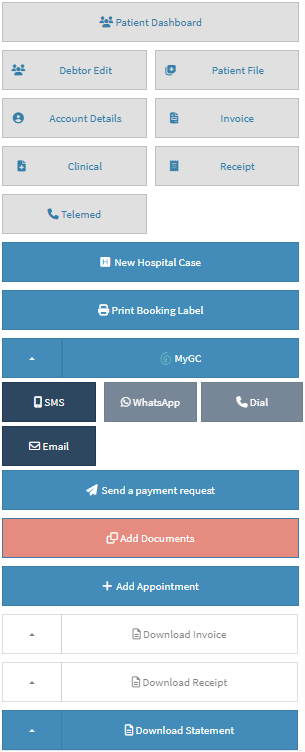
- Diary Sidebar Buttons
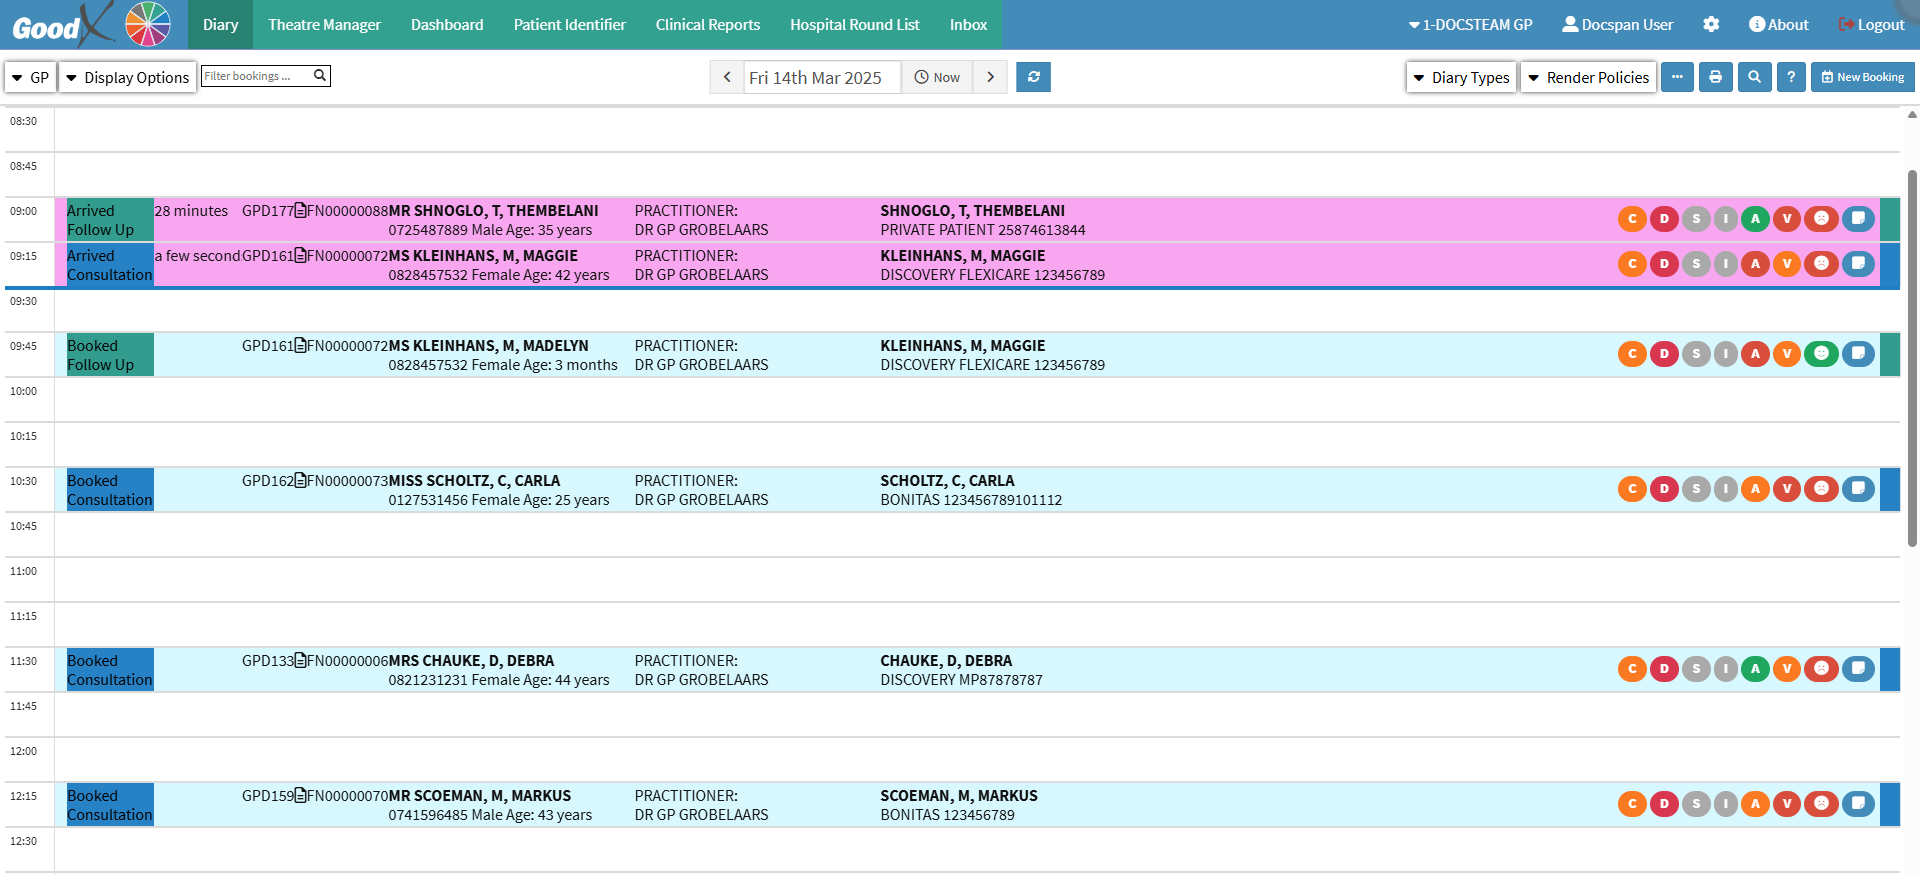
- This user manual will start on the Diary screen.

- Click on the desired Booking.

- The Diary sidebar will open.

Patient and Basic Account Information
The Patient's demographic and Medical Aid information that was added to their file when first arriving at the Practice will be displayed at the top of the sidebar. Additionally, the standing of their account will also be shown, displaying both Patient and Medical Aid outstanding amounts.
- The fields will be explained below:
- Patient's Details (MRS DEBRA CHAUKE): The Patient's Title, Name and Surname.
- Gender, Date of Birth, Age ( ♀️ 1980-12-12 (44 years)): Patient's Gender, Date of birth and their Age.
- Account Number and Patient's File Number (000013301) (None): The Main Debtor's Account Number and the Patient's individual File Number.
- Debtor Number (GPD133): A Debtor Number is autogenerated by the system and assigned per Patient.
- File Number (R01000020): The File Number which are created by the system automatically when the system's file was created.
- ID Number (8012120006086): ID Number of the Patient.
- Cellphone Number (0821231231): Cellphone Number of the Patient.
- Email Address (DCHAUKE@GOODX.CO.ZA): Email Address of the Patient.
- Medical Aid Provider, Option and Number (DISCOVERY / MP87878787 / DELTA CORE CLASSIC ACUTE): The Name of the Patient's Medical Aid, Plan and Plan Number.
Smart Stickers
The Smart Sticker enables Practitioners to set up medical guidelines that describe a process to be followed, to investigate a particular set of findings in a Patient or the method which should be followed to control a certain disease. Smart Sticker Protocols are used as treatment plans for specific conditions which will inform the Patient when to do certain tasks with regard to their condition.
💡Please Note: When the Patient has been registered for a PMB condition or has a Chronic medical condition, the Smart Stickers can be used as an indicator. The Smart Stickers can also be used as reminders of next appointments or if a task needs to be completed. For more information on this function, please refer to the user manuals: Adding a Smart Sticker Protocol, PMB Registration Workflow - Step 1: Register Patients for PMB with Smart Sticker Protocols and Smart Stickers.
Advance Status
Advancing the Status of a Booking changes the stage in which the Booking currently is, to a more advanced stage. By being able to view and change the Status of a Booking, you can easily see where the Patient is and where they will be going next. For more information regarding the advancing of the Booking, please refer to the user manual: Advancing the Status of a Booking.
💡Please Note: The Status will change every time you Click on the Advanced Status button. The Booking Statuses, and corresponding colours, seen above can differ between Practices. The order in which the Booking Statuses are set up also plays an important role. For more information regarding this feature, please refer to the user manual: Booking Status Setup.
Time to Booking Start/ Time Since Booking Start
Allows you to see times relating to the booking.- The Time to Booking Start will indicate the remaining duration until the Patient's booking is scheduled to begin.
- The Time Since Booking Start will indicate the duration that has elapsed since the Patient's booking began.
![]()
Patient Wait Time
The time between the start of the Patient's booking, and the booking's status being advanced to the next step, such as from Arrived, to In Consultation.💡Please Note: If the Patient is marked as arrived earlier than the Booking Start Time, the Patient Wait Time and start time will correlate.
Diary Sidebar Buttons
The Diary sidebar buttons are a quick way to access the various account and Clinical screens of the Patient. Some of these buttons also make communication with the Patient much simpler.💡Please Note: The buttons located on the Diary sidebar are customisable and can be set up in the Diary Settings. For more information regarding the setup of Diary sidebar buttons, please refer to the user manual: User Entity Settings: General Settings: Navigation and Use.

- Click on the Patient Dashboard button to quickly access the Patient's medical records.

- For more information on this function, please refer to the user manual: The Patient Dashboard.
- Click on the Debtor Edit button to change the Debtor and/or Patient Demographic information.

- For more information on this function, please refer to the user manual: View or Update Debtor and Patient Information.
- Click on the Patient File button to access the clinical history, as well as any other previous medical history of the Patient.
- For more information on this function, please refer to the user manual: Patient File Screen: Navigation and Use.
- Click on the Account Details button to access the Debtor/Patient account information.

- For more information on this function, please refer to the user manual: Navigating and Understanding the Account Details Screen.
- Click on the Invoice button to capture the procedure and items used on the Patient for the selected booking's Invoice.

- For more information on this function, please refer to the user manual: The Invoice Screen: Navigating and Use.
- Click on the Clinical button to capture any medical information of the Patient, and to use the different Clinical events.

- For more information on this function, please refer to the user manual: Clinical Case Screen: Navigation and Use.
- Click on the Receipt button to capture a receipt for the selected booking's Invoice.

- For more information on this function, please refer to the user manual: Receipt Screen (Overview).
- Click on the Telemed button to make a Virtual Call to the Patient.
![]()
- For more information on this function, please refer to the user manual: Telehealth (Telemed) for the Practitioner.
- Click on the myGC button to import a Patient's information from the myGC Patient Portal, as well as send a SyncVite to the Patient of the selected booking.

- For more information on this function, please refer to the user manual: Debtor Demographic Syncvites.
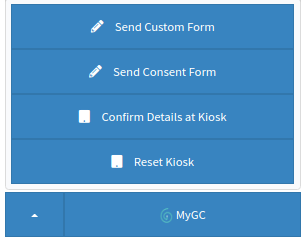
- Click on the Arrow button next to the myGC button.

- A Drop-Up screen will appear with additional buttons.

- Send Custom Form: A Custom Form, set up by the Practice, can be sent to the Patient using the Send Custom Form button. For more information regarding custom forms, please refer to the user manual: How to Send a Custom Form.
- Send Consent Form: Consent forms can be sent to the Patient using the Send Consent Forms button. Consent forms need to be accepted and signed by the Patient through the myGC app. For more information regarding consent forms, please refer to the user manual: Navigating Consent Forms on myGC.
- Confirm Details at Kiosk: The Confirm Details at Kiosk button allows you to confirm details of the Patient at the Kiosk if one has been set up in the Practice.
- Reset Kiosk: The Reset Kiosk button allows you to reset the Kiosk from your computer.
- Click on the SMS button to send the Debtor/Patient an SMS.
- For more information on this function, please refer to the user manual: Send an SMS.
- Click on the WhatsApp button to send a WhatsApp to the Debtor/Patient from GoodX Web.

💡Please Note: This feature will have to be set up by your Practice. For more information on how to set up WhatsApp, please refer to the user manual: Services
- Click on the Dial button to phone the Debtor/Patient from GoodX Web.

- For more information on this function, please refer to the user manual: Making a VoIP Call.
- Click on the Email button to send the Debtor/Patient an Email.

- For more information on this function, please refer to the user manual: Send an Email.
- Click on the Send Payment Request button to send a payment request to the Patient.

- For more information on this function, please refer to the user manual: Send Payment Request WebApp.
- Click on the Add Documents button to upload documents for the Debtor and/or Patient.

- For more information on this function, please refer to the user manual: How to Add/Upload Debtor & Patient Documents.
- Click on the Add Appointment button to open the Booking screen to book another appointment for this specific Patient.

- For more information on this function, please refer to the user manual: Make a Booking for an Existing Patient.
- Click on the Download Invoice button to download and print the Invoice that was created on the Patient booking.

- For more information on this function, please refer to the user manual: Download and Print Invoice.
- Click on the Download Receipt button to download and print the receipt that was created on the Patient booking.

- For more information on this function, please refer to the user manual: Download and Print Receipt.
- Click on the Download Statement button to download and print the Patient's statement.

- For more information on this function, please refer to the user manual: Download and Print Statement.