General Settings can be accessed under the User Settings section. These Settings offer a variety of configuration options, including Authorisation Setup, Login Combinations, Display Preferences, and other customisable features to tailor the system to each individual User's needs. Additionally, Users can adjust notification preferences, security settings, and more, ensuring a personalised experience across the platform.
💡Please Note: The User Settings will directly impact how certain features and functionalities behave or are displayed throughout the system.
The Contents of This User Manual
Authorisation Factors
Login Combinations
Change Signature
Display Settings
Navigation (Wheel) Settings
Ring Volume
Auto-save Clinical Screen Events
Email Signature
This user manual will start on the Settings screen, User Settings panel.
Click on the General Settings panel.
The General Settings panel will expand.
Authorisation Factors
A type of security credential that is used to validate a User's identity and authorisation before granting access to the system.
Serve as extra layers of security and privacy when logging in to the system and when populating a Practitioner's signature on clinical notes.
For more information on how to set up Login Combinations, please refer to the user manual: Login Combinations.
Change Signature
Allows you to set up your electronic signature that is used on the system.
Click on the Change Signature button to set and/or change your signature.
Display Settings
Allows you to set up how certain features and information will display on the Diary.
An explanation will be given for each setting:
Display Tasks on Diary: Tasks can be set to display on the Diary and can be managed from the Diary screen and the Task screen. If the task is closed, it will disappear from the Diary but still be displayed on the Task screen.
Tick the Check Box to activate the setting.
Display Closed Tasks on Diary: This will allow you to see closed tasks on the Diary. Closed tasks are not normally displayed in the Diary but if this option is ticked the closed tasks will also display in the Diary.
Tick the Check Box to activate the setting.
Display All Bookings: The standard display of the Diary does not include deleted bookings, if this option is ticked, the deleted bookings will also display on the Diary.
Tick the Check Box to activate the setting.
Scroll Diary to Current Time: This setting will scroll the Diary to the current time every time you exits a previous screen or the Diary is refreshed.
Tick the Check Box to activate the setting.
Indicate Current Time on Diary: This setting will indicate a bold coloured line on the current time slot on the Diary.
Tick the Check Box to activate the setting.
Current Time Line Colour: This option will be the colour of the bold line on the Diary for the time slot indicator.
Click on the coloured block to change the colour.
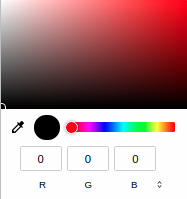
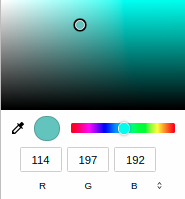
The Colour Selector will open.
One of the following methods can be used to select a colour:
Click on a colour on the Colour Bar.
Click on the desired colour to make a selection.
Click on the Dropper and navigate to the colour of choice to select it. Thedropper tool can be used to select any colour on the screen.
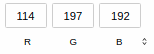
The RGB Colour codes can be entered (if known) into their respective fields by Clicking on the field to input the code.
Press Enter on the keyboard to use the selected colour.
The selected colour will display in the block.
Booking Overlap Resolution: How the bookings will display on the Diary when they have overlapping times.
Click on the Timeslot Overlap drop-down menu to select the desired option.
Select an option from the list that has become available:
Timeslot (Overlap): Bookings that have been scheduled for the same time will display next to each other on the timeslot.
Timeslot (Stacked): Bookings that have been scheduled for the same time will display stacked below each other (this is the suggested setting to use).
Stacked by Time: Bookings will stack on top of each other in time order and will not display timeslots.
Stacked by Type: Bookings will stack on top of each other in booking type order and will not display timeslots.
Stacked by Status: Bookings will stack on top of each other in the booking status order and will not display timeslots.
Inactivity Timeout: The number of minutes after which inactive users will be automatically logged out. If this is set, you will be logged out of the system after you have not been active on the system for the period that is set on this setting.
Click on the Inactivity Timeout field to input the number of minutes before you will be logged out of the system after being inactive. This is a numeric field.
Default Entity:The default entity that will be selected on startup. If you are linked to multiple entities, you can choose the default/most used entity per user.
Click on the drop-down menu to select the desired option.
💡Please Note: The options available will be dependent on the Practices' setup. If the Practice is only set up as a single entity Practice, no other options will be available to choose from.
Default Diary:Allows you to select the Diary that they would like to display when they log in.
Click on the drop-down menu to select the desired option.
💡Please Note: Only Practices that have multiple Diaries will have options to choose from.
Default Billing Screen:The default screen that will open when adding a new appointment on the Diary screen.
Click on the Invoice drop-down menu to select the desired option.
Select an option from the list that has become available.
Invoice: Allows you to bill the Patient for items and services that have been rendered, for more information, please refer to the user manual: The Invoice Screen: Navigation and Use.
Clinical: A screen whereyou are able to capture new clinical information that will be stored on the system such as a Sick Note, Medical Script, etc.
Switch: Sends electronic claims to the Medical Aid. This will open the Switch Details screen. For more information, please refer to the user manual: WA: Switch Response.
Clinical History: Where all the Patients' clinical information is stored. For more information, please refer to the user manual: Patient File Screen: Navigation and Use.
Medical History: A record of the Patients' previous health information and family medical information, for more information, please refer to the user manual: Medical History Tab: Navigation and Use.
Periodontal Chart: A graphical tool/function for organising all the important information about the Patients' teeth and gums, for more information, please refer to the user manual: The Periodontal Chart.
Mouth Diagnosis: A graphical tool/function for organising all the important information about the Patients' teeth and mouth (Imperfections, Fillings, Replacements). For more information, please refer to the user manual: Observation/Diagnosis Mode: Navigation and Use.
Navigation (Wheel) Settings
The Navigation (Wheel) Settings will allow you to set up what features will be available on your Navigation Wheel.
For more information on how to set up the Navigation Wheel, please refer to the user manual: Navigation (Wheel) Settings.
Ring Volume
Allows you to set up the volume for incoming calls on the system.
Call-in ring volume: This option allows you to set the volume for incoming calls. The default is set to 100%.
Click on the Call-in ring Volume field to input the volume level at which the incoming call will ring. This is a percentage field.
Auto-save Clinical Screen Events
Allows you to set up the autosave feature in Clinical screens. Autosave enables the system to automatically save the progress or current changes that have been made in the event of power failures, system outages or network failures.
Auto-save clinical screen events: This functionality is to give you the option to autosave on an event, for example, if you don't Type or Click on an open event for a certain amount of time the system will save what is currently captured on the event automatically.
Email Signature
Allows you to set up a custom signature for all emails that they send from within the GoodX system.
💡Please Note: Youcan add a pre-designed email signature and upload it as an image.
For more information on how to set up the Email Signature, please refer to the user manual: How to Add an Email Signature.