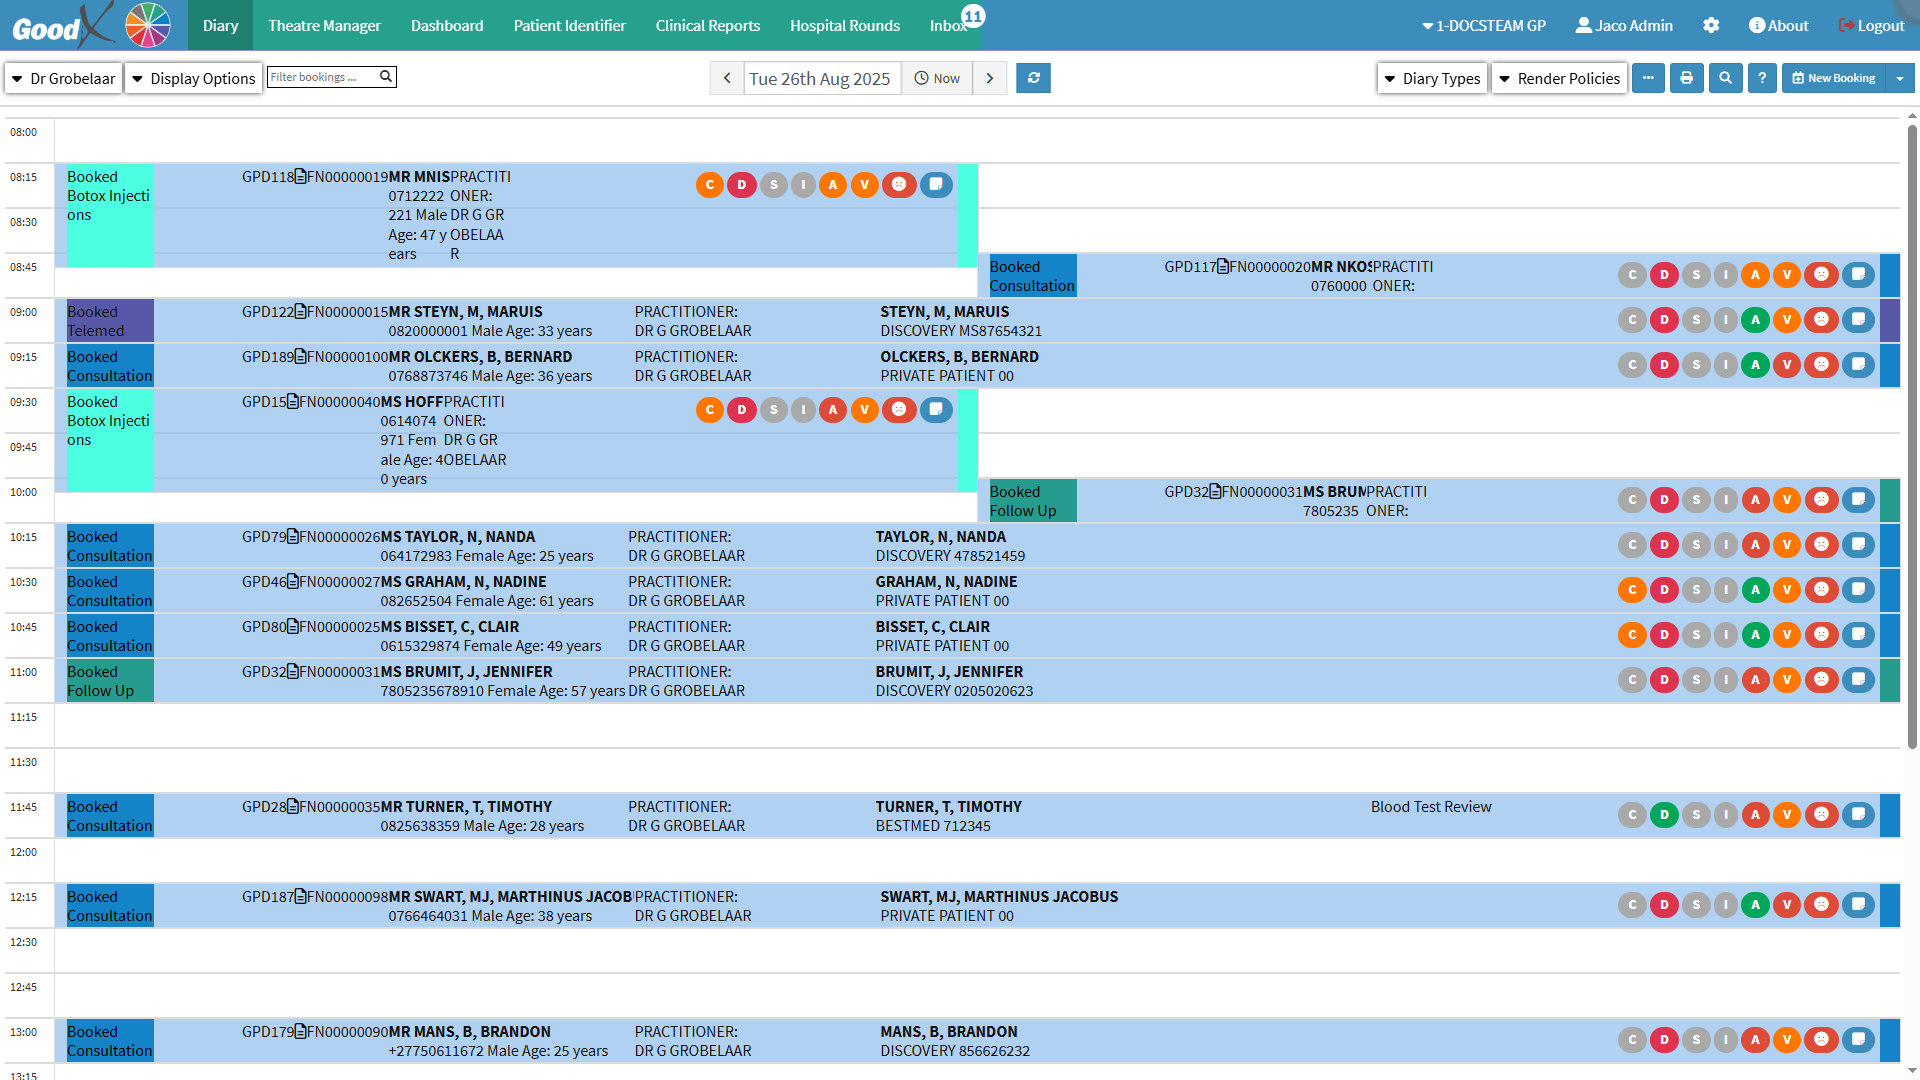
TheDiary screenis the central point for managing the daily workflow of the Practice and the Practitioner’s time. It provides a structured, customisable electronic view of time slots, making it easy to track and manage bookings, transactions, and events as they occur throughout the day. From the moment a booking is created, to the Patient’s arrival, and even after the consultation, every step is recorded in the Diary. This ensures accurate record-keeping, effective time management, and a clear overview of the Practice’s activities at any given time.
By leveraging the Diary screen, the Practice can streamline scheduling, reduce errors, and maintain a well-organised flow of Patient care and administrative tasks. This not only improves operational efficiency but also enhances the overall Patient experience by reducing wait times and ensuring timely care. Ultimately, the Diary screen helps Practices optimise daily operations, improve Patient satisfaction, and manage resources more effectively.
The Contents of This User Manual:
Navigation Bar
Diary Options
Diary Sidebar
Booking Information
This user manual will start on the Diary screen.
An explanation will be given of theDiary screen:
Navigation Bar
The Navigation Bar serves as the main menu, providing quick access to the different features and functions available from the Diaryscreen. This allows you to move seamlessly between tasks without leaving the Diaryscreen, improving efficiency and saving time when managing bookings, Patients, and workflow.
An explanation will be given for the options available on the Navigation Bar:
Practice Logo
The Practice can upload its own logo to be displayed on the Diaryscreen. Having the Practice Logo visible creates a professional appearance, strengthens branding, and helps you easily identify which Practice account you are working in, especially if you manage multiple Practices.
For more information regarding the Practice Logo customisation, please refer to the user manual: Entity Settings.
Navigation Wheel
The Navigation Wheel makes navigation easier, allowing you to access any desired system feature. It is divided into segments based on the various modules available on GoodX Web. The Navigation Wheel is completely customisable to your needs by only configuring the specific segments that you will use and have access to. The Learning Centre and The Client Portal can also be accessed directly from the Navigation Wheel.
For more information regarding the Navigation Wheel, please refer to the user manual: Navigation Wheel.
Diary Tabs
The Diary Tabs offer the ability to access and manage the Patients' information all from one screen. From the time a booking is made, the Patient arrives at the Practice and after the Patient has consulted with a Practitioner. The Diary Tabs are the most versatile segment in the GoodX Web App.
For more information regarding the Diary Tabs, please refer to the user manual: Diary Segment.
User Toolbar
The User Toolbar provides quick access to Practice and user-related options. Having these options available in one place helps you manage their session effectively, switch Practices without leaving the screen, and access important settings quickly. It also ensures secure system use by allowing you to log out easily when your session is complete.
An explanation will be given for the options available on the User Toolbar:
Entity Drop-Down Menu: Each Practice number requires its own Entity in the GoodX system. In the case of Group Practices, a single global Practice number can be used to create one Entity with multiple Practitioners of different specialities under that same Entity. For this to apply, the Practice must be registered as a Group Practice. Non-medical businesses, however, do not require a Practice number to have an Entity on the GoodX system.
For more information regarding the Entity information, please refer to the user manual: Entity Setup.
? Please Note: Entities are created during the initial installation of the system, and you are not able to create new Entities. However, the details of an existing Entity can be updated if required.
Click on the Entity drop-down menu to switch between entities.
Click on the Search for Entity... field to search for the desired Entity. The search list will automatically update as you type.
? Please Note: Practices with only one Entitymay not have the option of the Entitydrop-down menu available.
User: This section displays the details of the currently logged-in staff member. It helps Practitioners and staff quickly identify which account is active, ensuring that actions taken in the system are correctly attributed to the right staff member. This is particularly useful in multi-user environments, such as group Practices, where multiple staff members may access the system from the same device.
Settings:The Settings button allows you to customise how the Diary screen is displayed and functions. Having access to Settings directly from the Diary screen saves time and reduces the need to switch between menus. It allows Practitioners and staff to adapt the Diary to their unique workflow, enhancing usability and ensuring a smoother management of bookings and daily activities. This ensures that each staff member can tailor the Diary to suit their role and daily tasks, improving efficiency and making navigation more intuitive.
About: The About button provides key information regarding the installation and current version of the software. From here, you can also access user manuals, view changelogs, and see which additional services are currently active on the system. Having this information in one place ensures that you can quickly verify software details, confirm updates, and stay informed about available services.
For more information regarding the About screen, please refer to the user manual: Navigating the About Page.
Logout: The Logout button allows you to safely exit the system, ensuring that all sessions are securely closed. Logging out protects sensitive Patient and Practice information and prevents unauthorised access when the workstation is unattended.
Minimiser: The Minimiser is a small, round, grey button located in the upper right corner of every GoodX Web App screen. This feature enables you to leave certain tabs or screens running in the background without needing to save and close them. Examples of these include the Task screen, active Telemed calls, Settings, and the Setup Wizard. When the Minimiser is in operation, this feature's colour changes to blue; in the case when the software loses connectivity, it turns red.
For more information regarding the Minimiser, please refer to the user manual: How to Use the Minimiser.
Diary Options
The Diary Options allow you to customise how the Diary screen appears and access additional features specific to the Diary. You can adjust how bookings and information are displayed, tailoring the view to suit their workflow. Customising the Diary improves efficiency by reducing clutter and providing a clear overview of appointments, making it easier to focus on the most relevant information for daily tasks.
An explanation will be given for the options available on the Diary Options:
Practitioner: The Practitioner drop-down menu allows you to select which Practitioner’s Diary is displayed. This makes it possible to switch between different Practitioners quickly without leaving the Diary screen. Being able to select a Practitioner ensures that you can manage and view individual schedules with ease, especially in Group Practices where multiple Practitioners share the same system. This improves workflow by providing direct access to the correct Practitioner’s bookings.
Click on the Practitioner drop-down menu to switch to a different Practitioner's Diary.
Display Options: Display Options allows you to customise how the Diary is displayed to match their preferences. This makes it easier to navigate and focus on the most relevant information. To reduce clutter, you can choose to display only active bookings. They can also show or hide tasks, manage them directly, and switch between viewing all bookings or a filtered view of the Diary.
For more information regarding the Display Options, please refer to the user manual: Display Options.
Diary Filter: The Diary Filter allows you to display only bookings and tasks that match the specified search criteria. You can filter by any information shown on the booking or task. This will help you quickly locate specific bookings or tasks, reducing time spent scrolling through the Diary and improving overall efficiency and organisation.
For more information regarding the Diary Filter, please refer to the user manual: Diary Filter.
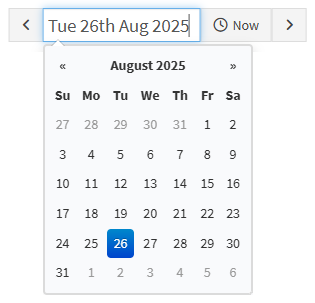
Diary Date: Displays the date of the Diary page that you are currently on, and allows you to select a specific date to view bookings and tasks for that day. This function will help you to quickly navigate to a particular day in the Diary, making it easier to manage appointments and plan workload efficiently.
Click on the Arrow buttons to navigate between dates.
Click on the Date Picker to select a specific date.
The Date Picker will open.
Click on the Now button to return to the current time and date on the Diary screen.
Click on the Refresh button to reload the page to the latest version of the webpage.
? Please Note: You can also use the Refresh button to reload the webpage if content appears outdated, cached, or if there has been a loss of connection.
Diary Types: Diary Types allows you to view and organise the Diary for effective management of bookings. You can view multiple Diaries at once, and if the Practice has more than one Practitioner, they can see several days on a single screen, displaying all upcoming bookings. The Diary view can also be customised to suit the specific needs of the Practice.
Render Policies: Render Policies will allow you to view all bookings for the day in a way that best suits their preferences. Views can range from the default Diary screen to a more condensed setup, displaying all bookings for the selected date in a list, or organised by type, time, or status.
ICD-10 Code Lookup: The ICD-10 Code Lookup button enables Practitioners to quickly search for and apply the correct ICD-10 diagnosis codes and billing item codes (including Procedures, Materials, Medicines, and Macros) during a Patient consultation. This functionality ensures that all medical conditions and services are accurately captured and classified according to standardised coding systems. It supports compliance with clinical and billing regulations, reduces the risk of coding errors, and improves claim accuracy. By streamlining the coding process within the system, the function enhances efficiency and helps Practitioners maintain complete and consistent Patient records.
Download/Print Diary: You can print hard copies of the Diary for a selected period of time or download the Diary as a CSV file. Hard copies are useful during power outages or when there is an interruption or loss of an internet connection, while the CSV file allows for further analysis or record-keeping.
For more information regarding the Download/Print the Diary option, please refer to the user manual: Download/Print Diary.
Debtor Booking Search: Having the ability to search for a booking provides a quick and efficient way to navigate across all available diaries. This powerful feature allows you to effortlessly locate bookings linked to a specific Debtor or Patient, saving valuable time and eliminating the need to search through individual schedules manually. Whether you're reviewing appointments, following up on outstanding debts, or making updates, the search function streamlines the entire process, making it faster and more intuitive to find, view, and manage Patient bookings.
For more information regarding the Debtor Booking Search, please refer to the user manual: How to Search for a Booking.
Available Booking Times: Provides quick access to all available time slots across all Diaries for the current Entity on a specific day or range of days. This eliminates the need to open each Diary individually to check availability. Open appointments are those that have not been booked or reserved. You can quickly view which booking timeslots are available for the selected date or period. The booking search function helps prevent double bookings. For Practices with multiple Practitioners, a list of available slots is displayed for each Practitioner, allowing the Patient to be offered an alternative Practitioner if the requested Practitioner is unavailable.
For more information regarding Available Booking Times, please refer to the user manual: Available Bookings Screen.
New Booking: Booking an appointment in the Diary is straightforward and efficient for both existing and new Patients. For existing Patients, the system already stores Patient and Debtor information, allowing quick access to records, saving time, and ensuring a seamless Booking process. For new Patients, only basic information, such as Name, Surname, Contact Number, and ID Number, is required to secure their place in the schedule. Once the Patient arrives, their full electronic file can be created and completed with all necessary details.
For more information on how to make a New Booking, please refer to the user manuals:
The Diary Sidebar is an extended screen on the right-hand side, which contains more information about the Patient for whom the booking was made. The Sidebar also contains buttons which lead to more actions that can be performed on the Patient's account or file. It is mainly used to navigate to the different screens quickly via the buttons. The Diary Sidebar can be minimised when not in use.
In the Booking Timeslot, all related Booking Information, including the date and time, the Patient, Debtor, Practitioner, and the reason for the consultation, will be displayed. You can view, review, and update this information as needed to ensure accurate scheduling and record-keeping.
? Please Note: Timeslot intervals in the Diary can be customised to suit the needs of the Practice, including the length of booking intervals and the information displayed.