Linked Invoices Sidebar
Why Use This Function:
The Linked Invoices sidebar provides a central place where staff can quickly action communication, account management and workflow updates for a selected Linked Invoice. The functionality helps staff streamline patient and Debtor engagement by placing essential communication tools like SMS, Email, Call, WhatsApp, Notes, Payment Requests and CCA Status in one accessible panel.
The purpose of the Linked Invoices sidebar is to ensure that all follow-up actions relating to an outstanding or linked account item can be completed without navigating away from the Add/Edit Payment Plan Screen. Staff can immediately review Patient demographics, contact details, Medical Aid information, and outstanding balances, and then act using the most suitable method.
💡Please Note: This feature is not available to all users and must be requested to set up for your Practice.
The Contents of This User Manual:
- Patient Details
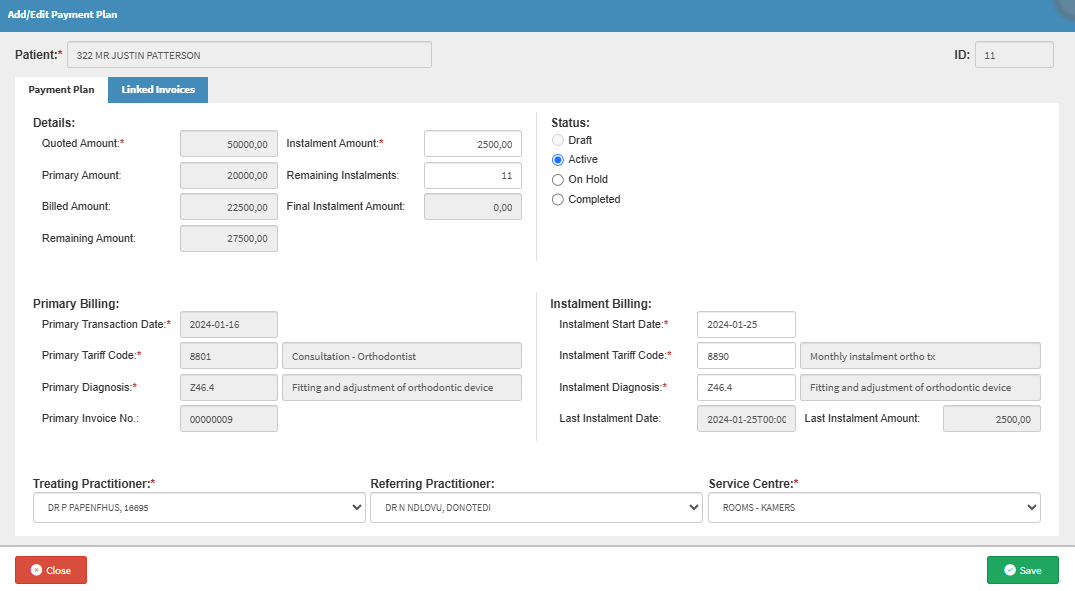
- This user manual will start on the Add/Edit Payment Plan screen.

- For more information on navigating the Add/Edit Payment Plan screen, please refer to the user manual: Add/Edit a Payment Plan: Navigation and Use.
- Click on the Linked Invoices tab.
![]()
- The Linked Invoices screen will open.

- Click on the desired Linked Invoice for the options in the sidebar to become available.
![]()
- The Linked Invoices sidebar will open on the right.

💡Please Note: The sidebar options will not be available until a Linked Invoice is selected.
- Click on the SMS button.
![]()
- For more information regarding the SMS screen, please refer to the user manual: Send an SMS.
- Click on the Email button.
![]()
- For more information on how to send an Email, please refer to the user manual: Send an Email.
- Click on the Dial button.
![]()
- For more information regarding the Call Event, please refer to the user manual: Workflow Event - Call Event.
- Click on the WhatsApp button.
![]()
- For more information regarding the WhatsApp - Add/Edit Workflow Event, please refer to the user manual: How to Send A WhatsApp.
- Click on the Notes on Debtors button.
![]()
- For more information regarding the Note Add/Edit Workflow Event, please refer to the user manual: How to Make a Note on a Debtor/Patient.
- Click on the Payment Link button to send the Debtor a Payment request link.
![]()
- An Attention pop-up will appear to confirm if you would like to send the Payment request link to the Debtor.

- Click on the Ok button to proceed.
![]()
- For more information on how the Payment Link button works, please refer to the user manual: Send Payment Request WebApp.
- Click on the CCA Status button.
![]()
- For more information on how to update the CCA Status, please refer to the user manual: Invoices Tab: How to Update the CCA Status.
Patient Details
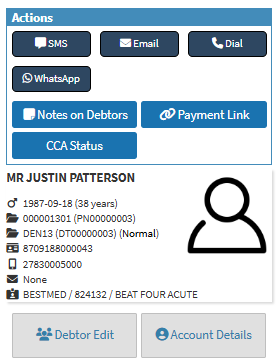
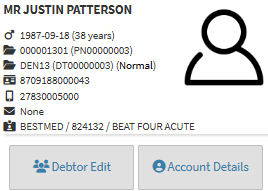
The Patient's demographic and Medical Aid information that was added to their file when first arriving at the Practice will be displayed at the top of the sidebar. Additionally, the standing of their account will also be shown, displaying both Patient and Medical Aid outstanding amounts.
- Patient's Details: The Patient's Title, Name and Surname.
- Gender, Date of Birth, Age: Patient's Gender, Date of birth and their Age.
- Account Number and Patient's File Number: The Main Debtor's Account Number and the Patient's individual File Number.
- Debtor Number: A Debtor Number is autogenerated by the system and assigned per Patient.
- File Number: The File Number which are created automatically by the system when the system's file is created.
- ID Number: ID Number of the Patient.
- Cellphone Number: Cellphone Number of the Patient.
- Email Address: Email Address of the Patient.
- Medical Aid Provider, Option and Number: The Name of the Patient's Medical Aid, Plan and Plan Number.
- Click on the Debtor Edit button to change the Debtor and/or Patient Demographic information.
![]()
- For more information on the Debtor Edit, please refer to the user manual: View or Update Debtor and Patient Information.
- Click on the Account Details button to access the Debtor/Patient account information.
![]()
- For more information on the Account Details, please refer to the user manual: Navigating and Understanding the Account Details Screen.