Debtor Screen Sidebar: Navigation and Use
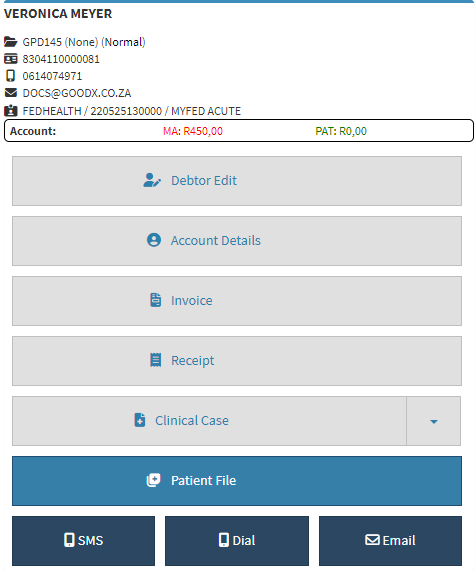
The Sidebar is an extended screen with shortcut buttons on the right-hand side, where more functions and information is shown of the Debtor/Patient. Different screens can be accessed from the Sidebar. The information shown on the Sidebar can be switched off by using the Sidebar Widgets. For more information on how to switch off Sidebar Widgets, please refer to the user manual: General Settings.
- The contents of this user manual will consist of the following information:
- Debtor Demographic Details
- Sidebar Accessibility Screen Buttons
- Communication Buttons
- This user manual will start on the Debtors screen.

- Click on the desired Debtor to access the functionality of the Debtor's sidebar.

- The Debtor Sidebar will open.

Debtor Demographic Information
The top of the Debtor's sidebar contains the Debtor's Demographic Information, such as their File number, ID Number, Contact Details and Medical Aid Information.
- An explanation will be given for the information that appears in the Debtor Demographic section:
- Debtor's Name (VERONICA MEYER): The Full Name and Surname of the Debtor.
- Debtor File Number (GPD145 (None) (Normal)): The File Number of the Debtor, the Debtor's hard copy File Number as well as the Status of the Debtor.
- ID Number (8304110000081): The Identification Number of the Debtor.
- Cellphone Number (0614074971): The Cellphone Number where the Debtor can be reached.
- Email Address (DOCS@GOODX.CO.ZA): The Debtor's Email Address.
- Medical Aid Details (FEDHEALTH/220525130000/MYFED ACUTE): The Name, Membership Number and the Plan Name of the Debtor's Medical Aid.
Sidebar Buttons
Using the buttons on the Sidebar, gives the user the ability to navigate to the most important screens regarding the Debtor's Information on the system.- Click the Debtor Edit button, in order to Edit the Debtor's account.

- For more information regarding how to Edit the Debtors Information, please refer to the user manual: View or Update Debtor and Patient Information.
- Click on the Account Details button, to access the Debtor's Account Information and all transactions made on the Account.
![]()
- For more information regarding the Accounts Details Screen, please refer to the user manual: Navigating and Understanding the Account Details Screen.
- Click on the Invoice button to create a new Invoice for the Debtor.
- For more information regarding New Invoices and creating new Invoices, please refer to the user manual: The Invoice Screen: Navigating and Use.
- Click on the Receipt button to create a New Receipt on the Debtor account.
![]()
- For more information regarding Receipts and how to create the Receipt, please refer to the user manual: Receipt Screen (Overview).
- Click on the Clinical Case button to access the Debtor's Clinical Information.

- For more information regarding the Debtor's Clinical Information, please refer to the user manual: Clinical Case Screen: Navigation and Use.
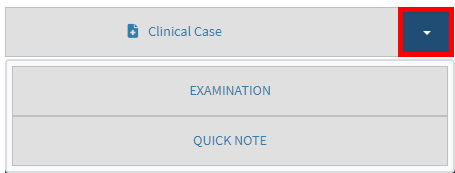
- Click on the Clinical Case drop-down menu to access your Easy Events.

- For more information regarding how to set up Easy Events, please refer to the user manual: Easy Events.
- Click on the Patient File button to access the Clinical History, Medical History and other information regarding the Patient.

- For more information regarding the Patient File, please refer to the user manual: Patient File Screen: Navigation and Use.
Communication Buttons
Communication Buttons are used to communicate more easily with the Debtor .

- Click on the SMS button to send the Debtor a Text Message.

- For more information on how to send an SMS to the Debtor, please refer to the user manual: Send an SMS.
- Click on the Dial button to make a Call to the Debtor.

- For more information on how to make Calls to the Debtor, please refer to the user manual: Making a VoIP Call.
- Click on the Email button to send the Debtor an Email.

- For more information on how to send an Email to the Debtor, please refer to the user manual: Workflow Event Template: Send Email.
Last modified: Wednesday, 14 February 2024, 10:00 AM