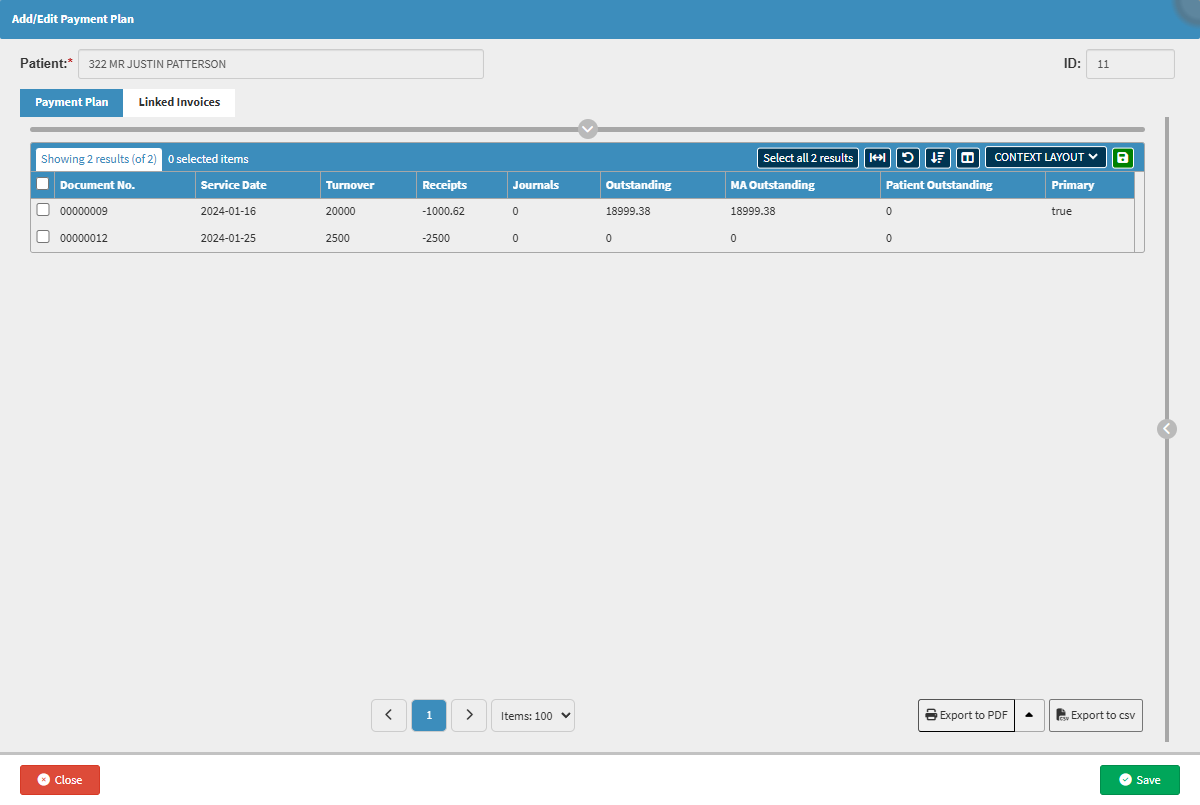
The Linked Invoices tab provides the Practice with a consolidated view of all Invoices associated with a Patient’s Payment Plan. Its main function is to give the Practice visibility into financial history by displaying posted Invoices, Outstanding Amounts, Receipts, Journals, and the Primary Invoice. This enables the Practice to verify billing accuracy, track payment allocations, and manage account balances without navigating to separate screens.
The Contents of This User Manual:
Patient and Payment Plan ID Details
Invoice Overview
Column Options
Columns
Linked Invoices Sidebar
Page Options
This user manual will start on the Add/Edit Payments screen.
An explanation will be given of the Linked Invoices screen:
Patient and Payment Plan ID Details
This section displays the Patient’s name and the unique Payment Plan ID. These fields are read-only to maintain data integrity, ensuring that the correct Patient and Payment Plan ID are referenced without the risk of accidental edits. This helps the Practice keep accurate records and ensures that Invoices and Payments are always linked to the correct account.
Invoice Overview
The Invoice Overview Table provides a detailed summary of all Invoices linked to the Patient’s Payment Plan. It helps the Practice track financial transactions by showing Turnover, Receipts, Journals, and Outstanding Balances. This consolidated view ensures Billing Clerks can quickly identify the Primary Invoice, confirm allocations, and monitor account status without navigating to other screens.
An explanation will be given of the Invoice Overview table:
Column Options
The Column Options section provides tools that allow the Practice to manage and interact with the Invoice table effectively. These options make it easier to organise, review, and export information from the Payment Plan records. By customising layouts, selecting records, and extracting data, the Practice can streamline reporting, maintain accurate records, and adapt the view to meet operational needs.
Click on the Select All Results button to select all Invoice results.
Click on the Expand Widths button to auto-fit the column width to the information within all columns.
Click on the Reset Widths button to restore the original widths after any modifications were made.
Click on the Sort Columns button to sort the columns in the order that you desire.
Click on the Context Layout drop-down menu to select the type of layout that will be used for the screen.
Click on the Save Layout button to Save the Layout of the Payment Plan.
?Please Note: You can create and save personalised layouts by using the Save Layout feature, which will display in the drop-down. For more information on how to create your own customised layouts, please refer to the user manual: How to Save Column Layouts on List Screens.
Columns
The columns in the Invoice Overview Table provide the Practice with a detailed breakdown of financial and service information linked to a Payment Plan. Each column highlights a specific aspect of the Invoice, such as service Dates, Payment Activity, and Outstanding Balances, giving the Practice a clear and accurate view of the Patient’s account status. This structured display enables efficient monitoring, reconciliation, and management of both Patient and medical aid responsibilities.
An explanation of the columns will be given:
Document No.: A unique system-generated number assigned to each Invoice. This allows easy identification and tracking of specific Invoices.
Service Date: The date on which the medical or dental service was provided. Helps confirm when the treatment linked to the Invoice occurred.
Turnover: The total value of the Invoice before any Receipts, Journals, or Adjustments. This shows the original billed amount.
Receipts: Payments received against the Invoice. Negative values indicate money has been paid into the account.
Journals: Any manual Financial Adjustments made to the Invoice (for example, corrections, write-offs, or reallocations).
Outstanding: The remaining balance that is still unpaid after Receipts and Journals have been applied.
MA Outstanding: The amount still outstanding from the Medical Aid for this Invoice. This helps track what portion of the balance is expected from the funder rather than the Patient.
Patient Outstanding: The portion of the Invoice still payable by the Patient themselves. This helps determine Patient liability versus Medical Aid responsibility.
Primary: Indicates whether the Invoice is the Primary Invoice in the payment plan. Only one Invoice will display “true,” making it easier to identify the main record tied to the plan.
Linked Invoices Sidebar
The Linked Invoices sidebar provides a quick summary of the selected Debtor’s personal, account, and medical aid details. It allows you to easily access and perform key Debtor-Related actions such as sending communication (SMS, Email, Dial, WhatsApp), adding notes, creating payment links, and viewing account or Debtor Information. This sidebar enables efficient account management and communication without navigating away from the main Invoice view.
Click on the desired Invoice Line.
The Linked Invoices sidebar will open.
For more information regarding the Linked Invoices sidebar, please refer to the user manual: Linked Invoices Sidebar.
Page Options
All the additional options that are available for the page.
Click on the Previous button to navigateto the previous page.
Click on the Next button to navigate to the next page.
Click on the Items drop-down menu to select the number of items that will be displayed on the screen.
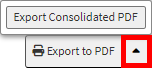
Click on the Export to PDF button to save a PDF file of all the data as a comprehensive report.
Click on the Export to PDF drop-up menu to access the Export Consolidated PDF option that allows you to generate a single document that combines all the data from multiple sources to provide an overview.
Click on the Export to CSV button to save the Report in a CSV format.