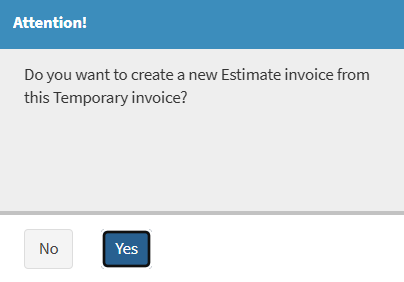
Creating an Estimate Invoice allows the Practitioner to generate an estimate of the expected cost of a treatment or procedure. The Estimate Invoice provides a detailed breakdown of the services, treatments, procedures, and items that will be used.
An Estimate is not a final Invoice and may change if the treatment plan is adjusted. This helps the Patient understand potential costs upfront and supports transparent communication within the Practice.
For a detailed explanation of what an Estimate is, please refer to the glossary entry: Estimate.
The Contents of This User Manual:
Creating the Estimate
Estimate Actions
This user manual will start on the Invoice Detail screen.
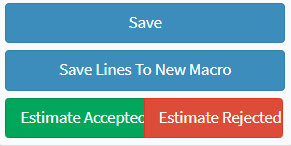
Estimate Actions gives you quick access to the key steps needed to finalise an Estimate. From here, you can save the Estimate, create a billing macro, accept or reject it, or save and close the Invoice screen. These actions help you complete the Estimate properly before moving on to the next step.
Click on the Save and Close popover menu.
The Save and Close popover menu will open.
Click on the Save button
This will save the content of the Estimate without closing.
Click on the Save Lines To New Macro button.
This will save all the lines on the Estimate as a Billing Macro in Billing Settings.
For more information on Billing Settings, please refer to the user manual: Billing Settings.
Click on the Estimate Accepted button.
This will mark the Estimate as accepted once the Patient confirms they are satisfied with the items on the Estimate.
Click on the Estimate Rejected button.
This will mark the Estimate as rejected when the Patient declines the items listed.
Click on the Save and Close button.
This will save the Estimate Invoiceand navigate you back to the previous screen.
💡Please Note: Estimates can be accessed from the Account Details screen.