Creating a Creditor/Supplier
By Creating a new Creditor/Supplier the user creates an account on the GoodX System. With the account, a user can document goods and services that the Practice receives. A Creditor is an entity, a company or a person of a legal nature that has provided goods, services, or a monetary loan to a Practice. Once a Creditor has delivered the goods/service, the payment is expected at an agreed-upon date.
- Log in to the GoodX Desktop using your GoodX username and password.
- From the Navigator, Double Click on the Creditors Module.

- The Creditors screen will open.

- There are 2 ways to create a new Creditor/Supplier:
- From the Menubar.
- From the Fixed Data button.
Menubar
- Click on the Lists menu from the Menubar.

- Click on the Creditors option from the sub-menu.

- The Creditor Input screen will open on the Choose Creditors tab.

Fixed Data
- Click on the Fixed Data button on the Toolbar.

- The Creditor Input screen will open on the Choose Creditors tab.

- The Creditors/Supplier information will be divided into columns:
- Account Number: The number linked to the account of the Creditor/Supplier.
- Name: Name of the Creditor/Supplier.
- Address: The Postal Address associated with the Creditor/Supplier.
- File Number: A unique number or ID for the specific Creditor/Supplier that references back to the hardcopy file.
- Balance: The outstanding amount owed to the Creditor/ Supplier.
- Click on the + button to add a new Creditor/Supplier to the list.

- A Confirm pop-up will appear which will ask the user if they would like to Reuse existing account number ?

- Click on the Cancel button to close the Cofirm pop-up.

- Click on the No button to allocate a new account number to the Creditor.

- Click on the Yes button to add an existing account number.

- The Creditor Input tab will open if the Yes or No button has been clicked.

- Fill in the relevant fields or Select an appropriate option:

- File number / ID: A unique number or ID for the specific Creditor/Supplier that references back to the hardcopy file.
- Language: The language preference of the Creditor/Supplier, the statements and invoices will be printed and all communication will go out according to the preferred language.

- Select an option by clicking on the relevant radio button:
- Afrikaans: All documentation and communication will go out in Afrikaans.
- English: All documentation and communication will go out in English.
- Creditor Type: Determines the type of Creditor/Supplier that will be created.

- Select an option by clicking on the relevant radio button:
- Creditor: Someone that will be paid for goods or services.
- Assistant: An assistant physician who assists the main Doctor with procedures.
- For an extensive explanation regarding how to add an assistant as a Creditor please refer to the user manual: Adding an Assistant as a Creditor.
- Manufacturer: A person or company who produces products by mixing raw ingredients to create a completed product to sell.

- Name: Name of the Creditor/Supplier.

- Postal Address: Address where parcels and letters can be delivered by the post office.

- Postal Code: The area code of the postal address.
- Click on the ellipse button in order to open the Postal Code screen to search for the area code.

- The Postal Code screen will open.

- Click on the Suburb/Town/Postal Code field to input the desired search.

- Click on Find (F5/Enter) button or press the F5 or Enter key on the keyboard to search.

- A list of the Postal Codes search results will appear.

- Click on the desired option to make a selection.

- Click on the Canel button or press the Esc key on the keyboard to close the Postal Code screen without saving the selection.

- Click on the OK button or press the F2 key on the keyboard to save the option that has been selected. The Postal Code screen will close and return to the Creditor Input screen.

- The selected information will fill into the relevant fields automatically.

- Cellphone: A cellphone/mobile number where the Creditor/Supplier can be reached.

- Telephone Number: A landline number where the Creditor/Supplier can be reached.

- Fax Number: A number where a Fax can be sent to.

- Contact Person: The name of the person who to communicate with, at the Creditor/Supplier.

- Group Code: A code that links Creditors/Suppliers to group the Creditors/Suppliers together with similar types of Creditors/Suppliers. For example, all medical equipment suppliers can be grouped together which will make it easier for the user to know what goods or services the Creditors/Suppliers provide.
Please Note: It is not necessary to use the group code feature, but Practices with many Creditors/Suppliers will benefit from using this feature.
- Click on the ellipse button to open the Creditor Group screen to link the Creditor/Suppliers to a group.

- The Creditor Group screen will open.

- Click on the Description field to input and search for the desired group whilst typing the list will shorten with search results. The more the user types the closer the search results will be to the desired result.

- Click on the desired option to make a selection.

- Click on the Cancel button to close the Creditor Group screen without linking the Creditor/Supplier to the selected group.

- Click on the Ok button or press the F2 key on the keyboard to link the Creditor/Supplier to the selected group. The Creditor Group screen will close and return to the Creditor Input screen.

- The selected information will fill into the relevant fields automatically.

- BHF Number: The Board of Healthcare Funders registration Number (only if applicable)

- HPC Number: The Health Professions Council registration number (only if applicable)

- Default Expense Account: The expense ledger where invoices will be posted by default.
Please Note: The Default Expense Account field only applies when the Creditor/Supplier's expenses will always be posted to the same Expense Account.
- Click on the ellipse (...) button to select an Expense Account to link the Creditor/Supplier to.

- The Expenditure Accounts screen will open, where the expense account can be linked to the Creditor/Supplier.

- Search for the desired expense account by typing in the Search field.

- Click on the desired expense account that the user would like to link the Creditor/Supplier to.

- Click on the Cancel button to close the Expenditure Accounts screen by making a selection.

- Click on the OK (F2) button or use the F2 key on the keyboard to add the selected Expense Account to the Creditor/Supplier.

- The Expense Account screen will close and return to the Creditor Input screen.
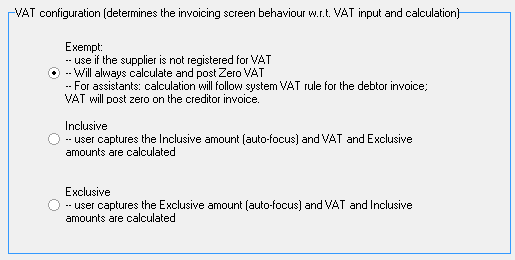
- VAT Configuration (Determines the Invoicing Screen Behaviour W.R.T VAT Input and Calculation): The different types of VAT, and how VAT will be applied to and calculated on transactions.

- Select an option by clicking on the relevant radio button:
- Exempt: The Creditor/Supplier is not registered for VAT and the VAT will always be posted as Zero.
- For Assistants: Calculation Will Follow the System VAT Rule for the Debtor Invoice; VAT Will Post Zero on the Creditor Invoice: No VAT will be posted to the Creditor/Supplier. VAT will however be applicable and posted on the Debtors account of the Patient to which the assistant has been linked.
- Inclusive: All the line items that are billed on the Creditor/Supplier invoice will include VAT.
- The User Captures the Inclusive Amount (Auto-Focus) and VAT and Exclusive Amounts are Calculated: When the user captures an amount that is inclusive of VAT, the system will automatically calculate the amount excluding VAT as well as the VAT amount.
- Exclusive: All line items that are billed on the Creditor/Supplier invoice will exclude VAT.
- The User Captures the Exclusive Amount (Auto-Focus) and VAT and Inclusive Amounts are Calculated: When the user captures an amount that is exclusive of VAT, the system will automatically calculate the amount including VAT as well as the VAT amount.

- VAT Number: If registered for VAT the VAT number of the registered Creditor/Supplier will be entered.
- Branch Code: Branch Code linked to the bank.

- Cheque Account Number: Bank Account Number.

- Account Type: The type of bank account.
- Click on the Account Type drop-down menu for options to become available to select from.

- Select an option from the list that has become available:
- Cheque: A day-to-day transaction account. Since the use of cheques has been discontinued in South Africa, cheque accounts now allow users to bank and manage user's money electronically.
- Savings: An interest-bearing account where the user can gain interest when the money is not used.
- Transmission: An account that allows the user to make deposits and withdraw money, with a linked card.
- Payment Agreement: This is the type of payment agreement that will determine the calculation used on the Assistant Audit Report and how the assistant will be paid.

- The payment agreement section is only applicable when the Creditor Type is selected as Assistant.
- For an extensive explanation of how to create an Assistant as a Creditor, please refer to the user manual: Adding an Assistant as a Creditor.
- Click on the Exit button to close the Creditors Input screen without saving changes.

- Click on the Save button to save changes when done and satisfied with the information that has been entered for the new Creditor/Supplier.

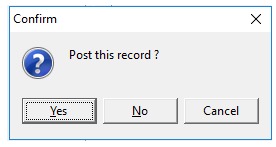
- A Confirm pop-up will appear to ask whether the user would like to Post The Record.

- Click on the Cancel button to make changes to the information that has been added.

- Click on the No button to exit the Creditors Input screen without saving the changes that were made.

- Click on the Yes button to post and save the new Creditor/Supplier.

- When posted, the new Creditor/Supplier will be added to the Choose tab.

- Click on the Refresh button to refresh the Creditors screen.

Please Note: When multiple users are creating Creditors/Suppliers simultaneously, the screen does not automatically refresh, this will allow the user to refresh the list to see all other Creditors/Suppliers that have been created by other users, without having to close and reopen the screen.
- Click on the Done button to close the Creditor Input screen and return to the Creditors Screen.
