Monitoring the electronic communication between your Practice and various health funders ensures that every claim is tracked from submission to response. Accurate oversight of these transactions allows you to identify and resolve potential rejections quickly, which maintains a healthy cash flow for the Practitioner. Management of these records provides a clear audit trail of all data sent to the Medical Aid on behalf of a Patient or Dependant.
💡Please Note: It is veryimportant for the Practice to go through the Switch History every day to make sure all claims are processed successfully.
The Contents of This User Manual:
Filters
Columns
EDI Action Buttons
This user manual will start on the Switch History screen.
For more information on how to navigate to the Switch History screen, please refer to the user manual: Reports Segment.
Filters
Filters are tools or functionalities that allow you to narrow down or refine the results displayed on the Posted Invoice screen.
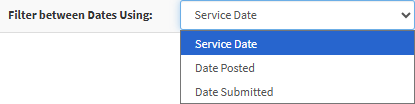
Click on the Filter Between Dates Using drop-down menu to select the desired date option.
Click on the From field to select the date from the date picker that becomes available.
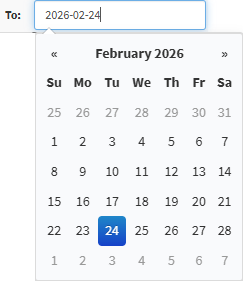
Click on the To field to select the date from the date picker that becomes available.
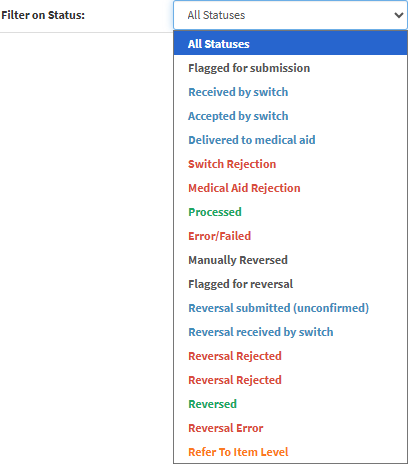
Click on the Filter on Status drop-down menu to filter on the selected EDI Status.
💡Please Note: The Status colour will also indicate the Status. For more information on the EDI Status, please refer to the table below.
Click on the Filter on Medical Aid field and start typing the desired Medical Aid, and select the option that becomes available.
Tick the Show Resolved checkbox to filter on resolved Switches.
Click on the Filter on Invoice Number field and type the Invoice Number you want to filter on.
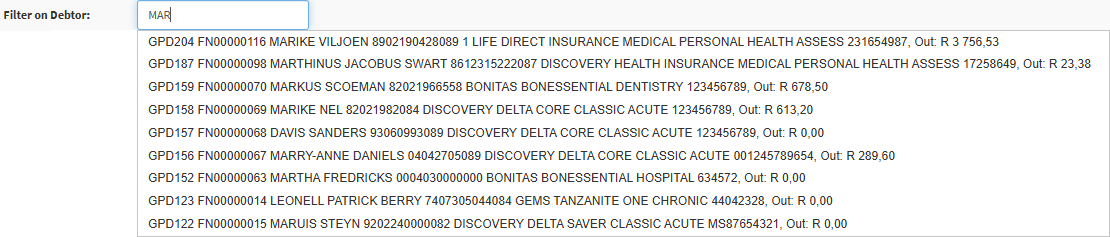
Click on the Filter on Debtor field and start typing the desired Debtor, and select the option that becomes available.
Click on the Search button to apply your filters to the list.
Columns
All the information on the Switch History screen is divided into Columns to logically group related information together.
Resolved: Displays a status button indicating if an issue with the invoice has been addressed; a red x indicates unresolved. Once resolved, a green tickbox will appear.
Inv No.: Reflects the unique system-generated identification number assigned to a specific invoice.
Service Date: Indicates the specific calendar day the clinical or administrative service was provided to the Patient.
EDI Status: Shows the current communication state of the electronic claim, such as a Medical Aid Rejection or successful delivery.
Date Posted: Records the exact date and time the financial transaction was originally captured on your system.
Date Submitted: Specifies when the claim was electronically sent to the Medical Aid or relevant switch.
Acc No.: Identifies the unique account code linked to the Debtor responsible for the invoice.
File Number: Displays the internal filing reference used by your Practice to organise Patient records.
Name: Lists the full name of the Debtor or Patient associated with the specific account.
Medical Aid: Name of the health funder, such as Discovery, which is linked to the Patient or Dependant.
Service Centre: Identifies the physical or logical location where the Practitioner performed the service.
Invoiced: Represents the total gross amount billed for the services rendered.
Outstanding: Shows the total remaining balance currently due on the invoice.
Med. Outst: Indicates the specific portion of the invoice total that is still owed by the Medical Aid.
Pat Outst.: Details the remaining amount that the Patient or Debtor is personally liable to pay.
EDI Action Buttons
Action buttons provide you with the tools to resolve outstanding claim issues or view specific responses received from a Medical Aid. By using these shortcuts, you can quickly manage the communication status of an invoice or edit Debtor information without navigating away from the list.
Click on the Resolve All On Page button to resolve all the Invoices on the filtered screen.
Click on the View Response button for the selected Invoice to view the response from the Medical Aid.