Text size
Line height
Text spacing



The Automated Credit Control Management feature acts as a management assistant and is frequently referred to as CCA, CCM, or ACC within the GoodX learning centre and the GoodX training courses. This feature automates procedures designed to prevent bad debt. For example, you can schedule automated invoices to be sent to patients with outstanding balances at 14, 30, and 60 days from either the capture date or the date of service. You must be on GoodXweb version 1.20 or higher to activate this feature.
In a nutshell, the CCM is an automated system that periodically reviews your debtor and patient invoice accounts for outstanding balances. Based on your setup, the system systematically reviews accounts and takes action depending on whether they are patient-liable or medical aid-liable.
Patient-liable accounts receive periodic SMS and email reminders, and convenient payment links to settle balances instantly and securely.
For medical aid-liable accounts, the fund informs patients directly about submitted or rejected claims, and triggers task reminders for the practice representative to manage additional medical fund and switch actions.
For edge cases, you can add additional statuses to your “No Action” groups for any payment arrangement, IOD reviews/reminders, or special practice-specific exclusions.
Please note that the Automated Credit Control Management system includes a once-off fee that covers activation, setup assistance tailored to your practice needs, and the training required for implementation.
Additionally, this credit control feature integrates with other services that may incur costs. For instance, VoIP calls and payment links are an extra service that requires a separate subscription or agreement stating their additional fee, while SMS fees are included in your installation agreement with GoodX.

| Date of Change | Changes | Editor |
| 2026 05 17 | Established Page | Chendene Barnard |
Where can the Automated Credit Control Management feature be accessed within GoodX?
In GoodXweb version 1.18 and below - From the navigation wheel, select the "Reports" section, then open the "Credit Control Management" tab to detail and create your practice's specific requirements if you have an active agreement in place. To use the Automated Credit Control Management system to its full potential, please contact the GoodX Feature Liaison for additional guidance.
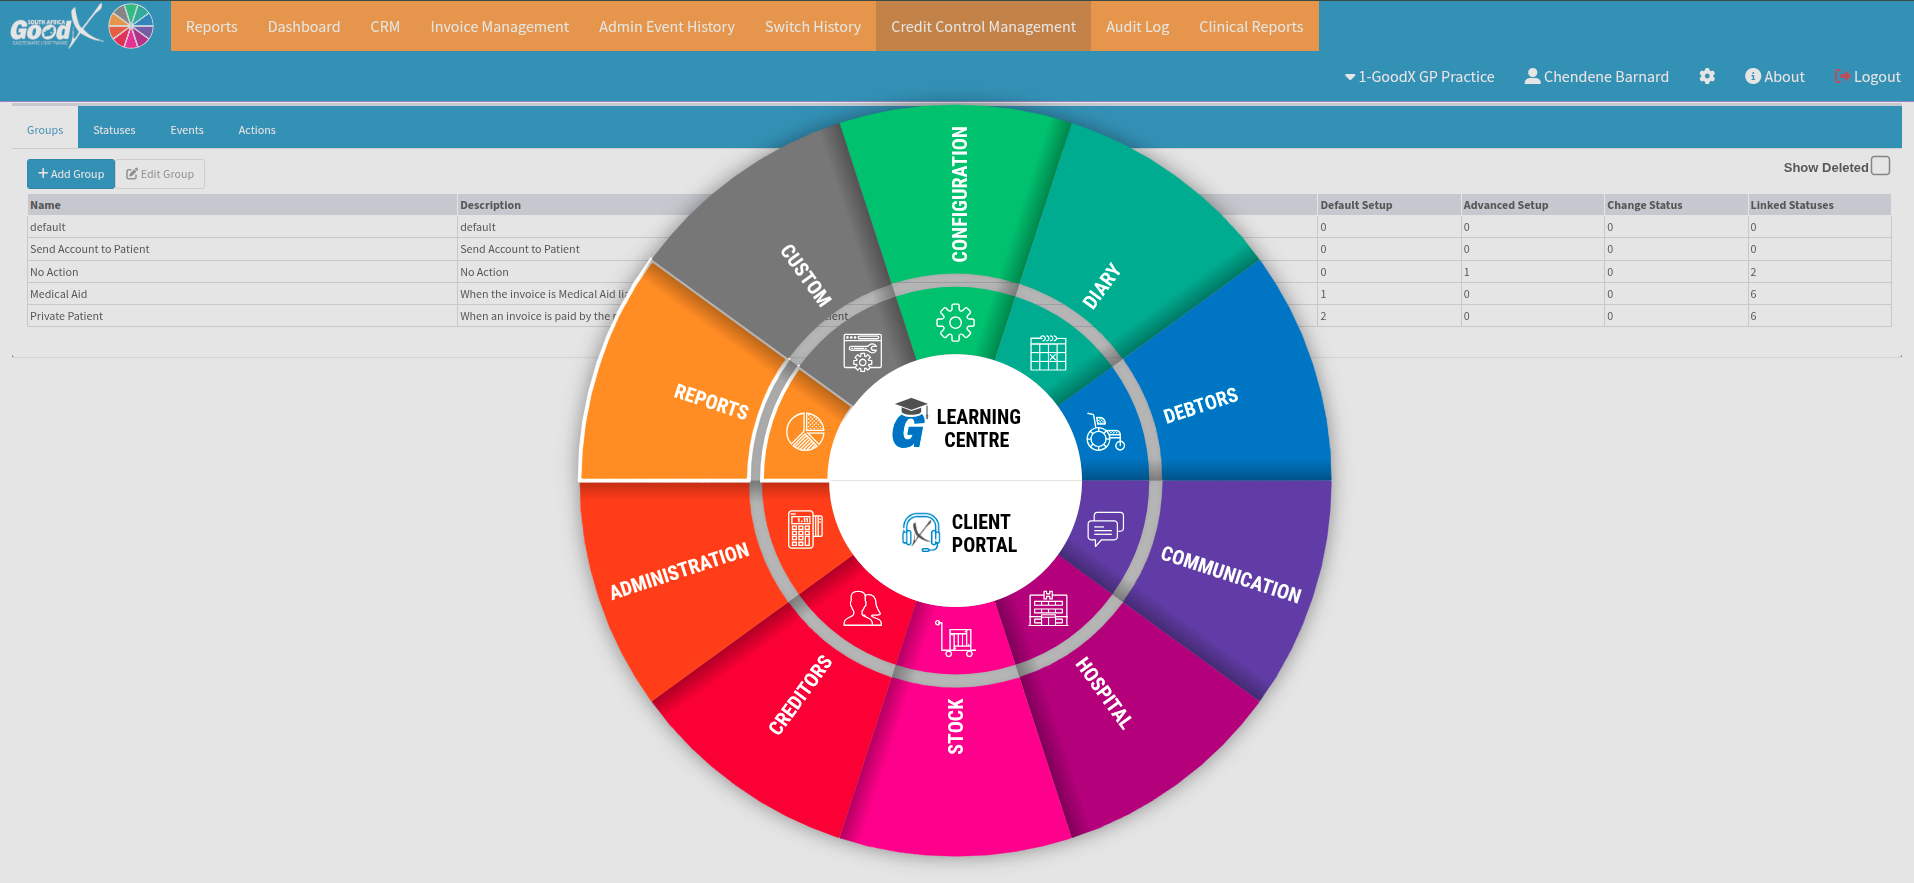
In GoodXweb version 1.20 and above - From the navigation wheel, select the "Configuration" section, then select the "Practice setup" tab drop down menu. Select "Credit Control Management" from the list. Continue to detail and create your practice's specific requirements if you have an active agreement in place. To use the Automated Credit Control Management system to its full potential, please contact the GoodX Feature Liaison for additional guidance.
What can the Automated Credit Control Management system feature do within GoodX?
The Automated Credit Control Management feature is designed to automate repetitive administrative tasks, allowing you to schedule it to run daily or on specific days at a selected time from your GoodX Entity Settings panel. Ensure the Automated Credit Control Management process is fully configured before activation, as enabling the feature too early may result in incomplete workflows and a poor patient experience.
Only pre-defined actions and events are available for selection. If your practice requires additional Credit Control Management functionality, please contact your client liaison, who will help determine if a custom request can be accommodated or if an alternative GoodX feature better suits your workflow needs.
Where the Automated Credit Control Management process is scheduled to run daily, these checks will be completed and actioned on those specified days at 06:00.

Here is a practical example of a Debtors Credit Control Management workflow designed to remind patients of outstanding funds:
30 days – Send out a statement.
60 days – Send the patient an SMS.
90 days – Issue a final warning.
180 days – Hand over the account or write it off.
Here is a practical example of a Creditors Credit Control Management workflow designed to manage supplier accounts:
Immediate payment upon delivery – Ensure the delivery has been captured and the payment has been processed immediately.
Account reviews – Perform specific, routine reviews on outstanding creditor accounts.
Overpayment management – Where suppliers have been overpaid, Credit Control Management can assist with issuing payback requests or requesting that the amount be allocated to the account for future transactions if an ongoing business relationship exists.
Here is a practical example of a Medical Scheme Credit Control Management workflow designed to review submitted claims and manage subsequent actions:
Rejection handling – Based on the specific medical scheme rejection reason, the system triggers the required task or check. If no billing or ICD-10 code errors require resubmission, the account can automatically make the client liable after a specified number of days, based on practice preferences.
Custom workflow requests – Where a specific practice action or response option is not currently available in the system, please reach out to your liaison to determine if this option can be developed or if alternative solutions exist to meet your practice's requirements.
Template examples – Pre-configured templates, such as a "Claim rejected, client liable" template, can be automated for instant communication.
Here is a practical example of a P2P (promise to pay) Credit Control Management workflow designed to review P2P system arrangements:
Where can the GoodX Credit Control templates be set up?
Add the Automated Credit Control Management process templates to your existing GoodX workflow events. Name your templates clearly based on their specific role or function, ensuring they are easy to identify and select when building your workflow.
Use "Placeholders" to automatically insert information from the patient's file into the required task. When placeholders are used correctly, unique patient details will populate automatically for each call. If you have any setup questions, please contact your GoodX Client Liaison.
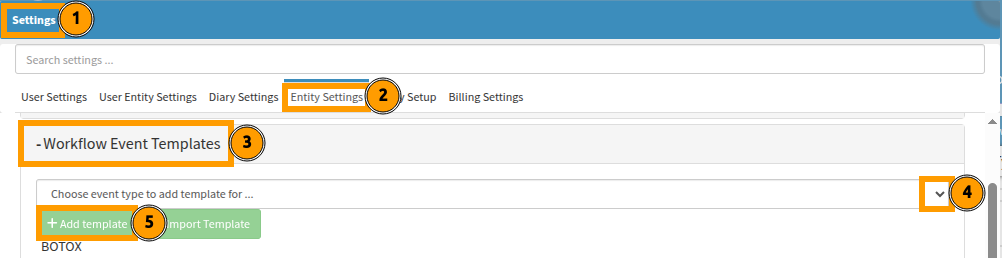
Next to your login view, the settings icon will redirect you to a new menu screen, from which you can navigate directly to the "Entity Settings" tab.

Scroll down to the "+ Workflow Event Templates" section and select the line item to expand it. Choose the type of template you intend to add from the library drop-down options, as highlighted in bubble "4", and select "+Add Template" to start editing the template.
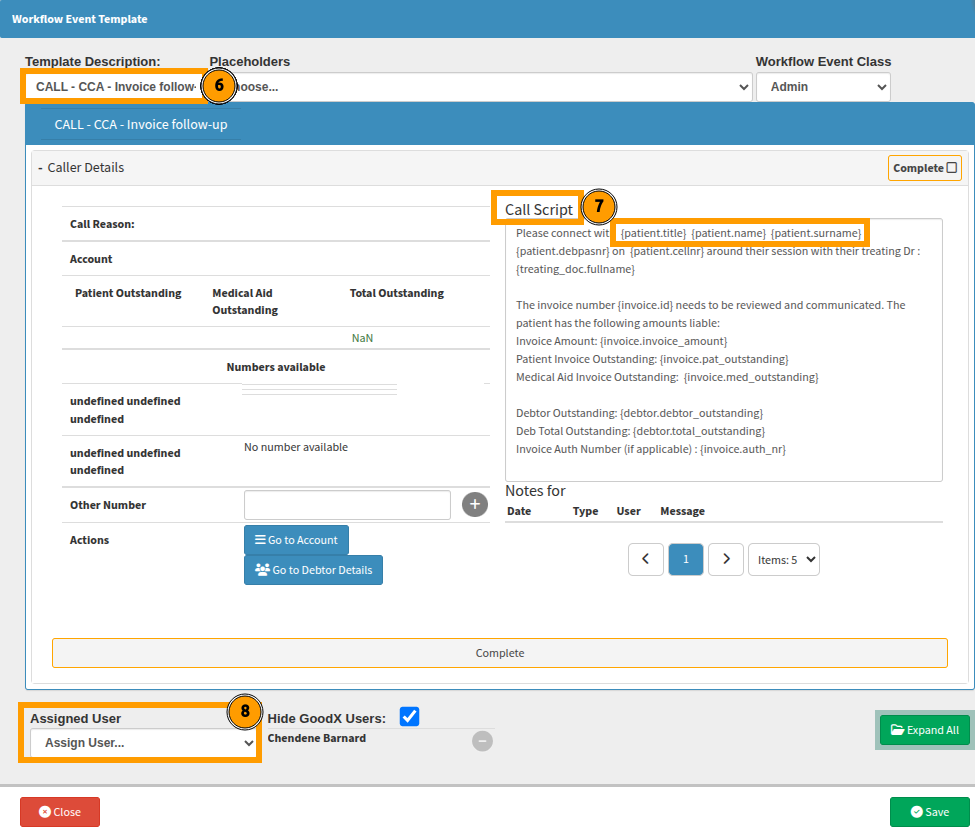
In this example highlighted by bubble 6, a "Call Event" has been renamed to reflect its specific purpose, and the template includes a script to guide the assigned user through the required task.
Each template can have a dedicated assigned user, as indicated by bubble "8", which ensures accountability and an even distribution of workloads. This also maintains data security by ensuring users only view tasks specifically assigned to them.
Always refresh your screen view after selecting "Save" on both your template and the "Workflow Event, Entity Settings" page, ensuring all updates are correctly reflected in the system.
What is the Automated Credit Control Management system tabs mean?
Here is the meaning behind each setup option available for selection in the Automated Credit Control Management process:
Default Actions: If you have a specific action that must be called upon, it can be requested for import into your Automated Credit Control Management interface. An example is shown below, including standard payment requests.
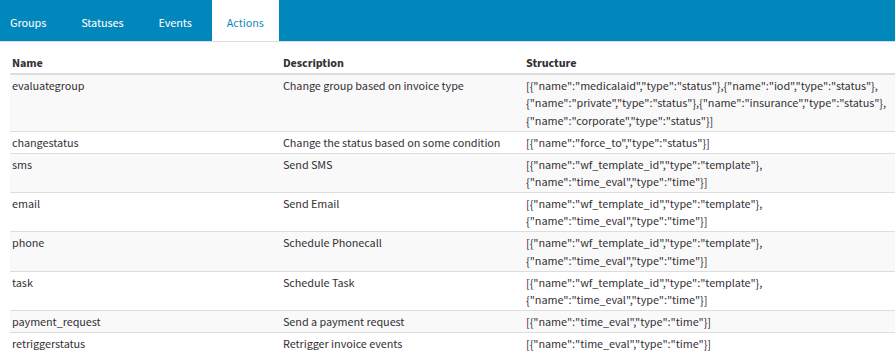
wfe_change requests are not included by default.
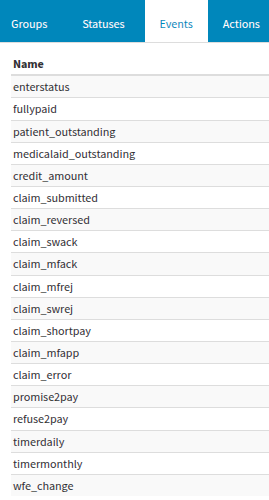
The status tabs represents areas where the automated processed would be linked to time period or specific communication events. Each status is linked to a group type, when instructions are not defined in the status itself.
The groups tabs if the source process to follow every time a status is updated. This takes away duplicate actions when numerous steps are involved and allows easier management of automated communication and actions.
What does the Automated Credit Control Management feature setup entail?
Each status relies on linked events and actions - such as automated emails, task creation, or status updates - to define the underlying Automated Credit Control Management logic required to be actioned.
It is therefore imperative that all templates are ready for use before you begin mapping your statuses.
Please do not make manual alterations to these events without consulting your GoodX Client Liaison. Because tasks, events, and statuses are tightly interlinked, unauthorised changes can disrupt your broader workflow and compromise data integrity.
If changes are required, always contact your GoodX Representative. They will ensure your Automated Credit Control Management features remain fully functional and that all conditional dependencies remain intact.
To ensure your Automated Credit Control Management Setup functions correctly, any workflow events requiring a linked SMS or email must be fully configured before they can be assigned to a status.
Your GoodX liaison will set up default groups and statuses to establish a baseline for your project, ensuring your workflow aligns with standard practice from day one.
Important: To add steps to your process, select the line item name of the group or status directly rather than using the icons.
The plus (+) icon is used only when the practice requires additional, custom steps based on specific workflow needs.
The minus (-) icon will remove a step from the sequence.
Example below illustrates the automated communication workflow sections
From the Status setup, you can send emails or SMS messages, link the communication to practice-specific templates created for this process, and define the conditions for when the communication is sent to the debtor.
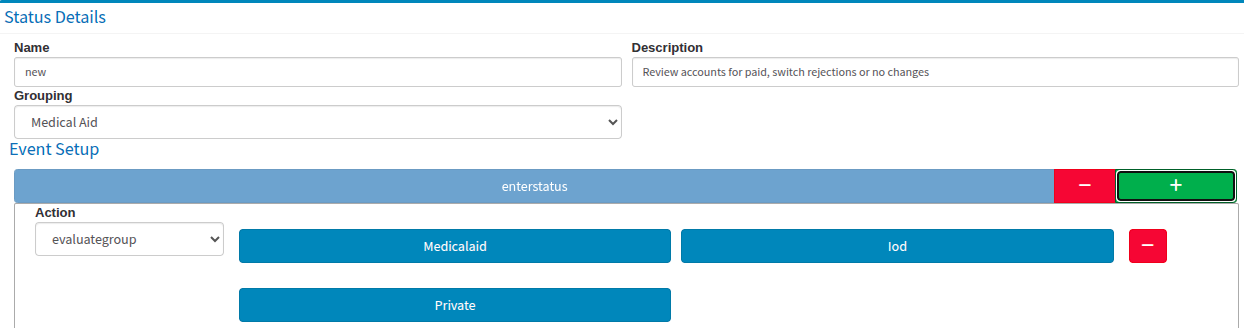
Each time a status is changed or edited, it may move on the list. This cannot be reordered or filtered at this time.
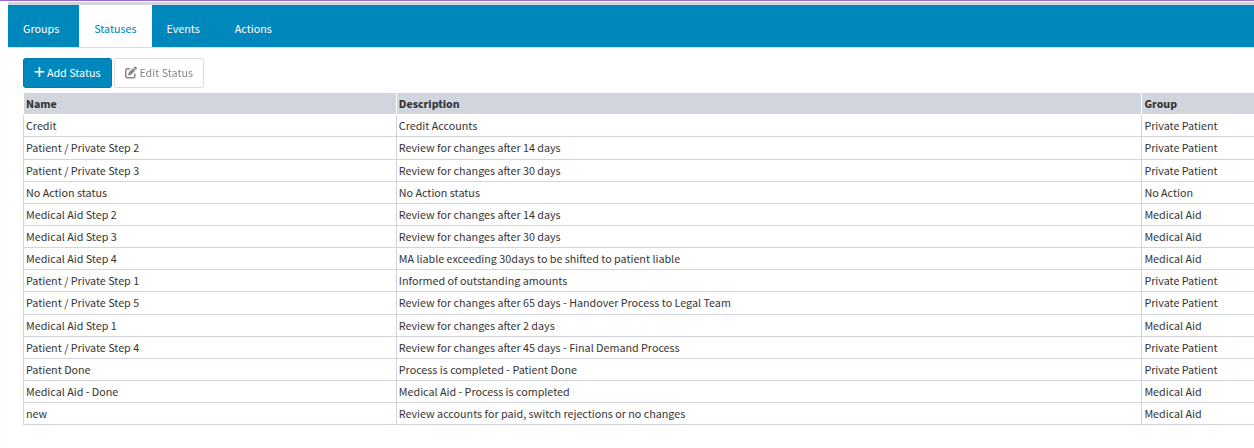
Each status has multiple sections; once activated, they will no longer appear greyed out. You can further define any activated lines, as illustrated by bubbles 1, 2, and 3.
Quick Tip on Operators:
When the "less than (<)" or "greater than (>)" operator is used (depending on your specific rule direction), the system will review the status and resend any linked communication daily until the account moves to the next state.
If you only want to send the linked communication once, select the "equal (=)" sign on step 3 or wherever that specific feature setup is required.
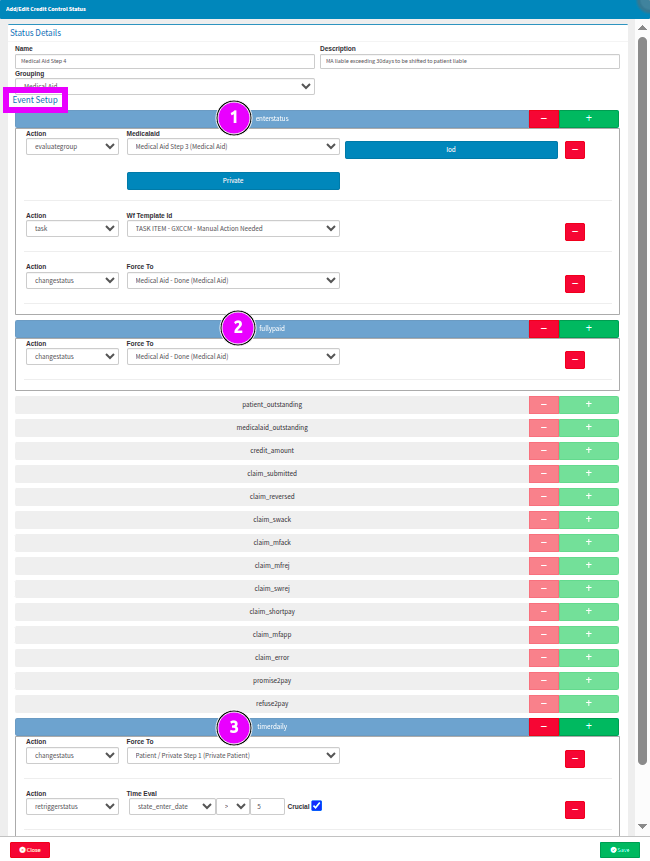
Here is an example of a Automated Credit Control Management Setup Cycle explained with reference to the numbered bubbles:
Here is a breakdown of the meaning and functionality behind each of these setup configuration steps:
1. Step Name: Your uniquely named step will allow for easy linking between the steps.
2. Description: A description is important to understand the intention behind the step being built, along with its expected outcomes.
3. Group: The group fixes the search to a specific field, allowing steps and templates to be separated in accordance with set goals and outcomes.
4. Previous Step Reference: The first step is to reference the previous step you are coming from (if this is not the first step in the cycle) by giving the correct instruction.
5. Previous Step List: List what the previous step was.
6. Additional Actions: List additional actions you expect (e.g., SMS, email, or other). In this scenario, create a task, as the medical aid has been due for 30 days by the time it changes to this state. Therefore, manual intervention is required to determine whether the claim can be resubmitted due to human error or is now a patient-liable account. This is initiated by generating a Task.
7. Stop Automated Process: As this account is moving into manual intervention, the automated process may end.
8. Cycle End Reference (Standard): The end of the cycle state name is referenced.
9. Conditional End (Paid): However, if the account has been fully paid in the evaluation interim, the automated process may end.
12. Cycle End Reference (Alternative): The end of the cycle state name is referenced.
13. Section Activation: Any sections which are relevant to your practice can be activated and defined.
14. Line Item Customisation: The defined line items can be removed or added at your discretion.
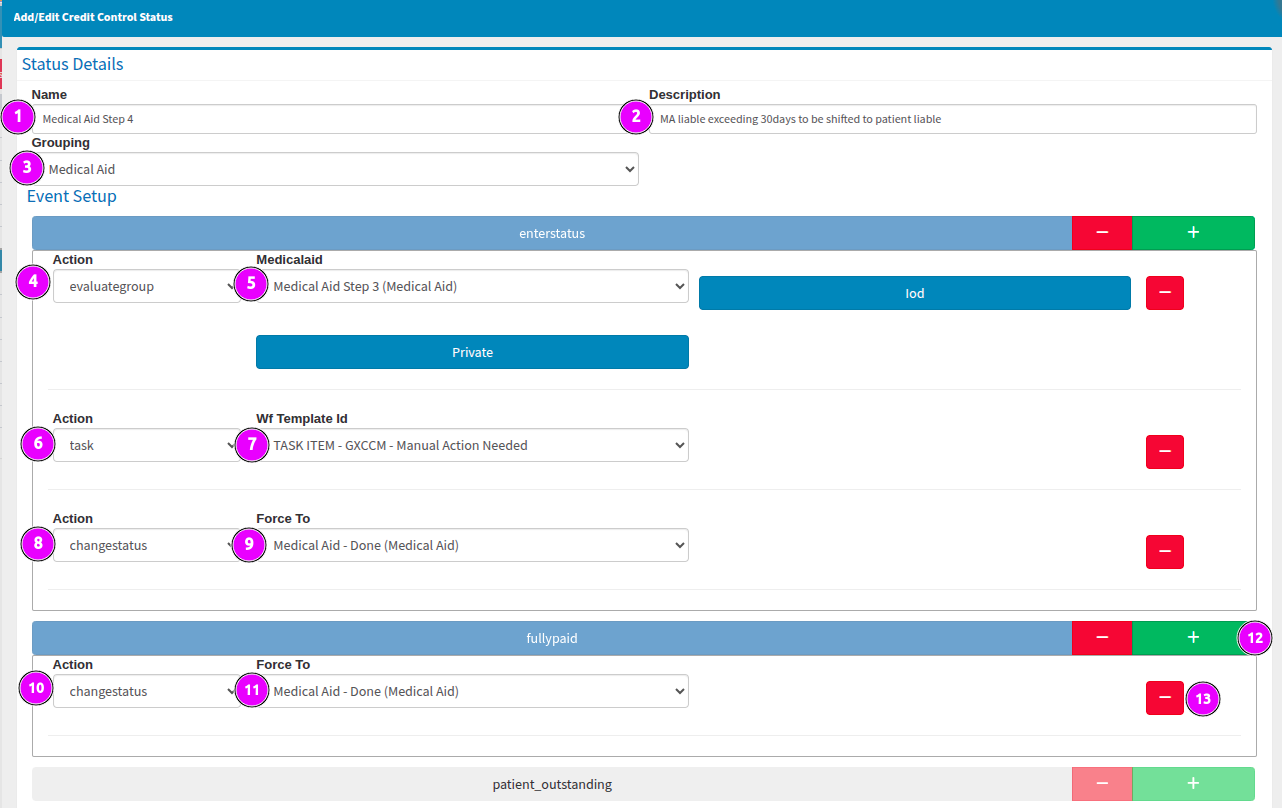
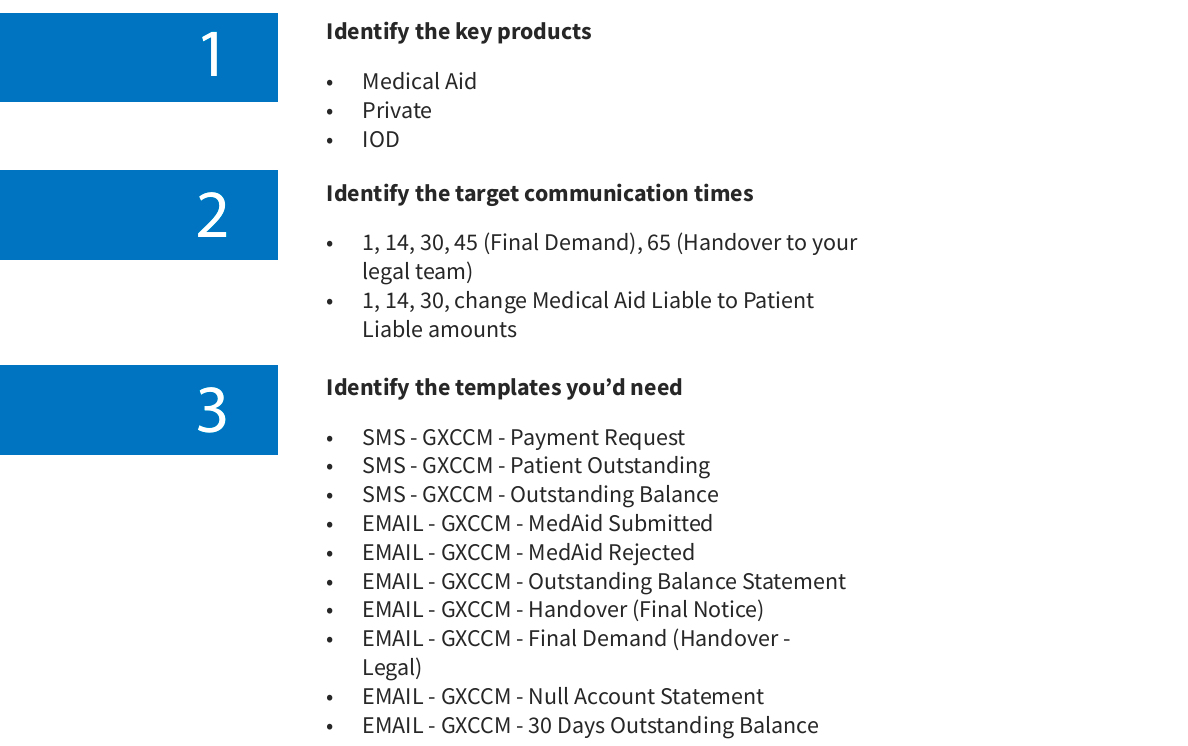
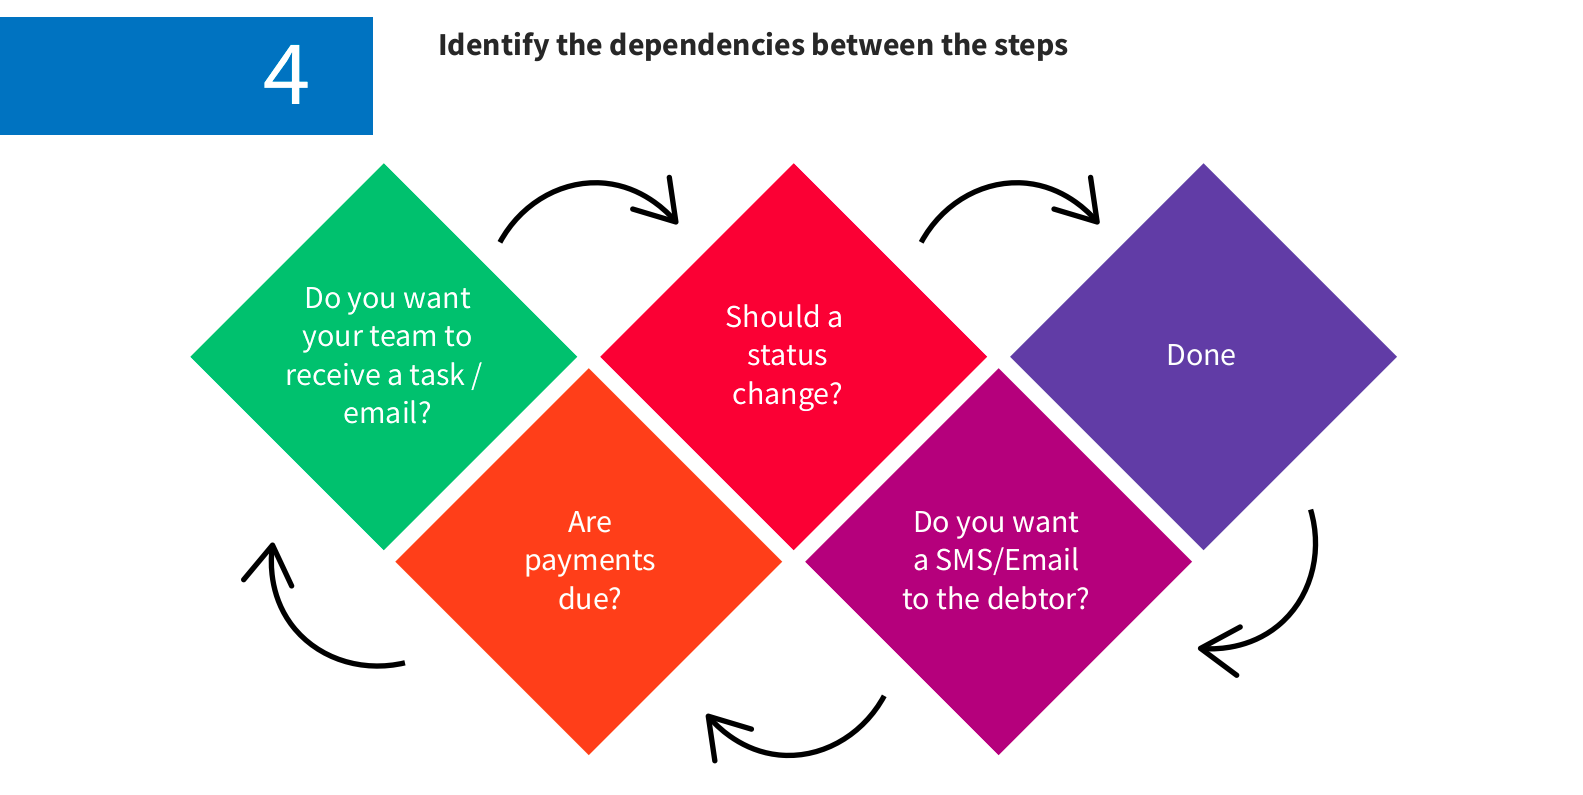
Mindmap Brainstorming the Automated Credit Control Management process feature set up for your practice