Text size
Line height
Text spacing


"Technology is most powerful when it becomes invisible in the service of patient care."
Use these guides to turn GoodX into your practice's greatest silent partner.

What is the “AI GoodXpert” feature?
The AI GoodXpert is a powerful assistant integrated directly into the GoodX software suite, functioning as a real-time AI scribe that streamlines clinical documentation. By turning voice recordings or text prompts into context-aware medical notes, this feature significantly reduces practitioners' administrative burden. It can also automatically generate detailed reports and assessments from recorded clinical observations, eliminating the need to manually search patient files for relevant data.
While the AI GoodXpert is designed to provide proficient clinical support and relevant content, it is not a diagnostic tool. Healthcare professionals must review all system responses to verify accuracy and clinical relevance before finalising any patient records ofinalisings.
Please note that AI GoodXpert is an optional, premium service that requires an additional subscription fee. Similarly, certain features within the credit control management system may incur extra costs. For example, Voice over IP (VoIP) calling is an optional add-on service that requires a separate sign-up and subscription fee, whereas your standard GoodX installation agreement governs SMS rates.
What is considered and used by the “AI GoodXpert” feature?
The GoodXpert button is only available on specific Workflow Events where the AI functionality can be utilised to interpret information from voice and text transcriptions.
The system can build a comprehensive patient file and history by utilising audio recordings and context linked to the relevant clinical form. If there is specific information you would like the AI to consider that is not currently being captured, please consult your GoodX liaison to discuss feasibility or alternative solutions. For manual data entry, a built-in spellchecker is available to assist during rushed typing. Ultimately, output quality depends on input, as more detailed prompts to the AI GoodXpert will produce a more comprehensive and balanced note.
GoodXpert serves as both an intelligent clinical assistant and a clinical scribe within the GoodX system. While your voice recordings must be captured in either English or Afrikaans, the AI can transcribe and seamlessly translate the audio into another preferred language if required.
Remember that the AI's output is only as effective as the manual prompts configured in your workflow event templates. All prompts are manually integrated for the AI to follow and apply to your workflow events using the audio transcriptions from your recordings.
Because of this manual customisation factor, please allow time to review, modify, and refine these prompts over a few months (or longer) to ensure they are perfectly tailored to your specific practice needs.
Always thoroughly review the generated prompt results to ensure that the correct interpretation of the recording has been populated before you accept the response.
How can the AI GoodXpert feature be set up?
Given the intricate nature of this Configuration, we recommend that your GoodX liaison assists you with the initial setup. Select the "Configuration" option on your GoodX wheel and navigate to the "Workflow Event Configuration" tab.
Locate the clinical form template you wish to update or edit. You can either double-click the line item to open the template directly. Once opened, you can use the "+ GoodXperts Default" drop-down menu to select the specific information you want included in the final generated results of the forms. This capability is particularly useful when compiling detailed medical reports or creating formal patient referrals. From the "+ Settings" drop-down menu, you can choose how the AI feature is triggered within the system.
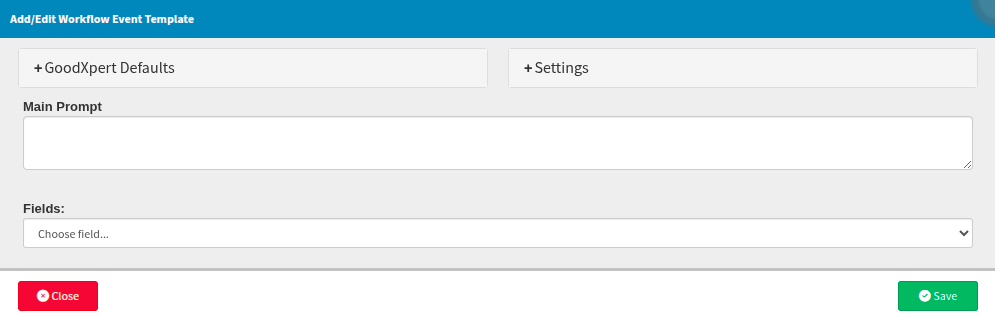
"Prompt" means the practitioner must initiate the action manually by selecting the GoodXpert button. "Auto" means the template is automatically applied; the practitioner only needs to accept the response to proceed, or select "Generate" to trigger the required actions and then accept the response if it meets their needs.
Any editing and corrections must be made directly on the form after accepting, as you cannot edit text within the GoodXpert feedback field itself. Once accepted, the response will populate on the letter for final review and completion. Adding your signature will then auto-complete the form.
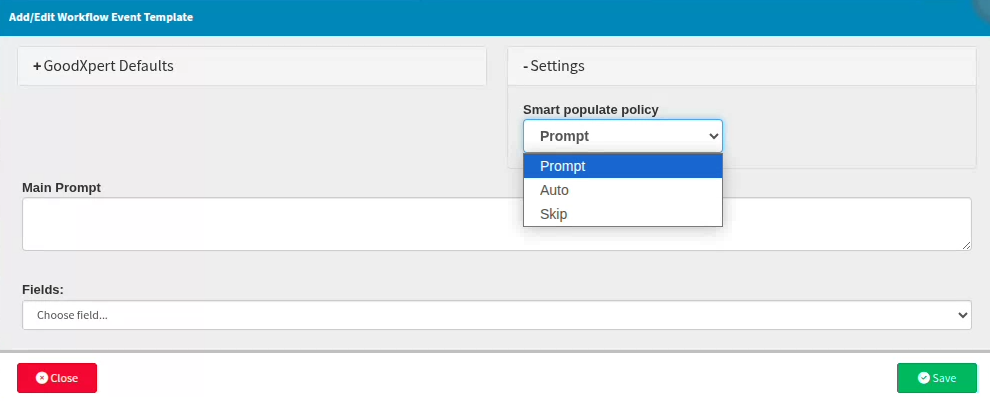
Alternatively, based on your GoodX software version, select the checkbox to the left of the form and click "Open Row" to view the current setup, or double-click on the form of interest.
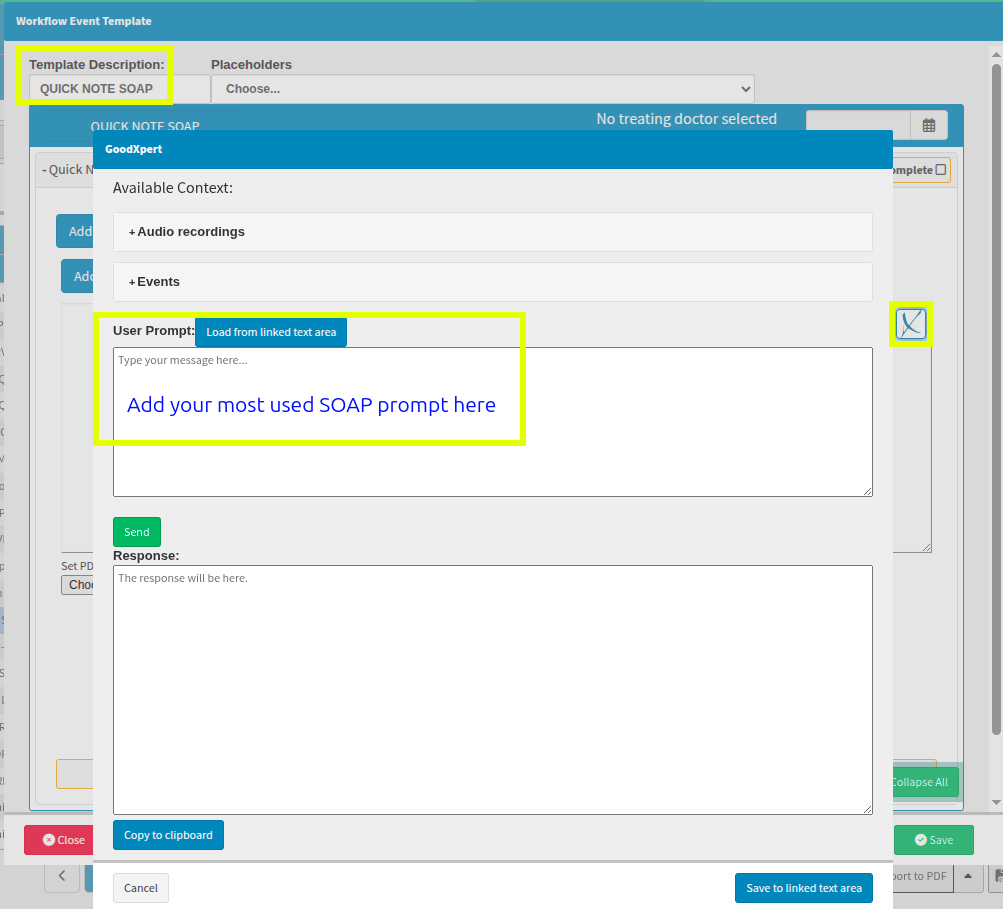
This example shows how SOAP notes, consisting of the Subjective, Objective, Assessment, and Plan components, are completed within the examination clinical form.
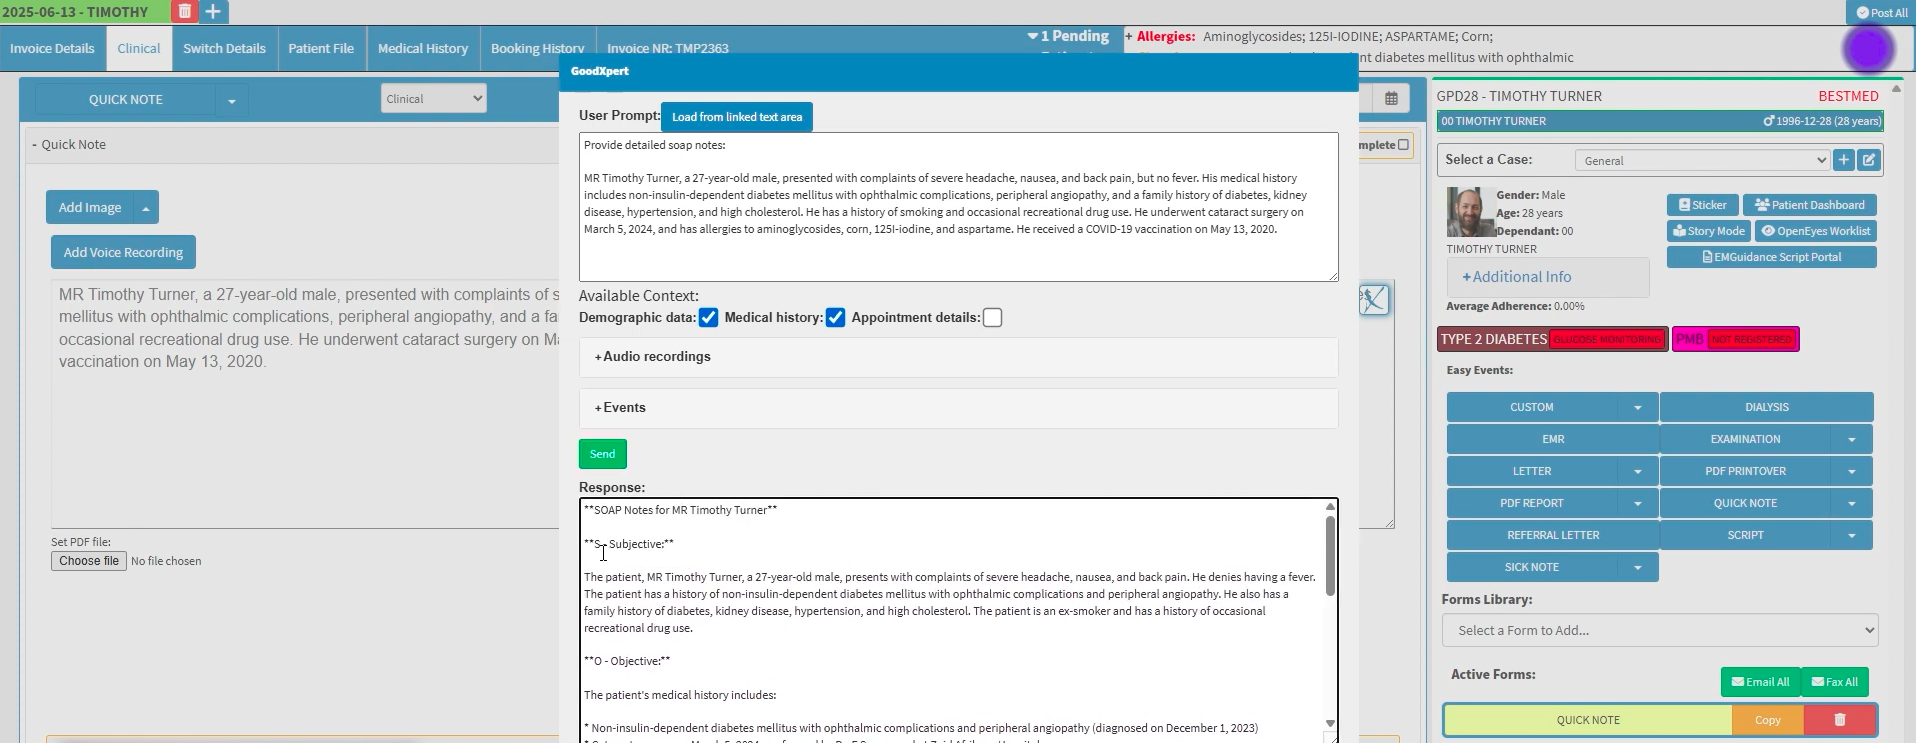
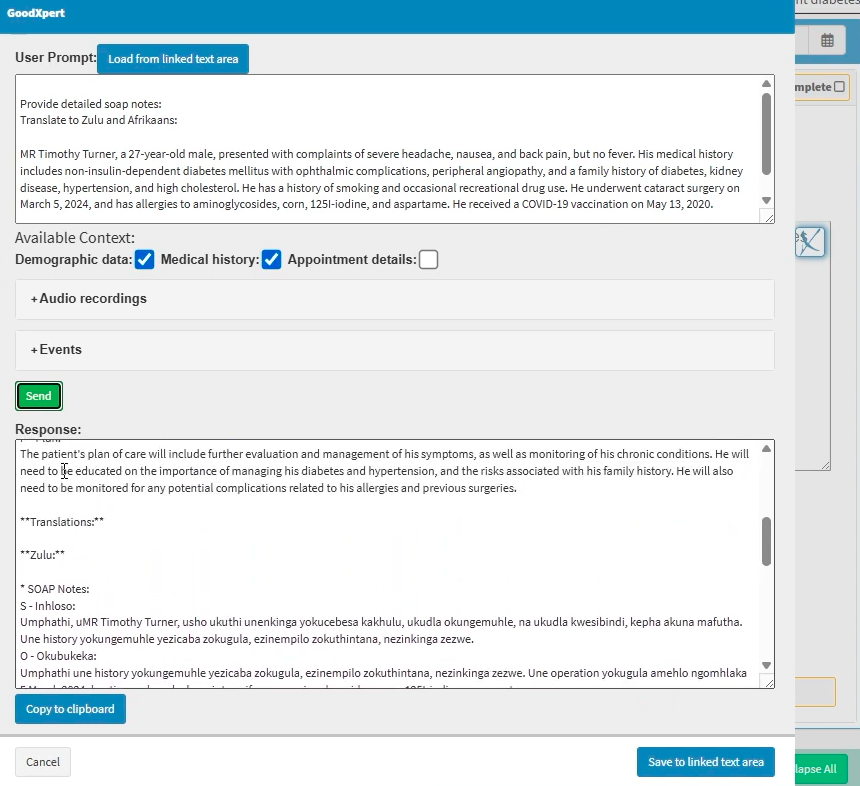
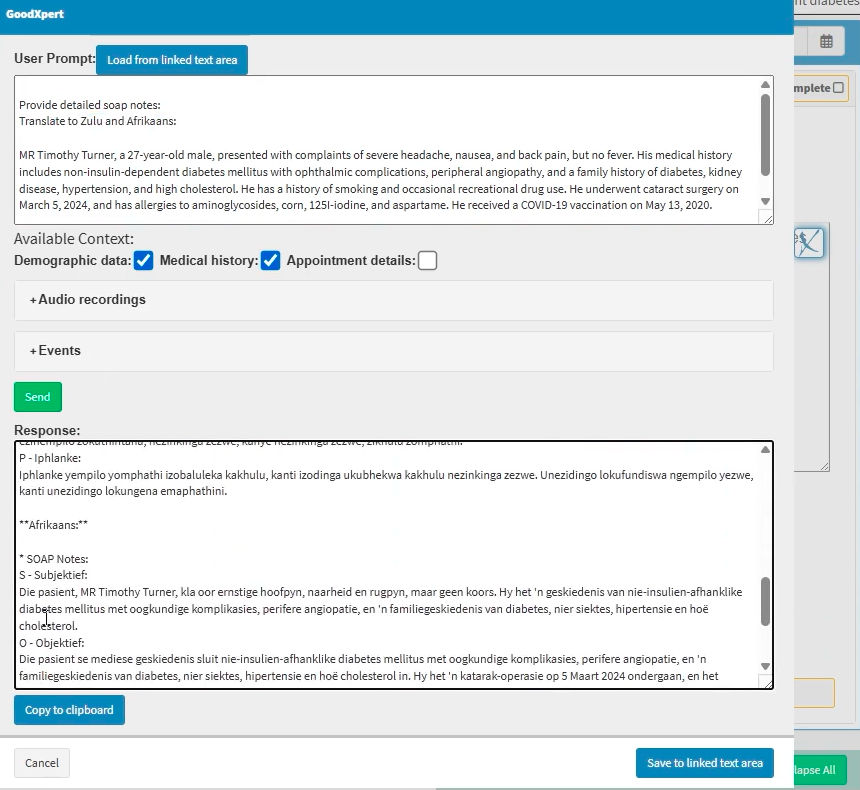
You can request that the generated results be translated into your preferred language if your primary language of operation is not English.
Zulu translation example
Afrikaans translation example
How to use GoodXpert only once on a patient?
Utilising GoodXpert directly with a patient file or at the patient level—rather than from the workflow event setup window—means that these configurations and changes will not be saved for future use. Any actions completed in this manner will apply solely to the single form you have opened for that specific patient.
Select the blue GoodXpert "X" button to open the prompt box, where you can define the limitations on which clinical notes the response should use. These limitations are unique to the specific type of clinical form you are currently working on. The prompt section is designed to direct the AI, so please clearly type the exact instruction or the specific outcome you require from the report or form.
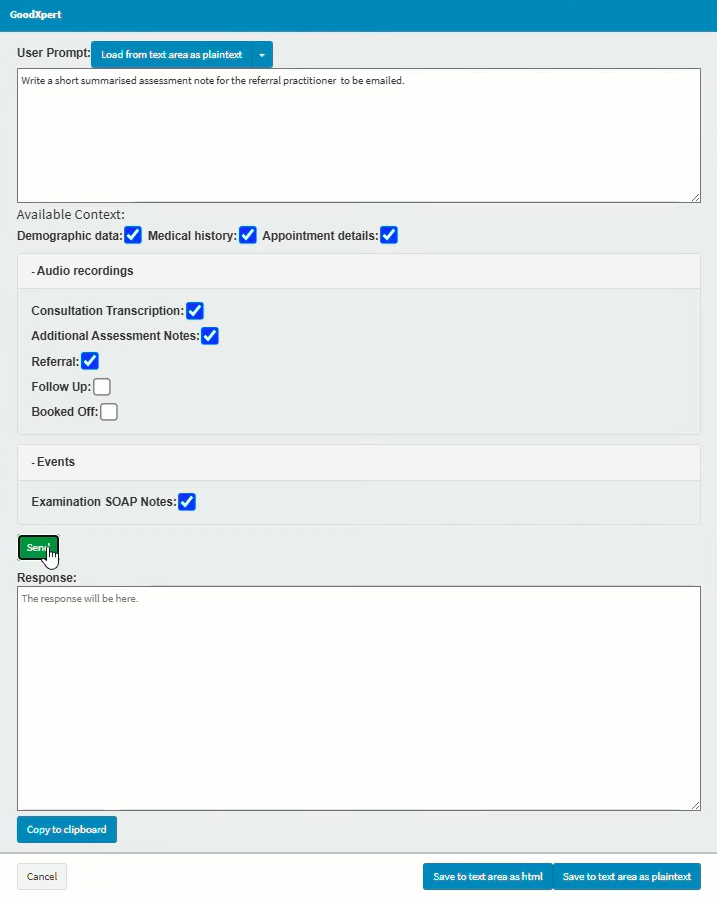
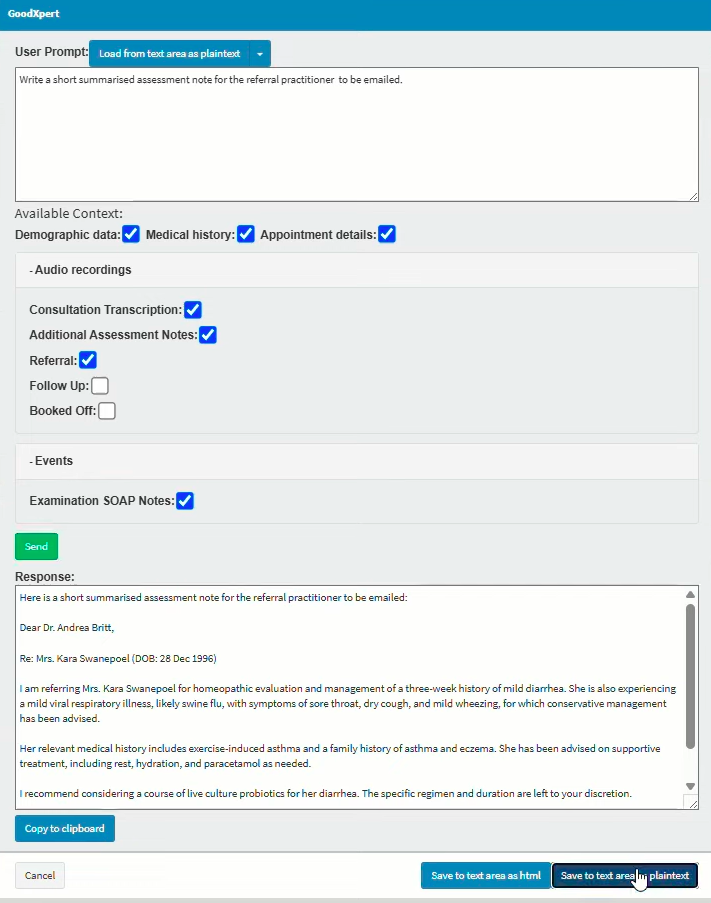
You can copy the recording transcript into the user prompt section along with the prompt to action.
Once you have selected the "Send" button, the AI GoodXpert will generate a response for you to review, copy, and apply. The "Copy (Save) to clipboard" button allows you to copy the generated text and paste it wherever required. It is a good habit to select this option first before moving forward to ensure your response is saved to your clipboard.
You can paste the text by pressing "Ctrl+V" or "Ctrl+Shift+V" on your keyboard when your mouse is in the correct text area, or by right-clicking with your mouse and selecting the paste option from your device's default menu.
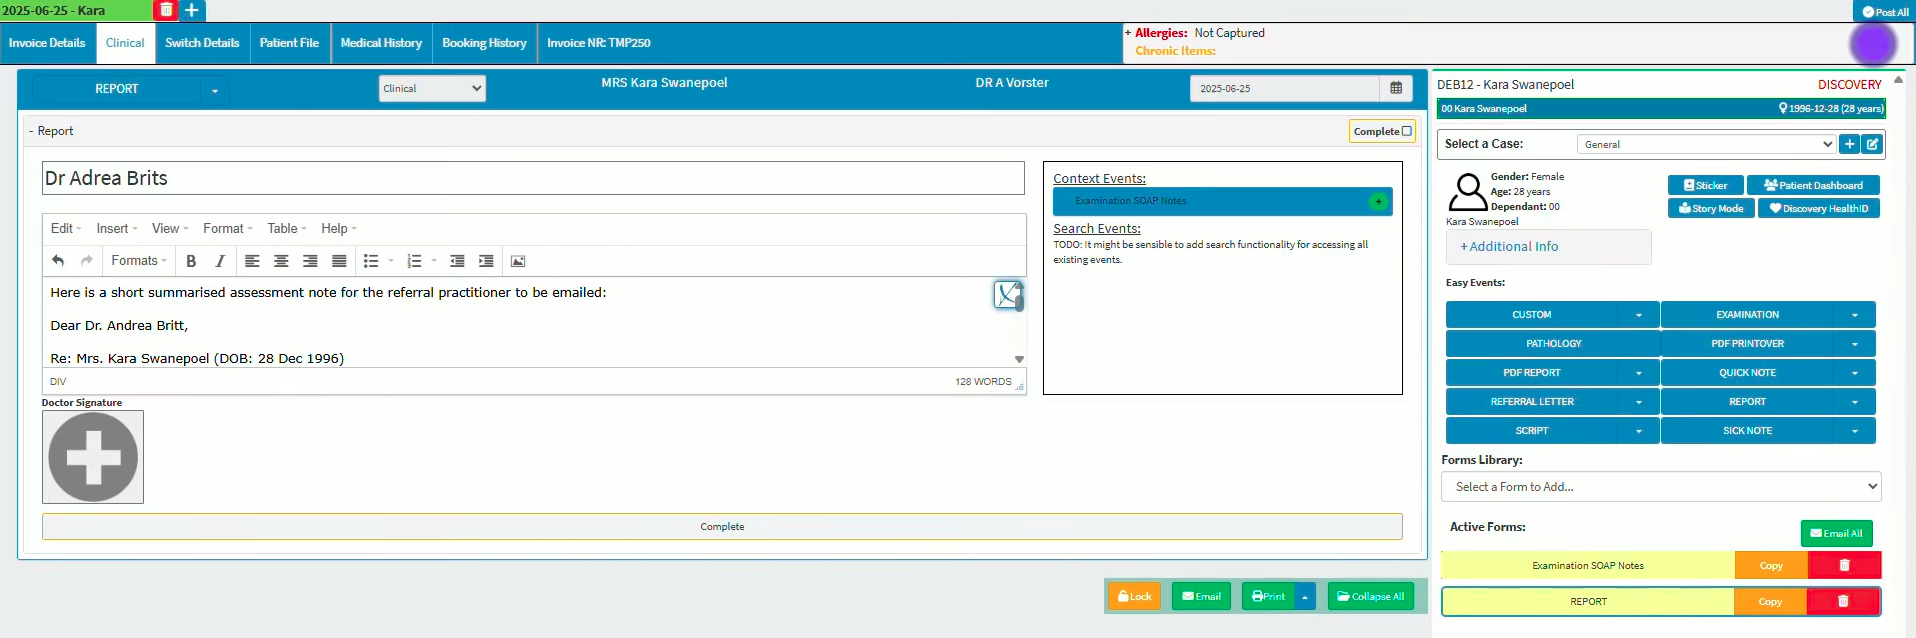
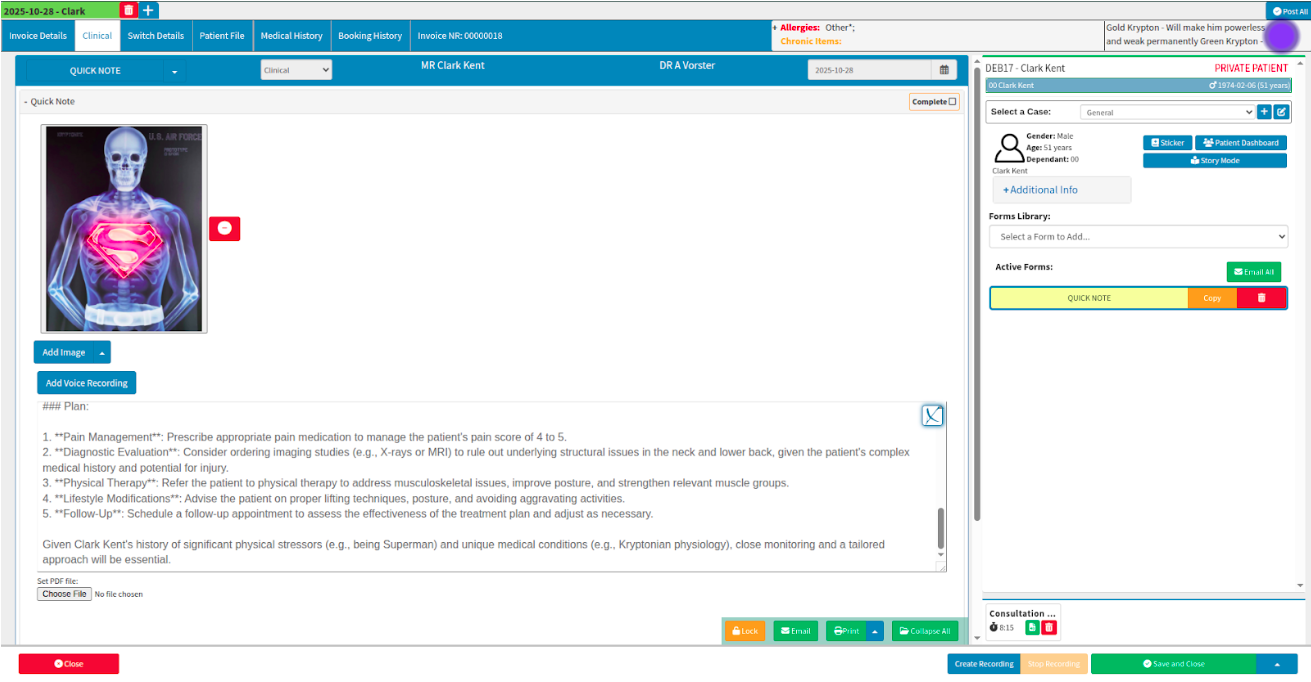
Selecting the "Save to text area as plain text" or "Save to linked text area" button will transfer the populated information directly into the specific report or text area from which the AI GoodXpert button was initially activated.
On this screen, you may make changes or edits. Once completed, you can mark the note or report as complete. If you subsequently realise that additional data need to be included, or if you want GoodXpert to provide alternative or further feedback, you can re-open the GoodXpert screen by selecting the blue "X" button.
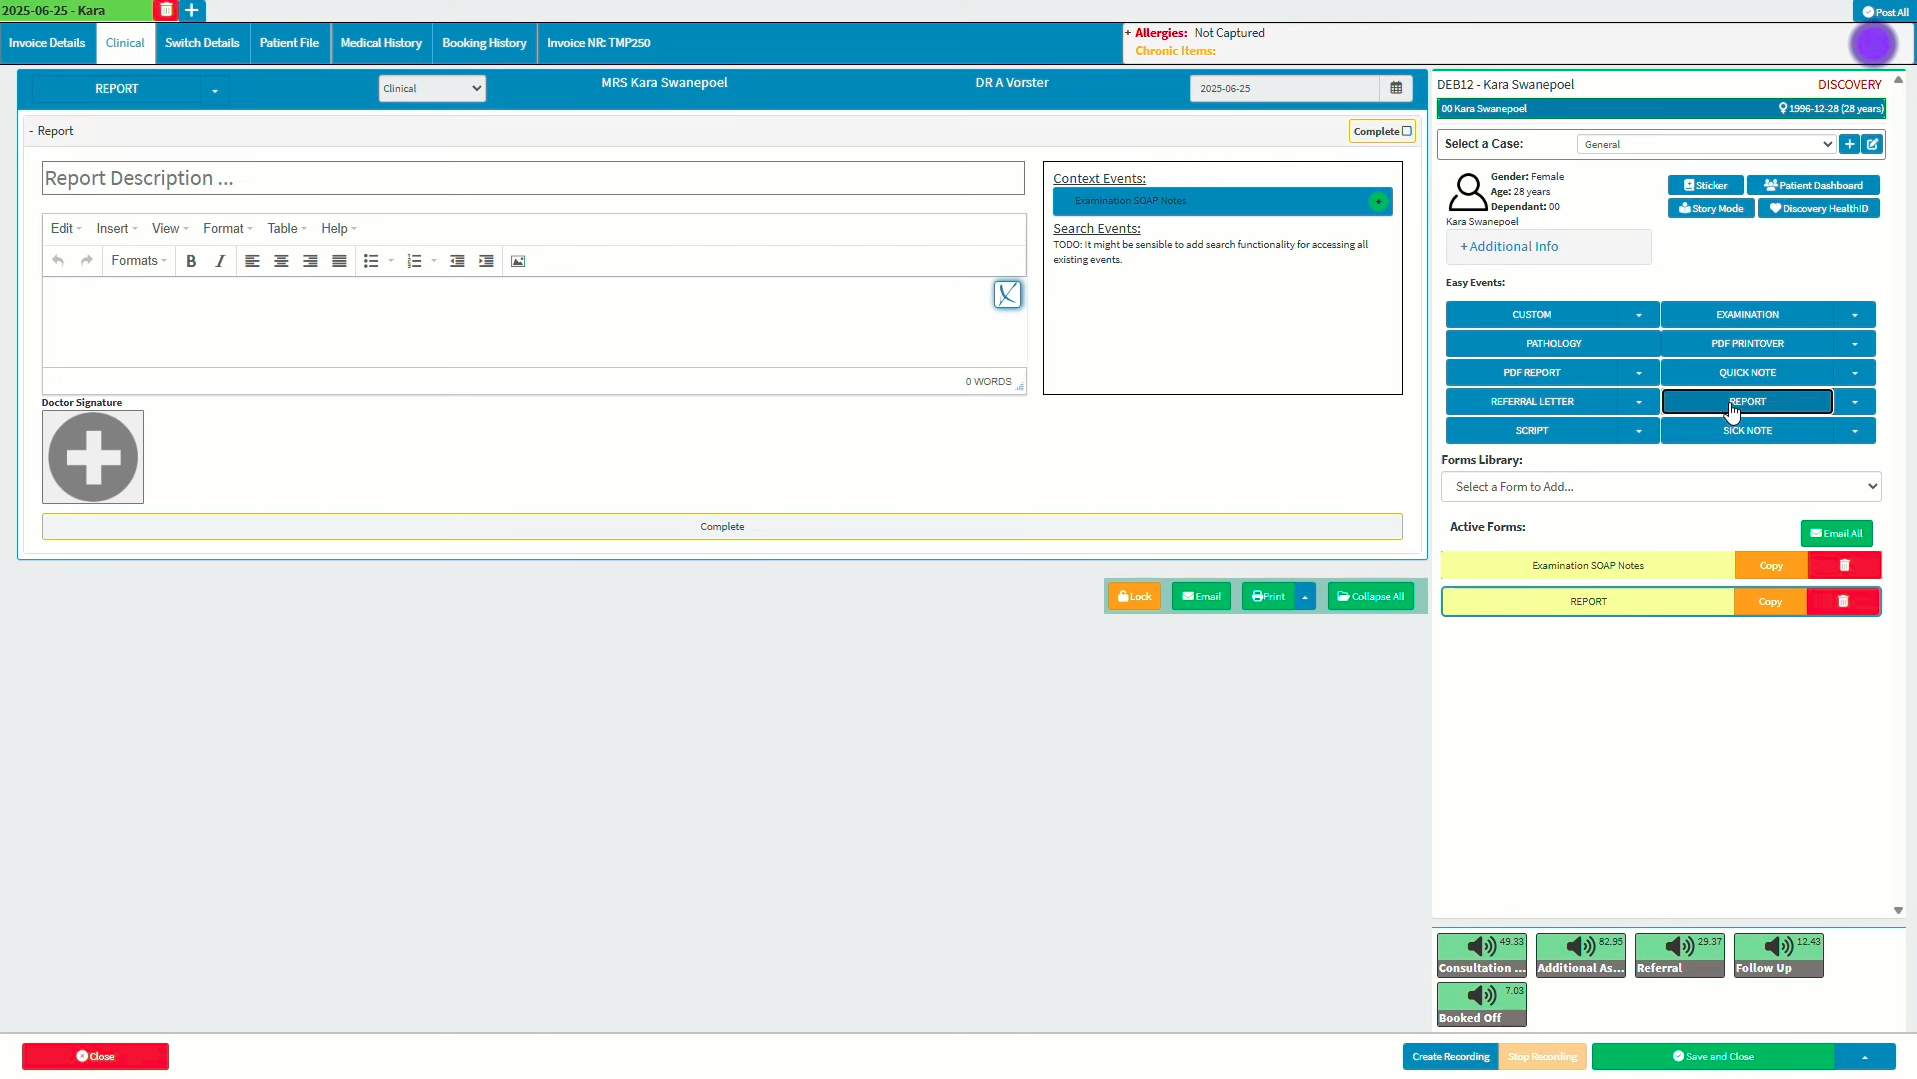
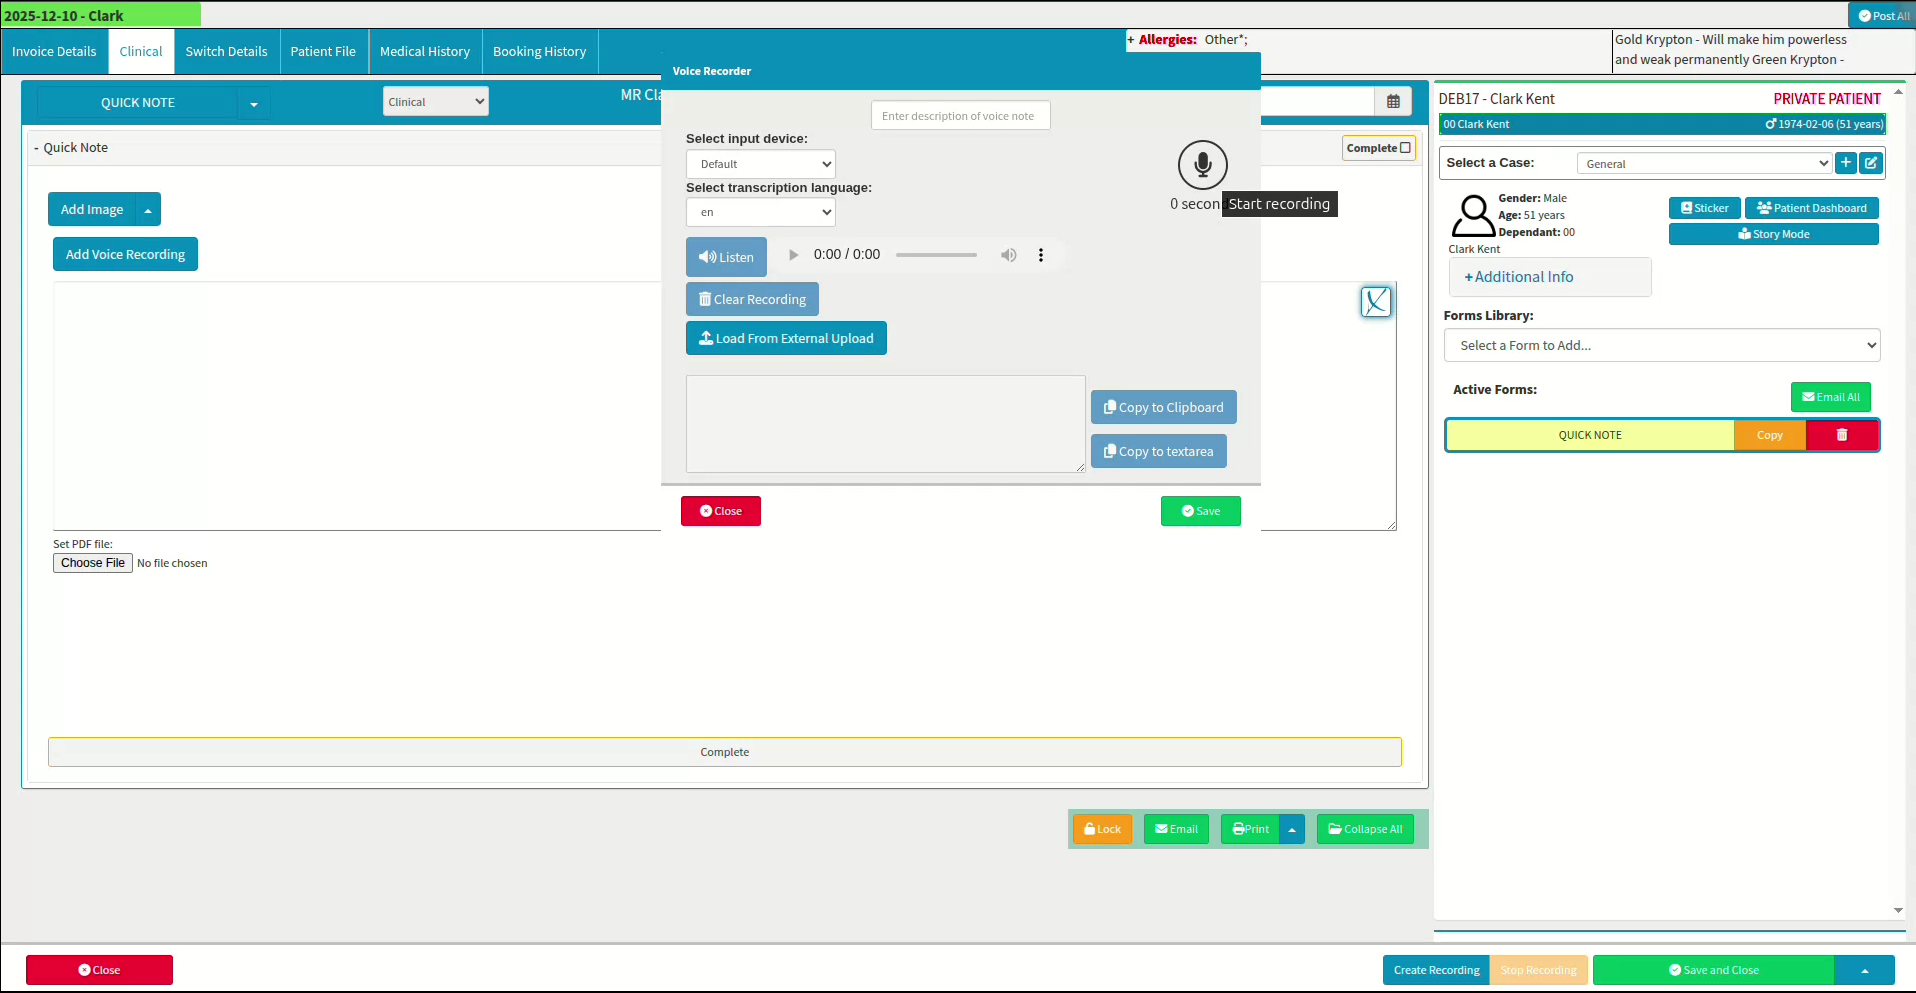
Example of manually using GoodXpert in the “Quick Note” clinical forms
Once on your patient file section, navigate to the library for the relevant clinical form. You can select quick notes directly from your clinical forms listed, or from the shortcut in the side panel if it has been configured that way. The report will be blank by default, and selecting "Start Recording" will open a new, blank voice recorder interface where you can manage audio permissions, rename the file, and begin recording. Ensure the selected language matches the language spoken during the session (e.g., en for English, af for Afrikaans).
Rename sessions by date, purpose, or a key aspect of the visit. This makes it easier to select the specific voice notes relevant to the prompts you want AI GoodXpert to process. Where you need the audio transcribed to text, select the "Transcribe" button. Audio must be transcribed to be used by the AI prompts set up by the practitioner.
Each recording can be reviewed by selecting "Listen", and the playback speed can be increased or decreased as required from the mini-menu next to the audio player.
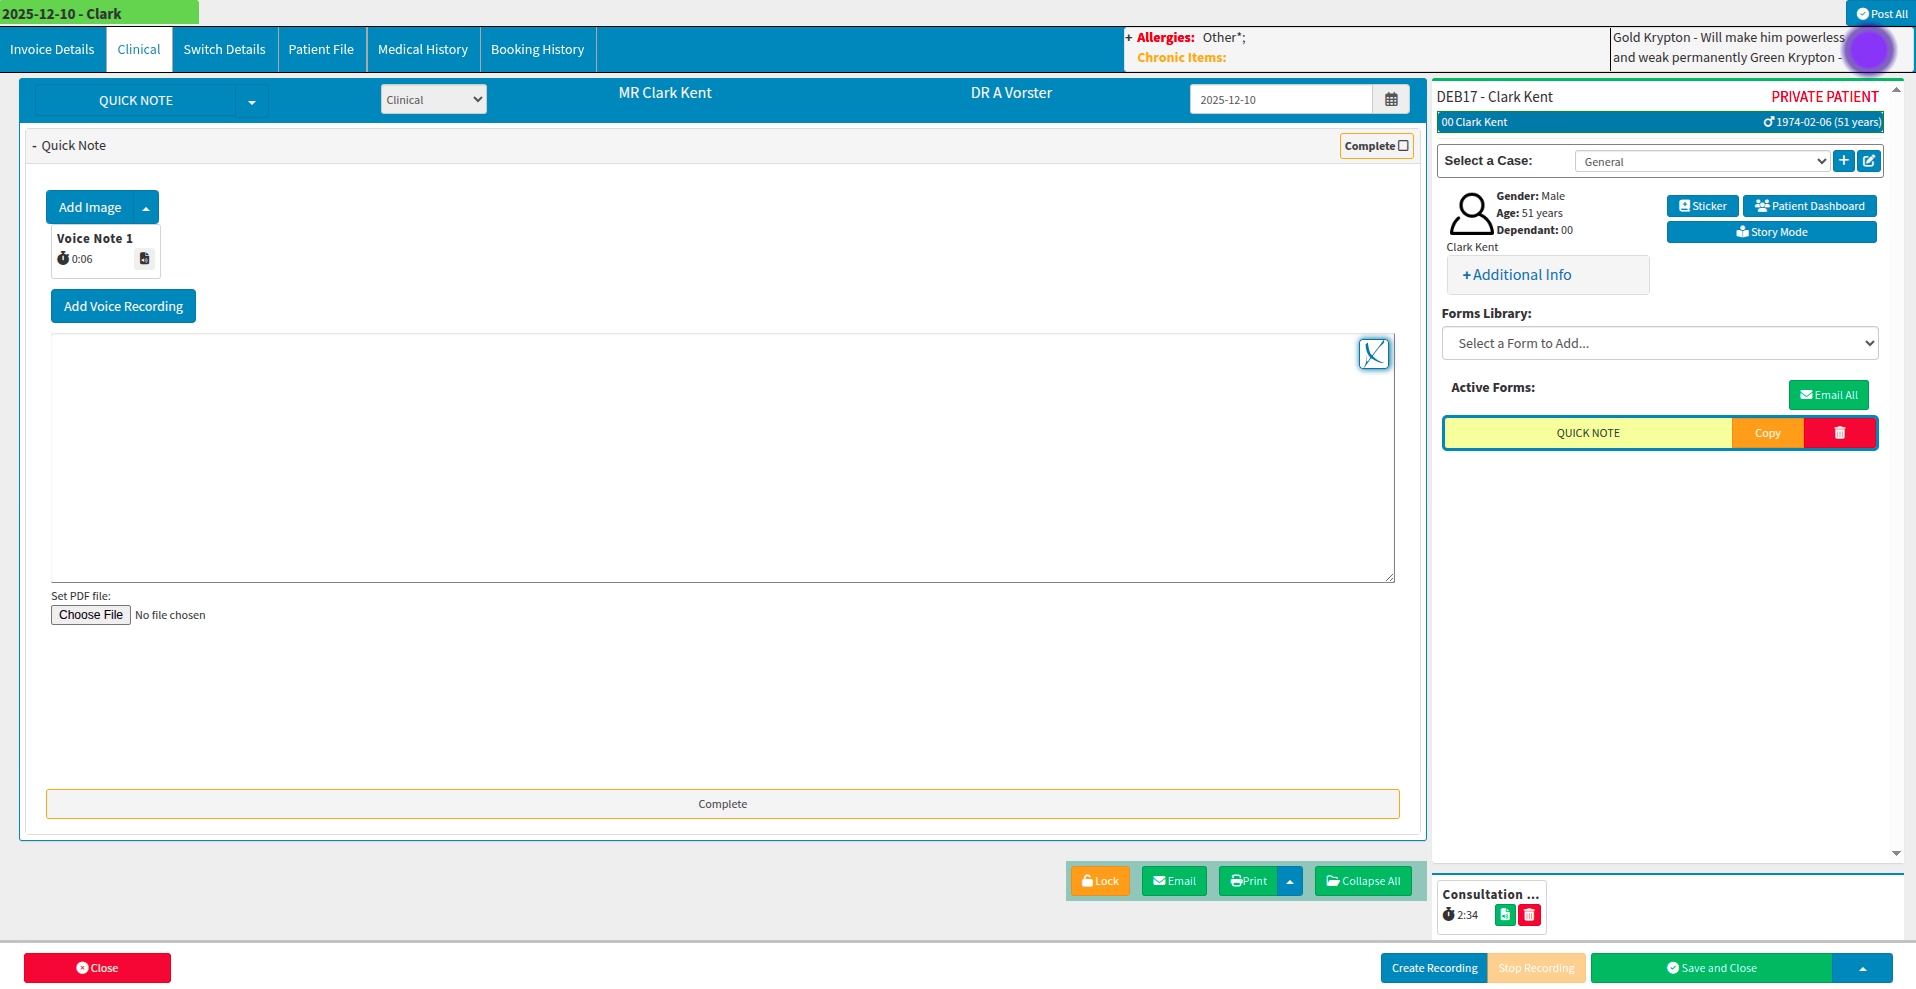
Any voice recordings linked to the patient will appear at the bottom of the clinical side panel and can be incorporated directly into your GoodXpert AI request.
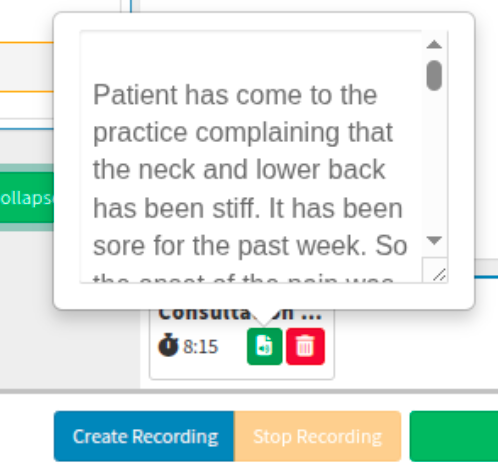
Hovering over the green notes page lets you read the transcribed session or notes you left on the session.
As soon as you close the audio clip, the recording will appear in the clinical side panel. Where GoodXpert is required for additional assistance, select the blue "X" icon, which represents the GoodXpert action.
How to make or prevent edits to the GoodXpert accepted responses?
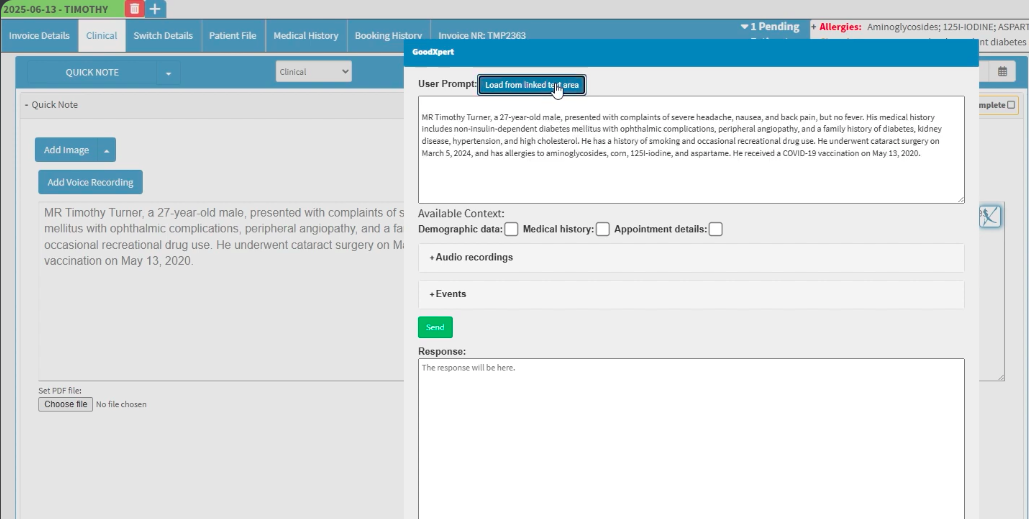
When information is already present on the form or note, the GoodXpert button can be selected to make additional alterations. Although the screen appears blank when initially opened, selecting the "Load from linked text area" button will repopulate the previous response directly within the user prompt area.
Any completed information can be marked with "Lock", which prevents further editing of the entry to ensure strict compliance with privacy laws like POPIA or HIPAA, whilst supporting traceability in patient care and maintaining legal accountability.
Locking the form establishes an audit trail and ensures that the information accurately reflects the practitioner's final decisions at the time of the consultation. To prevent accidental locking, the user will be prompted twice before the file is locked.
If needed, superusers or administrators can unlock a locked item. This process is recorded in the audit history to ensure the ongoing integrity of the medical records.
How is AI GoodXpert and AI prompt used together?
You can configure the clinical forms you use most frequently to pull patient details automatically by setting up the main document from your clinical form library.
To set this up, select the ConfigurationGoodX wheel. Navigate to Workflow Event Configuration, create a clinical form, and rename it to indicate its core linked services (for example, "AI Referral Letter"). Be sure to provide as much detailed information as possible within the Configuration so your intention is accurately received and processed by AI. Configuration AI prompts can be linked to clinical forms by selecting "Setup AI" on the relevant form. This is a single setup event per form, but you must repeat the process for individual patients if a different requirement arises for that specific form. Save any changes or additions you want to keep. The document will then auto-populate whenever it is called upon from the debtor library.
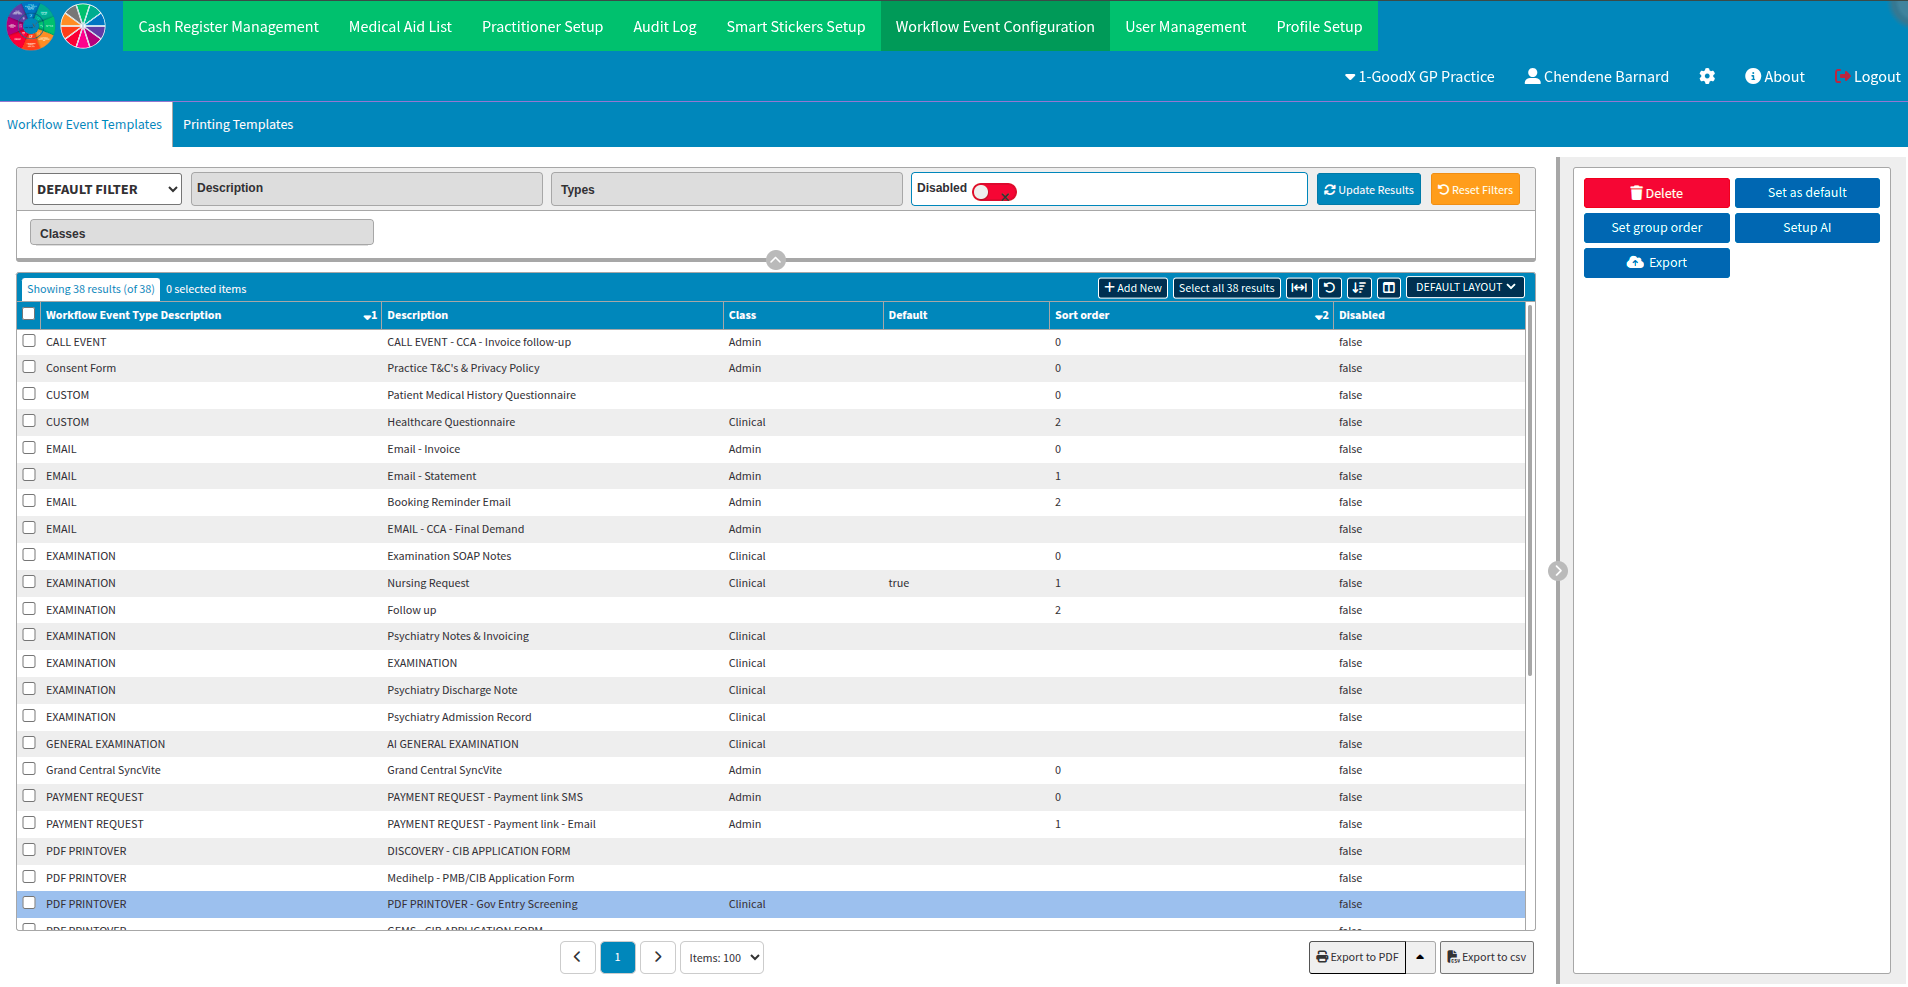
You can link AI prompts to individual areas within your clinical form. Please note this setup is time-consuming and requires attention to detail and testing to ensure the form functions to the practitioners' preferences.
Example of line item level AI Prompt linked to an Examination Clinical form
Below is an example of the AI line item prompt outcome after GoodXpert has transcribed the audio and applied the AI prompts. This outcome incorporates the audio linked to the patient, along with the specific fields selected for consideration based on the practitioner's setup.
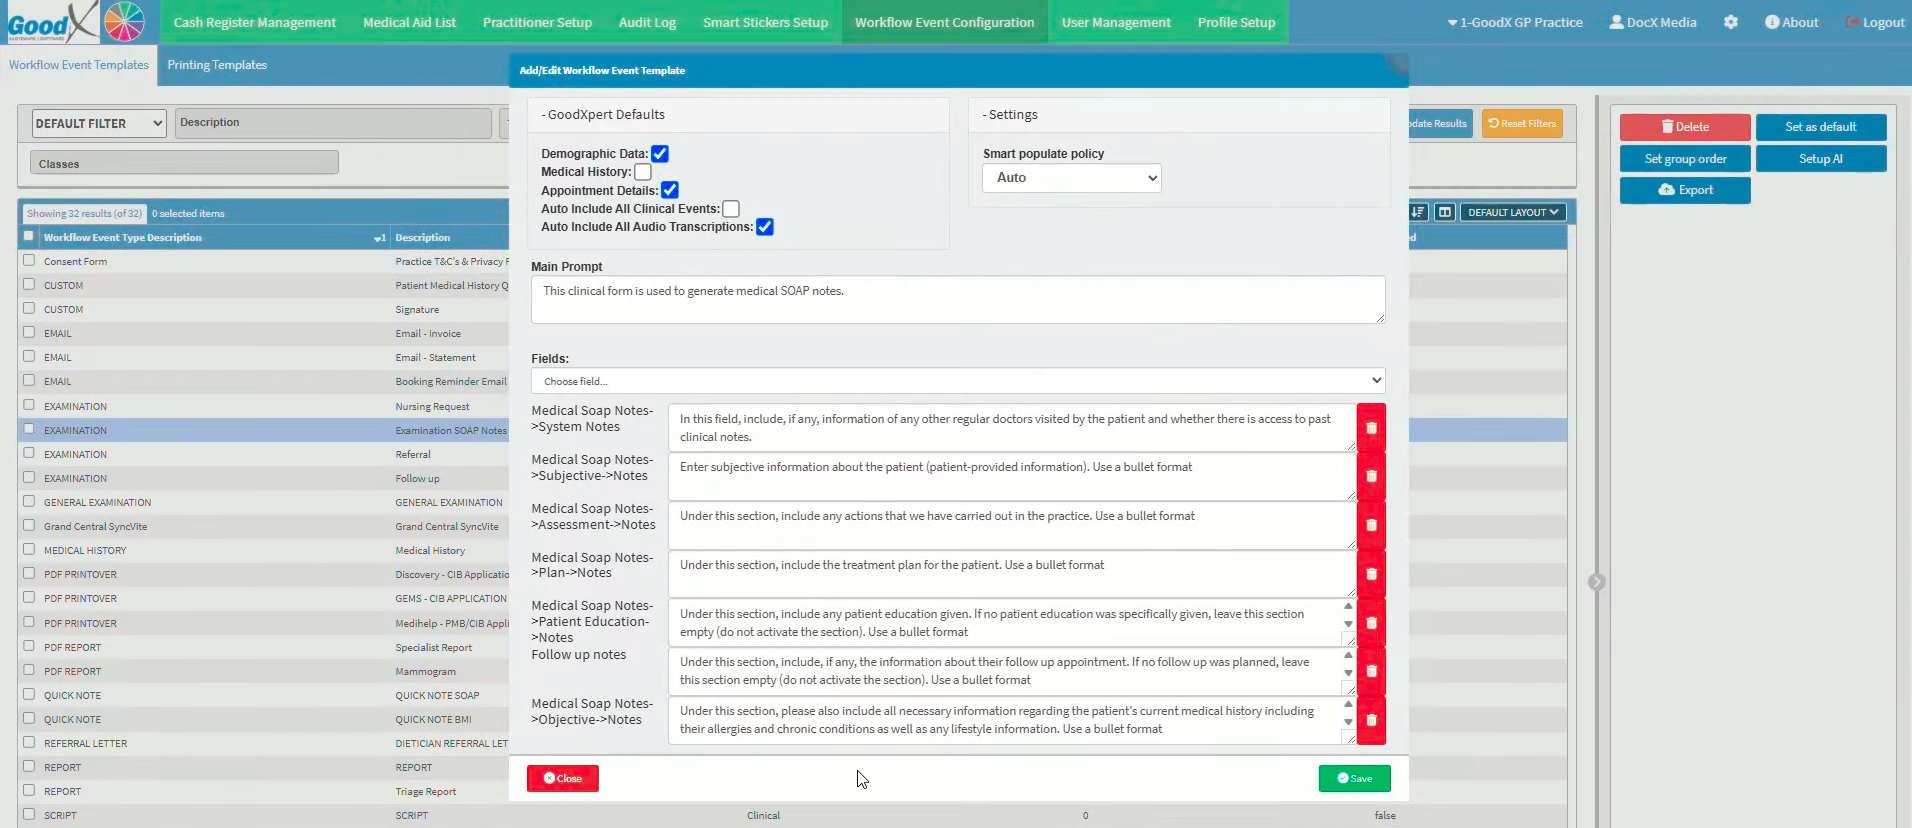
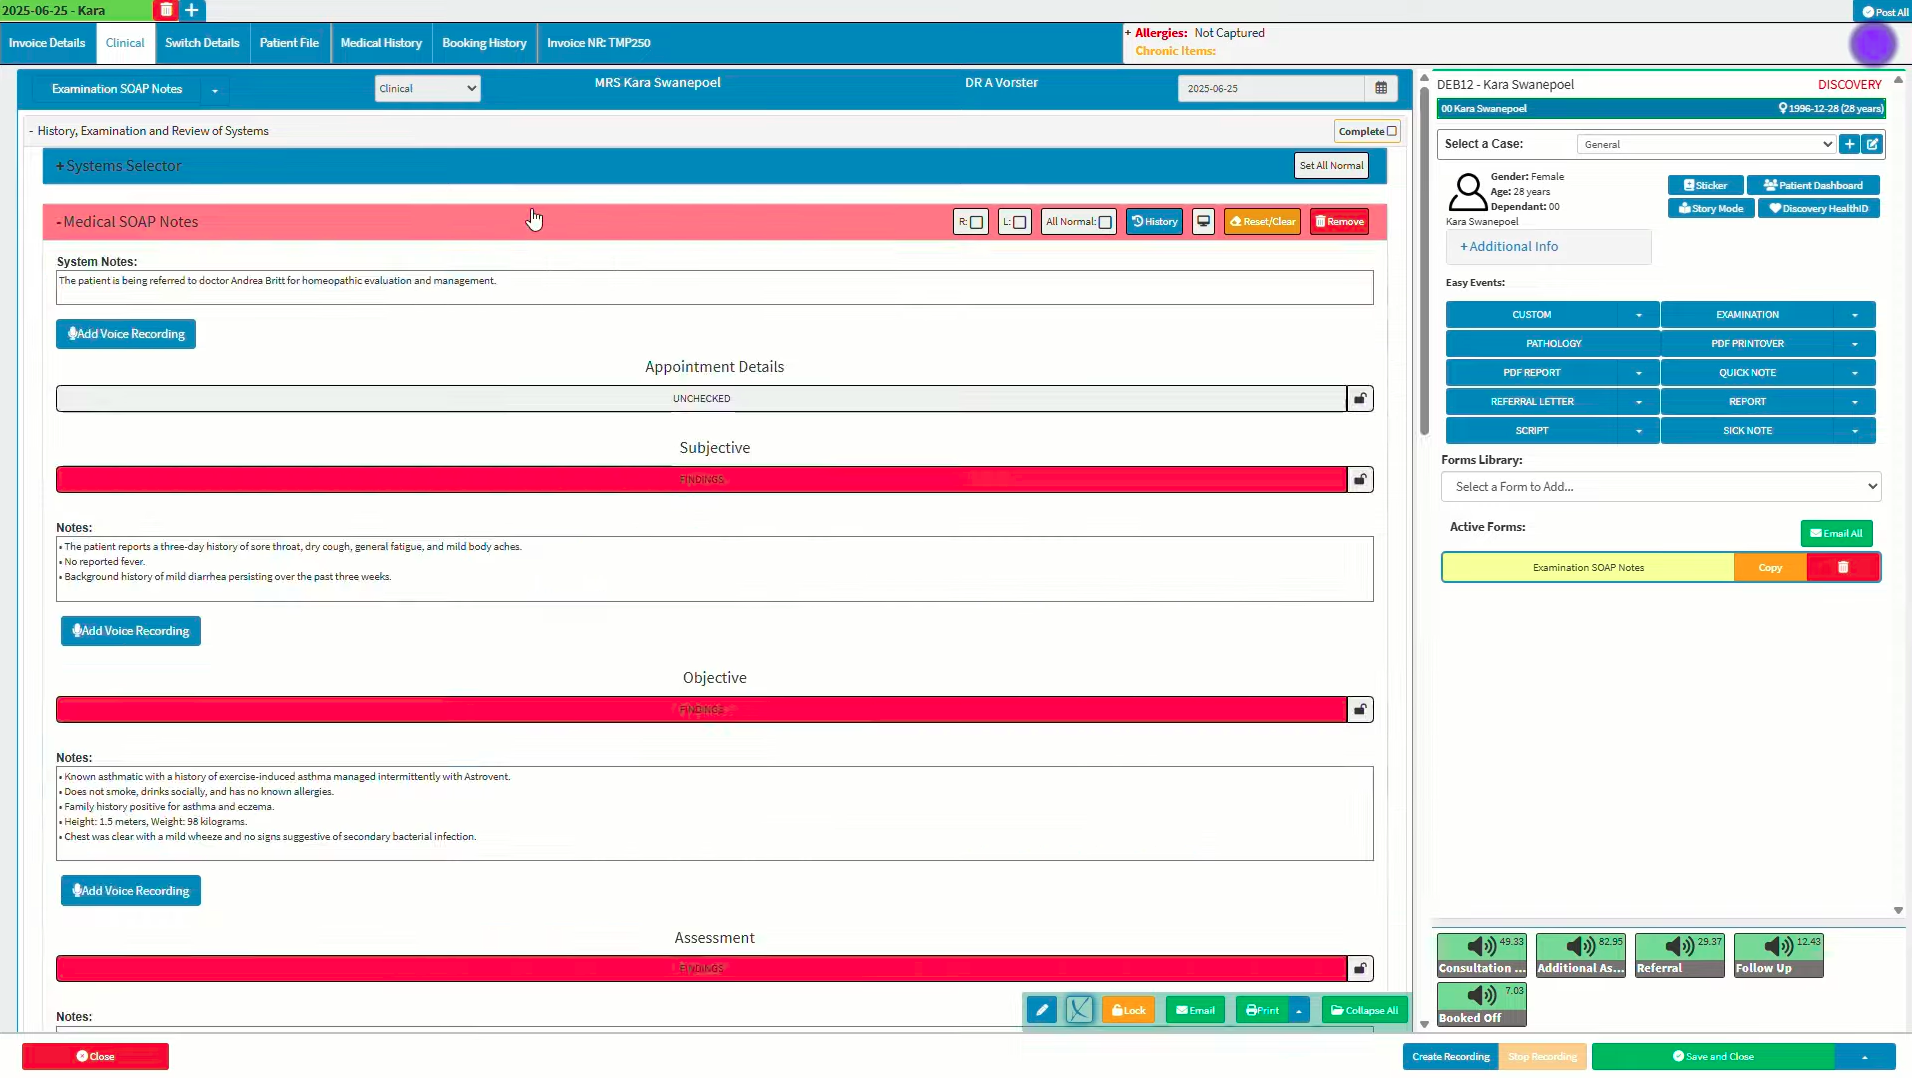
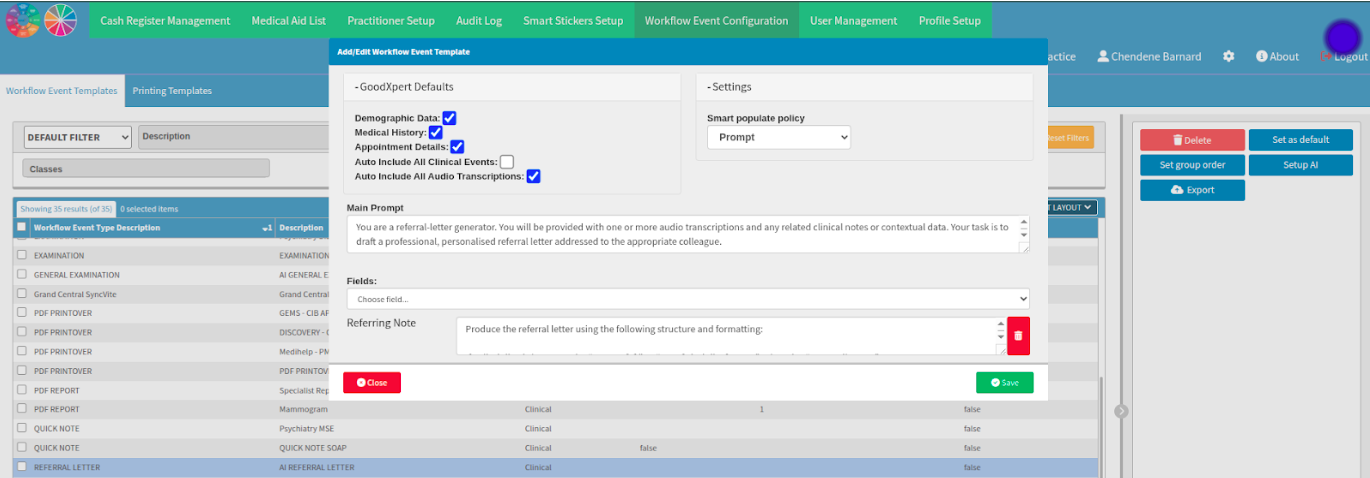
Example of prompts
Prompt hidden text example: "You are a referral-letter generator. You will be provided with one or more audio transcriptions and any related clinical notes or contextual data. Your task is to draft a professional, personalised referral letter, addressed to an appropriate colleague."
Referring note hidden text example: "Produce the referral letter using the following structure and apply formatting: If a discipline is known, write "Dear Dr [X]," or "Dear [Discipline] Team," otherwise "Dear Colleague,". Provide the necessary demographic information about the patient, including full name, age and gender. Provide one or two sentences summarising why the patient is being referred. Provide a brief medical history, including any chronic conditions and lifestyle choices, and key findings from the consultation or notes. Highlight any investigations or treatments already undertaken. Mention attachments (e.g. test results, imaging reports), if available. If his weight and height are both available, provide a BMI. If either is missing, provide only the data you have and do not mention BMI. Clearly state what you would like the specialist to assess or manage. Note any time sensitivity or follow-up requirements. Thank the colleague for their assistance. Ensure the final letter reads smoothly as a single, cohesive document.
Keep the prompt box simple and focused entirely on the current visit. Once you are ready, select "Send" for AI GoodXpert to provide you with a clear and accurate response tailored to your submitted query.
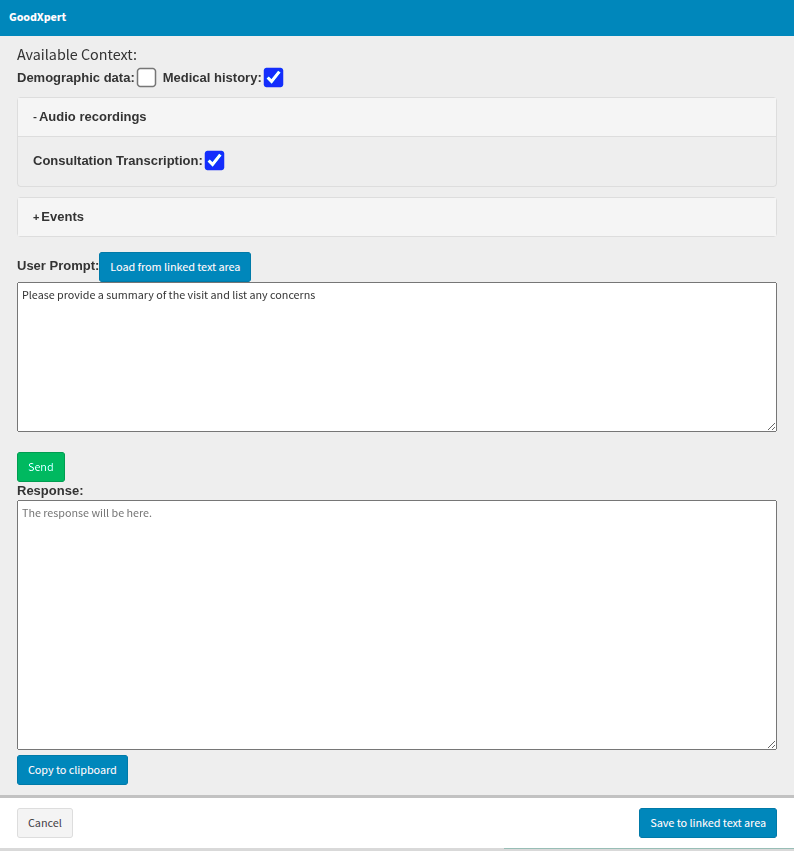
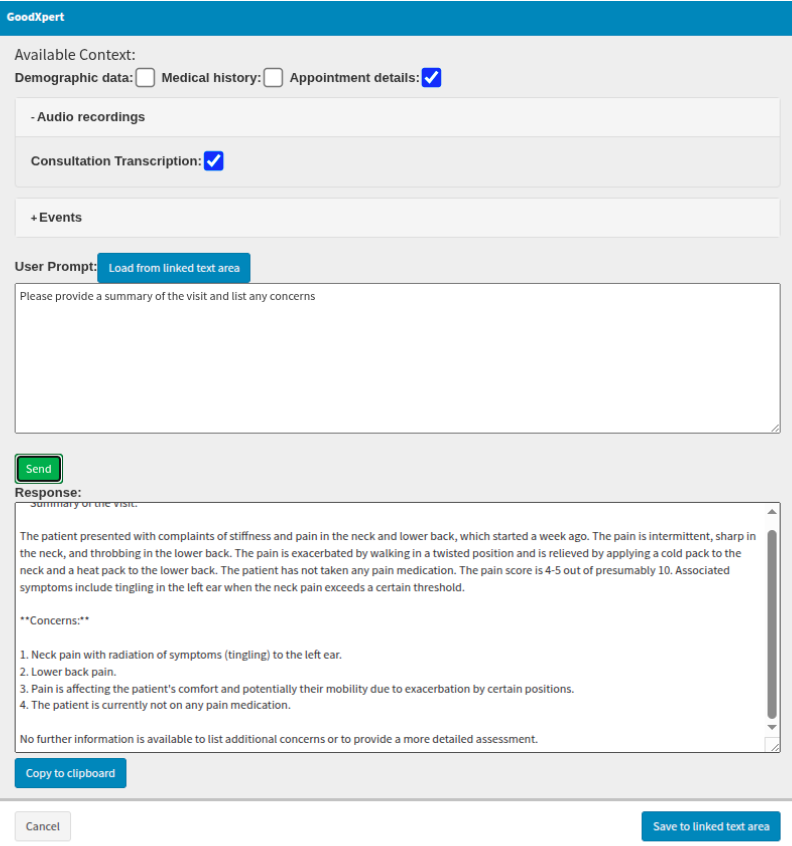
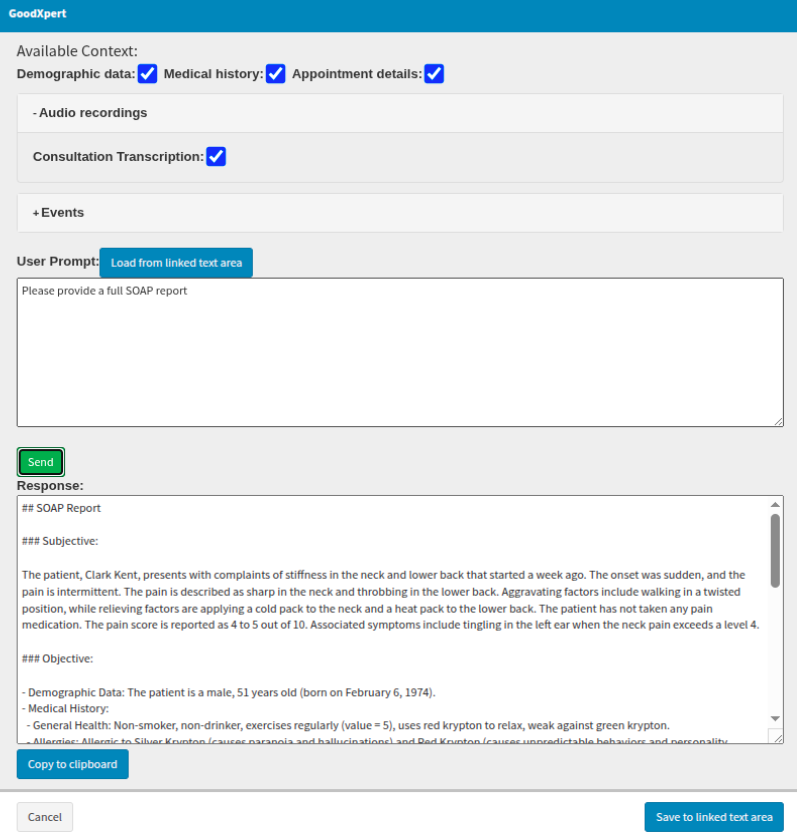
Alternatively, you can write a more detailed prompt and ask the AI to consider the patient's full details. Once completed, select "Send" for AI GoodXpert to provide you with a clear and accurate response tailored to your submitted query.
The information received can be sent directly to the current clinical document by selecting the "Save to linked text area" button.
Where to learn more about AI GoodXpert within GoodX?
The GoodX Click&Learn Courses https://courses.goodx.co.za/
The GoodX YouTube Channel https://www.youtube.com/@GoodXSoftware
The GoodX Learning Centre https://learning.goodx.co.za/
Please note these courses are only modules and are different from the Click&Learn courses. To learn more about AI GoodXpert, you can use these search terms:
| Date of Change | Changes | Editor |
| 2026 05 17 | Established Page | Chendene Barnard |
| 2026 09 22 | Spell-check review; removed temporary discrepancies. | Chendene Barnard |
| GoodXpert AI for Clinical Excellence

| GoodX Course: Patient Dashboard

| GoodX Course: Smart Sticker protocols

What is the “Smart Stickers” feature?
Smart Stickers are clinical protocols designed to identify essential patient care and priority details quickly. These indicators provide a clear, at-a-glance overview, ensuring critical information is immediately visible to support effective, safe patient management.
Smart Stickers enable practitioners to establish formal medical guidelines that outline specific clinical processes. These protocols guide the investigation of specific findings or dictate the appropriate methodology based on a specific patient scenario or diagnosis. By implementing these guidelines, the practice ensures a standardised approach to care that is triggered by the patient's unique clinical presentation.
Smart Stickers support bespoke treatment plan reminders and progress tracking, and deliver personalised plans and communications directly to the patient. These stickers can be configured to trigger an automated alert based on specific ICD-10 codes recorded, or manually assigned to a patient's record. To apply a sticker manually, navigate to the clinical screen and select the "Sticker" button located within the debtor clinical interface.
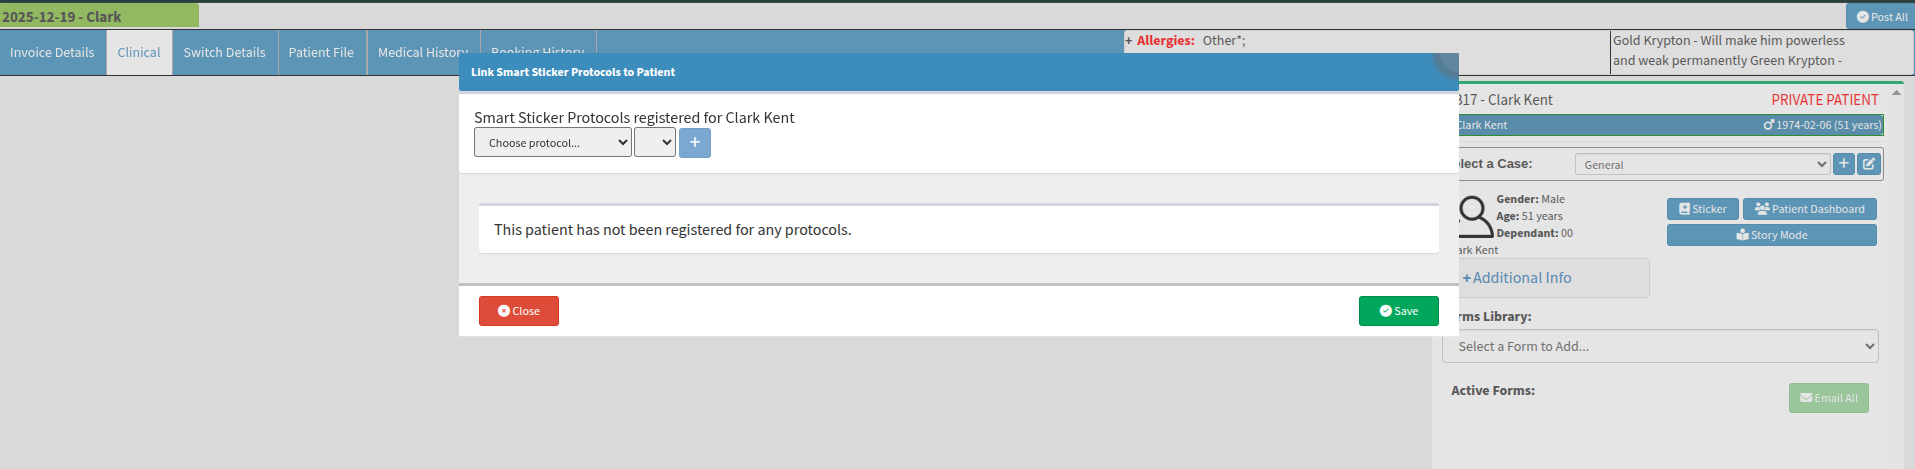
The dropdown menu provides access to all previously configured protocols and their associated statuses. Once you identify the relevant options, select the "+" icon to assign the protocol to the current patient's record. It is essential to select "Save" to ensure the protocols are successfully applied, as selecting "Close" will exit the screen without retaining any of your selections.
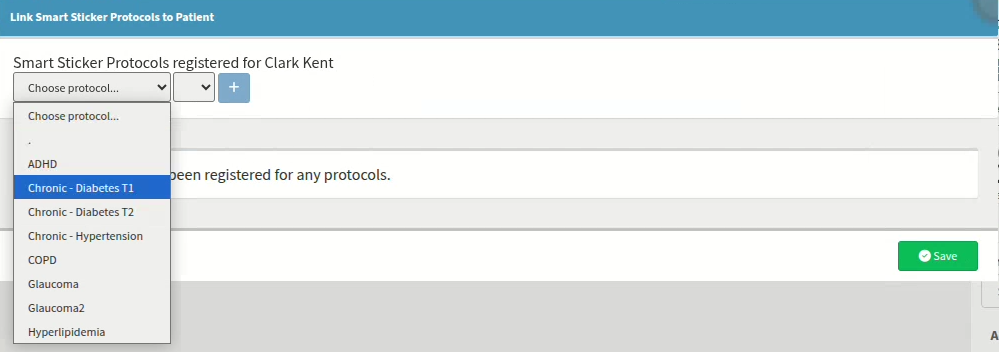
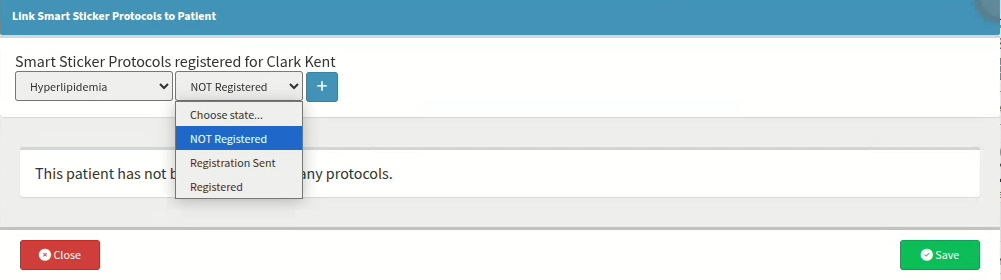
Similarly, you can finalise any sticker protocol to conclude the process and end any associated communications or tasks linked to it. When you initiate this action, the system will prompt you to confirm the finalisation; if you do not confirm, the protocol will remain active, and the action will not be completed.
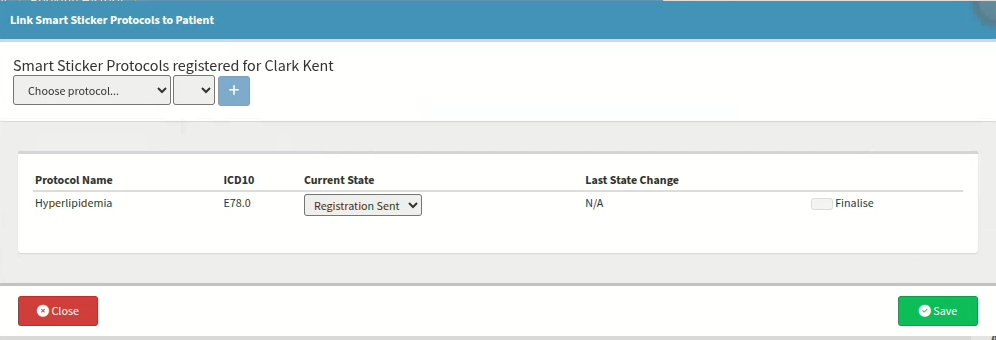
Should the protocol be required again in the future, it can be re-enabled by selecting the "re-open" option. You will receive a system prompt requesting confirmation to re-open the protocol; the action will only proceed once confirmed. After re-enabling, select the correct status to reflect the patient's current clinical needs accurately.
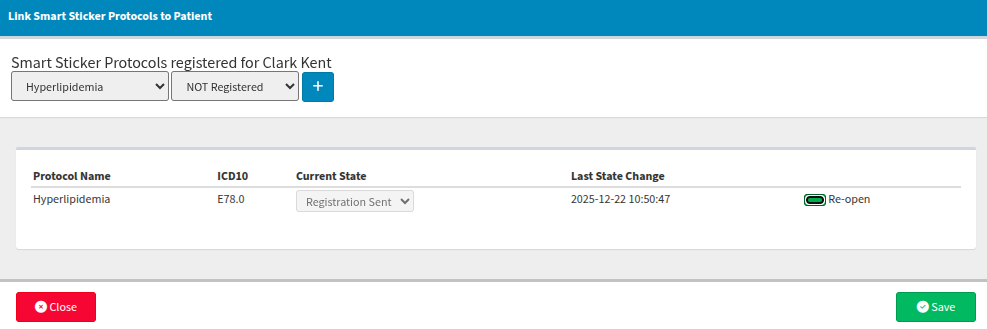
What is a “Smart Stickers” feature status
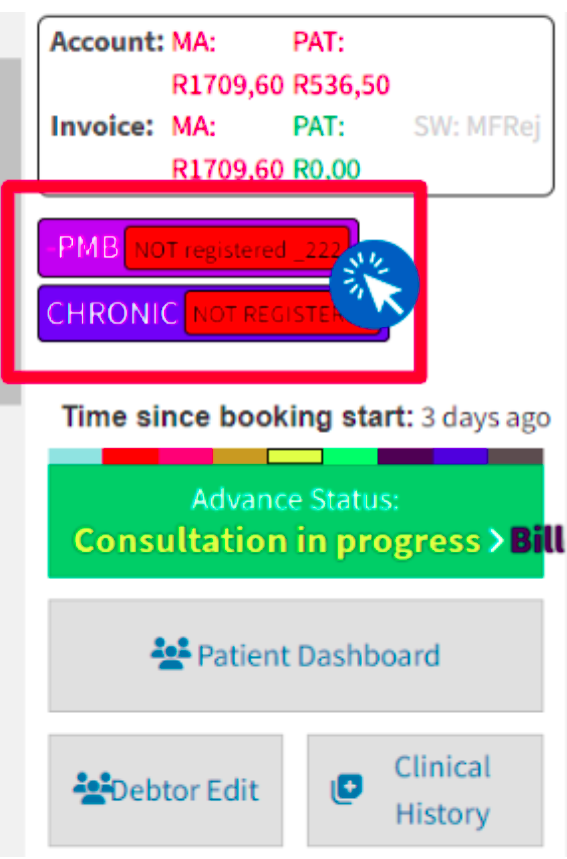
The status function serves as a sub-selection within the Smart Sticker protocol feature, providing a clear indication of the protocol's current stage at a glance. For example, you can update a PMB protocol status from "Not registered" to "Registered," ensuring the patient's progress is accurately reflected.
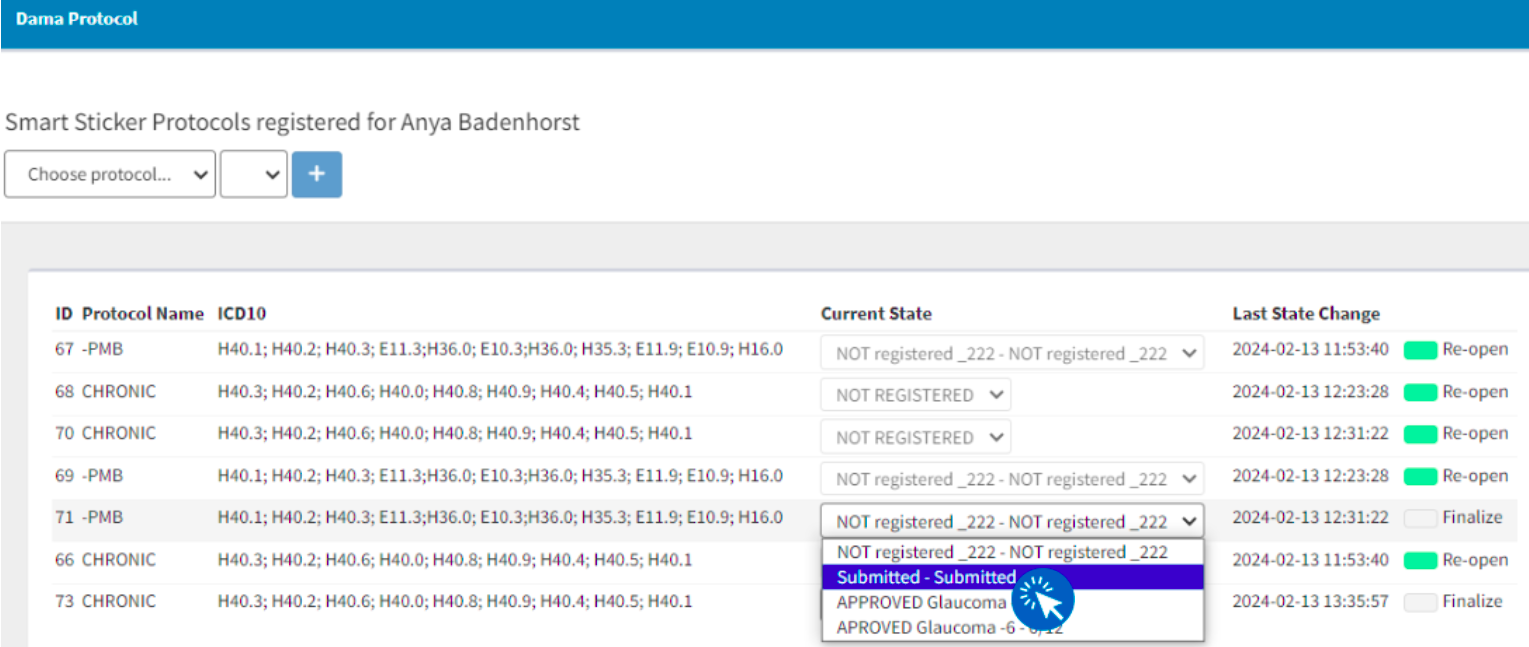
By selecting the relevant sticker, you will be redirected to the Smart Sticker Protocols page, where you can view a complete list of active protocols for that patient. From this screen, select the updated status for a specific protocol using the dropdown menu for the desired active entry.
These statuses can be automatically applied based on the practice's predefined protocol conditions. Alternatively, when the practice team must perform specific actions, the status can be updated manually as the agent completes each designated task. If the status is not updated manually, the protocol will not proceed, as the system requires this input to recognise that the task has been finalised.
Multiple sticker protocols can be assigned to a single patient. These active sticker protocols are clearly visible directly on the patient dashboard.
When new protocols are added rather than updated, the full history of protocols remains visible simultaneously. Please note that while you can't filter these protocols at the patient level, you can generate a report that provides a comprehensive overview of all smart sticker protocols across the practice.
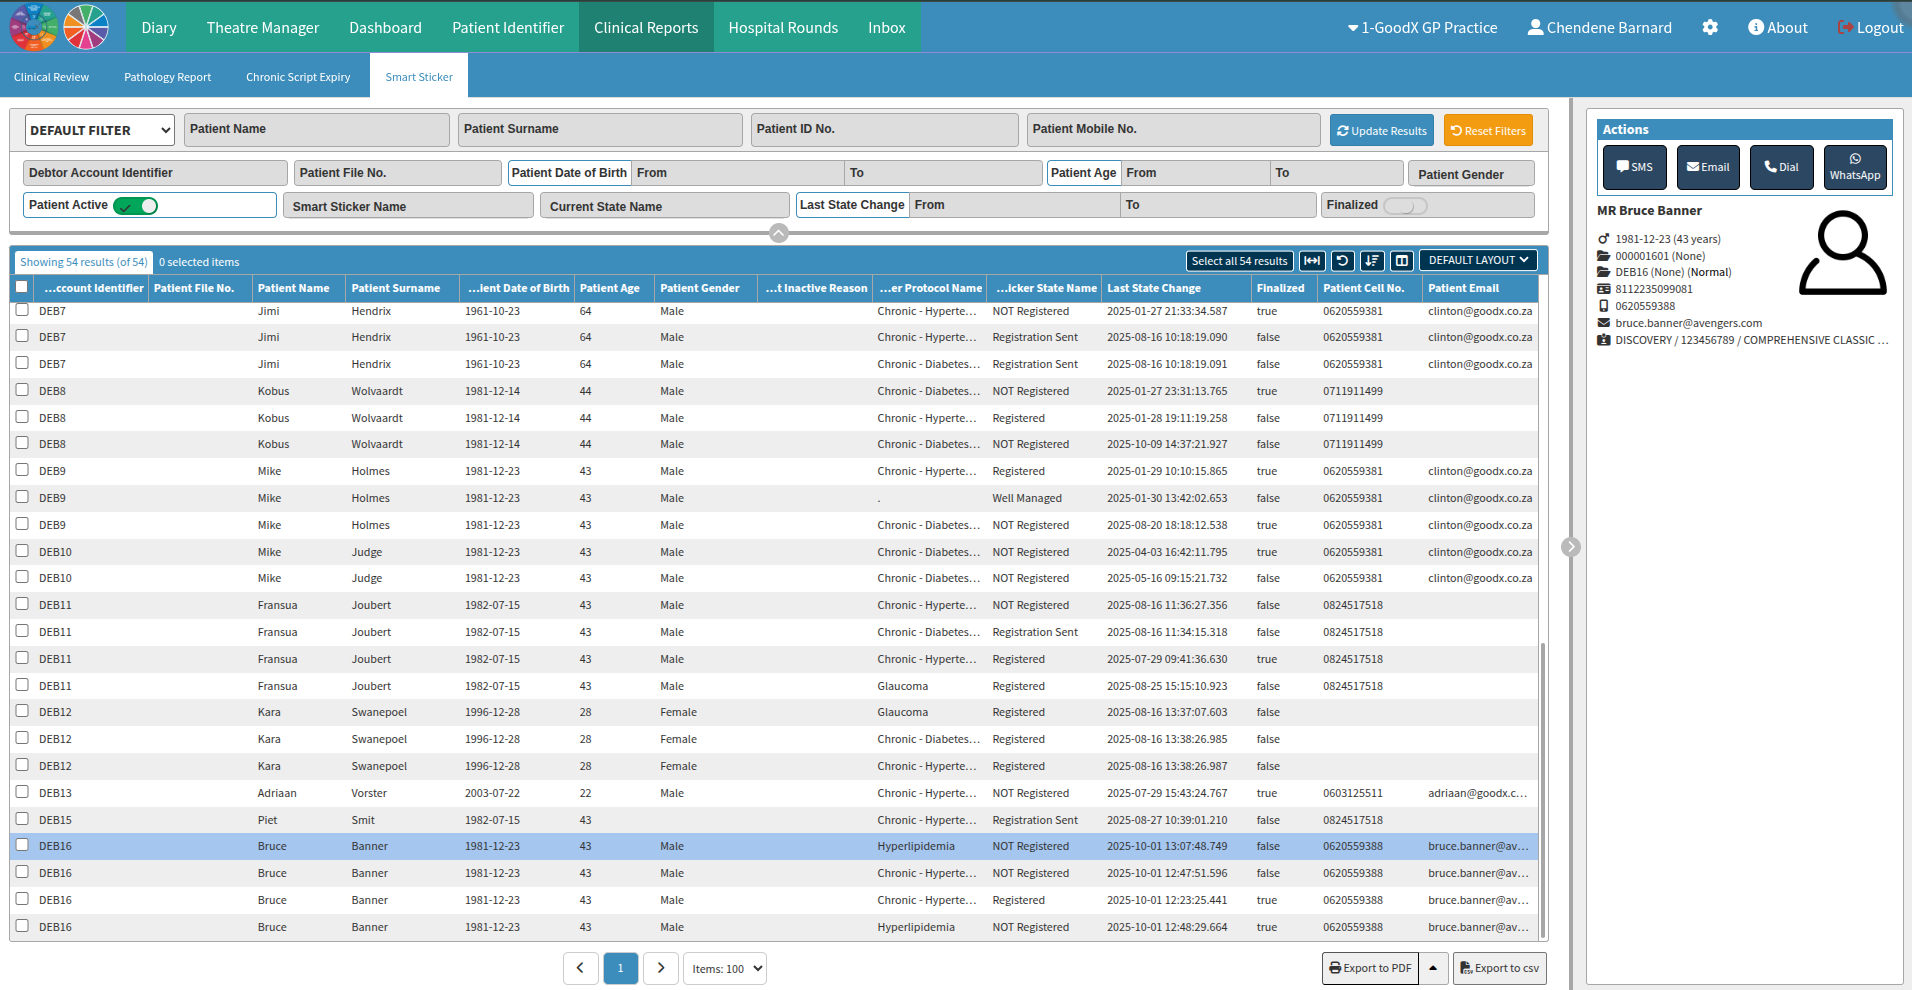
Are there “Smart Stickers” feature reports?
From the GoodX wheel, select "Reports" and navigate to the "Clinical Reports" tab. Within this section, locate the "Smart Sticker" sub-tab, which allows you to filter, view, and manage protocols according to your practice requirements. You can compile these protocols into a report and send the desired communication directly to the patient from the report screen.
How are the “Smart Stickers” feature set up?
You can configure the Smart Sticker feature by creating protocols tailored to your practice's specific requirements. These protocols are added by selecting the GoodX navigation wheel, choosing the "Configuration" option, and navigating to the "Smart Sticker Setup" tab.
You must define a sticker state before you can save protocols. These states typically represent what you require your patient to receive, review, or be informed about at predefined intervals or based on set conditions. These states can also track processes such as PMB applications, payment plans, or similar scenarios with multiple sub-stages.
Once you select a protocol, a new window appears where you can add the envisioned protocols and steps. Ensure all workflow events, including templates, tasks, and questionnaires, are designed and completed beforehand.

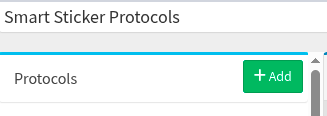
From this screen, you can incorporate the preferred protocols based on your practice requirements by selecting the "+ Add" button. A blank protocol will be provided, allowing you to define your practice's specific requirements.
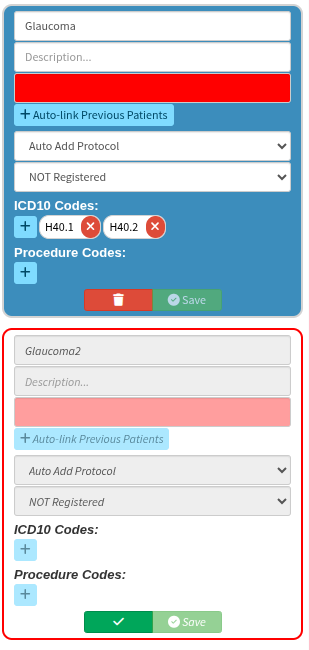
The protocol name serves as the primary identifier, allowing the key aspect of the protocol to be recognised at a glance. The description is used to explain the purpose or specific details of that identifier briefly. Keep both the name and description as concise as possible, as this information appears directly on the patient profile for quick reference.
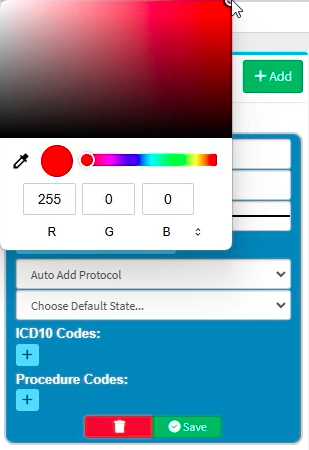
Smart Stickers can be easily identified or grouped by colour to improve visual organisation. By default, the colour selector shows a box with a line through it; selecting this box opens a colour picker where you can choose your preferred shade. Once you click outside the colour selector, the chosen colour will be saved automatically as the preferred setting for that protocol.
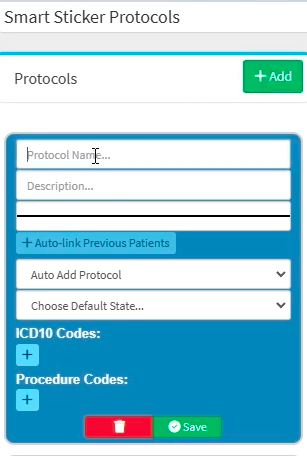
These protocols can be configured to "auto add" based on the ICD-10 codes used, or to trigger a pop-up prompt whenever a specific ICD-10 or procedure code is utilised. Use caution when linking these codes, as the prompt will appear with every application of that code across all patients.
What are the core ideas which should be known before deciding on the “Smart Sticker” protocols?
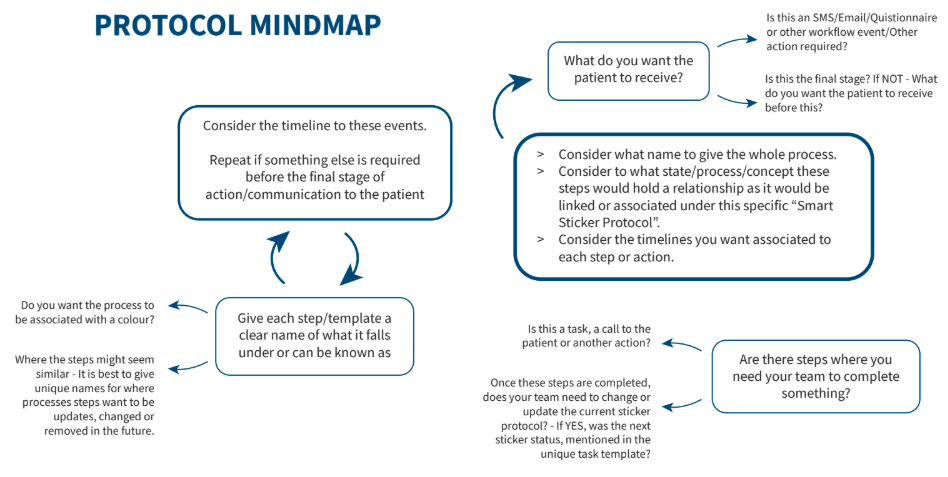
Review your practice's requirements and identify which communication processes can be automated. To ensure you have fully prepared the necessary content, it is advisable to draw a mind map detailing what information patients should receive and the specific timelines for each interaction. Use these insights to assign unique, clear template names, ensuring the protocols accurately reflect the intended information and deliver the expected communication.
You can use these protocols to communicate disease awareness weekly or monthly, depending on the practice's needs or the ICD-10 codes used during billing. Depending on your protocol setup, billing can trigger an automatic reminder to add the relevant sticker protocol.
Please note that the pop-up will appear each time the linked code is used. Alternatively, unique trigger codes can be created specifically for scenarios where you require the associated processes to be completed, which are then linked to the protocol. If these codes do not currently exist, please communicate with your GoodX liaison to add your preferred custom codes. This ensures you can use the protocols only when desired, particularly when standard ICD codes might overlap between different conditions.
Establishing accurate, clear naming conventions will simplify future changes, corrections, or alterations to your templates. By using a consistent naming structure now, you ensure locating and updating specific protocols remains straightforward as your practice evolves.
Please note that entries cannot be permanently deleted from view; instead, they will be marked as inactive, indicated by a red line through the item. To re-enable a specific line item, select the green tick to make it active again.
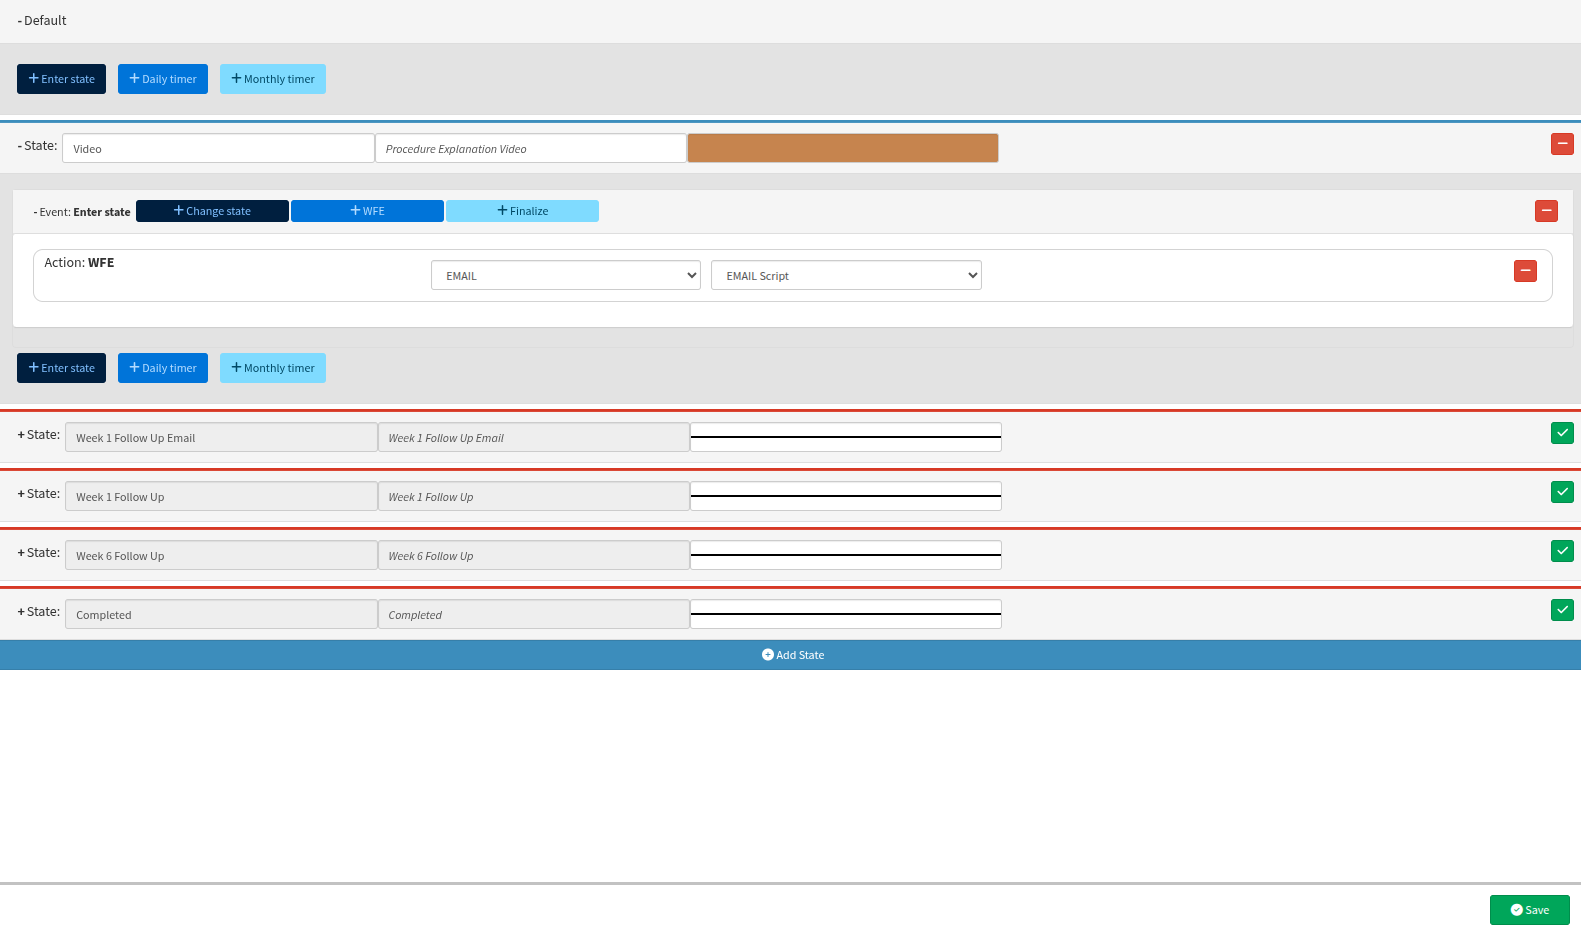
If mistakes are made on an entire protocol, please be aware that the entry cannot be permanently removed from the interface. Instead, you can mark it as inactive by clicking the "trash" icon.
Once deactivated, the protocol will appear greyed out to distinguish it from your active workflows. If you need to restore it, select the green tick icon and follow the confirmation prompts to reactivate the protocol.
The key questions which need to be answered during your protocol setup:
Example of a mindmap for the Smart Sticker Protocols to manage the PMB registrations:
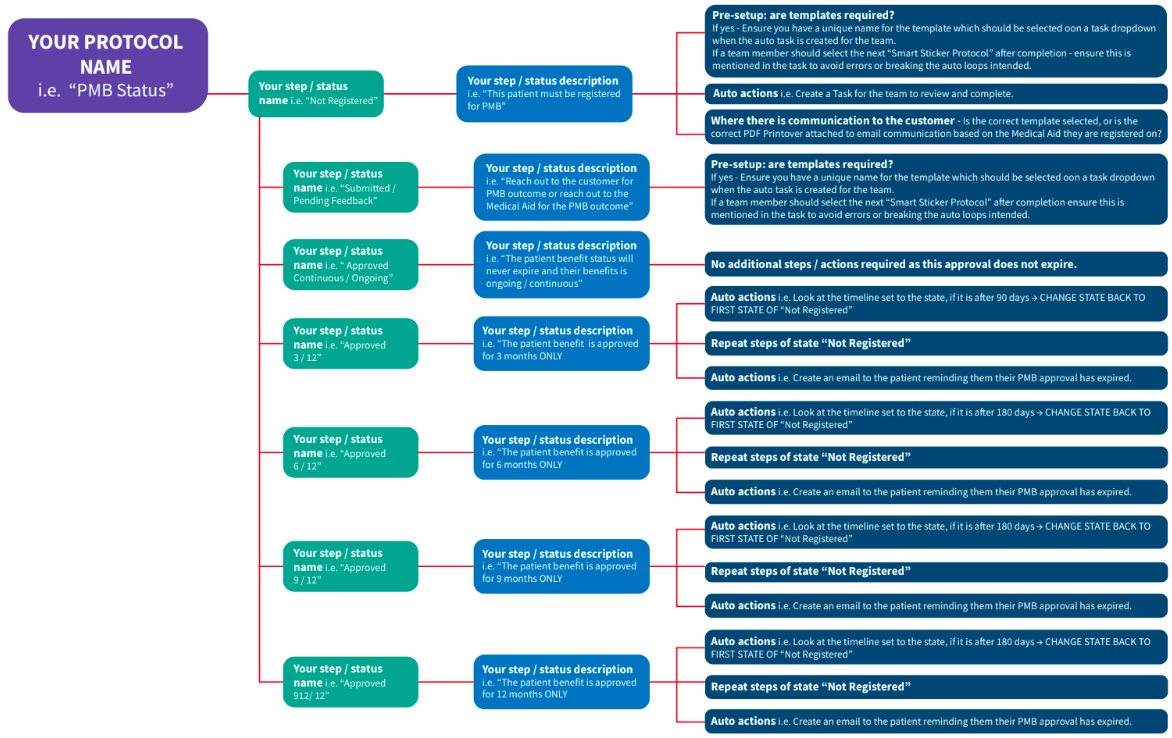
PMB approvals can vary from patient to patient. If the practice prefers to focus on the period of validity, it should develop communication for when these PMB approvals expire. Similarly, the practice needs to maintain awareness of these statuses, which represent the different states of a protocol. These states can include the following:
Not registered
Submitted / Pending Feedback
Approved 3/12
Approved 6/12
Approved 9/12
Approved 12/12
Approved Continuous / Ongoing
However, these shorthand references may have different meanings to different staff members at a glance. Clear, concise descriptions for each protocol state name help prevent misinterpretation or incorrect application. Without adequate descriptions to ensure full comprehension of the linked actions, agents may select the wrong state due to differing definitions, ultimately resulting in incorrect information being communicated to the patients.
Clear descriptions will help you create and select the correct templates from the dropdown options. Please also consider the templates intended for use in task requests, emails, or SMSes during your mind mapping process. Finalise and word these details according to practice preferences before requesting assistance from the GoodX client liaison. It is best to keep a separate PDF that clearly confirms the names and wording your practice envisions for the smart protocol setups, along with the expected outcomes for each state or step.
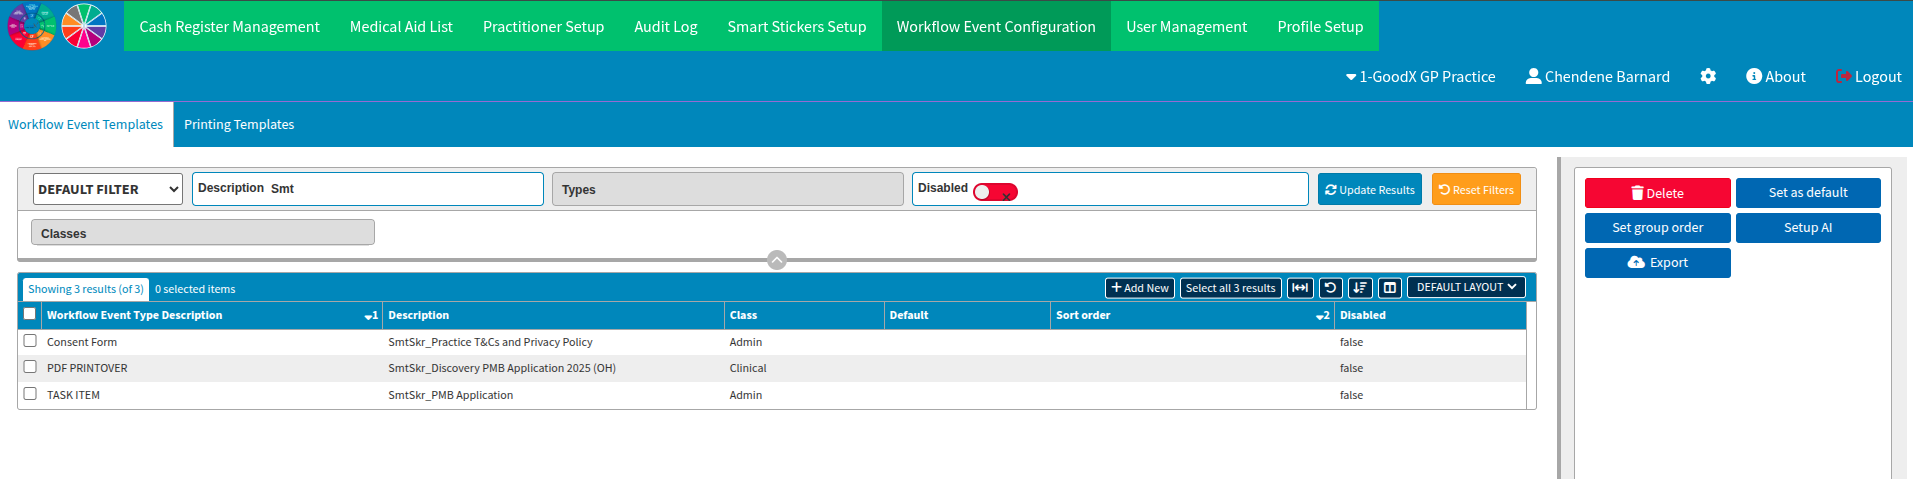
Below is an example of the dedicated forms set up for "Smart Sticker" protocol use only. Notice how the description starts with the application grouping, followed by the template name with its intended purpose. This approach helps you filter your active protocol templates. It lets your dedicated GoodX Client Liaison efficiently support updates or corrections when your protocols change or require specific information for review.
Your practice can decide whether to group these protocol colours by concept, such as using one colour where actions are required and another where steps are automated. Alternatively, different colours could represent different procedures. Decide the colour scheme clearly beforehand for ease and comfort whenever an association between colours is required or preferred.
We recommend having your GoodX liaison assist you until you fully understand the protocol setup. Please note that using this feature can be complex, and we will be happy to help you achieve your desired outcome within the software's functionality.
During a smart sticker setup, you can review the various protocols in the left column. You cannot minimise this column, nor can you view it in a list format. Furthermore, these protocols cannot be reordered or filtered to display currently active entries only. However, a scroll bar lets you navigate through your created protocols.
When you select a protocol, the right side of the screen shows the specific details and states for that protocol.
You can edit an existing protocol if you wish; however, if the new protocol requires fewer steps or the steps vary, the setup may become visually chaotic. This is because you would need to delete any additional states or line items. As a gentle reminder, a deleted state is not removed completely from view; instead, it will appear with a red line through it. Therefore, we recommend reviewing your mind map for protocol setups, noting all steps, and considering any potential actions required around these protocols beforehand.
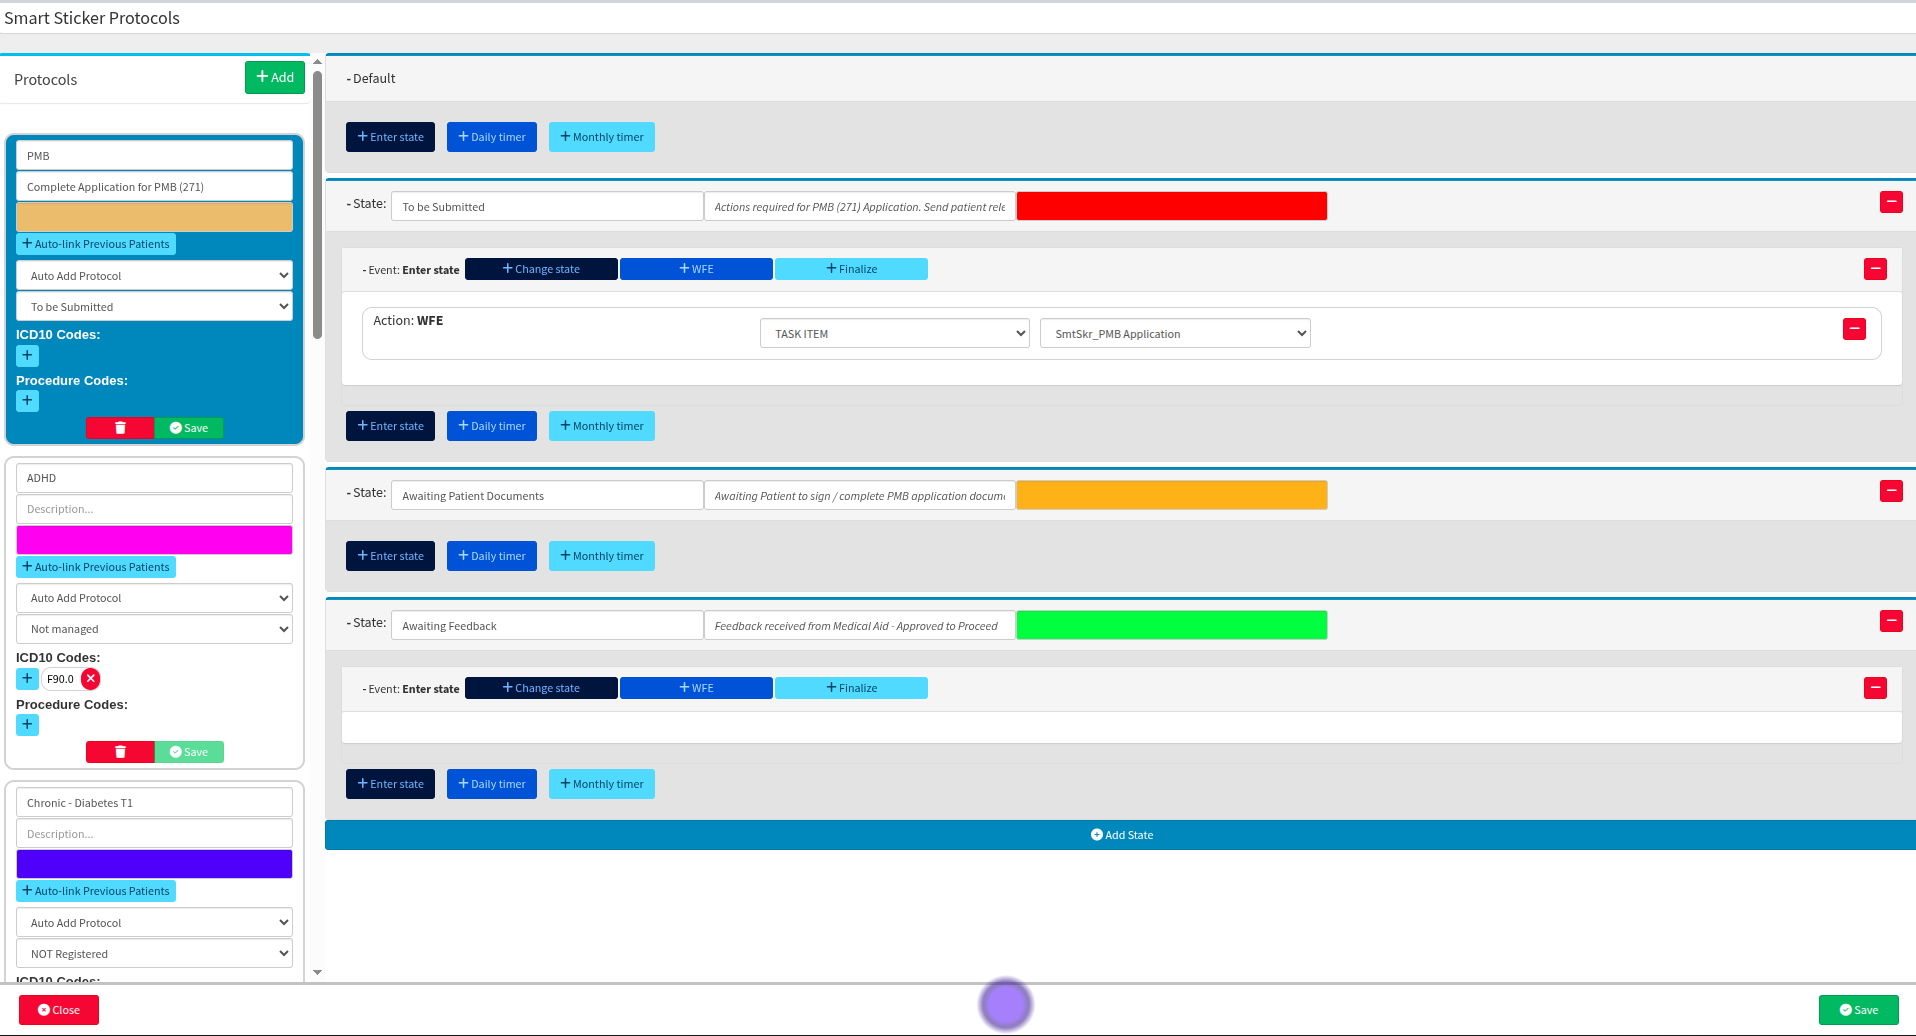
Below, you can see that we created a protocol to address a PMB application directed at the standard 271 PMB conditions. When we created this protocol, only three templates existed to meet our smart sticker protocol needs for this PMB. These protocol statements reflect the actions staff must take to complete the PMB application for the specific patient and medical scheme.
In this section, we must now instruct the protocol on the next expected actions. Your practice will need to decide on the following options:
Do you finalise the protocol because nothing else is required?
Are additional communications required?
Does it move to a next state?
Are there additional actions required from the practice's team?
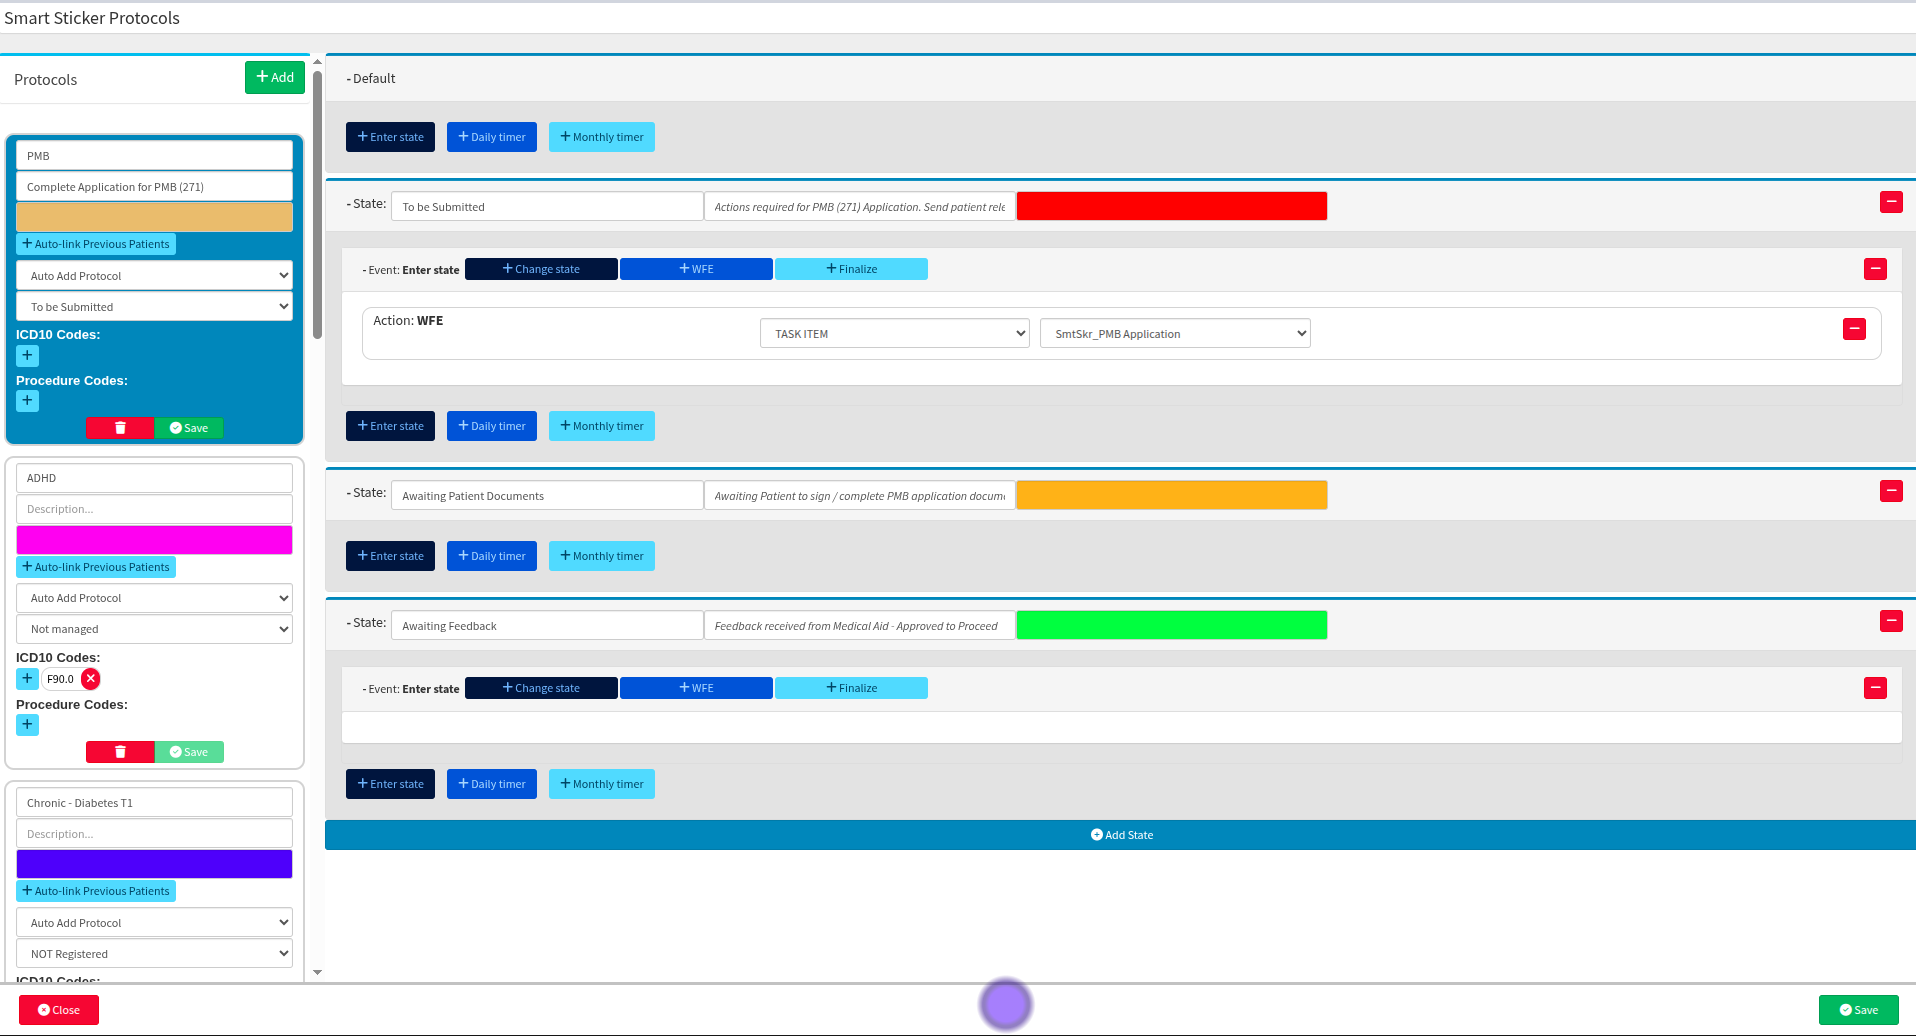
However, while setting up this protocol, there is a potential logic flow issue regarding what happens when a PMB application is declined. If the team needs to take action, or the doctor must review part of the application, create templates to ensure consistent communication and complete information requests. This reduces the time the team spends on repeated tasks and communications, allowing the practice to run a successful smart sticker protocol through to finalisation.
Where to learn more about Smart Sticker Protocols within GoodX:
The GoodX Click&Learn Courses https://courses.goodx.co.za/
The GoodX YouTube Channel https://www.youtube.com/@GoodXSoftware
The GoodX Learning Centre https://learning.goodx.co.za/
Please note these courses are only modules and are different from the Click&Learn courses. To learn more about Smart Sticker Protocols, you can apply these search terms:
| Date of Change | Changes | Editor |
| 2026 05 14 | Established Page | Chendene Barnard |
| 2026 09 22 | Spell-check | Chendene Barnard |
| GoodX Course: PDF Printover


What is the “PDF Printover” feature?
The PDF Printover feature lets patients complete custom or unique forms electronically. Essentially, it transforms non-editable documents into interactive files that clients can easily fill out digitally.
The PDF Printover Form feature lets your practice create unlimited templates, so you can complete forms digitally instead of printing and filling them out manually.
This is particularly effective when importing third-party documents or using custom practice forms, as the system can be configured to automatically populate the patient's details directly into the form.
Custom forms designed for client completion are typically linked to the myGC application, which is provided free of charge. This platform serves as a centralised portal where patients can review account details, clinical data, or general forms the practitioner requires before a consultation. While these specialised forms are discussed more comprehensively in the clinical files section, you are encouraged to contact your liaison to discuss any unique requirements specific to your practice.
Please note that extensive support for clinical PDF Printovers may be considered an additional service, which could incur a service fee for the user.
What are the capabilities and applications of the PDF Printover Feature?
This feature has vast potential. Sensitive personal information is securely protected from damage and unauthorised access, ensuring patient privacy and strict compliance with data protection regulations, such as the POPI Act. Furthermore, the system allows for the creation of PDF printovers to facilitate the registration of Prescribed Minimum Benefits (PMBs) on behalf of the patient.
The risk of incomplete or misfiled information remains a significant concern in environments where physical files have historically been prioritised, especially during office relocations or displacements. Maintaining an accurate, detailed digital clinical history is therefore invaluable, as it ensures the treating practitioner can make well-informed decisions about patient care and treatment.
These preferred forms can be submitted for conversion through the PDF Printover feature, which allows the practice to maintain the document's original aesthetic. This transition reduces concerns about handwriting legibility and the loss of physical paperwork, while significantly lowering the risk of misfiling documents.
What benefits does PDF Printover hold?
Software providers and healthcare practices can implement stringent access controls and encryption protocols to safeguard the integrity and confidentiality of electronic medical records. When stored in the cloud, these records are further protected by robust security measures designed to ensure comprehensive data safety.
In cases where multiple practitioners or teams collaborate on a patient's care, electronic medical records enable seamless access to and sharing of vital information. This functionality fosters collaboration, enhances clinical decision-making, and ultimately improves the standard of patient care. When different practice management systems are used, practitioners can still securely receive, download, and send files as PDF documents.
How does the manual PDF Printover work?
Should you receive a non-editable document that is reflected under your clinical documents, you can convert it into an editable format by selecting the "+ Create PDF Printover" button.

Alternatively, you can import a non-editable document by selecting "PDF Printover" from your clinical forms library and then choosing the required file from your desktop or the device where it is saved.
Once you select the form to import as a PDF Printover, the document will display, allowing you to add, adjust, and configure fields to meet the practice's needs.
You must manually configure the form to define fields for manual entry or specify where patient information should be automatically populated. This ensures consistency for the specific form or PMB being created. You will have access to specialised tools to ensure the necessary fields are available for the patient to complete, while preventing them from entering information in irrelevant or unnecessary fields.
How do I add a new PDF Printover?
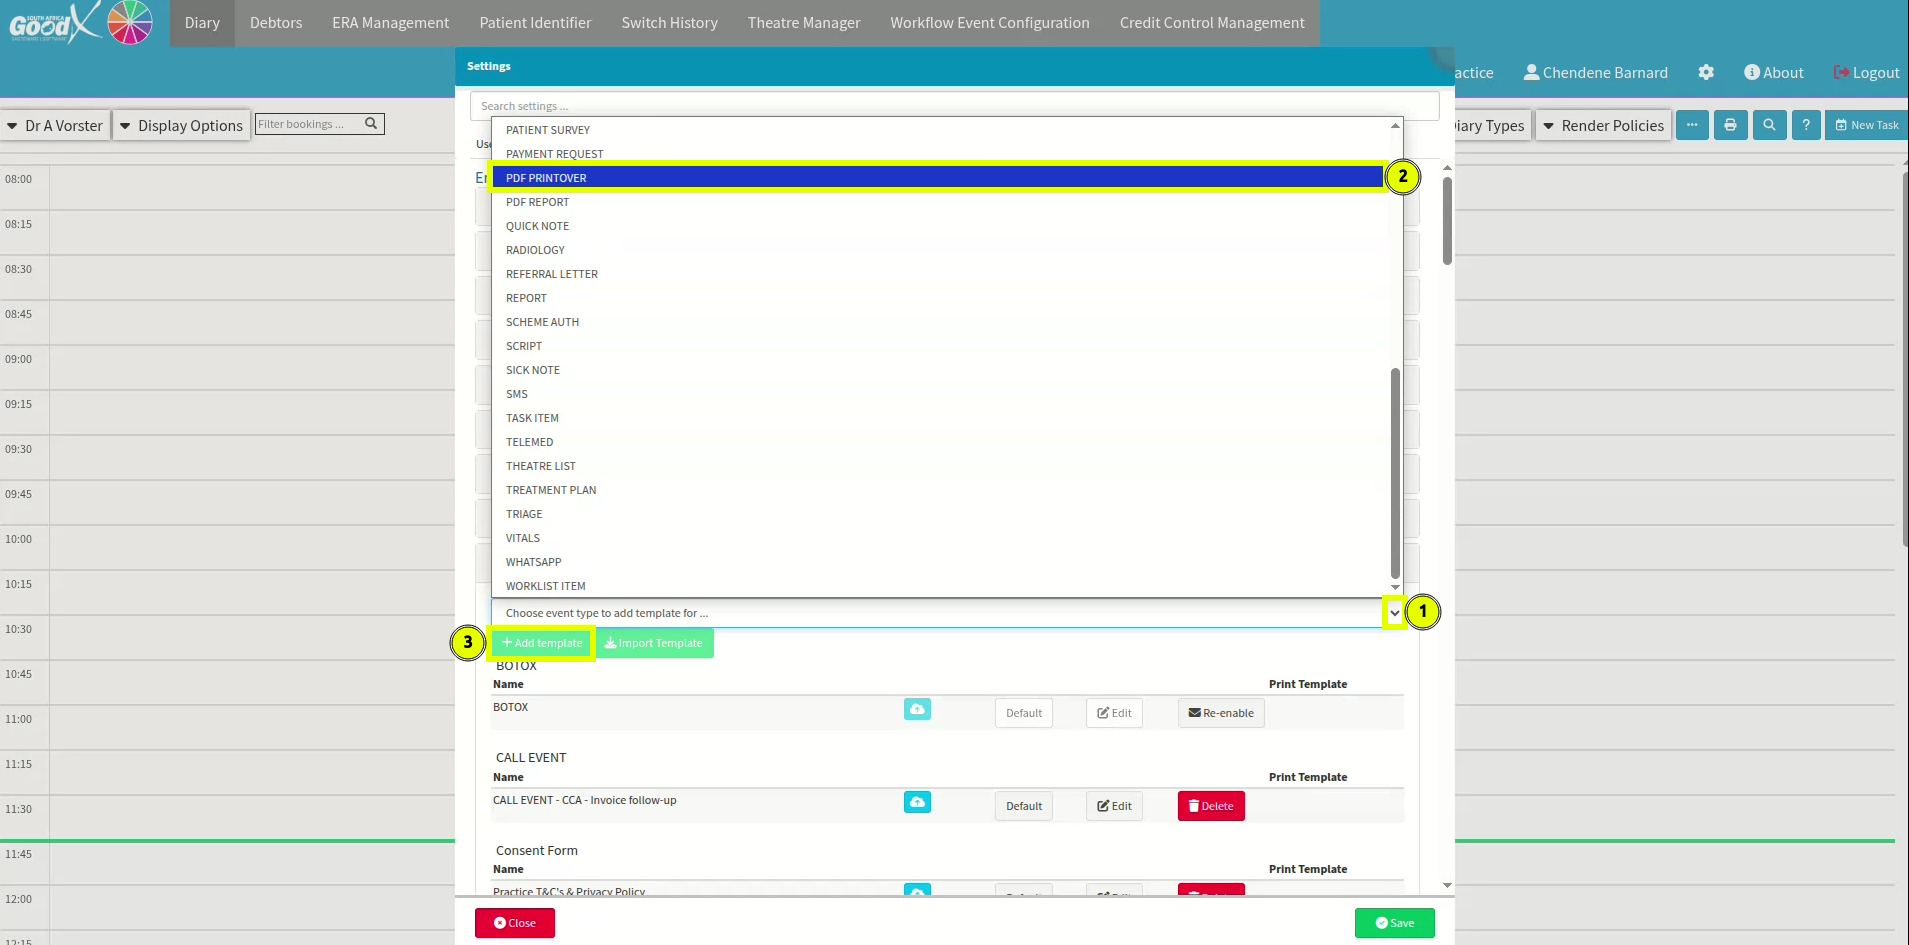
To add a new PDF Printover, select the Site Settings icon located at the top right of your screen, adjacent to the "About" section. Select the Entity Settings tab, then navigate to the Workflow Event Settings section and expand it. Within the library, use the dropdown menu to locate and select the PDF Printover template. Once identified, select the + Add Template button to complete the process.
How do I edit the once-off manual PDF Printover?
Pre-populated fields eliminate the need for patients to complete the same document multiple times because of misplaced or incomplete data. If you need help with a form, contact your liaison for guidance. You can add text fields, image spaces, signature prompts, or checkboxes to denote relevant options. Once your document has been imported, the file will be displayed alongside the available edit menu.
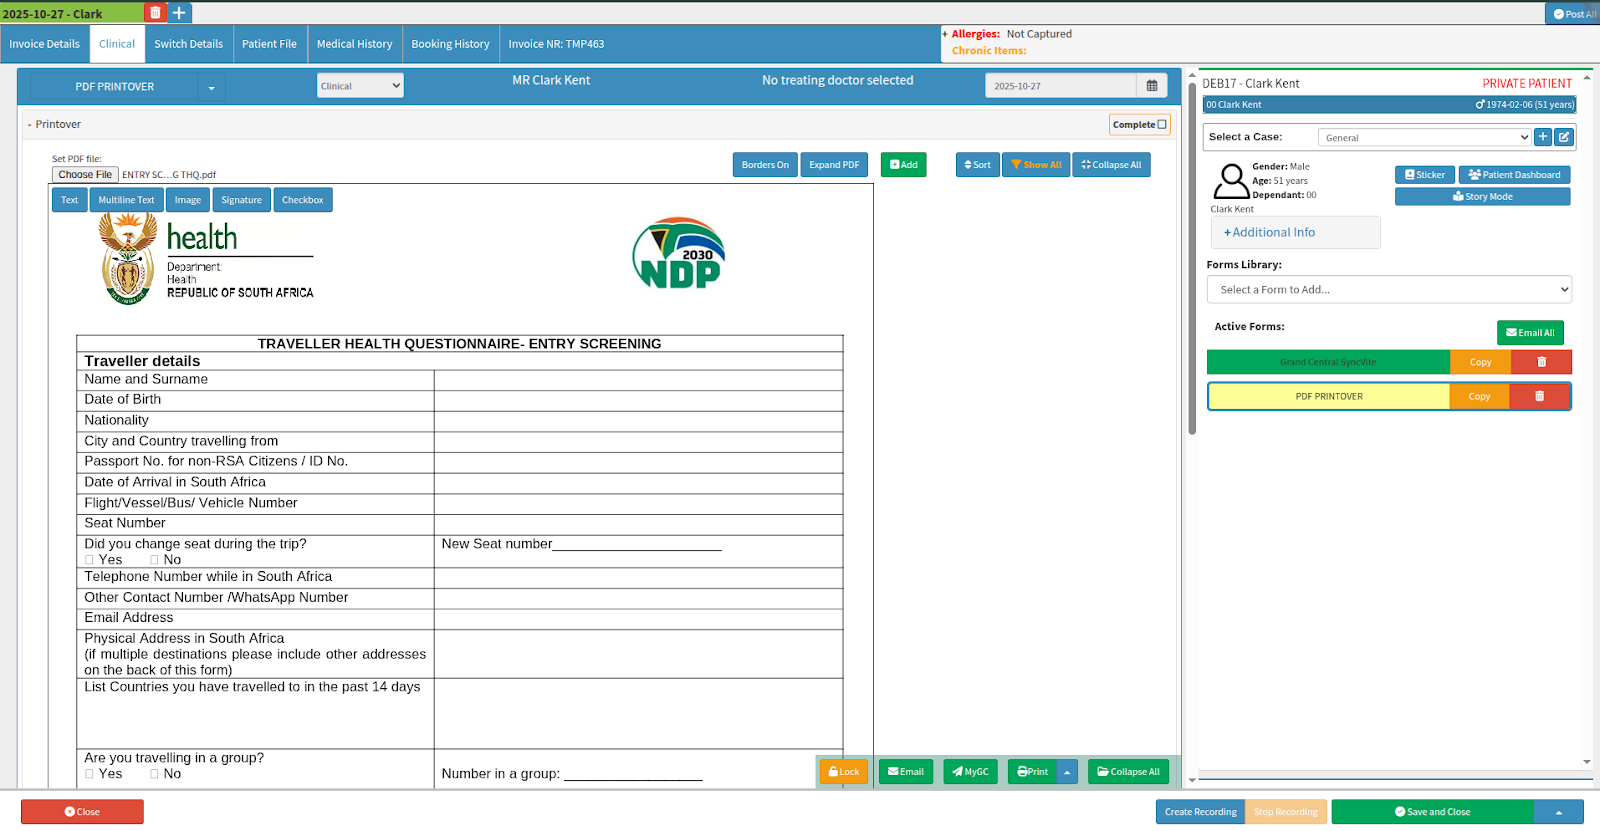
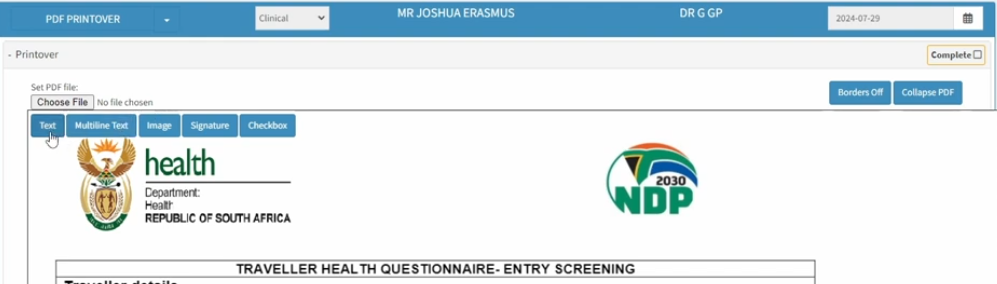
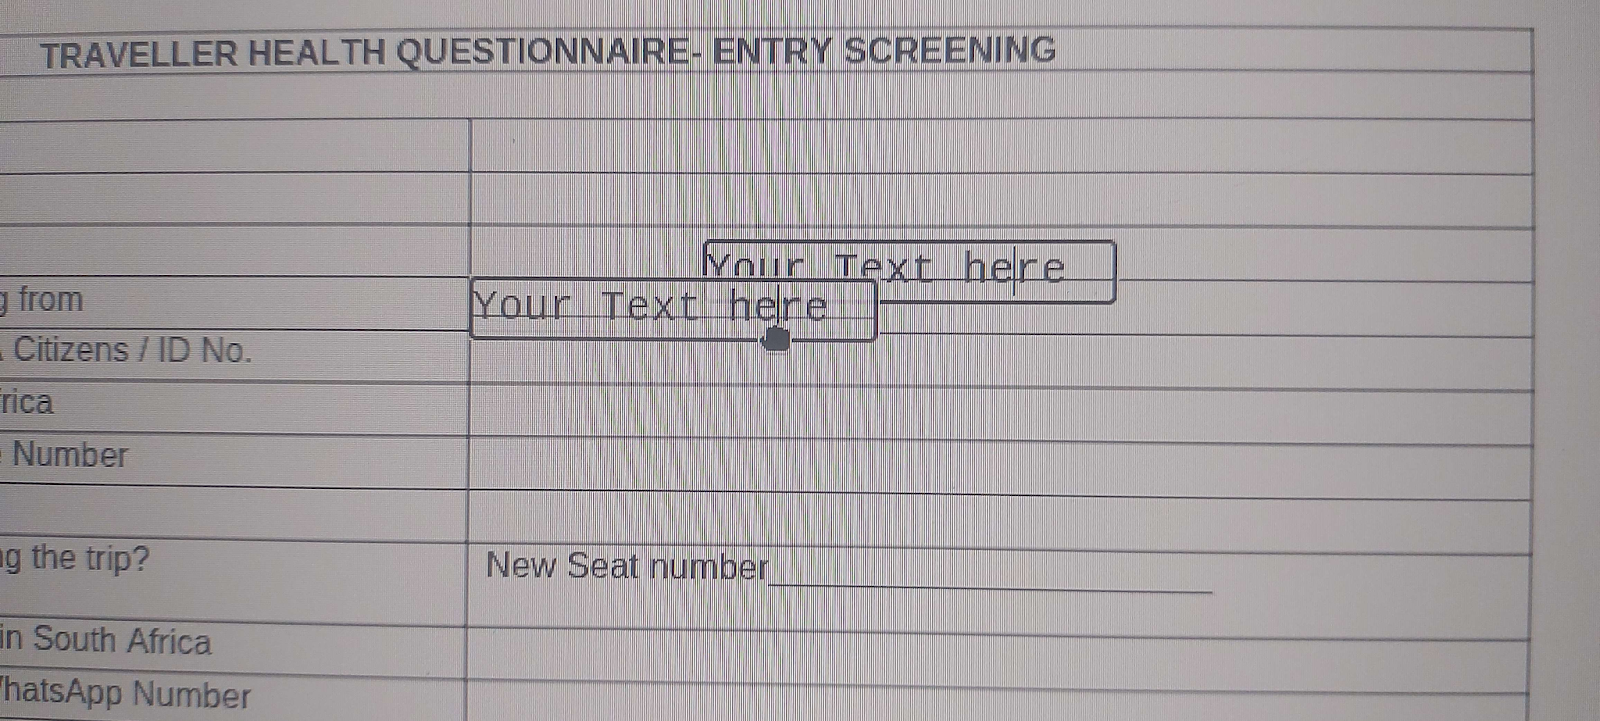
Selecting the Text button automatically generates a menu item and adds a text area to the document. This field must be positioned using a drag-and-drop action to the specific area where the patient is required to enter information.
Although there is no distinct highlight around the box to indicate it can be moved, clicking and holding the mouse within the text area activates a grab icon to reposition the text box in the template setup. This allows you to accurately reposition the box to the desired location on the form for the patient to complete.
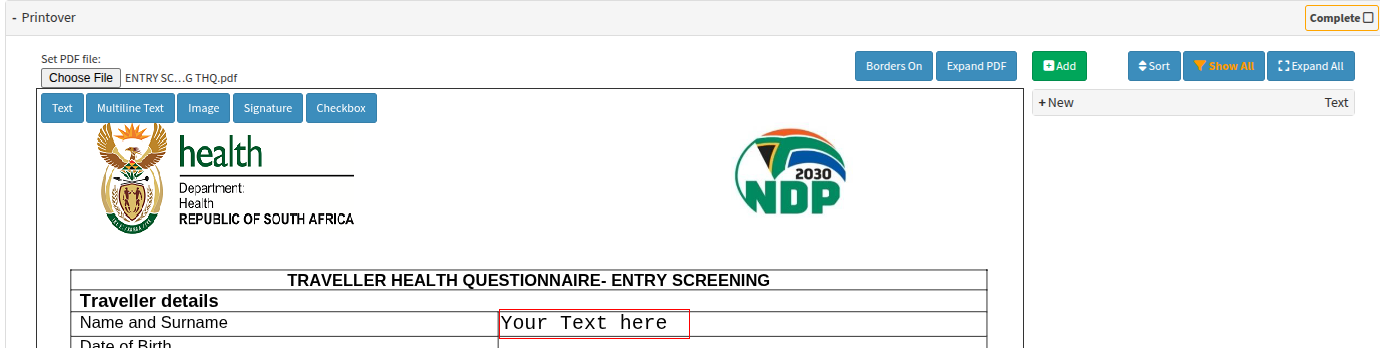
Selecting the + New menu option provides access to the editing settings for that specific text area. To remove the red outline, you can select the Borders On button, which toggles the visibility of the text area's boundaries. Please note that when you add a new item, the borders are automatically set to visible by default; therefore, it is recommended to toggle this setting once the form layout has been finalised.
As you populate the document with entry fields, rename each item to match its corresponding field on the form. This practice lets you see at a glance whether any sections have been missed and makes it much easier to identify and update specific text areas if changes are needed in the future.
You can rename the text area to track form completeness, and customise the visible text prompt. Additionally, you can adjust the font size and select from three of the most commonly used font families to ensure the added text aligns with the original document's style.
If you need an alternative font, contact your client liaison to see whether they can accommodate your request. Please be aware that such customisations may incur additional fees.
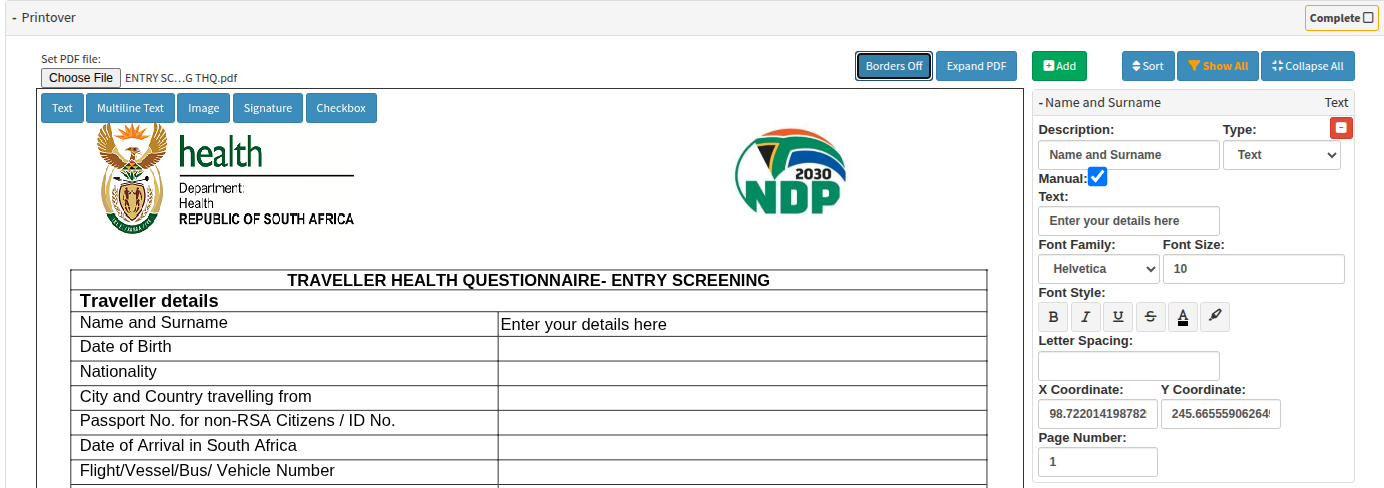
When adding new items, they will automatically populate at the top of the menu. To reorder them, select the Sort toggle to arrange the list from top to bottom in the order they were added.
Please note that adding a new item will not reset your existing list; however, the most recent addition will always appear at the top by default. We recommend toggling the sort order once the form is complete to ensure a logical sequence.
When adding a checkbox, the value defaults to "Y." Clicking the populated checkbox toggles it between a blank state and an "X" value for the patient to complete. Please remember to toggle all checkboxes to a blank value if patient input is required.
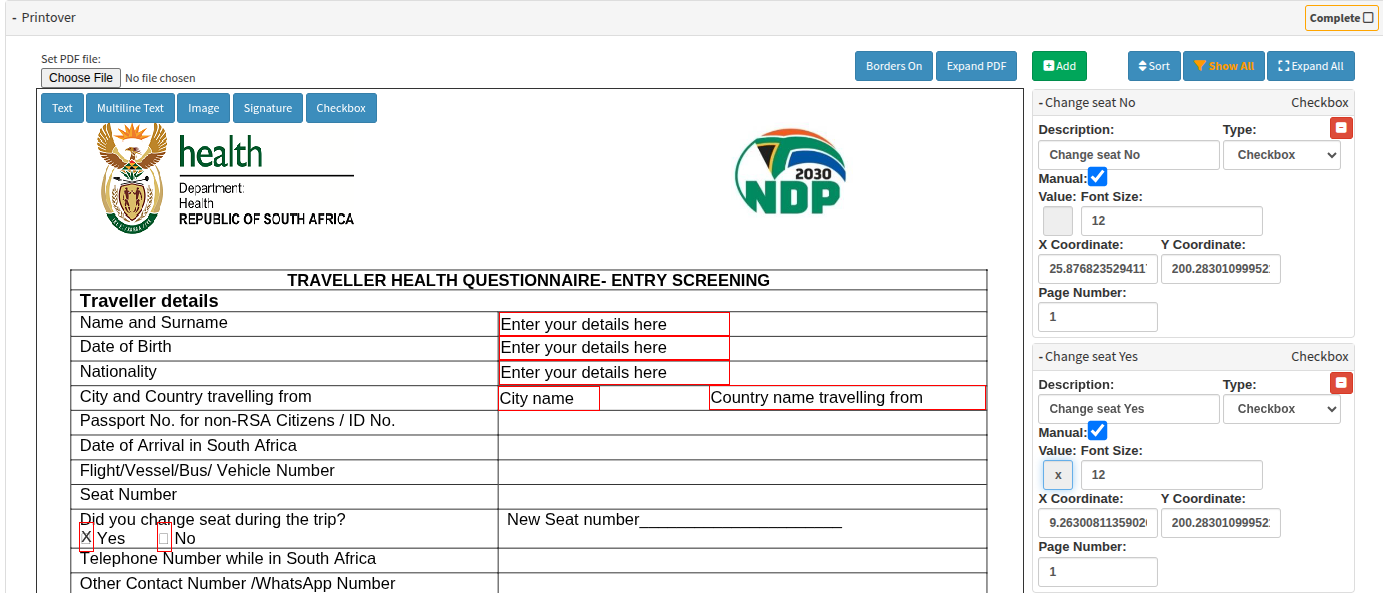
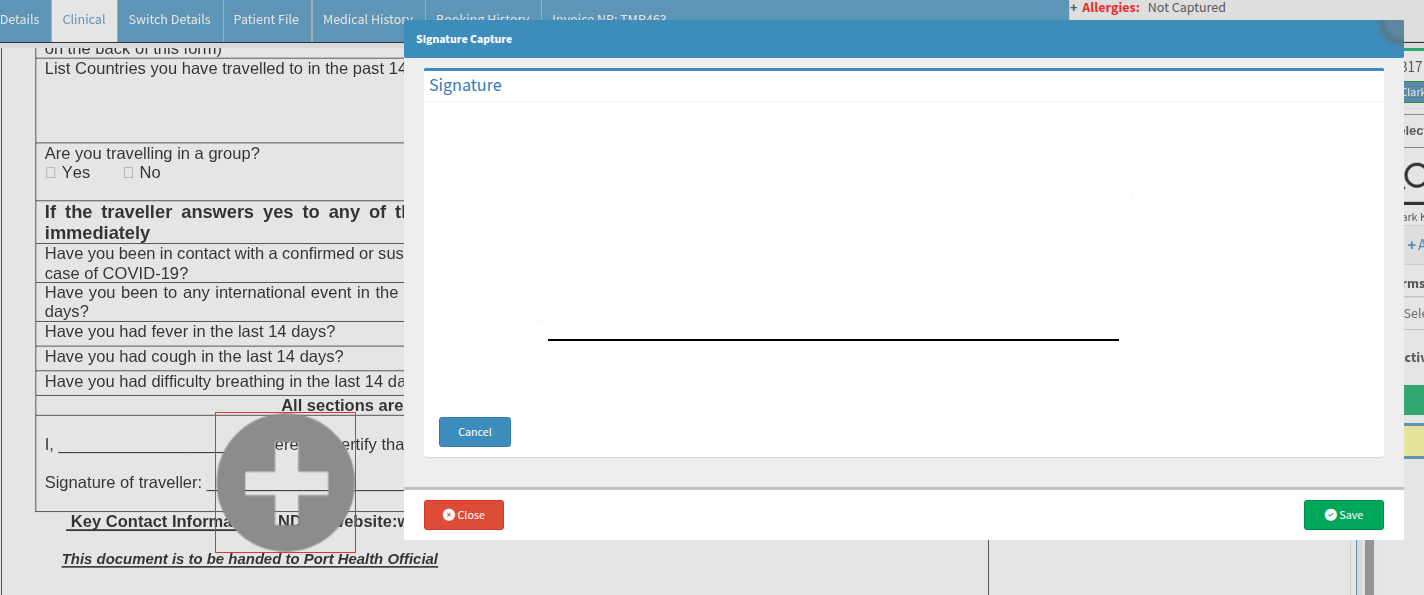
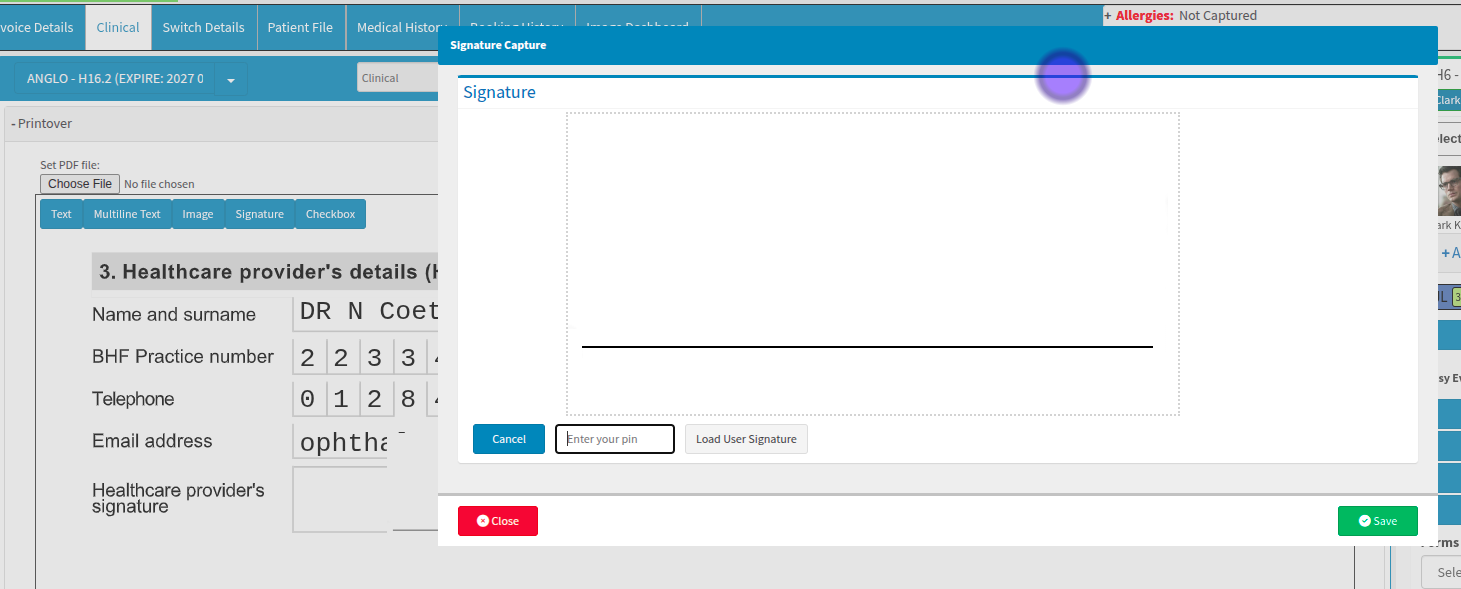
Where a signature is required, a default icon—appearing as a plus sign—will be visible. When the patient selects it, the system will prompt them to provide an electronic signature. When adding a signature on the patient PDF printover, the practitioner may need to sign. If the user does not have a set PIN and uploaded signature, they will not see this PIN option. To load a signature through a PIN, the user must have an active saved signature uploaded and protected by a PIN.
If the default signature icon or any added image appears too large for the document layout, you can adjust the dimensions via the side panel. This allows you to scale the element down to fit precisely within the designated signing area or form field. Best practice is to enter the signature field and select Save so a blank signature appears, which you can then realign to the correct position.
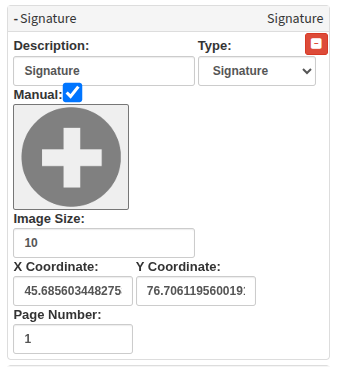

The specific type of editor you have added will be clearly visible both in the side panel and on the individual item itself. This dual-visibility ensures you can easily distinguish between text fields, checkboxes, and signature prompts while managing your document layout.
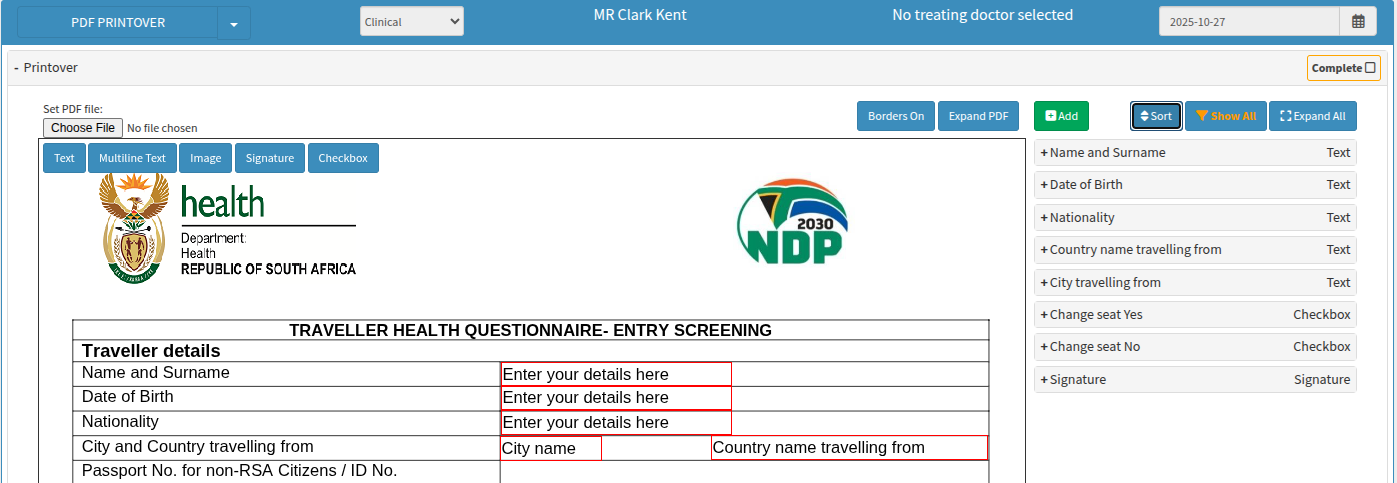
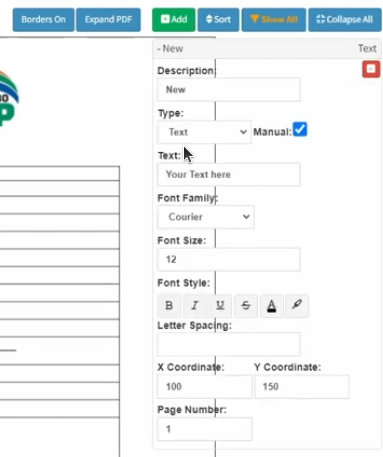
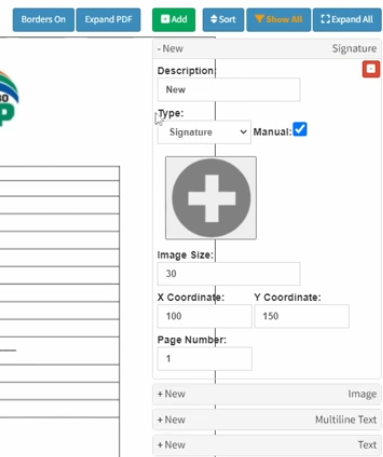
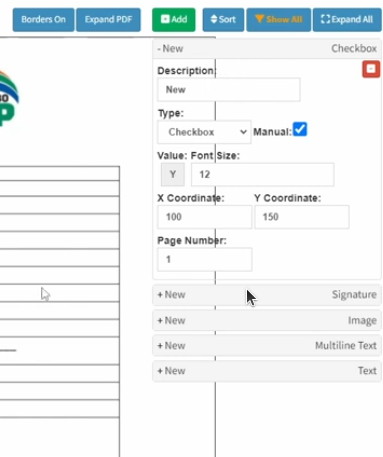
If your clinical documents already include PDF Printover files with predefined fields, selecting these documents will automatically populate those areas with the relevant patient or clinical information. This integration ensures that the required data is pulled through seamlessly, presenting you with a pre-filled form that minimises manual entry and maintains clinical accuracy.
Automatic PDF Printover is set automatically when you perform setup, edits, and adjustments within the Entities workflow event setup, rather than directly in a specific patient's clinical form area. Modifications made at the patient level are temporary and do not persist beyond that specific instance. Conversely, customisations applied at the entity template level are permanent and will govern all future versions of that document. To ensure recent updates are reflected in the system, reselect the template from the PDF Printover dropdown within the clinical form.
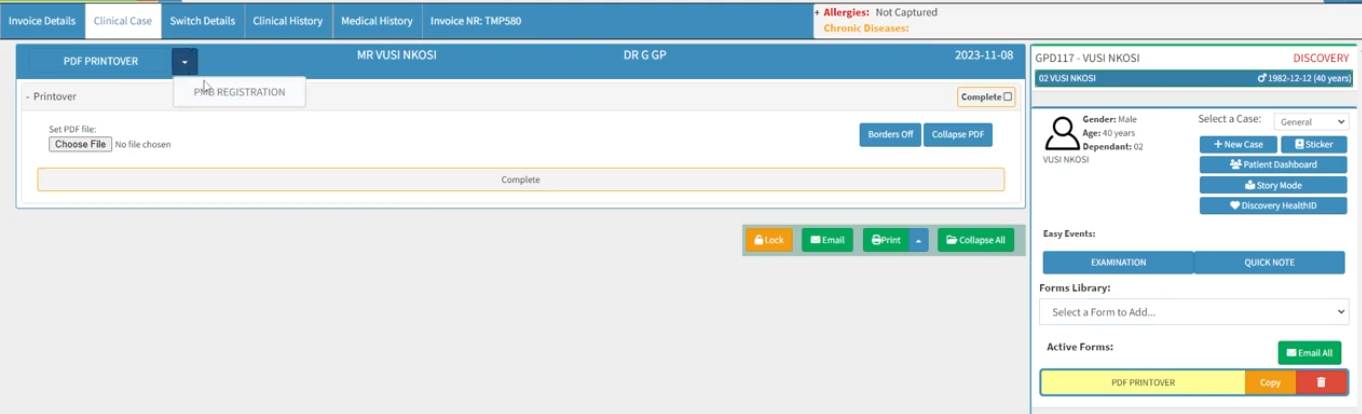
The process for configuring these templates and their associated functionality follows the same principles outlined in the preceding sections, "How do I add a new PDF Printover" and "How do I edit the once-off manual PDF Printover?". By applying these established methods, you can ensure that your permanent entity templates are correctly structured and ready for automated use across the practice.
As soon as the selected document is loaded, the relevant clinical fields will automatically populate with the available data. This automated process ensures the form updates instantly with the necessary information, streamlining the transition from document selection to final review.
Please ensure that these forms are always marked as completed, followed by selecting the "Save" and then the "Close" options. Following this sequence ensures all captured data and clinical updates are finalised and stored in the system.
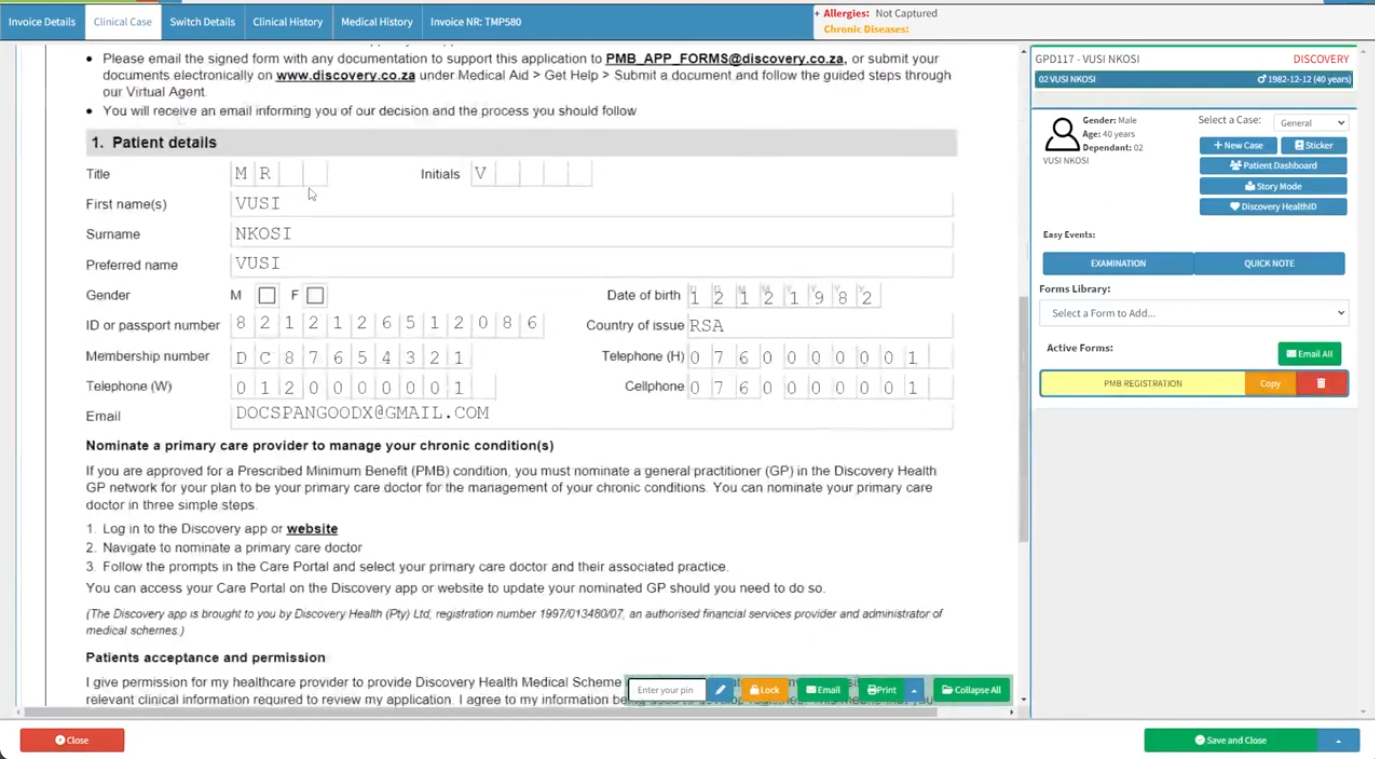
From the clinical interface, once a practitioner has selected a PDF form, they have several options for distribution and management:
Email: Select the Email button to send the converted, editable form directly to the patient. You can include additional documents or forms via the Attachments feature. The system will automatically populate the message using your pre-configured email templates.
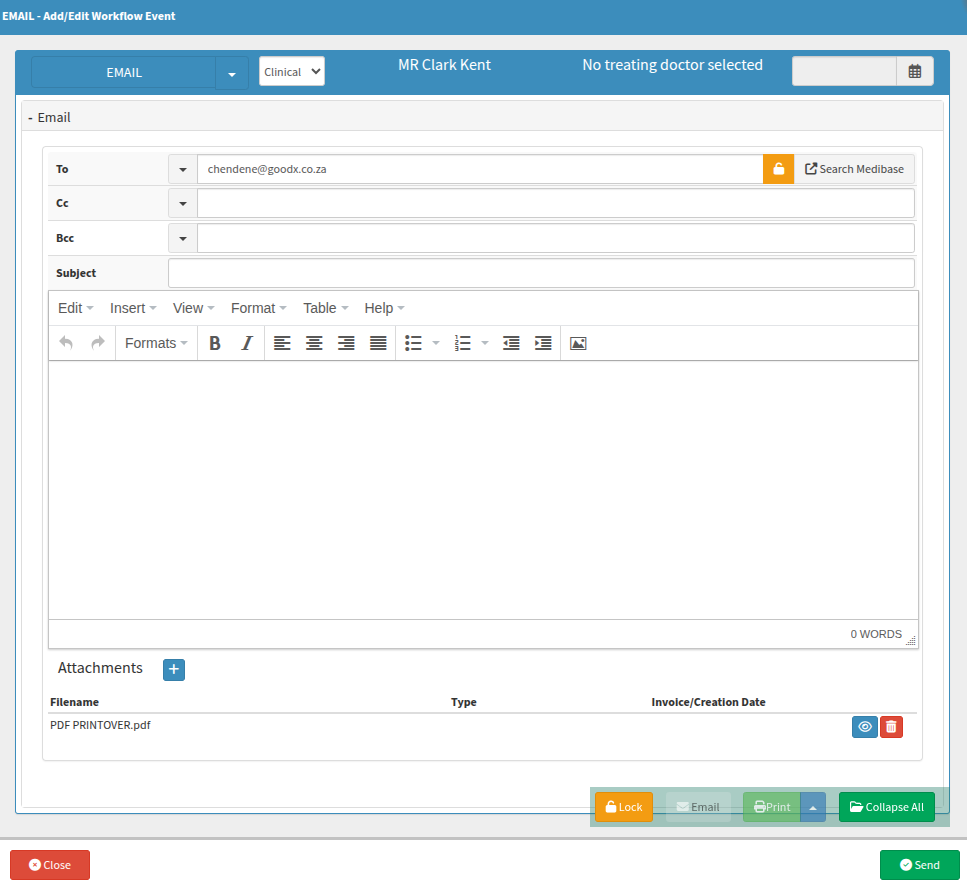
MyGC: Select the MyGC button to transmit the editable form to the patient's MyGC dashboard, allowing them to access and complete it within their personal portal.
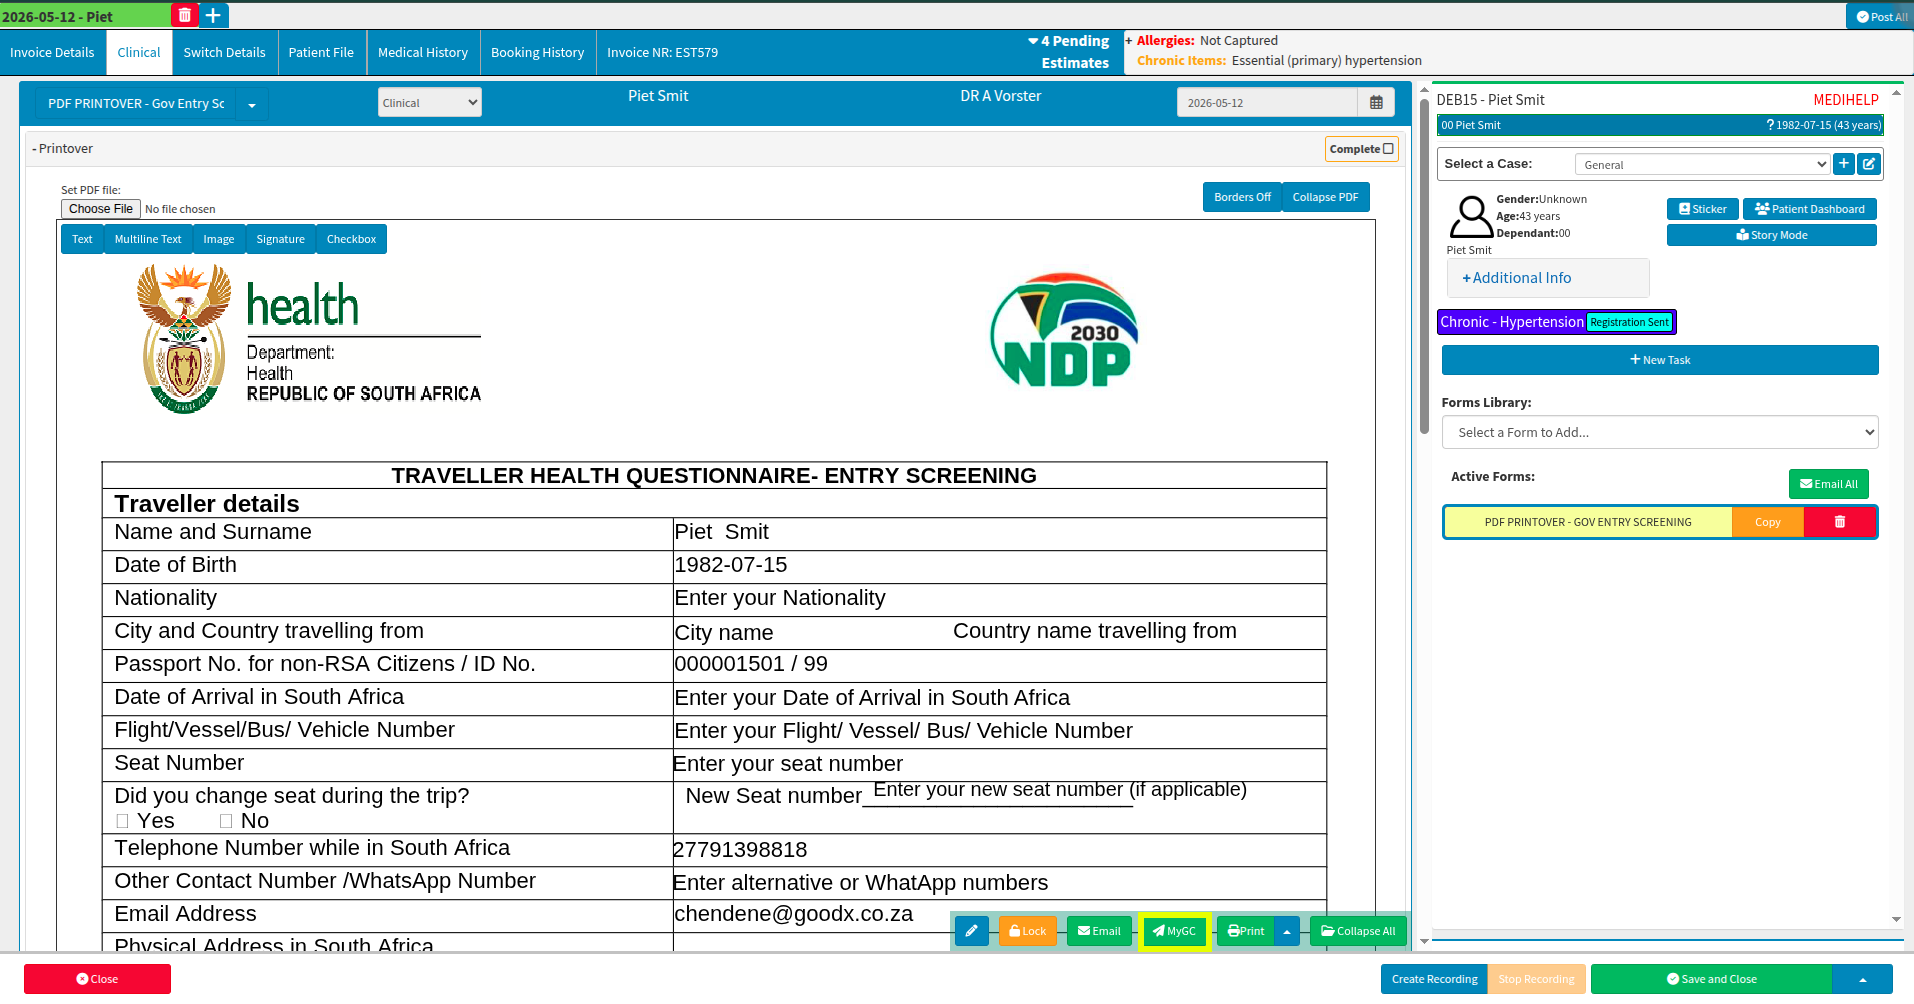
Save Locally: Access the Print dropdown to save a copy of the editable document directly to your local device.

Where else do I build an automatic PDF Printover?
To begin the setup, select "Configuration" from the navigation wheel and then navigate to the "Workflow Event Configuration" tab. This path lets you access the settings needed to manage and customise your clinical document workflows effectively.

Select "+Add new" to create a new PDF Printover and navigate to the required template. Rename the template immediately to keep it easily identifiable as your list expands and prevent accidental selection of the wrong form. Once you have selected the file, the edit menu will become available. Please note that the interface view is slightly constrained to make it easier to select placeholders, which ensure patient details automatically populate when the file is opened in the clinical workspace.
When adding new text, the box will appear in the centre of the screen, where you must drag and drop it into the desired position.
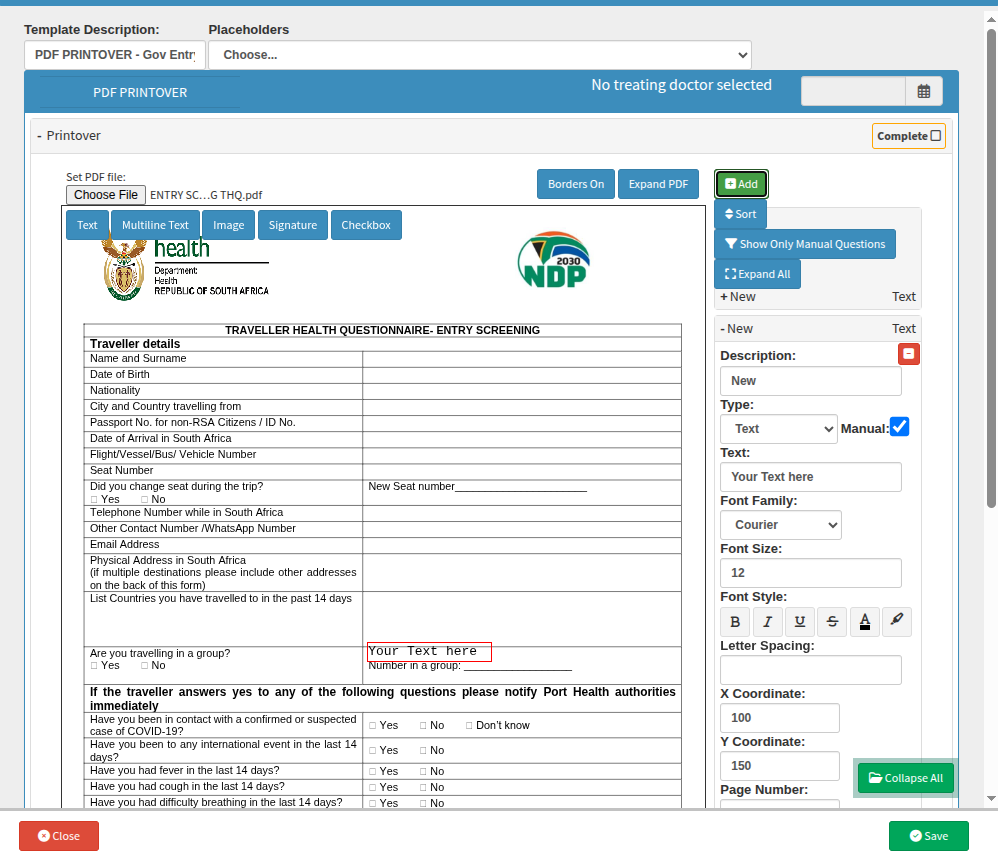
If you select placeholders, they will automatically be inserted into the text box or area currently being edited. Should you require further clarification or encounter any uncertainty during this process, please get in touch with your GoodX representative for additional assistance.
Once you have finalised the necessary pre-populated fields and specific requirements, you can save the form for future selection. This ensures the template is readily available for ongoing use throughout your practice, maintaining consistency across your clinical documentation.
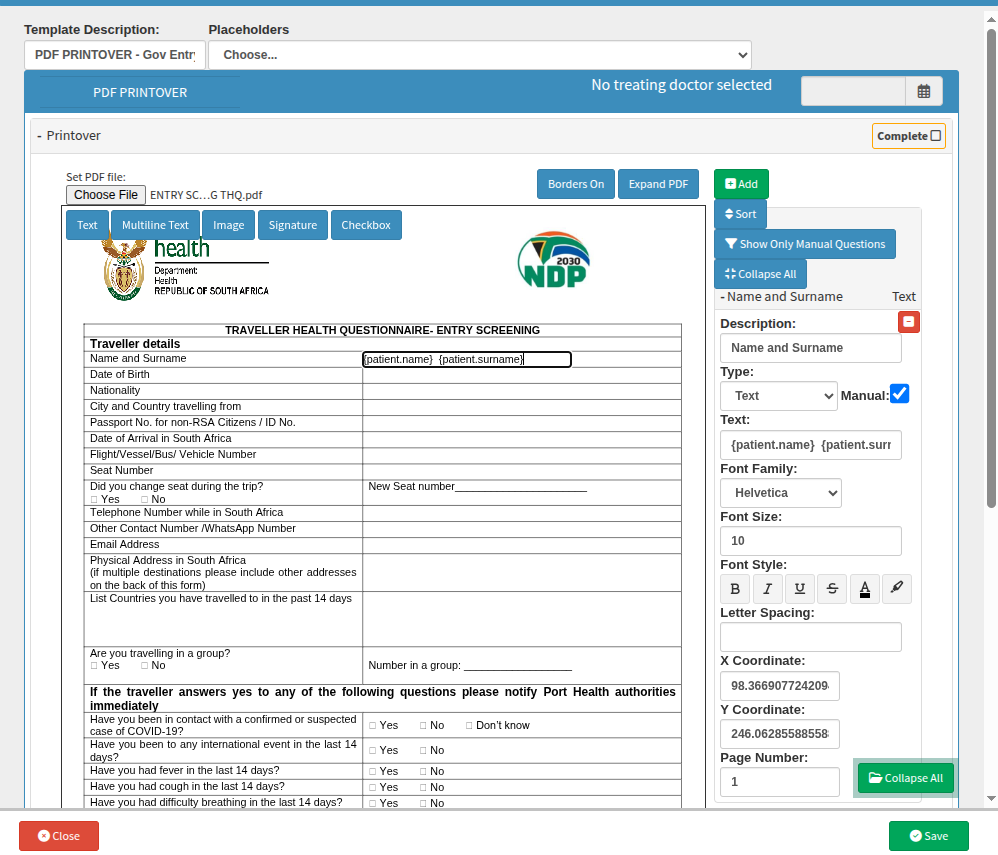
Scenario: The process of registering a PMB on behalf of the patient?
Prescribed Minimum Benefits (PMBs) are registered via the clinical module. To begin this process, select "Diary" from the navigation wheel and navigate to the "Diary" tab. Once you have identified and selected the relevant diary entry, click the "Clinical" button located in the side panel. From there, go to the "Clinical case" tab, then use the "Forms Library" in the side panel to select the form required for PMB registration.
Because the PMB is a PDF Printover document, you must first select that specific form type from the library to access the necessary template. Once the PDF Printover type is active, you can use the dropdown to choose the customised template previously created for your practice.
It is recommended to rename each template according to its specific purpose—for example, "PDF Printover PMB Registration - SureMed"—to maintain an organised list. As the system does not provide a preview of the document before selection, clear and descriptive naming ensures you can quickly identify the correct form. This prevents your library from becoming cluttered as you add more templates.
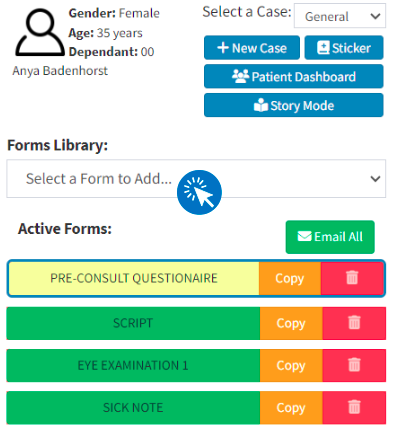
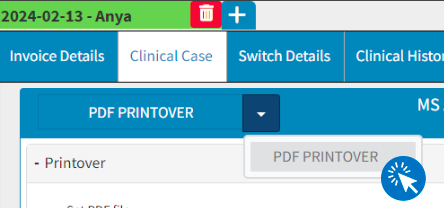
Similarly, if a corresponding email template has been created, it may be selected when sending the completed PMB registration form. Choosing the correct template automatically populates the required fields and attaches the finalised, signed document. Please ensure the patient or applicant signs the form before sending it.
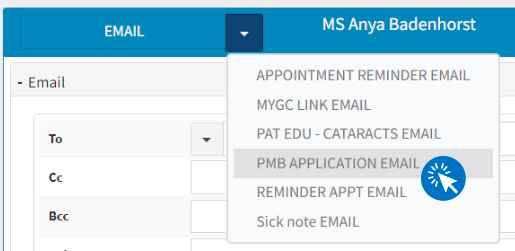
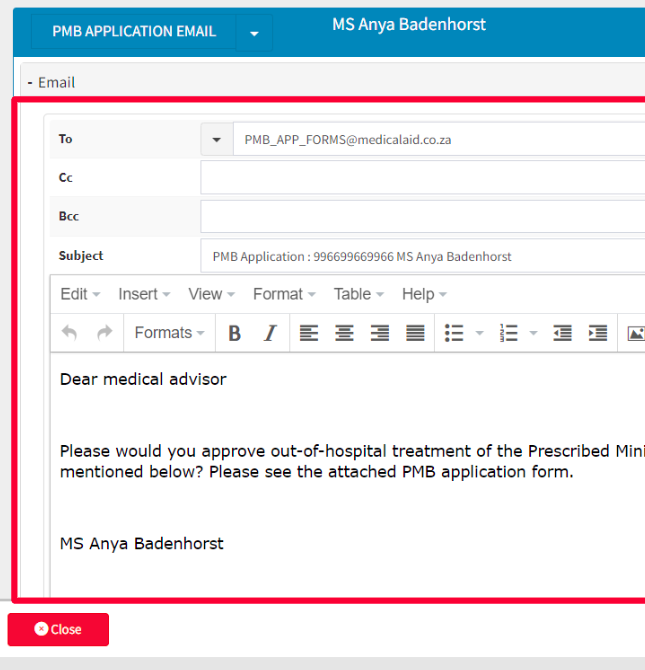
Upon completing these steps, always remember to save your progress and close the window to ensure the completed form is correctly updated and stored. This final action confirms that all captured information is finalised within the system record.

Where to learn more about PDF Printover within GoodX?
The GoodX Click&Learn Courses https://courses.goodx.co.za/
The GoodX YouTube Channel https://www.youtube.com/@GoodXSoftware
The GoodX Learning Centre https://learning.goodx.co.za/
Please note these courses are only modules and are different from the Click&Learn courses. To learn more about PDF Printover, you can use these search terms:
| Date of Change | Changes | Editor |
| 2026 05 14 | Established Page | Chendene Barnard |
| 2026 09 22 | Spell-check | Chendene Barnard |
| GoodX Course: Tasks


What is the "Tasks" feature?
Tasks are multifunctional and can be tailored to your practice's specific requirements. You can use them as manual reminders, to assign duties to colleagues, or trigger them automatically based on practice setup and events. These triggers include, but are not limited to, claim rejections, the approval of scheme authorisation billing codes, and subsequent authorisation follow-up tasks such as creating or updating smart sticker protocols or making the necessary follow-up calls.
What can be created as a Task in GoodX?
You can create a wide variety of tasks tailored to your practice's specific needs. For practices managing authorisations, a task can be automatically generated by selecting the relevant checkbox when adding an authorisation number to a debtor or patient profile. Similarly, pathology results imported into GoodX can be linked directly to a patient and assigned as a task to a specific representative or practitioner using their verified mnemonic code.
If you utilise the automated credit control management system or the reports management screen, tasks will automatically populate as call events. To streamline repetitive workflows, task templates let you pre-define responsible users; when you create a task using a template, it automatically assigns it to the designated staff member. Alternatively, tasks can function like digital sticky notes, serving as simple reminders for general instructions or daily practice to-dos.
What does a task look like?
Within the Communication Wheel, the Task tab will automatically display the default tasks assigned to the currently logged-in user.
You can customise and rename these columns to suit your entity's specific requirements. To manage your workflow effectively, you can filter tasks to view all entries or exclude those already marked as completed. Additionally, tasks are not restricted to a single individual and can be assigned to multiple people simultaneously.
The numbered bubble above the "Tasks" tab indicates the total count of assigned tasks pending for that user. Below is an example of a manual task configured with a "Call Event" that requires a follow-up call to complete.
Users can filter the task list to view all entries or exclude those already completed.
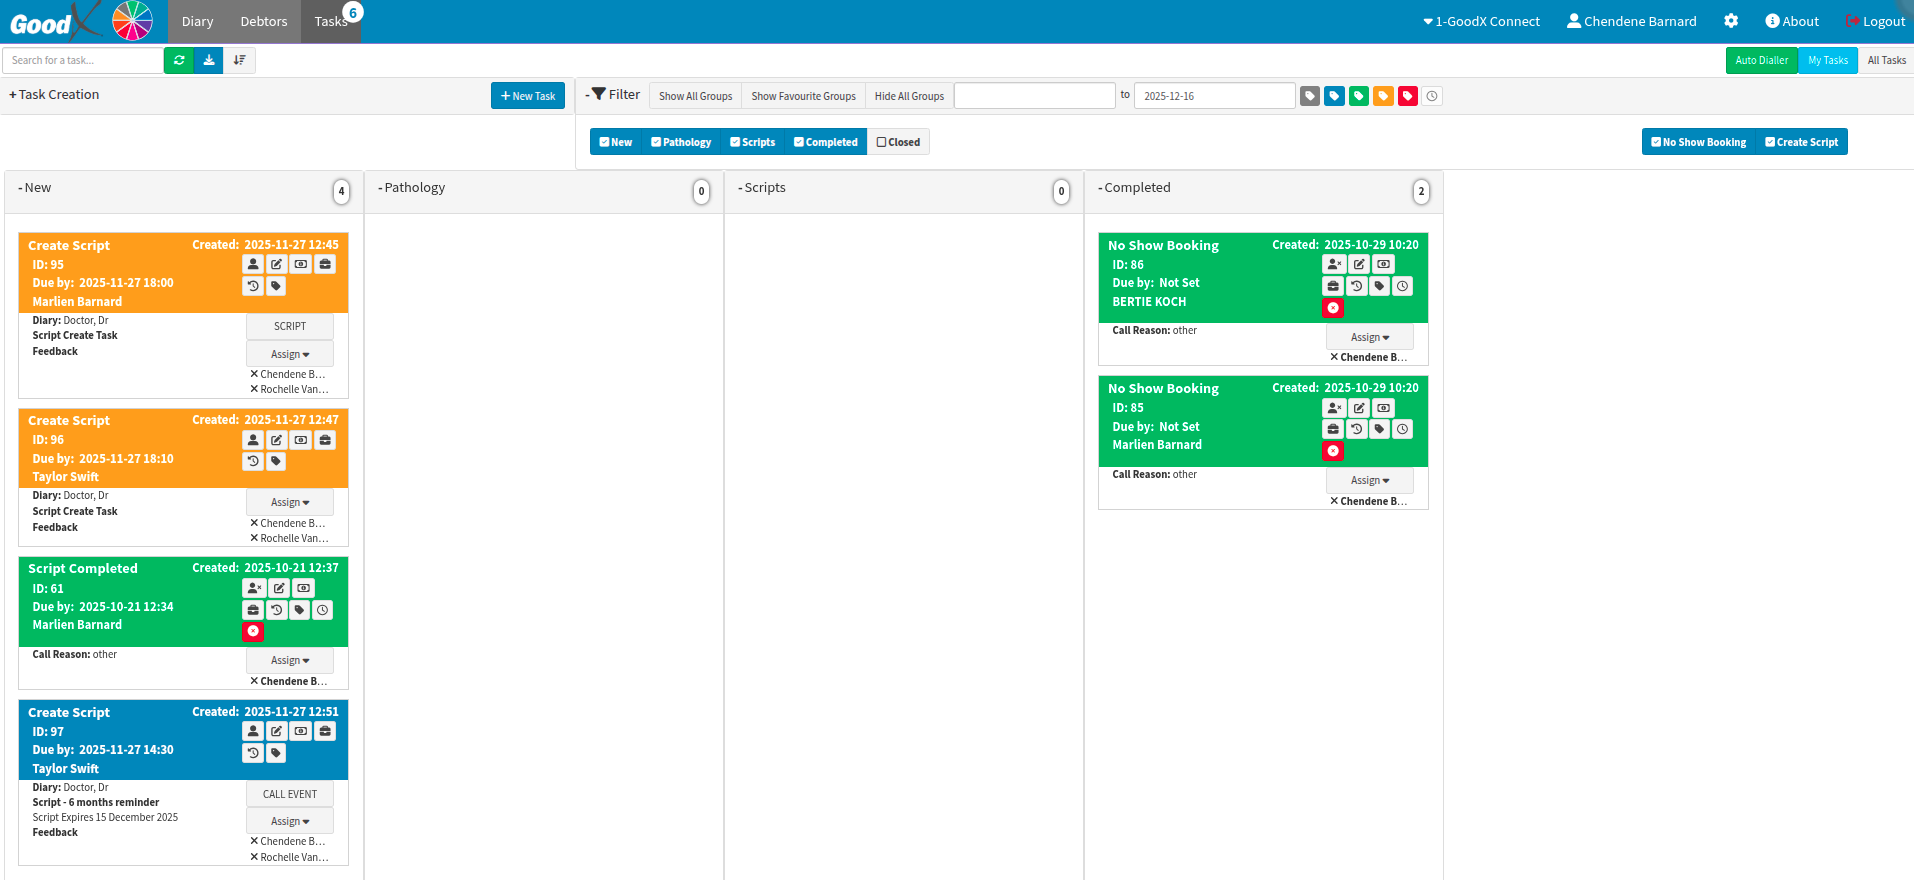
A standard task is categorised and listed as a "Task Item" within the system. Where a template is selected, the task will be renamed to the template name.
When a call request is generated via the Automated Credit Control Management (ACC/CCM/CCA) system, it will be categorised as a "Call Event" task type for easy identification.
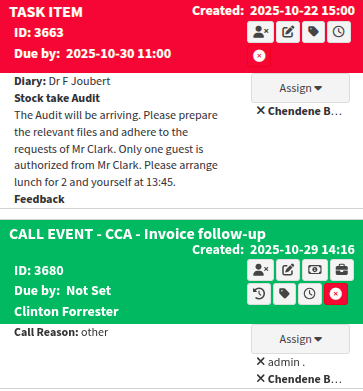
How are tasks identified as assigned?
If your practice has dedicated personnel for specific workflows, you can create tasks in GoodX to notify the relevant team. These tasks are flexible: you can leave them open for the next available staff member to claim or assign them to a specific individual for completion.
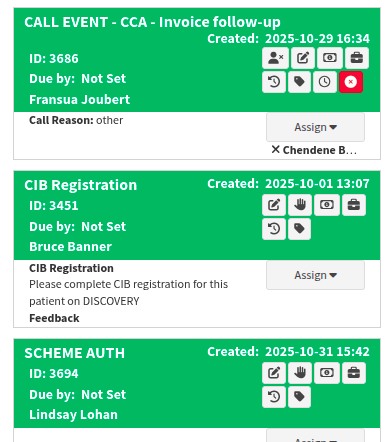
To determine if a call request is assigned, look for these two indicators:
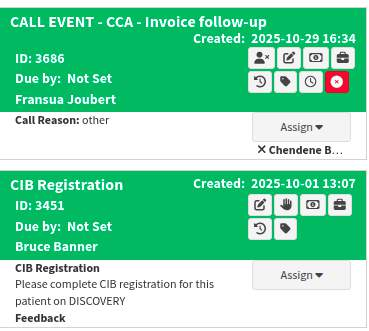
Assigned Tasks: These feature a person icon alongside the name of the user responsible for the task.
Unassigned Tasks: These feature a hand icon.
By clicking the hand icon, you are "claiming" the task and taking responsibility for its completion.
How is a Task created?
The navigation wheel is your most efficient way to move through the software. To begin, select "Communication" from the navigation wheel to access your messaging and task management features.
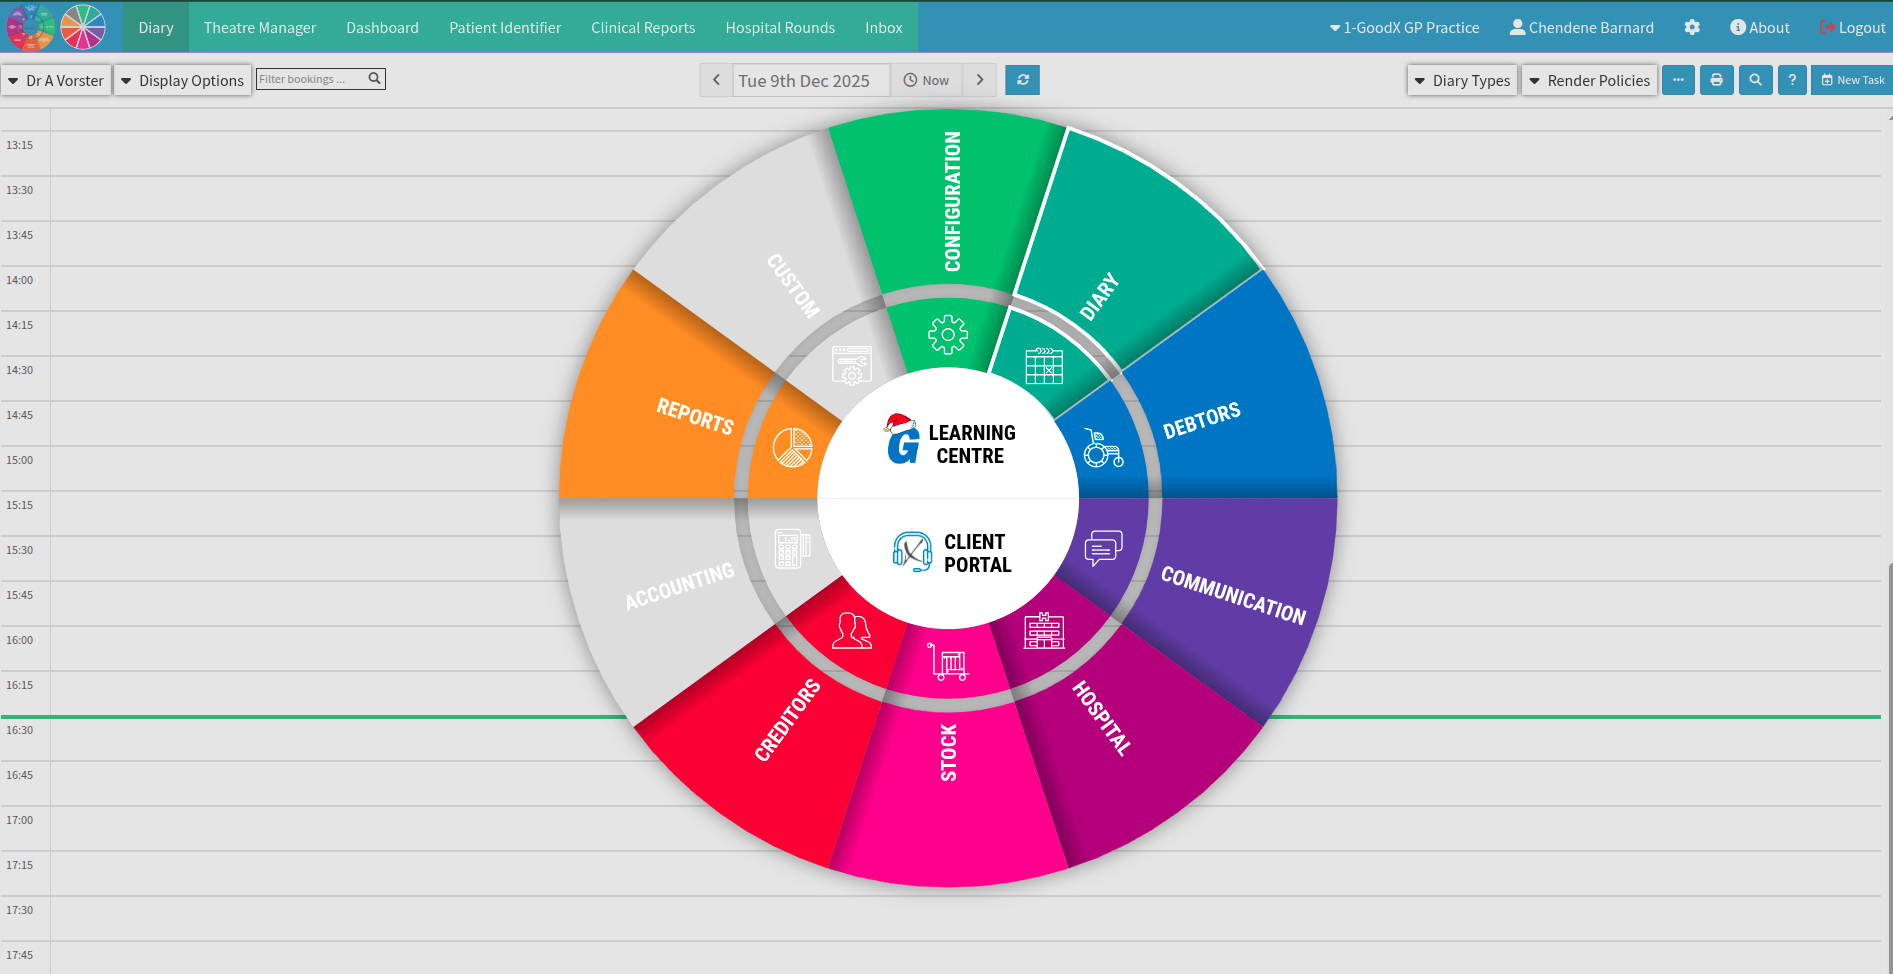
Navigate to the Tasks tab and select "+ Task Creation" to generate a new task for your team.
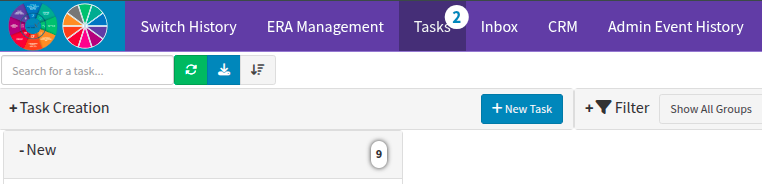
Once the menu is expanded, you can choose to create either a Task Item or a Call Event. While standard tasks can be created without being linked to a specific debtor, a Call Event requires a debtor to be specified first.
To manually create one from the tasks screen, expand the "+Task Creation" menu and select "+ New CALL EVENT". Keep in mind that this option will remain inactive until you define a patient.
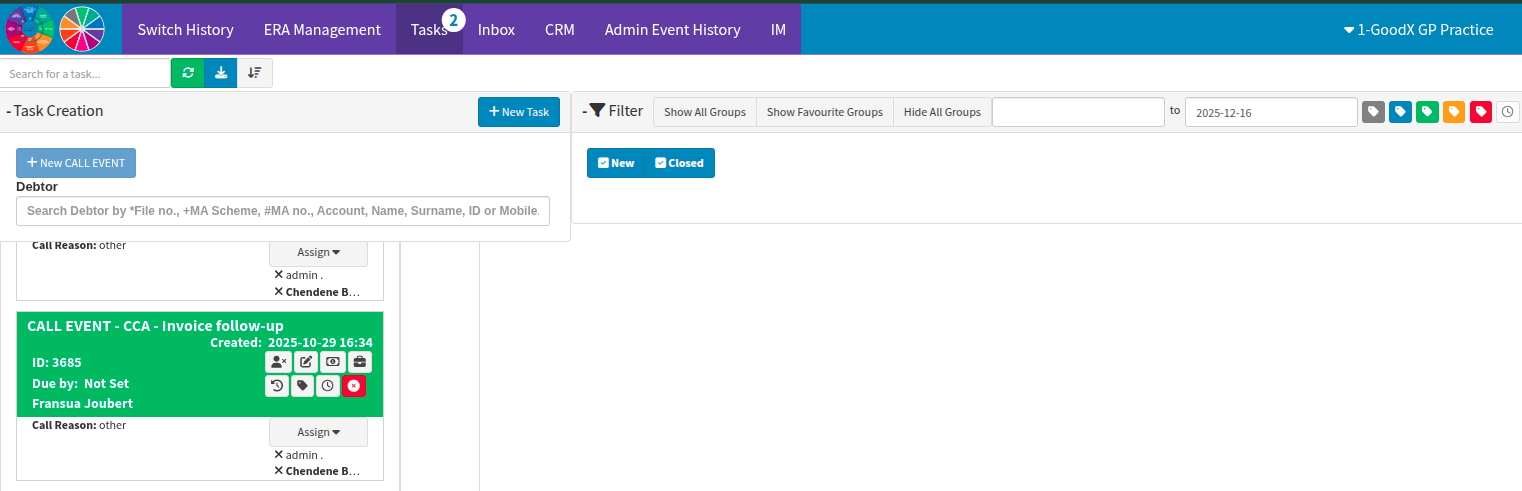
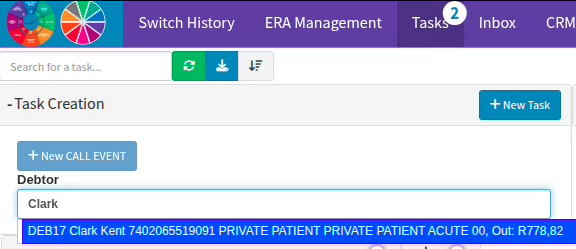
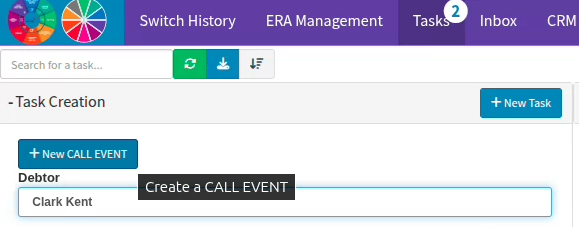
If your practice has established templates, the dropdown menu will display all available options from your CALL EVENT templates. Selecting a template will automatically populate the relevant information for the specific patient, saving time and ensuring consistency. Similarly, when creating a new task, the dropdown menu will present pre-loaded templates specific to the entity for common actions. For example, you can select a template for script requests, allowing the practice to route client requests to the practitioner for completion quickly.
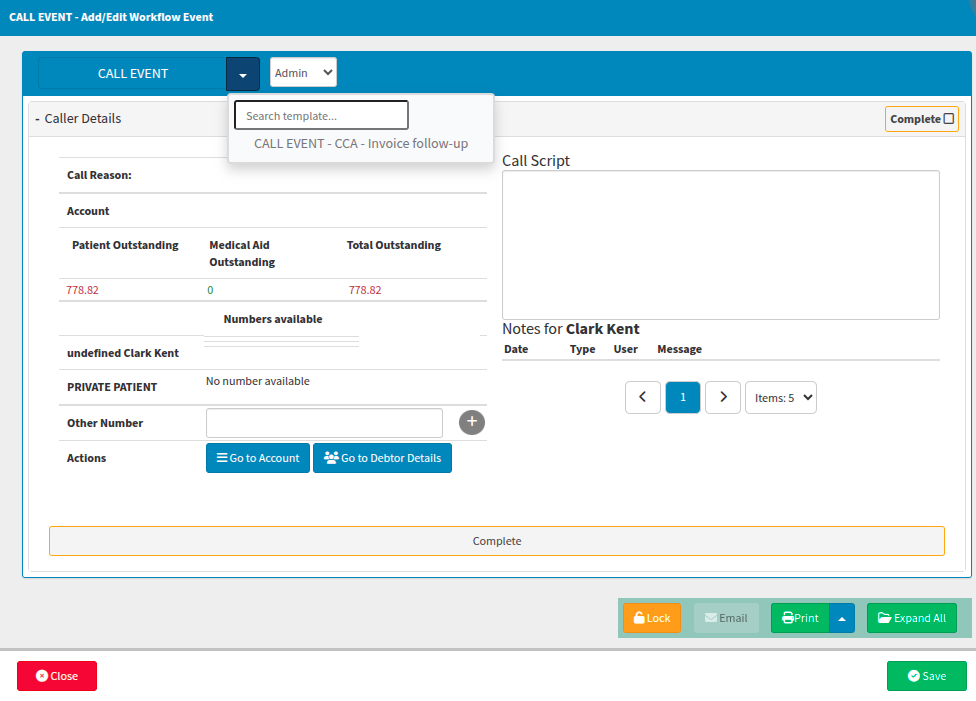
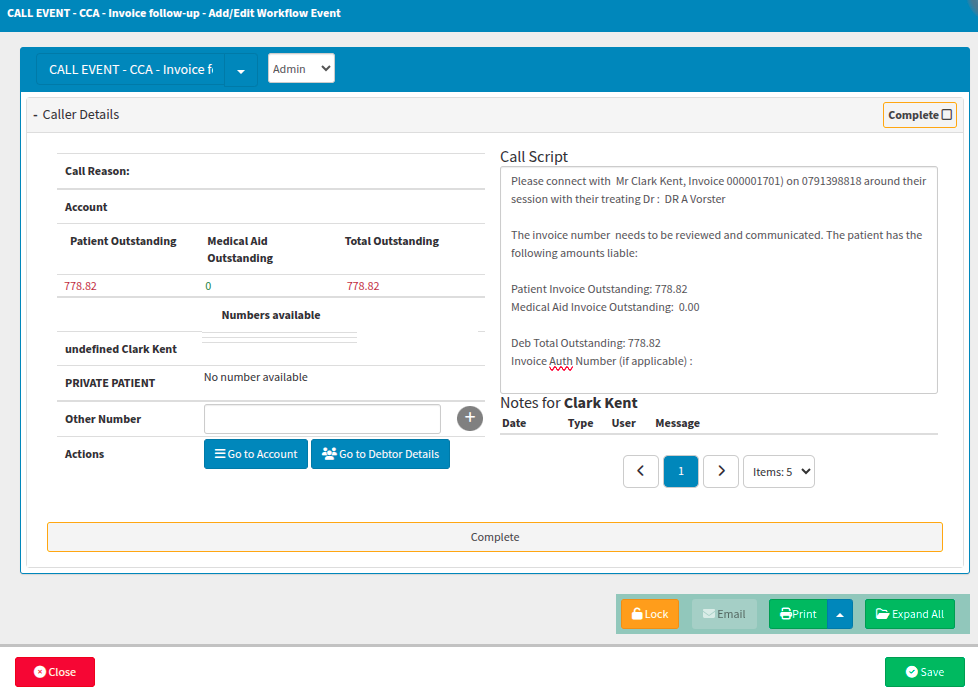
In the scenario above, the payment team creates a "Call Event" task for the reception team to action. To access these, select "Communication" from the GoodX navigation wheel. By default, the "Tasks" tab displays tasks assigned to the currently logged-in user.
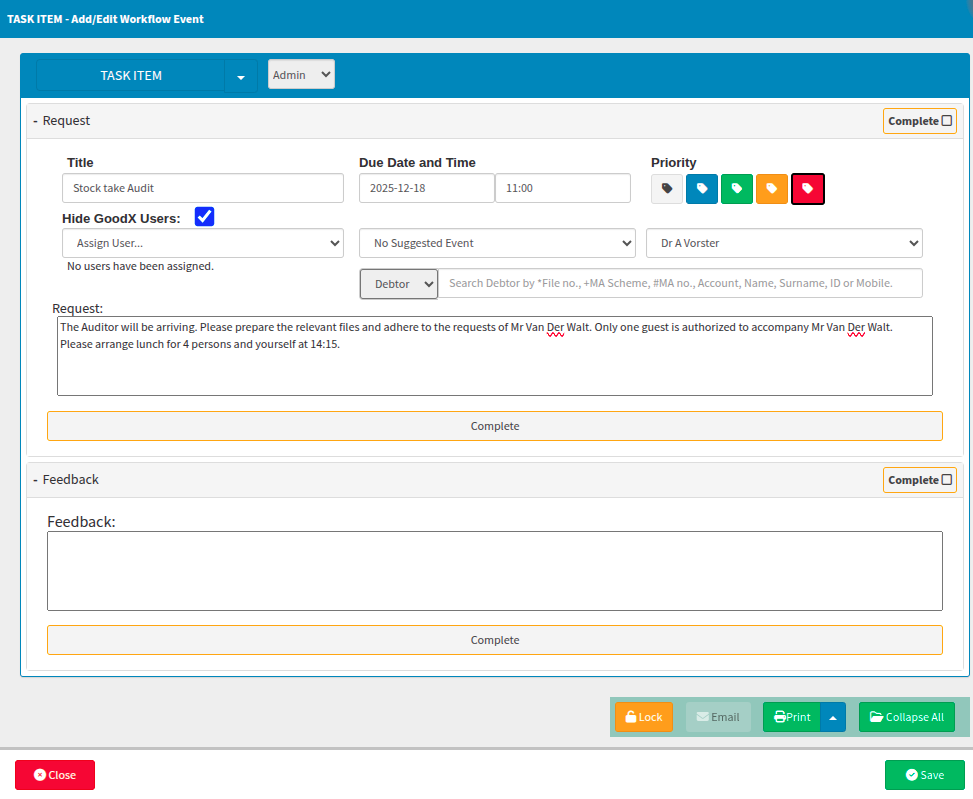
If the request is uncommon and no template fits, you can complete the setup manually. Assign the relevant user responsible for the task, set a priority level (if applicable), and provide specific instructions or details regarding the required action. Once you've finalised the details, select "Save" to create the task.
How are tasks managed?
The newly created task will appear based on your active date filter. To keep your workspace organised and clutter-free, you can also filter by open or closed tasks; this hides resolved items and keeps your focus on pending work.
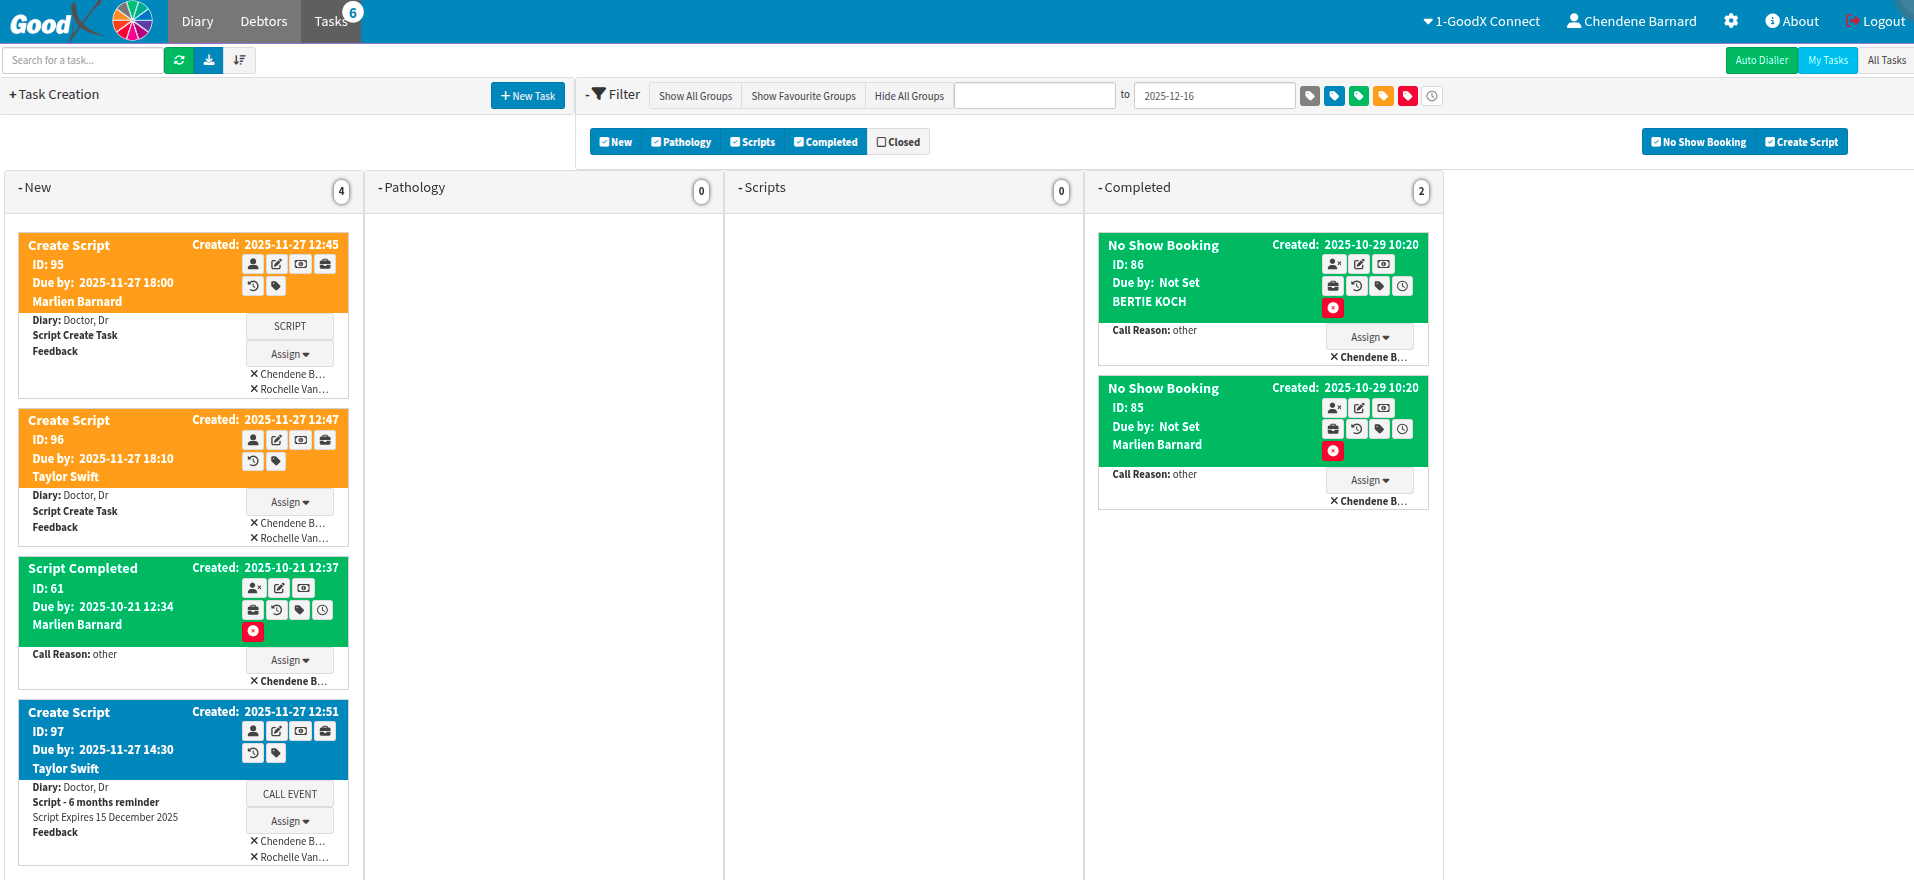
To manage a task, double-click it to open the details. From there, you can add notes for documentation and mark the task as completed when it's finished.
If the workflow changes, you can reassign the task to a different staff member. You can also add additional users to the task, which is useful if you need feedback or collaborative input to resolve the item.
The assigned user can add comments directly into the Feedback section of the task. Any notes entered here are visible to all users assigned to that task, ensuring clear communication across the team.
Depending on your practice's preferred workflow, the task creator can either add themselves as an assignee to stay updated or request that the task be reassigned back to them (or another relevant user) once the initial action is completed.
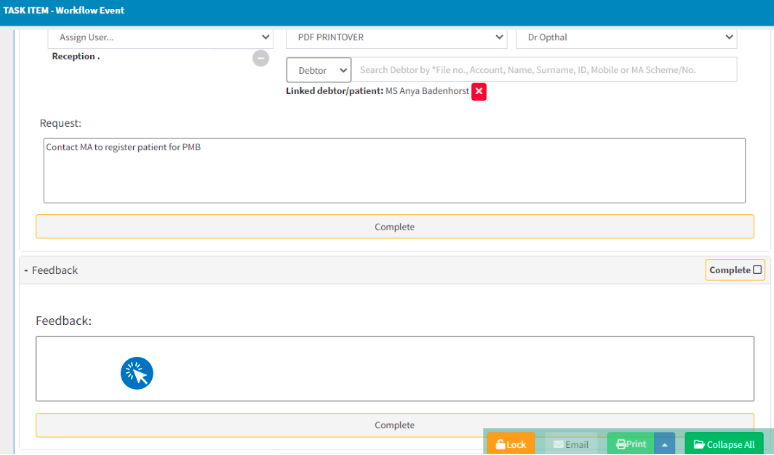
You can add feedback at any time, even after the initial task setup. In cases where multiple users are assigned to review or manage the same task, it is important to note that the system tracks status individually: a task marked as finished will only reflect as completed for the specific user who ticked it off. This ensures that every assigned team member has the opportunity to review the task before it disappears from their personal queue.
To resolve diary tasks, you can either mark them as completed or select "X Close" directly within the diary view of the doctor linked to the task. Tasks can be dragged-and-dropped between designated columns.
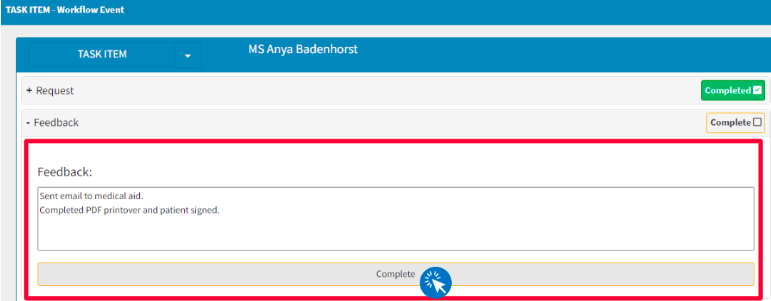
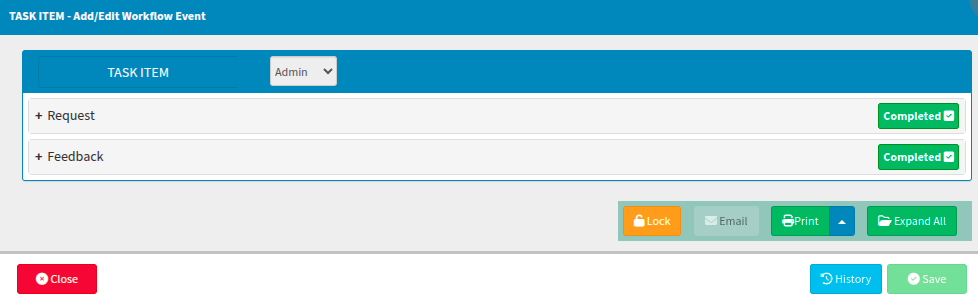
If you need to switch perspectives, use the "Display Options" dropdown menu on the diary screen; this allows you to toggle back and forth between the Diary view (for appointments) and the Task view (for pending actions). To finalise a task, select the lighter-colored button depicting "X Close". This will close the task and remove it from your current list, depending on your specific diary settings.

How are Pathology results handled as tasks in GoodX?
Practitioners can transmit lab test requests directly to pathologists manually or electronically, with results returned electronically and automatically linked to the patient's profile. This integrated workflow reduces the risk of manual errors and improves turnaround times. By enabling faster, more informed clinical decisions, this feature ultimately enhances the standard of patient care.
Please contact your relationship liaison to ensure your preferred pathology providers are correctly activated and registered on your GoodX Web platform. When requesting the addition of pathology providers, you must submit official documentation confirming the practitioner's mnemonic code to complete setup.
Pathology results typically arrive within three to five business days, though some cases may take up to ten business days to process. Should the results remain unavailable on the eleventh business day, please notify us if the pathology report has not appeared as an automated task or if the data is missing from the GoodX pathology integration report system.
While we continue to expand our support for additional laboratories, we currently support integrations with several specific systems.
You can currently transmit lab requests to:
Skylims
Prelink
Chiron
Afrilims
Lancet Lab (Ampath Lab)
Pathcare
Vermaak & Partners Lab
Dynacare [Canada]
You can currently receive the results from the following laboratories:
PathPoint
Hamadilab
Ampath
Sapath
JDJ
Lab24
Bledlab
Afrilims
GlobalLabs
Vermaak
TogaLabs
IVC
Lancet
Pathcare
Dynacare
Path24
Nanolabs
Pathology results may also be accessed through a dedicated report view by navigating to the GoodX Wheel and selecting Reports. From there, proceed to the Clinical Reports tab and select the Pathology sub-tab. When configuring the report filters, ensure that the correct treating practitioner is selected and that the search criteria are set to Pathology from the dropdown menu.

To refine your dropdown for a specific laboratory result, you may also apply a filter based on the particular lab involved.
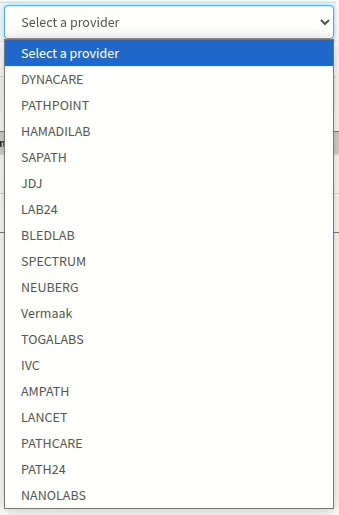
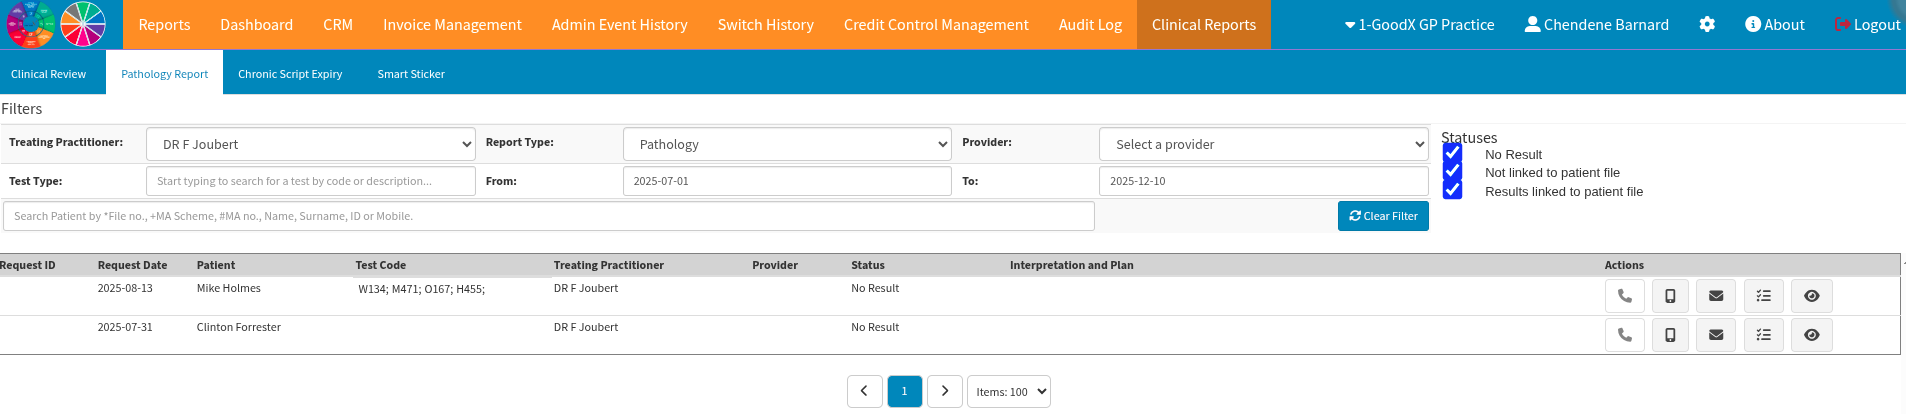
Once you identify the necessary results, the practitioner has several ways to contact the patient. By selecting the eye icon, you can review the original pathology results and call the patient directly from the report screen.
By selecting the menu view icon from the actions bar, practitioners can generate tasks for staff members to complete. These tasks may include scheduling follow-up calls or initiating other actions based on the patient's results or the practitioner's specific requirements. To further improve efficiency, you can create task templates to minimise administrative input, freeing up more time for patient care.
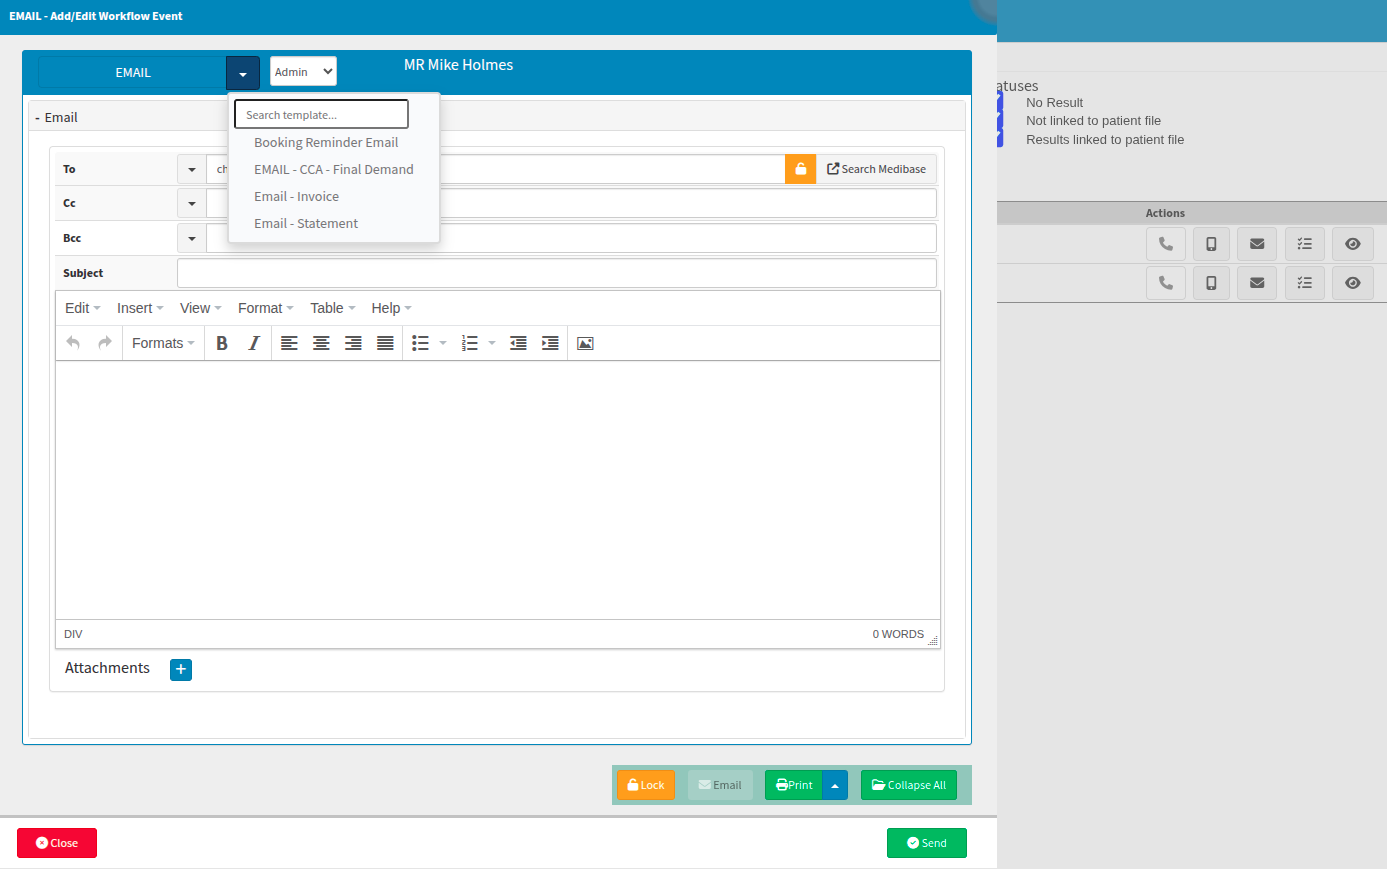
A lighter grey phone icon indicates that your VoIP calling function is currently inactive. Alternatively, if a telephone conversation is not required, the system provides options to send an email or a text message.
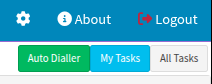
Gentle reminder on “Dial” options versus the “Auto Dialler”
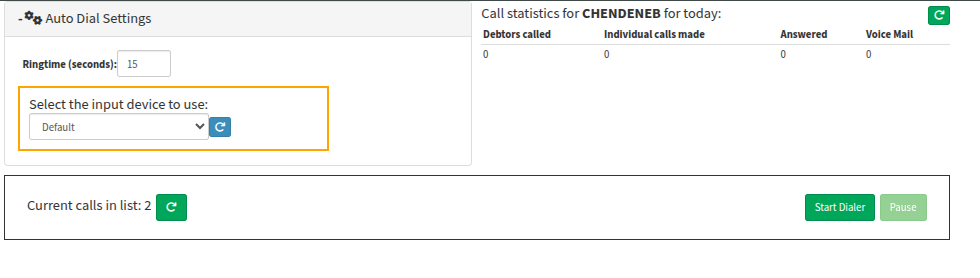
The auto dialler is integrated with the Automated Credit Control Management system for continuous calling and becomes available for selection only once the VoIP service is fully activated. Any Automated Credit Control Management call tasks or manual call events created within the system will automatically populate under the auto dialler task list for streamlined processing.
Please note that utilising the Automated Credit Control Management system may incur a service fee depending on the specific application, and users might be required to subscribe at an additional cost.
The Automated Credit Control Management is designed to automate repetitive processes, such as managing call requests to multiple debtors or triggering specific responses to system actions. Given the extensive customisation possibilities available, you are encouraged to contact your client liaison for additional software support and further information on how the Automated Credit Control Management can best serve your practice.
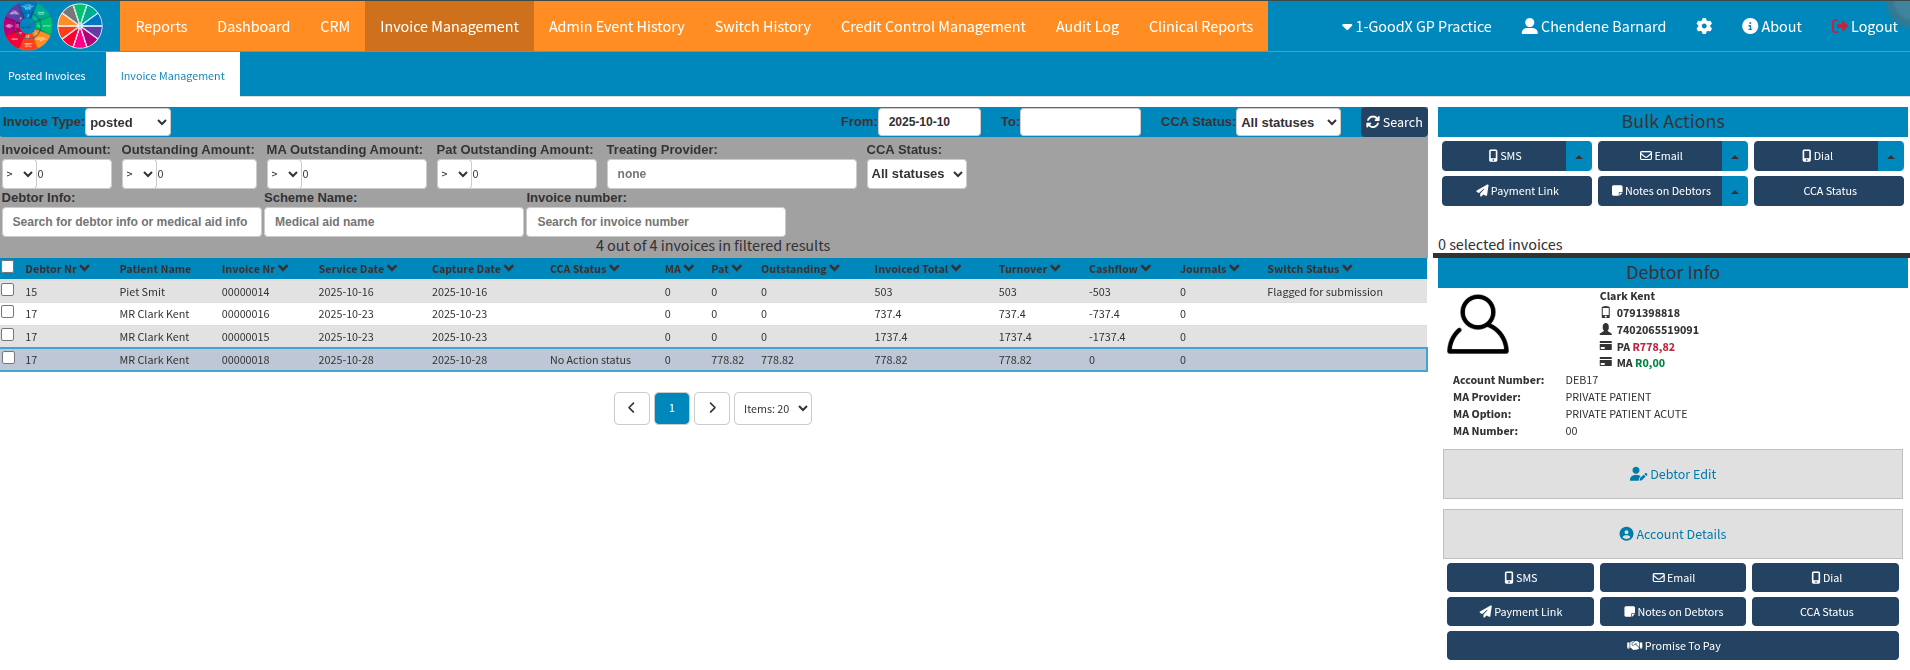
By manually selecting the relevant debtors to be contacted and clicking the Dial button, you generate bulk Call Event task items. These items will be allocated either as unassigned tasks or directed to a designated representative within your practice for further action. These calls will be reflected on the auto dialler interface and will proceed as a continuous calling cycle until a practice representative chooses to pause or stop the process.
Once a task is assigned, the designated staff member can record relevant notes and mark the action as completed during the continuous calling as each call populates a linked call event task for scripts or notes.
For further assistance or detailed information on task management, please get in touch with your client liaison or software support.
Where to learn more about Tasks within GoodX?
The GoodX YouTube Channel https://www.youtube.com/@GoodXSoftware
The GoodX Click&Learn Courses https://courses.goodx.co.za/
The GoodX Learning Centre: https://learning.goodx.co.za/
Please note these courses are only modules and are different from the Click&Learn courses. To learn more about Tasks, you can apply these search terms:
| Date of Change | Changes | Editor |
| 2026 05 13 | Established Page | Chendene Barnard |
| 2026 09 22 | Spell-check | Chendene Barnard |
| GoodX Ophthalmology Courses



What is the “Eye Eval 2 & Harmony” feature for an Ophthalmologist?
This powerful medium helps you complete your examinations and is fully linked to various aspects of the GoodX software system to ensure a smooth, integrated practice management experience.
Please note: Utilising Eye Eval 2 & Harmony for Ophthalmologists with GoodX is an optional premium service. Users must sign up for this feature for an additional fee, calculated based on the specific features and integration needs selected for your practice.
The GoodX Eye Eval fields feature self-learning capabilities, allowing you to either type new information or select from a saved list of items that automatically updates based on your previous entries. You can easily manage these lists by removing any duplicate or inconsistent data you don't want the system to retain.
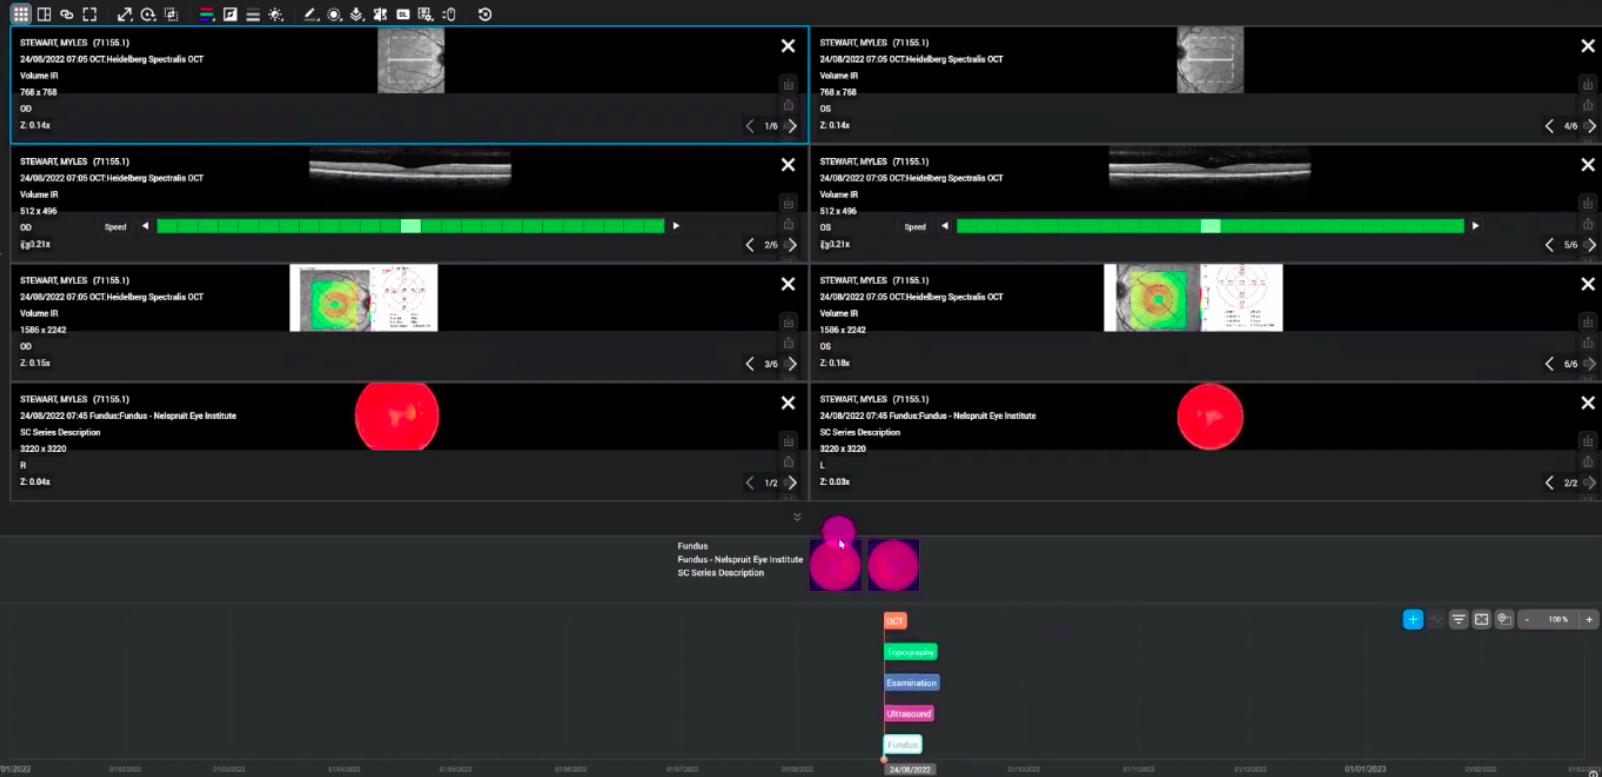
Currently, GoodX integrates with DICOM-compatible diagnostic equipment through Harmony RS, which requires an active Harmony subscription. DICOM (Digital Imaging and Communications in Medicine) is the international standard used for storing, transmitting, and exchanging medical images and related data, thereby ensuring seamless interoperability between imaging devices from various manufacturers.
What are the “Eye Eval 2” clinical form functions or features?
The primary benefits of the Eye Eval 2 clinical examination forms include easy invoicing, effortless completion of various form sections, and straightforward use of custom pills. The system also supports streamlined communication and report generation directly from the platform.
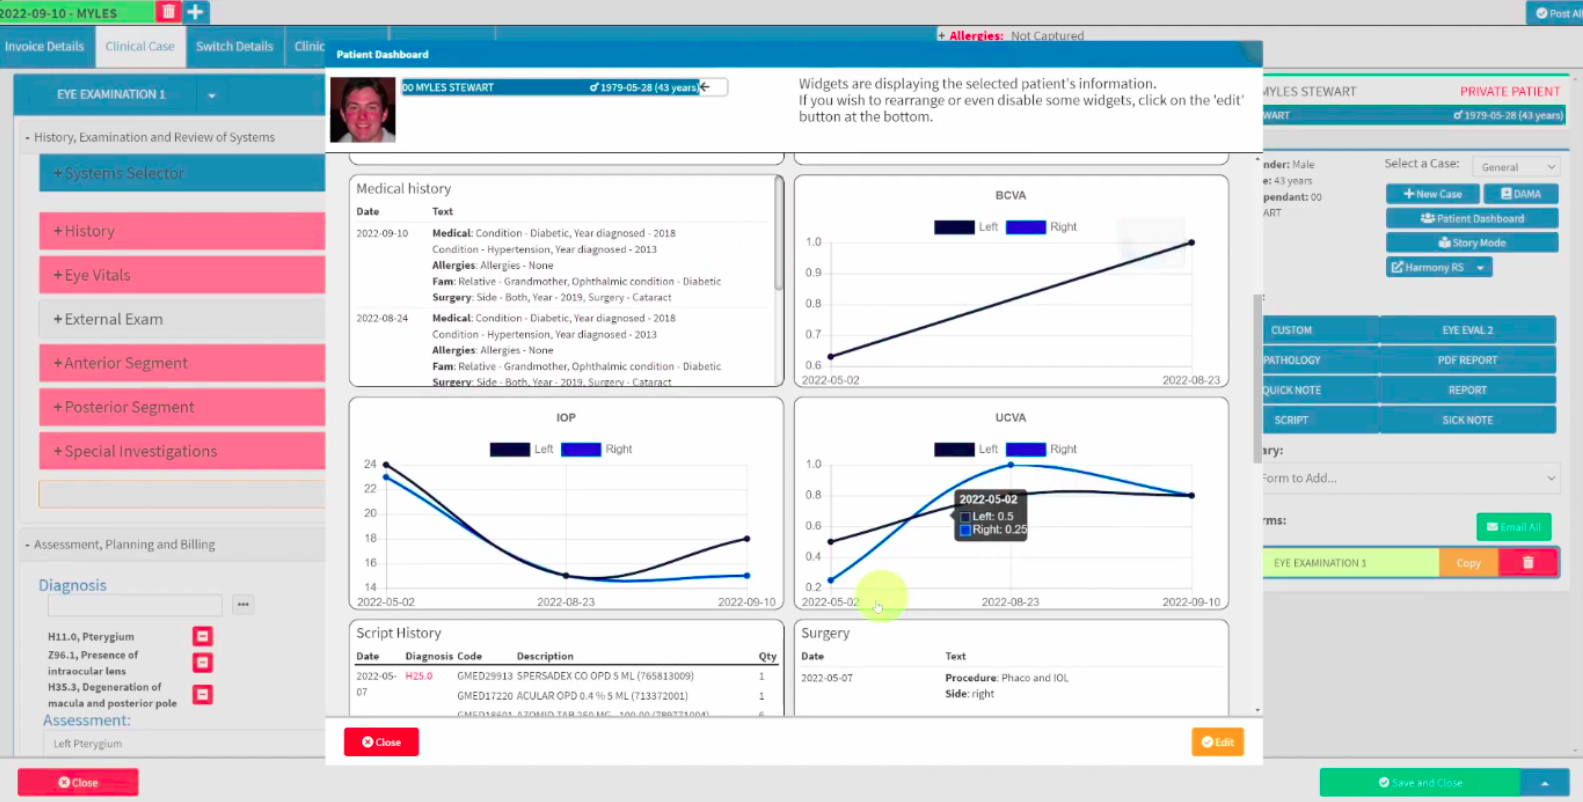
When preparing medical aid motivations, you have access to a fully customisable Patient Dashboard which draws its information from your clinical forms. This dashboard can be tailored to your practice needs, allowing you or your team to efficiently review the most recent patient history and activities at a glance.
Invoicing with ease
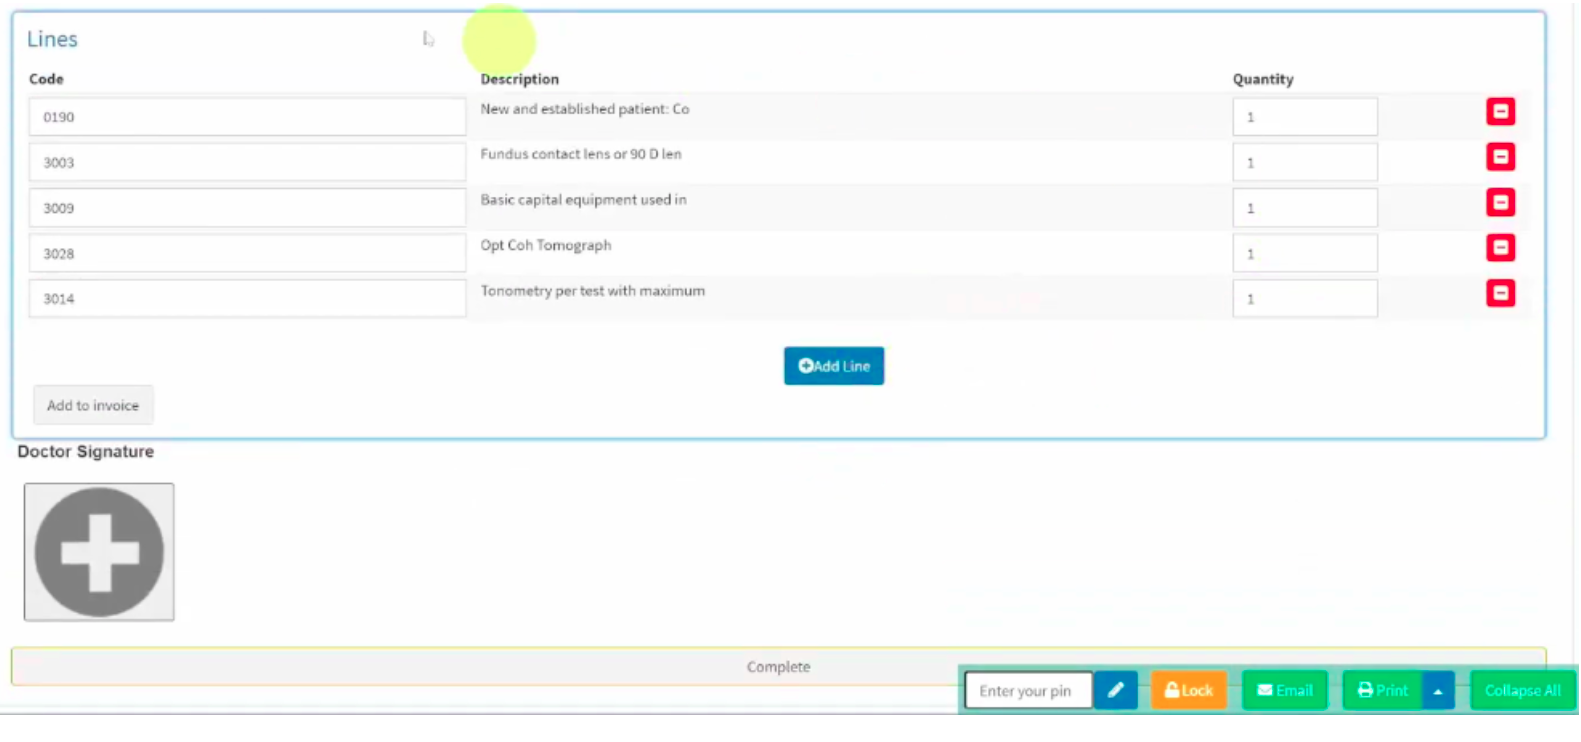
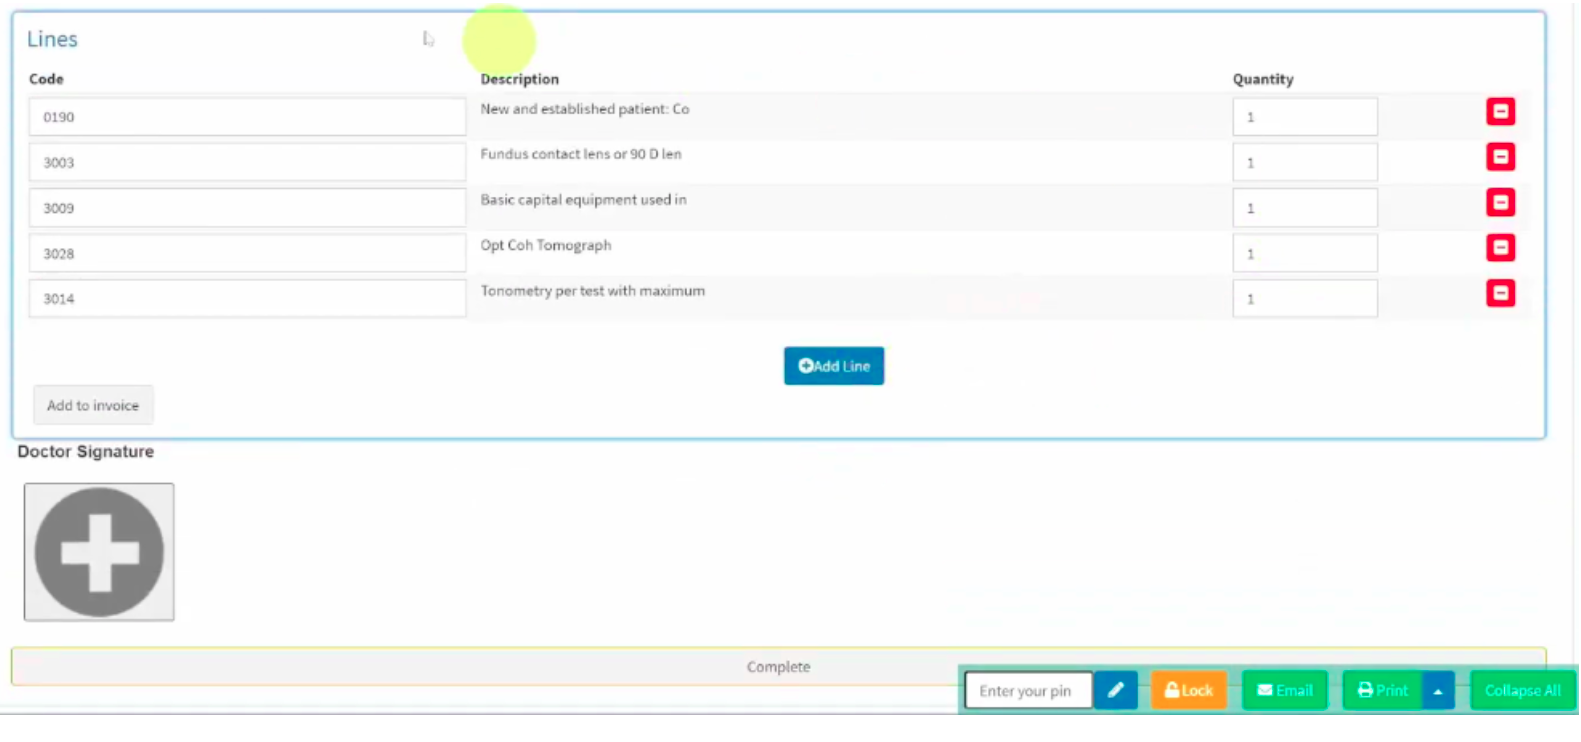
The clinical "Eye Eval 2" form is a comprehensive, robust tool designed to record every aspect of a patient's eye examination in a simplified yet thorough way. This form integrates seamlessly with your Harmony RS machine results and automatically populates linked invoice line items and ICD-10 codes based on the clinical information completed during the assessment. For your convenience, these ready-to-bill line items appear at the bottom of the examination form, ready to transfer to an invoice if desired.
You may add additional invoice items to the patient's invoice before finalising the examination. The examination is officially completed once the practitioner adds their signature. Please note that you cannot push any changes or additions to the invoice after the signature has been applied.
Completing form sections with ease
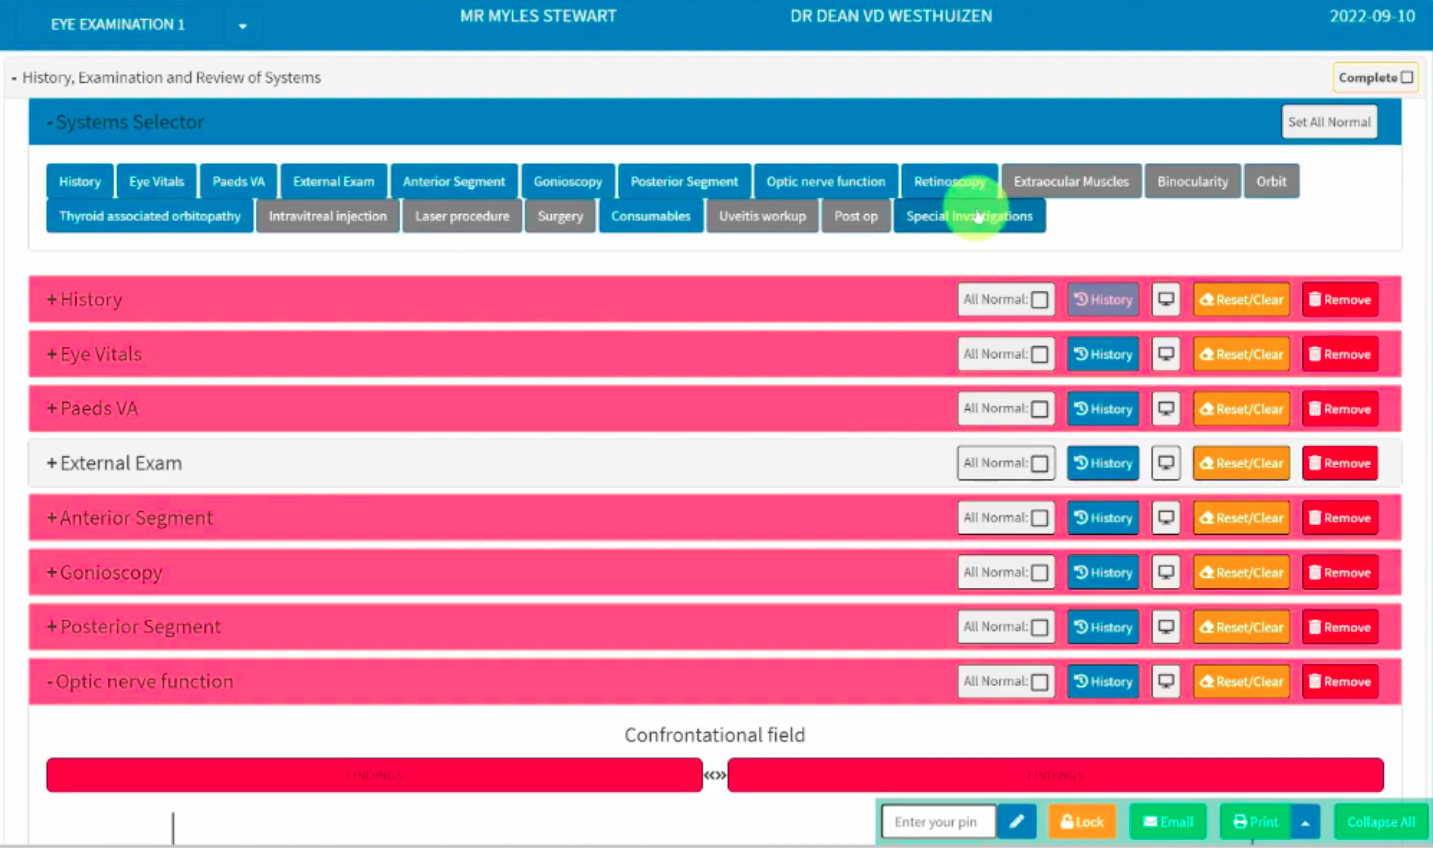
The "Unchecked" status is set by default and can be toggled continuously between "Unchecked", "Normal" (or the field-specific equivalent to normal), and "Findings".
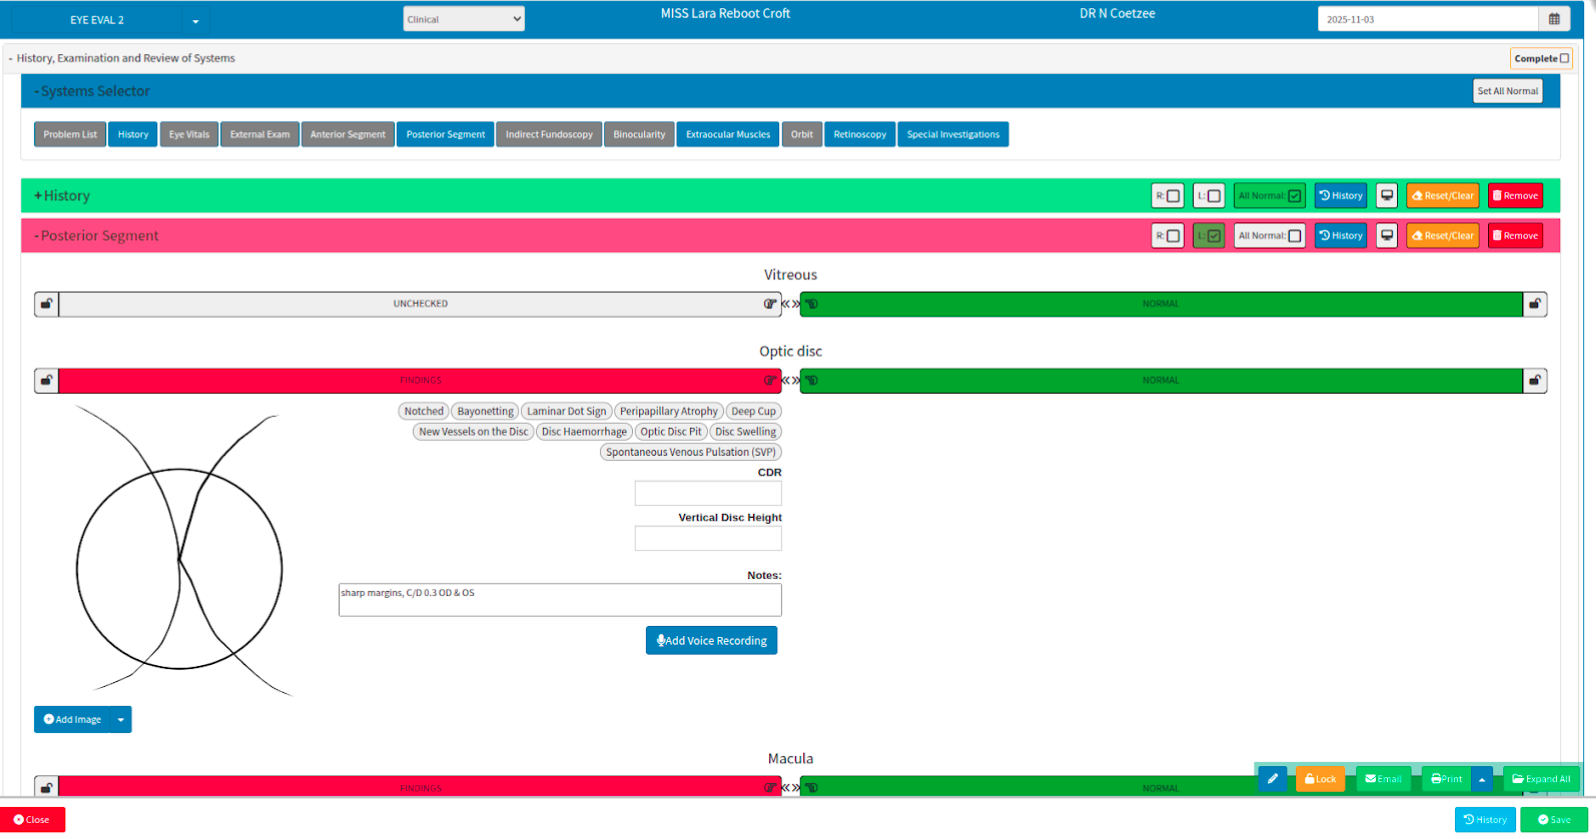
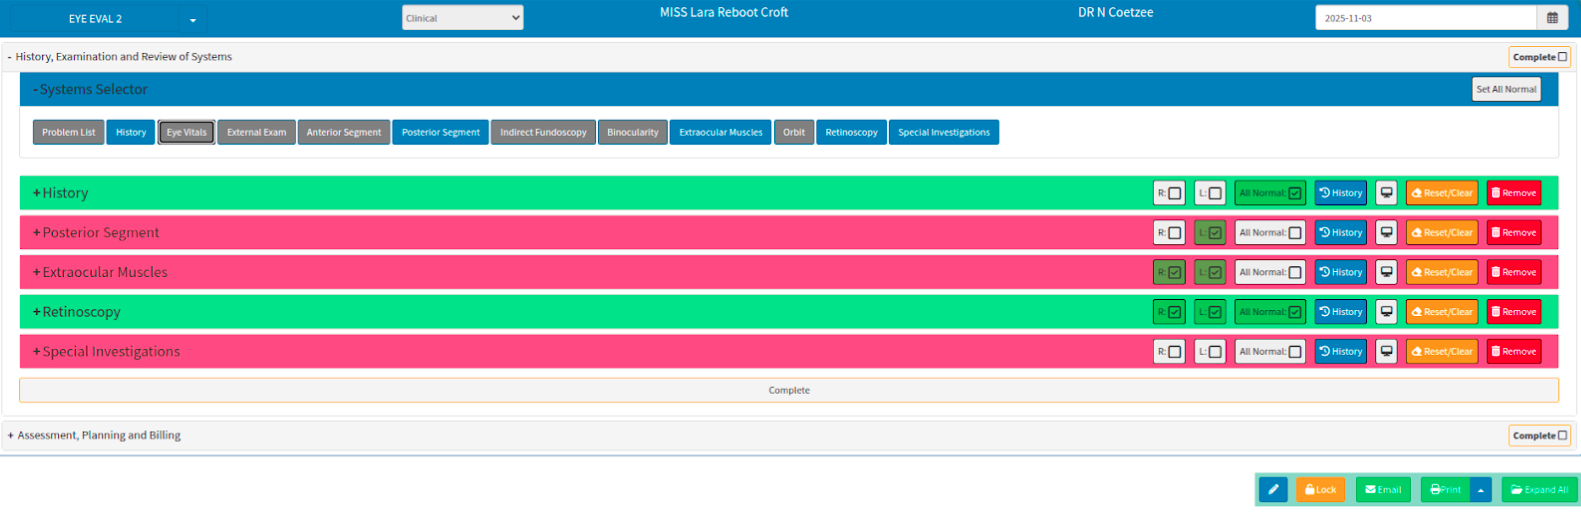
The form view menu is managed using the "+ Systems Selector" option. This feature allows you to hide various selected sections from the current view, with the options expanding or collapsing in an accordion fashion as they are toggled. Selecting a section once will grey out the button and hide that specific section from the form layout. Reselecting the same option restores the section, making it visible on the form again. Expanding this menu allows you to see at a glance if any options are currently hidden, enabling you to conceal sections that are not required for the specific examination.
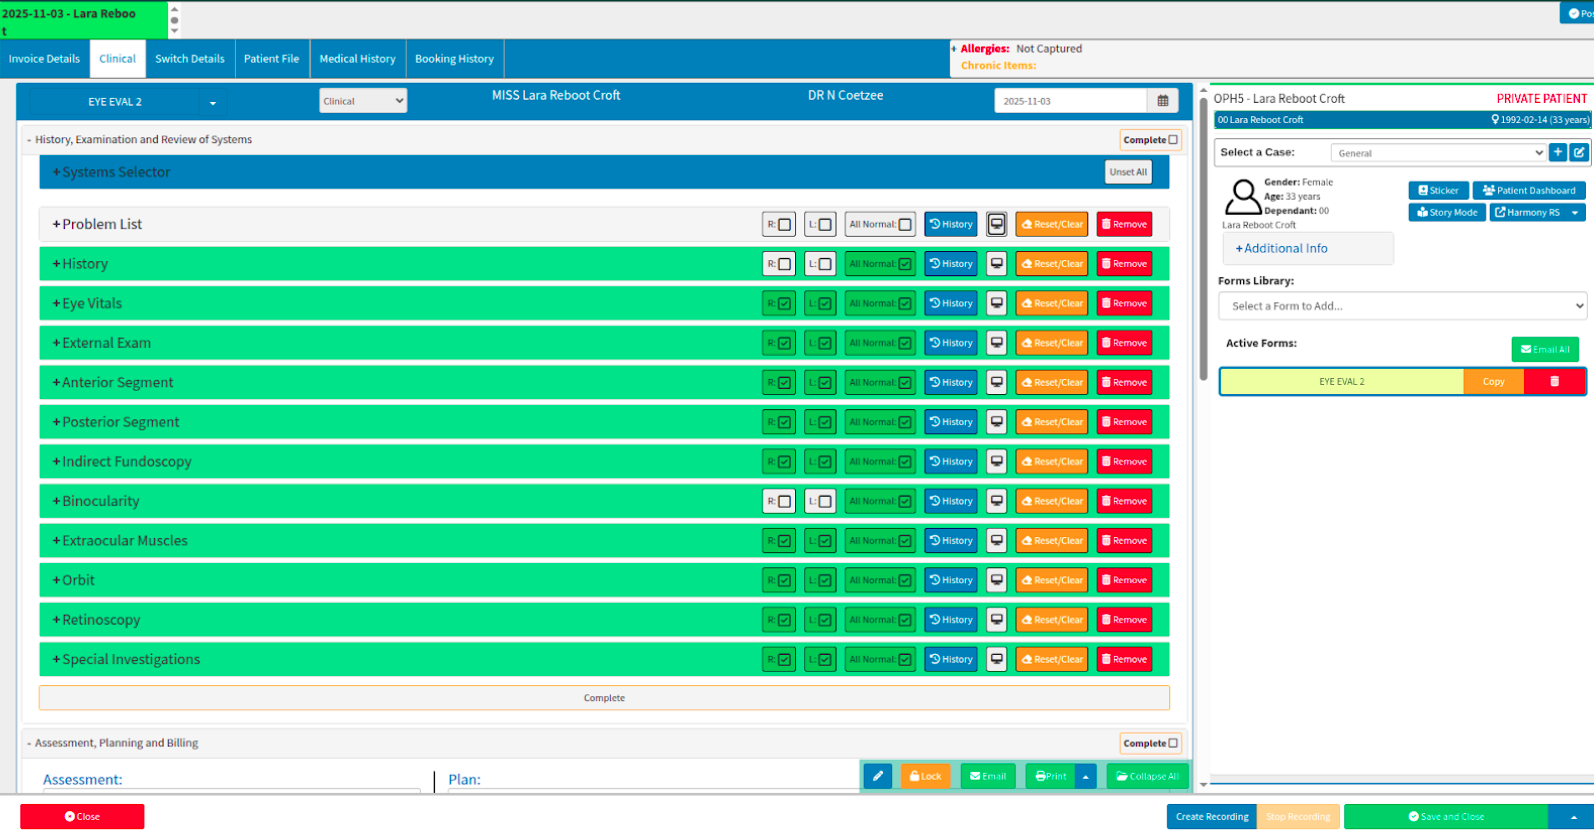
The "pills," or default selections visible on the form, are fully customisable to align with your specific practice preferences. You can draw images for reference notes. The pills are fully customisable. The configuration and ease of use regarding custom pills linked to the Eye Eval 2 form are discussed in detail in the latter part of this guide.
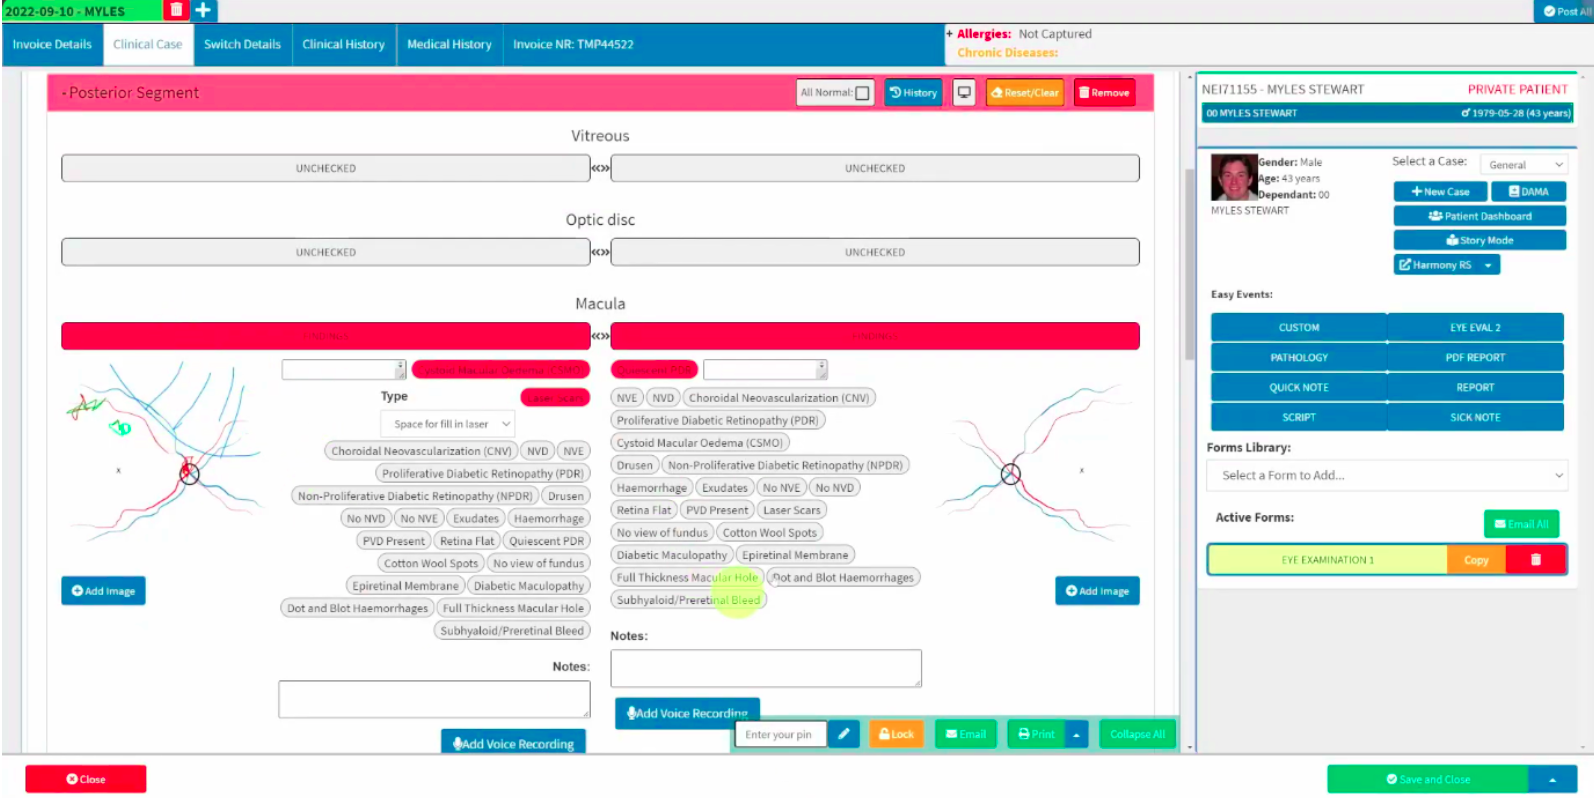
Example of custom form preference options on the Eye Eval 2 form
What are the unique aspects possible within the “Eye Eval 2” clinical form?
As you progress through the form, the associated ICD-10 codes will automatically populate at the bottom of the form under the "Assessment, Planning and Billing" section based on your selections. You can add additional ICD-10 codes at any stage by selecting the ellipsis menu in the blank area located below the Diagnosis section.
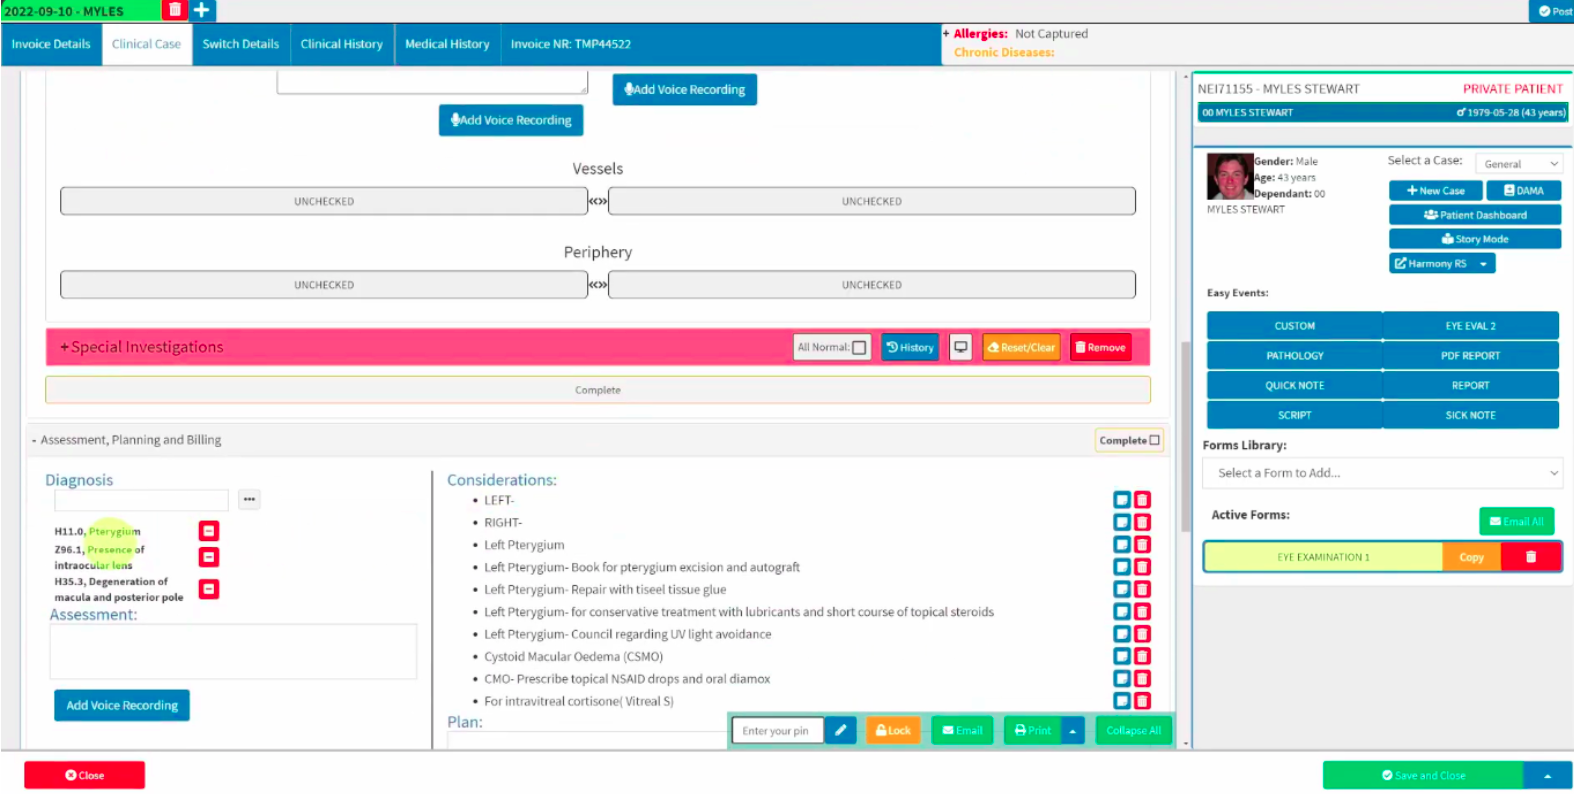
Similarly, the expected billing line items will be populated automatically, allowing you to add them to the patient's invoice before finalising the form with the practitioner's signature. You can easily navigate to the "Invoice details" tab to toggle between the clinical form and the active invoice screen for the current patient.
To provide feedback on an invoice that has been "posted (await response)" to confirm whether the medical aid will cover the items, navigate to the "Switch Details" tab. If the medical aid supports real-time feedback, this tab shows the medical scheme's response to the proposed invoice, indicating whether the switch transaction will be rejected or accepted based on the available information.
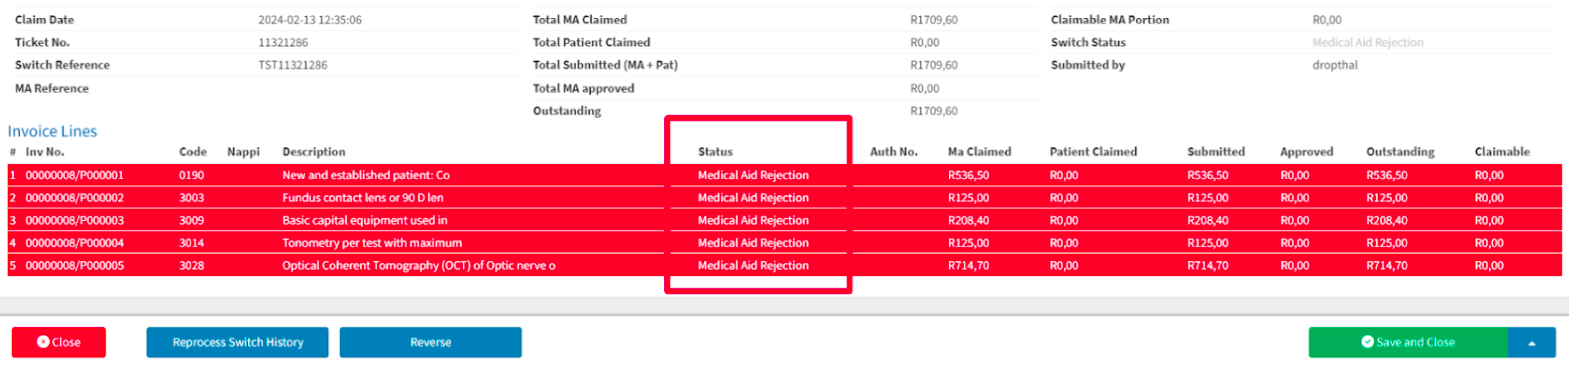
If you make mistakes with the ICD-10 codes on the user side, you can reverse and resubmit the claims. If the patient is not covered for the claims, the practice must decide on the appropriate way forward with the patient. Additionally, the "considerations" that appear based on the selected "pills" are also fully customisable.
Selecting the blue note icon button next to a line item will send that specific item directly to the "Assessment" section. Once in this section, clicking directly on the bullet name will transfer the line item to the "Plan" section located below it.
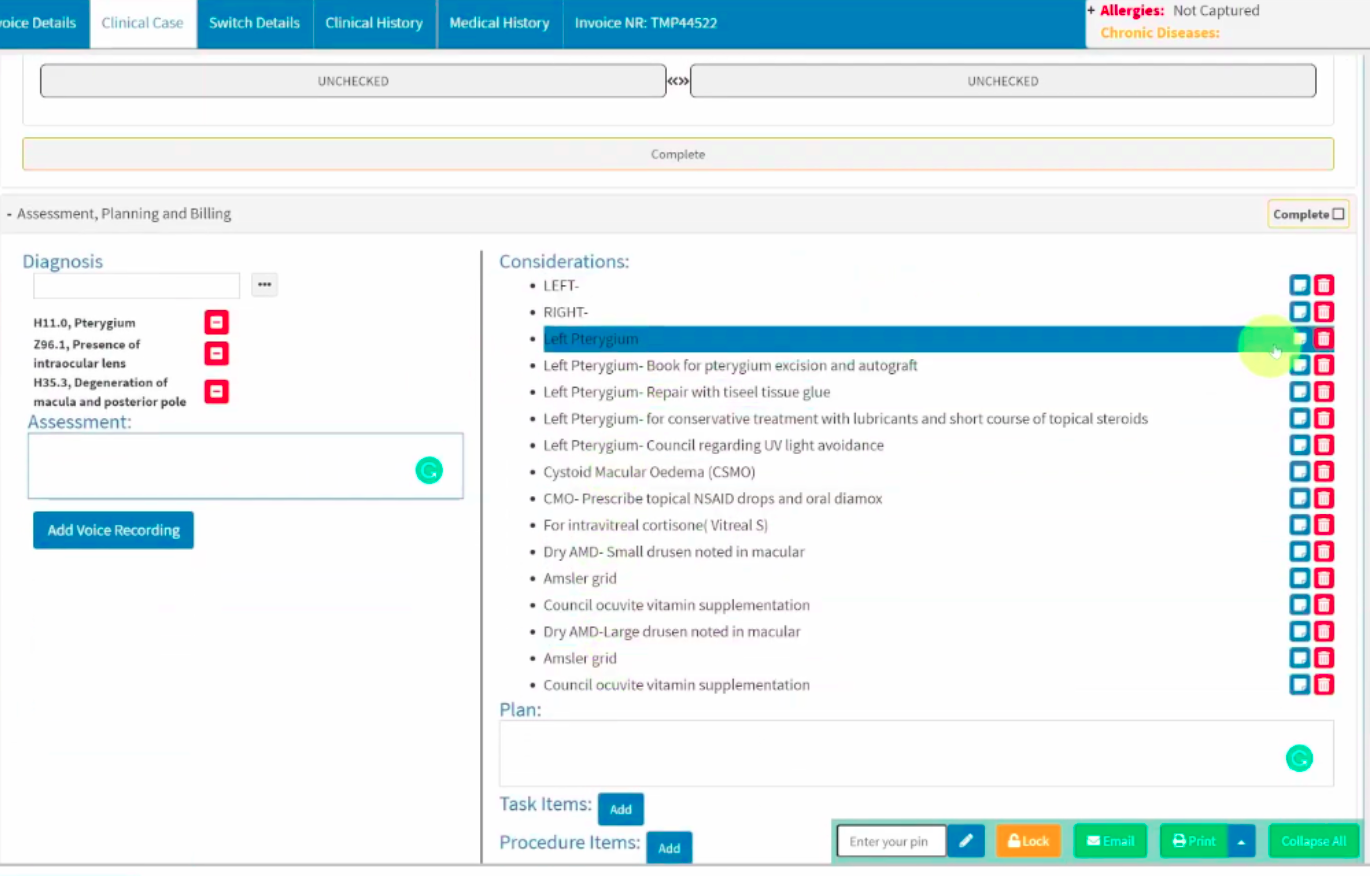
Where columns of options are available throughout the Eye Eval 2 form, your practice has two setup options.
If your options are limited and you don't need self-learning, you can preset the Eye Eval 2 form lists with predetermined line items for the practitioner to select from. With this approach, you must manually add any additional items to the source list, as they will not be automatically remembered upon use. Please note that the Eye Eval 2 forms are administrative-intensive at inception, as all defaults and lists must be set up initially to ensure easy selection later. Everything should be configured to align with your unique practice needs, and your dedicated GoodX liaison is ready to assist should any queries arise during this initial setup.
Alternatively, fields can be configured as self-learning, meaning the system will remember all previously completed entries. Please note that this option is case-sensitive, which may lead to multiple spelling variations being saved. However, you can easily clean up the list by selecting the "x" next to the incorrect option and clicking "OK". The self-learning model will then remember your preference and permanently remove that specific item from the list.
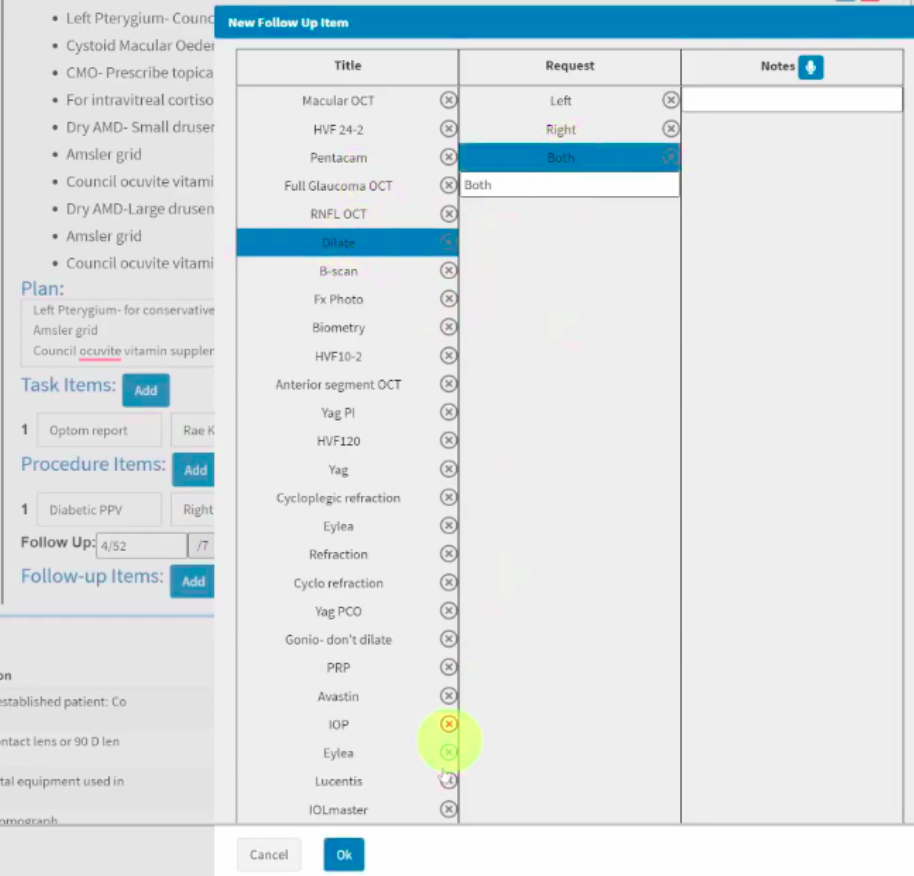
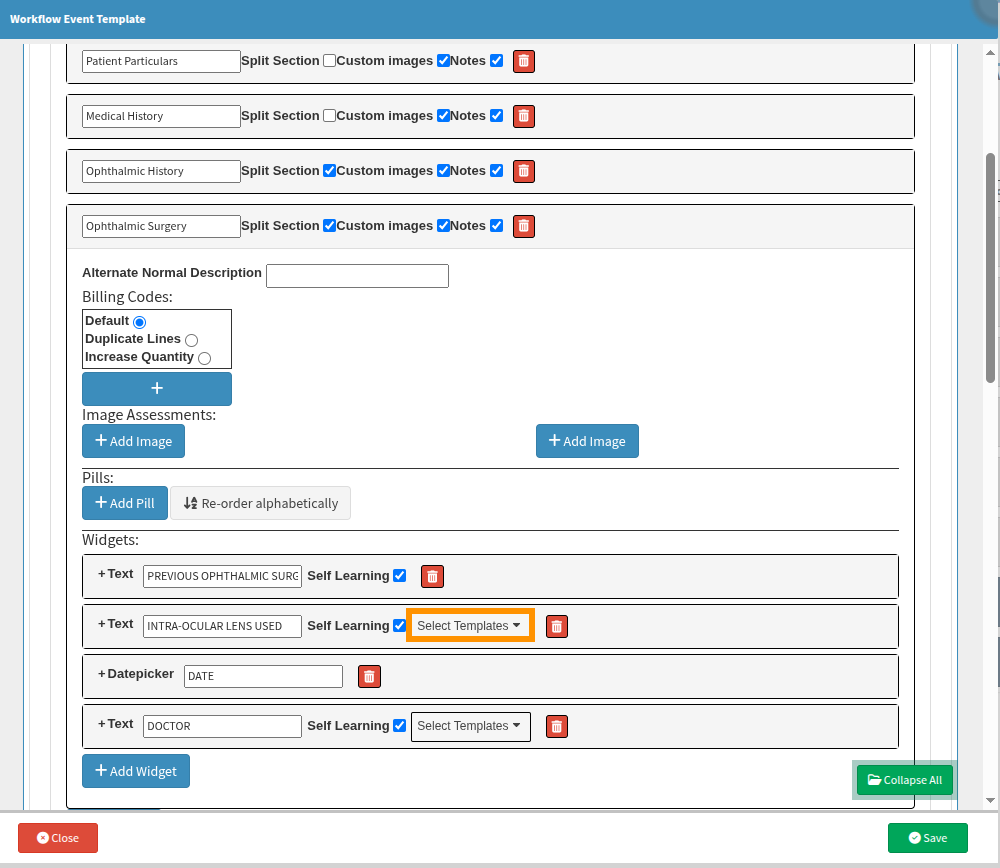
When building a custom examination form in the Eye Eval 2 module, you can link self-learning fields if you have added three or more to the form. Once linked, any data completed in one field correlates directly with the other selected self-learning fields. This allows you to easily choose from previously saved self-learning items without having to manually recreate the list for each section individually.
However, these fields should be linked with caution, as adding or removing items from one list will automatically update all other linked fields. If you are uncertain whether the fields should share identical data, it is best to leave these configurations blank.
Please note that these dropdown options will only appear automatically once you have added and saved at least three self-learning fields. When you return to the customisation screen, the configuration options will appear as shown in the image.
Can the “Eye Eval 2” form information be viewed at a glance?
For your convenience, you can configure patient dashboards to review past surgeries, clinical notes, or specific Eye Eval 2 results, among other options, at a glance. This provides a clear overview of the patient's clinical history and enables comprehensive consultations without sifting through folders or files to find key points and clinical notes.
You can also set up profiles on specific dashboard items that you prefer to view simultaneously. You can tailor these profiles to practitioner preferences or specific clinical conditions and save them with unique profile names. You can instantly toggle between these visible profiles, with a blue tick next to the profile name reflecting the profile currently in view.
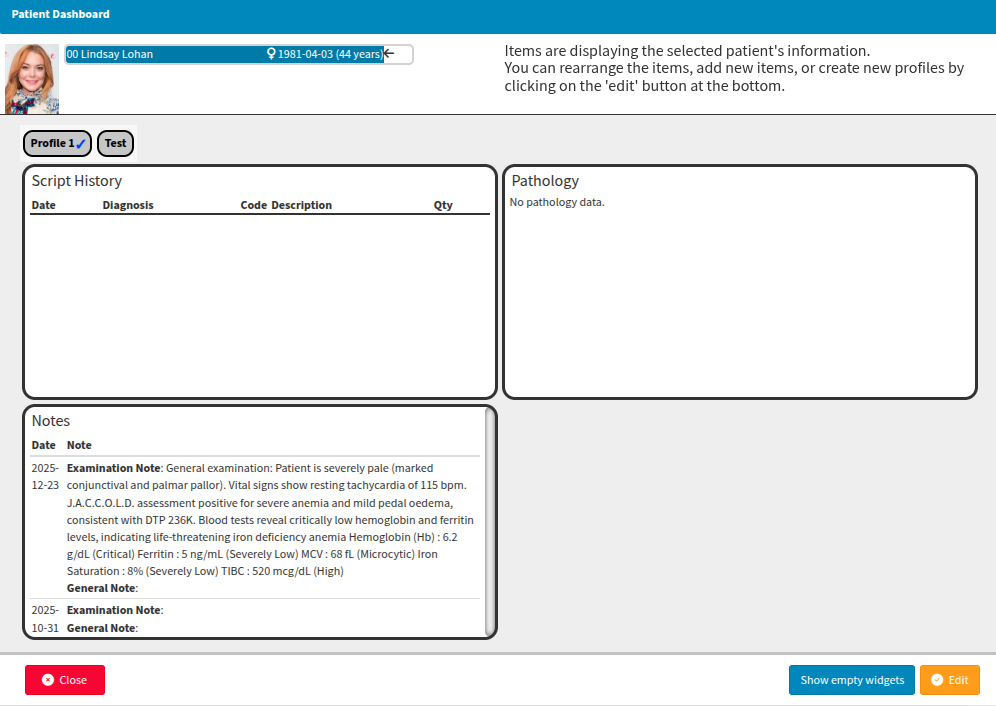
If you need to update the patient dashboard with additional information sources or new profiles, select the "Edit" option to modify your configuration.
While the initial profile setup may seem daunting at first, feel free to connect with your GoodX liaison to share your expectations for preferred colours and views (including line, scatter, text, or image graph options) and to receive guidance and recommendations for your desired patient dashboard configuration.
Always select Save to retain your changes or updates, as closing the window without saving will discard any actions completed. Graphs can only display information that was explicitly recorded and saved in the specific forms being referenced.
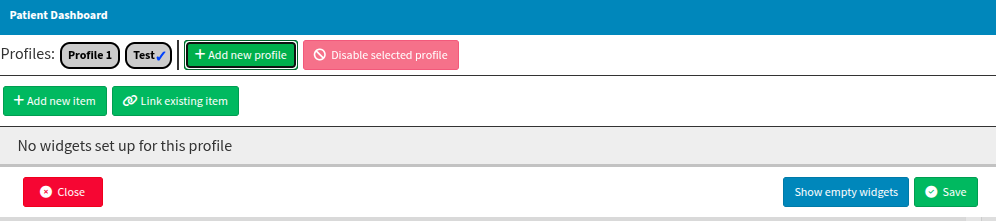
Examples of what can be viewed from the “Patient Dashboard”
From selected form templates, you can choose which clinical information to display on the dashboard. For instance, using data captured in the "Eye Examination" template, your patient dashboard could potentially reflect the following:
The summary notes recorded during previous examinations for the form type specified during your initial setup.
The specific Assessment (A) and Plan (P) notes pulled directly from the dedicated clinical form.
The historical record of patient complaints as reflected in the case history notes.
The medical history can be configured to reflect recorded medical conditions, allergies, family history, or any ophthalmic surgeries documented within the form.
The system can display scheduled follow-up tests, specific line items, or general follow-up notes that have been recorded.
The system can track and display UCVA (Unaided Visual Acuity) for both eyes over the recorded historical timeline.
The BCVA (Best-Corrected Visual Acuity) for both eyes can be tracked and viewed over the recorded historical timeline.
The IOP (Intraocular Pressure) values, reflecting essential eye vitals, can be monitored across the recorded time points.
You can review completed procedures, along with the specific side or eye operated on, as recorded on the forms.
You can keep your special investigations visible, such as CMT (Central Macular Thickness) for both eyes, or display Corneal Topography for both eyes as a "Pentacam" graph.
The optic disc information will display only when data is available; for example, the graph monitors both the left and right sides but will reflect only recorded information such as the right CDR (Cup-to-Disc Ratio).
Detailed information notes relating specifically to patient pathology can be displayed.
Laser procedures can be viewed at a glance, with direct reference to a "YAG Posterior Capsule Opacity" or an Argon procedure performed.
Even surgery booking procedure items can be viewed at a glance where they have been recorded on the completed eye examination forms.
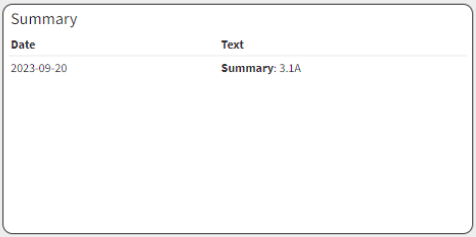
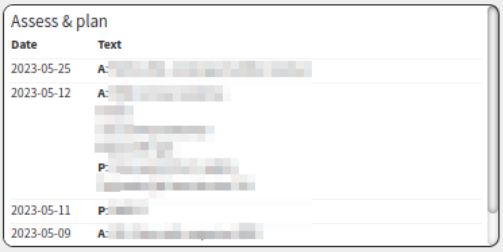
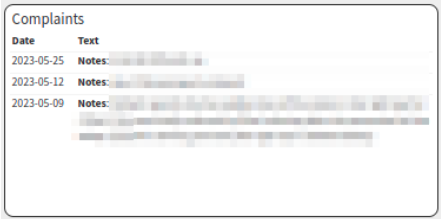
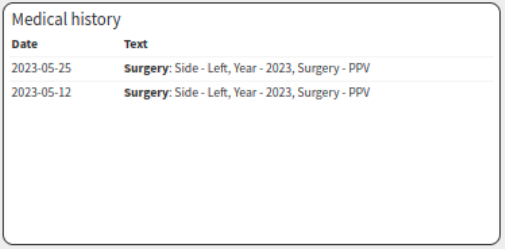
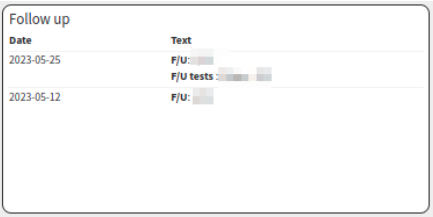
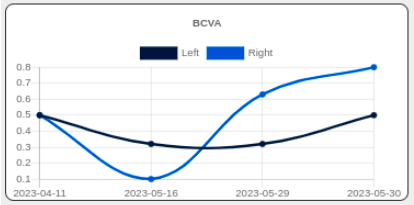
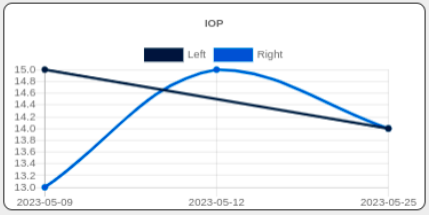
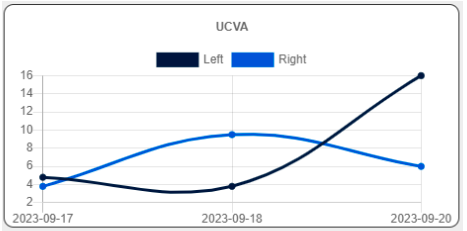
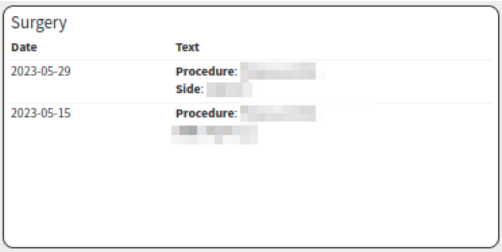
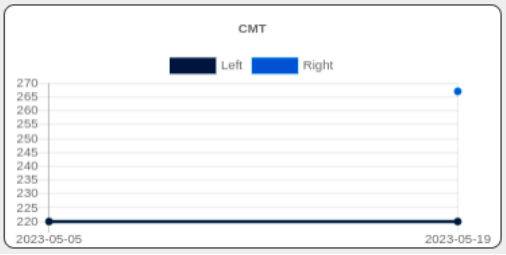
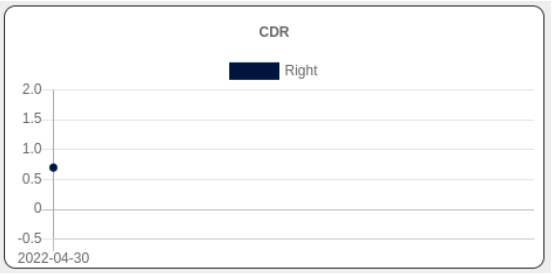
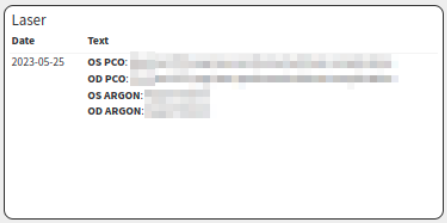
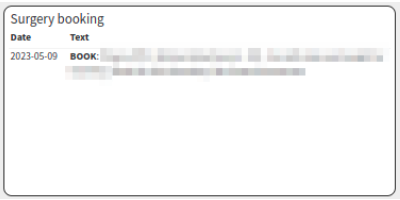
If a section you use often isn't available, connect with your GoodX liaison to confirm whether that section already exists and can be added to your profile, or whether it's still in development.
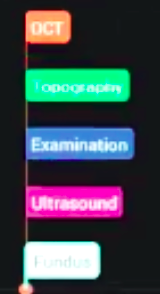
The dashboard view defaults to a royal blue theme. However, you can also colour-code your forms or related clinical notes using the Harmony colour palette, which is particularly useful when displaying multiple results on a single graph:
OCT: Orange
Topography: Green
Examination: Blue
Ultrasound: Violet / Purple
Findings: White
Where can the “Patient Dashboard” be accessed?
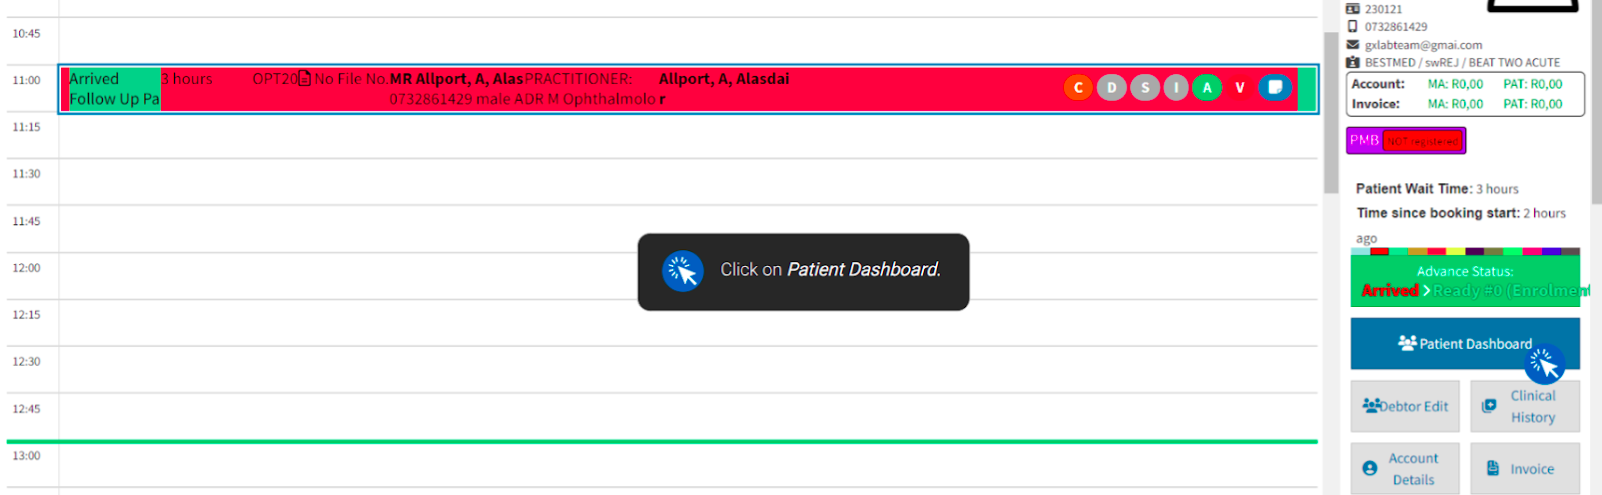
From the diary booking screen
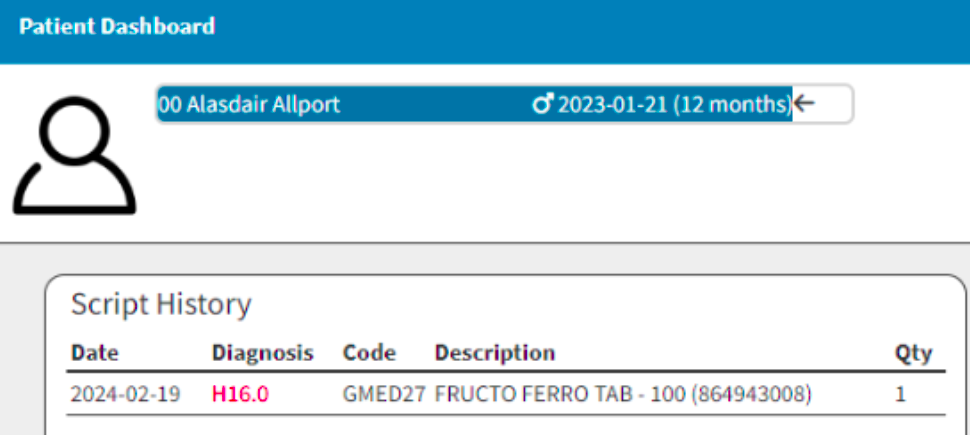
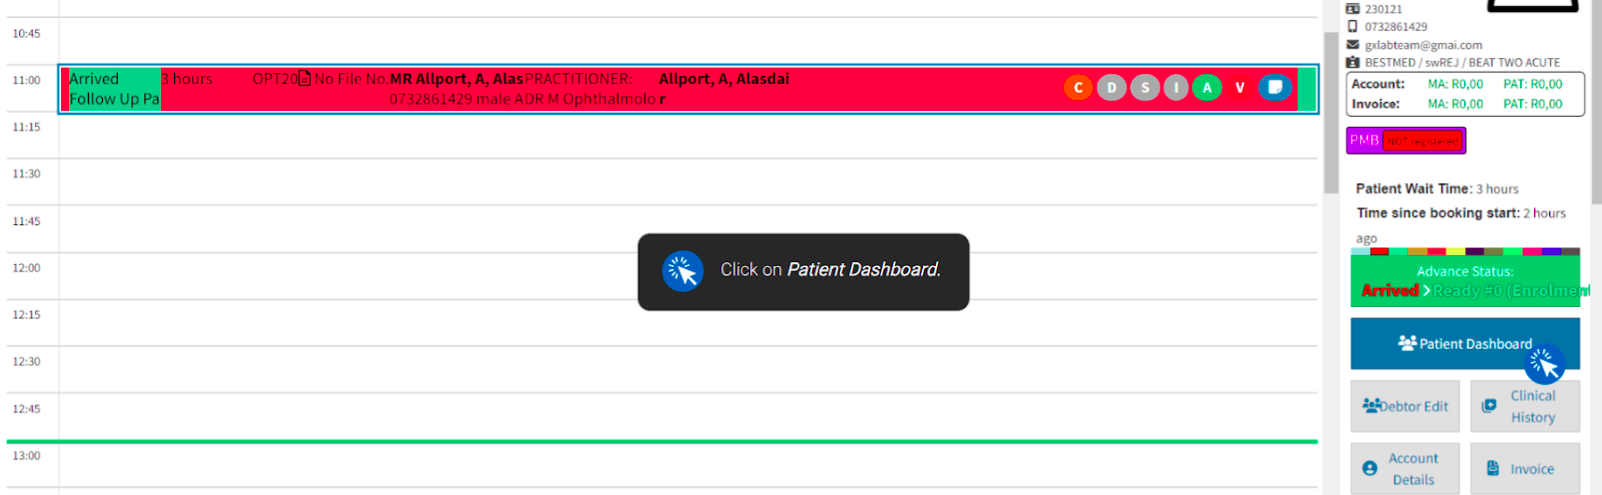
The patient dashboard can be located by selecting "Diary" from the main GoodX wheel. From the Diary tab, click the relevant patient booking to display the patient's information on the debtor panel alongside the booking, along with other quick-access shortcuts in the side panel. From this side panel, select "Patient Dashboard", ensuring the arrow indicator points to the correct patient. Once selected, your configured dashboard profiles will be displayed. Where clinical information has been completed for the patient, the linked data will be reflected according to that specific user profile setup.
Always ensure the arrow next to the patient's name is correct, as it indicates that the clinical data currently displayed belongs to that patient.
From the debtor panel
Alternatively, the patient dashboard can be located by selecting "Debtors" from the GoodX wheel and navigating to the "Debtors" tab to search for or select the debtor of interest.
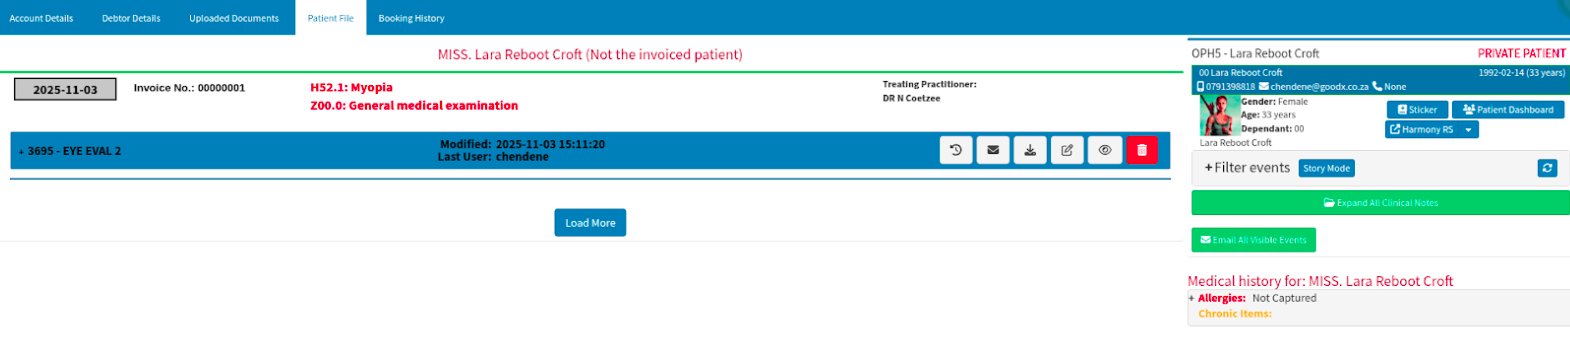
If you select the desired debtor with a single click, a new panel view will appear. From there, click the"Clinical" button on the right-side panel, then select the "Patient File" tab on the top panel. This reveals a side panel with quick-access buttons, including the patient dashboard feature button.
If you double-click on the desired debtor, a new window view will open. From this view, navigate to the "Patient File" tab on the top panel to reveal the side panel with quick-access buttons and the patient dashboard feature button.
How can the Eye Eval 2 form be managed?
You can configure the patient's history to copy forward automatically, or manage it manually. This clinical information will always copy forward between sequential follow-up consultations.
Manually copy forward history
By selecting a specific date from the form history, the completed information recorded on that day will populate directly into the current form you are working on. This historical data can continue to copy forward automatically until you choose to change the setting.
The clinical findings from the previous examination on that selected date will be copied forward. Please note that even when this historical data is brought forward, you can still clear, edit, or completely remove any images and notes. This ensures you can easily update the record if you observe changes or need to add new information alongside the copied data.
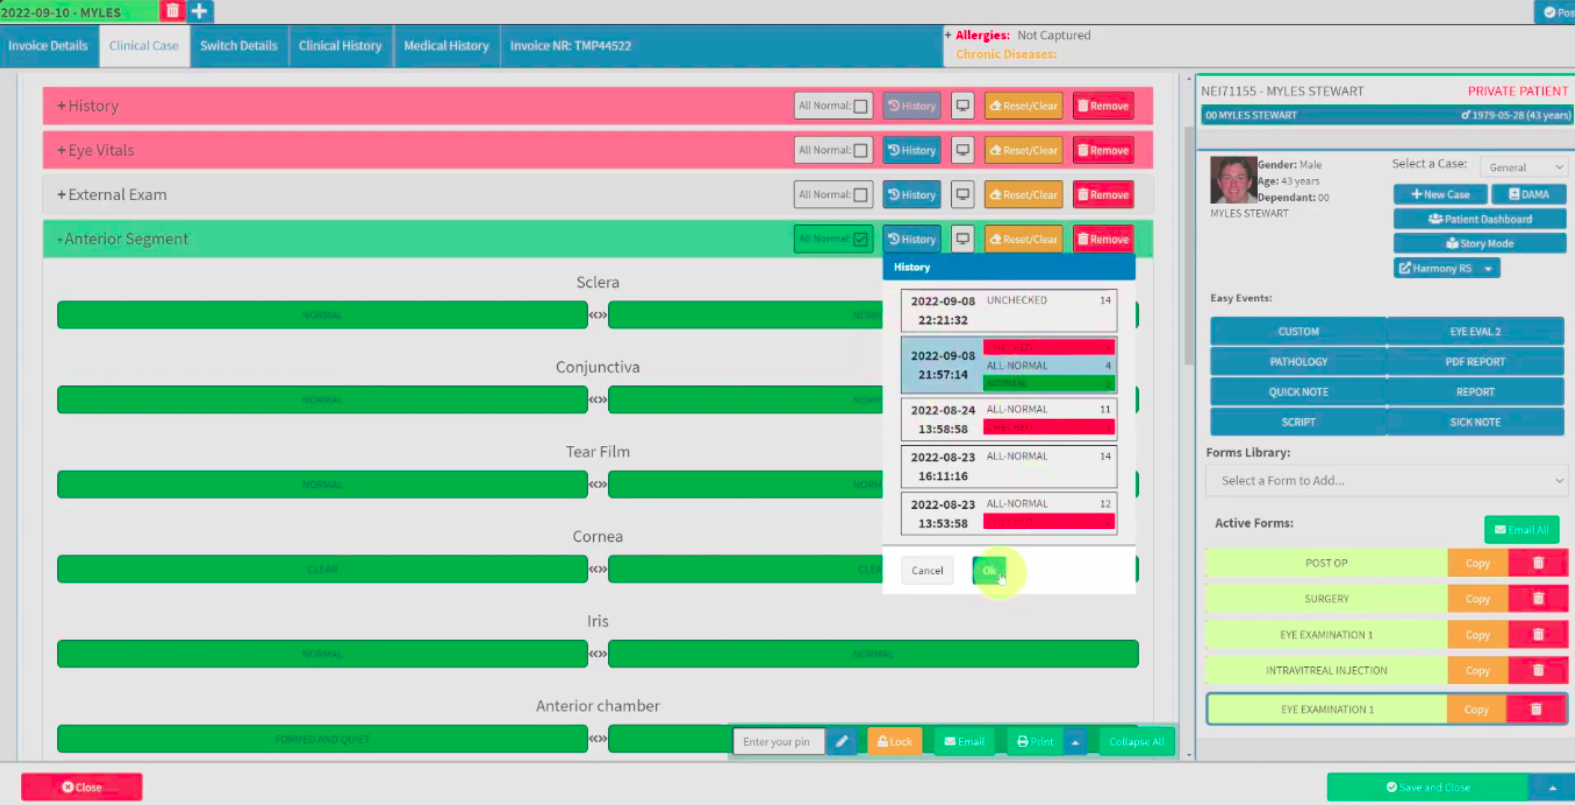
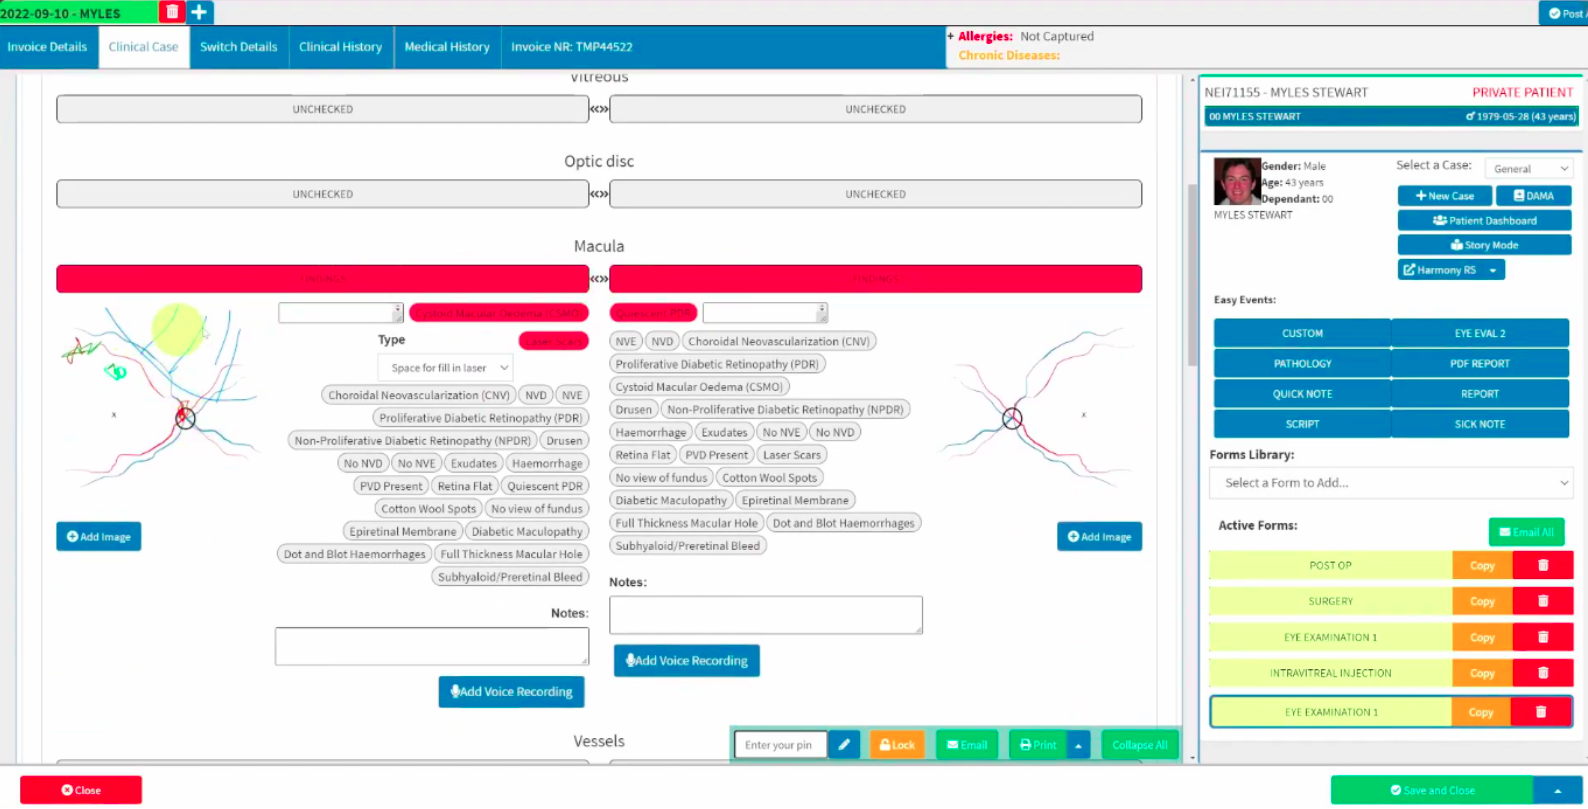
Automatically copy forward history
To configure the system to copy information forward automatically, review the setup directly within the active workflow event. Ensure that the correct template form is selected from the available workflow events.
Each section of the form appears as a distinct subsection that you can select to copy forward previously saved information automatically. By ensuring the "copy forward" option is enabled on the relevant fields, the system will carry the data forward for the practitioner to review and edit where required.
These configuration settings appear after you select the blue "Toggle Mode" button, which reveals the custom options available for that form's sections.
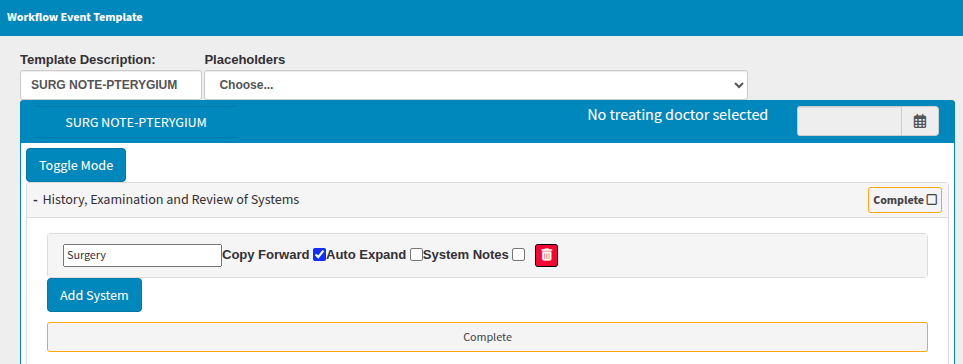
Custom pills to the Practitioner’s workflow
A wonderful feature of the system is the extensive functionality that a pill can hold. The pills visible within the template sections can be linked not only to ICD codes but also to your most frequently used medicine combinations based on the clinical evaluation in progress. The customisable suggestions you can link to a pill are highlighted below.
These pills function like a billing macro: selecting the pill automatically populates the linked medicines and ICD codes configured in the workflow event template. The pill name itself serves as a quick identifier of these linked components.
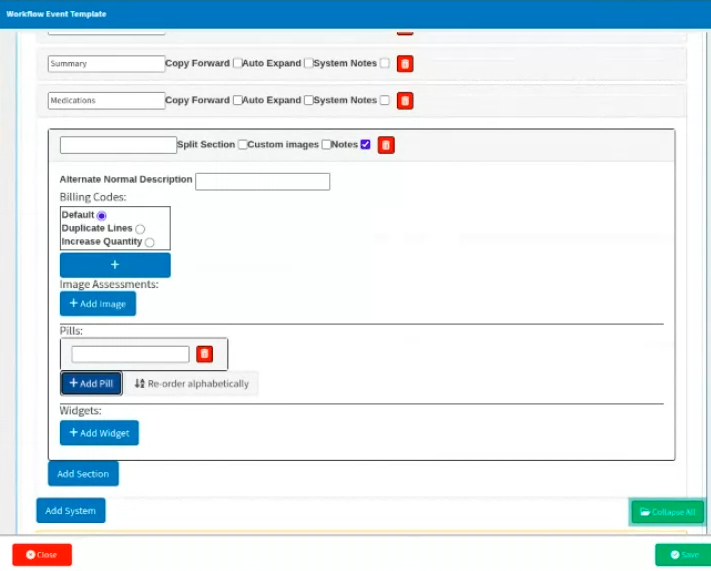
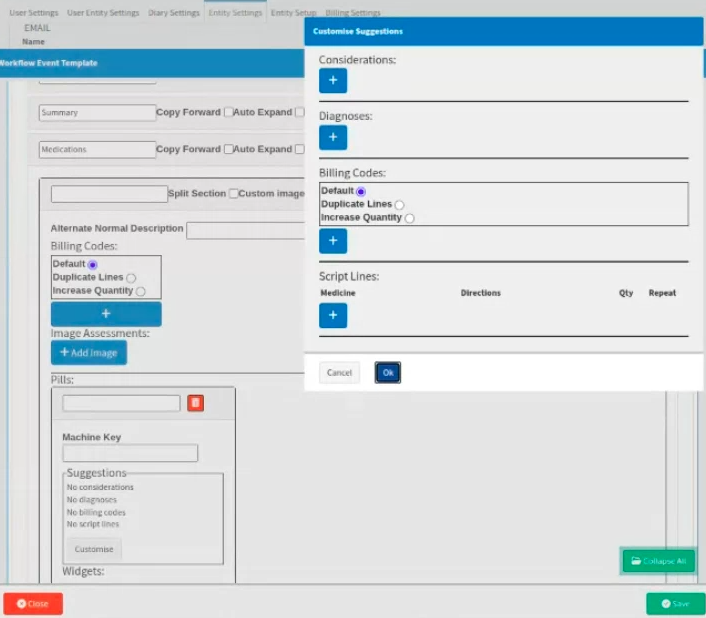
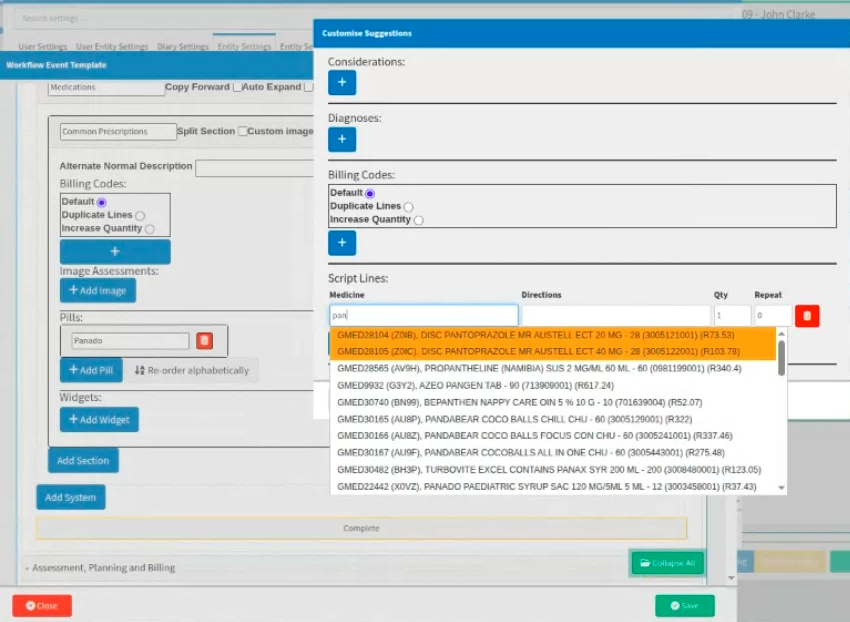
Example of a custom pill: “Common Prescriptions”
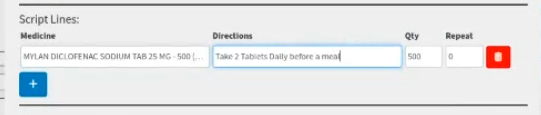
For this example, the pill name would be "Common Prescriptions," featuring a shorthand list of the medicines under the pills section. A more detailed selection of the specific medicine to be linked to this form is highlighted below, followed by an example of the clinical directions to be completed for the added medicines.
The medicines, along with their clinical instructions, will be visible within the "Medicine" section of the form, directly above the proposed billing line items to be invoiced.
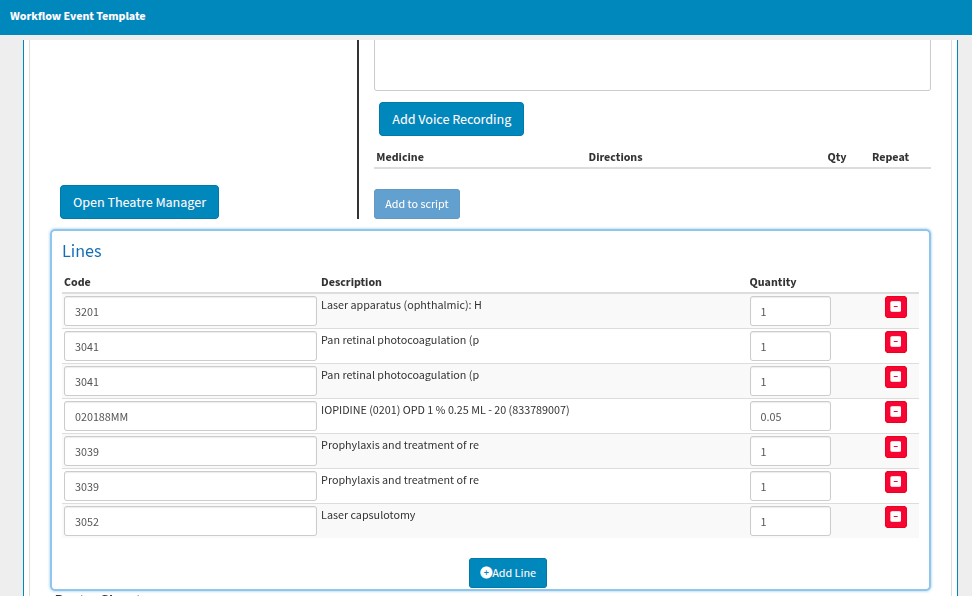
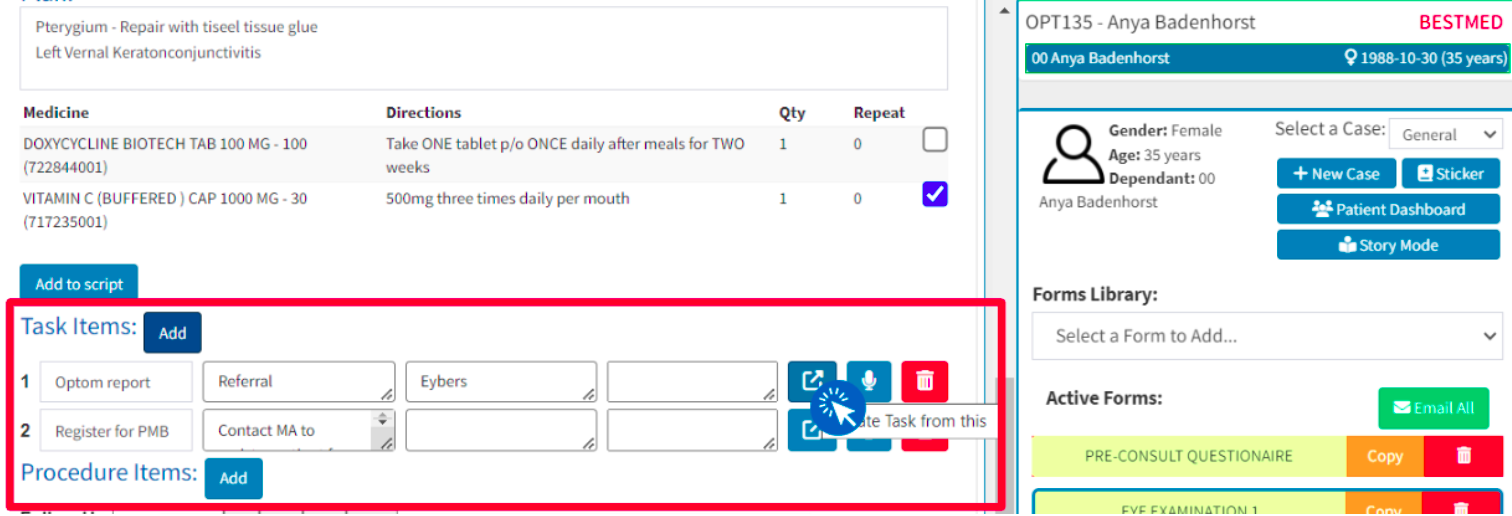
Example of creating a task from your examination clinical form
If your practice needs a representative to complete additional tasks, you can create them directly from the Eye Evaluation clinical form. After the details have been added, remember to select the "pop-out icon"—which displays the hover message "Create Task from this"—to generate the task and assign it to the relevant practice representative for completion.
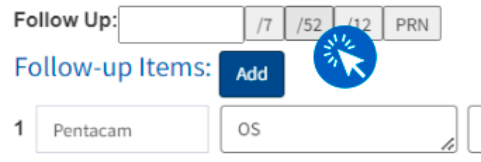
Example of follow-up periods
The selected number represents the exact interval of days, weeks, or months after which the patient must return for follow-up. You can also choose to add specific procedures or the type of review needed for that next scheduled visit, serving as a helpful clinical reminder to your future self.
You can ensure a follow-up is clinically noted by scheduling it according to the following standard shorthand conventions:
/7 (Days)
/52 (Weeks)
/12 (Months)
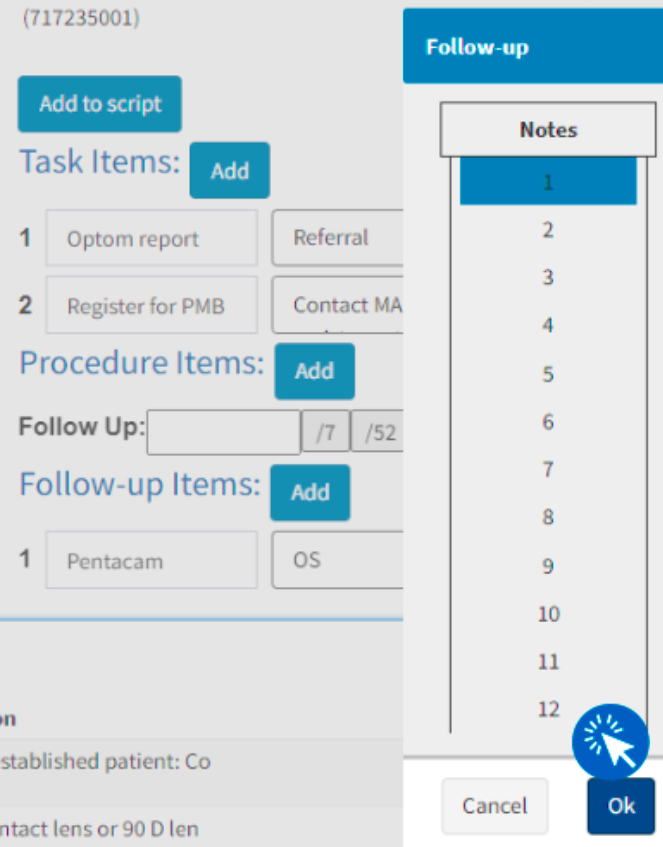
Example of follow-up self-learning items
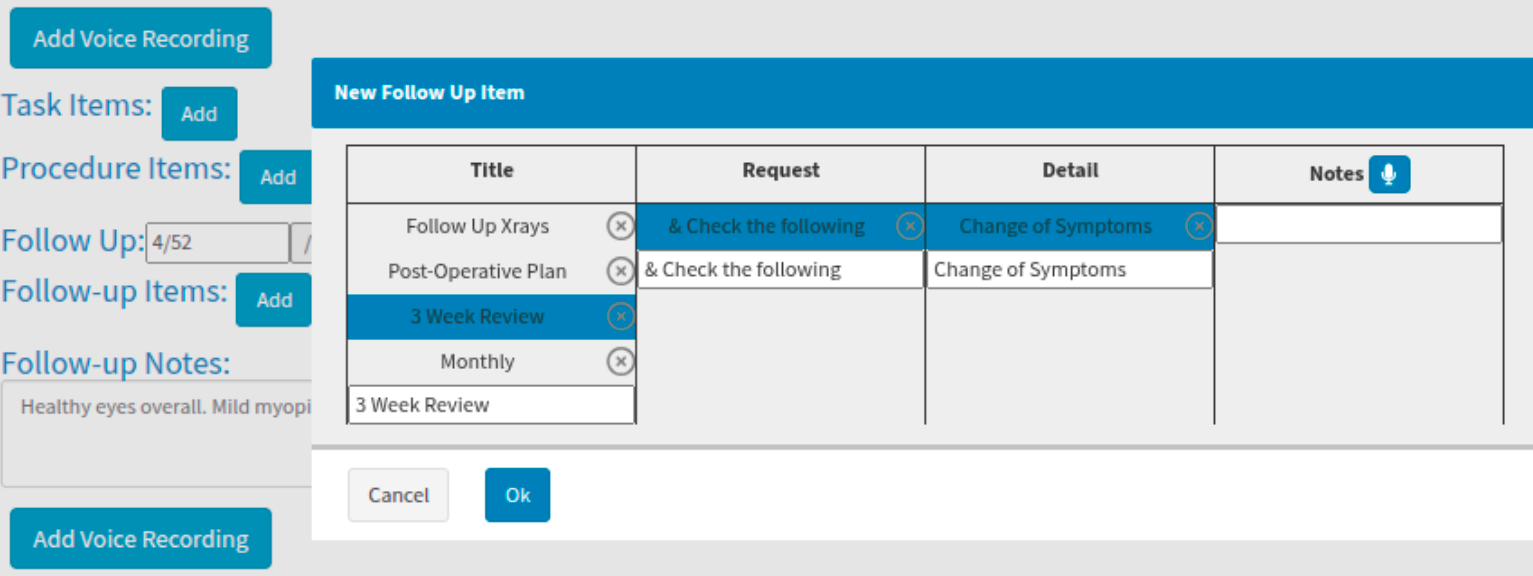
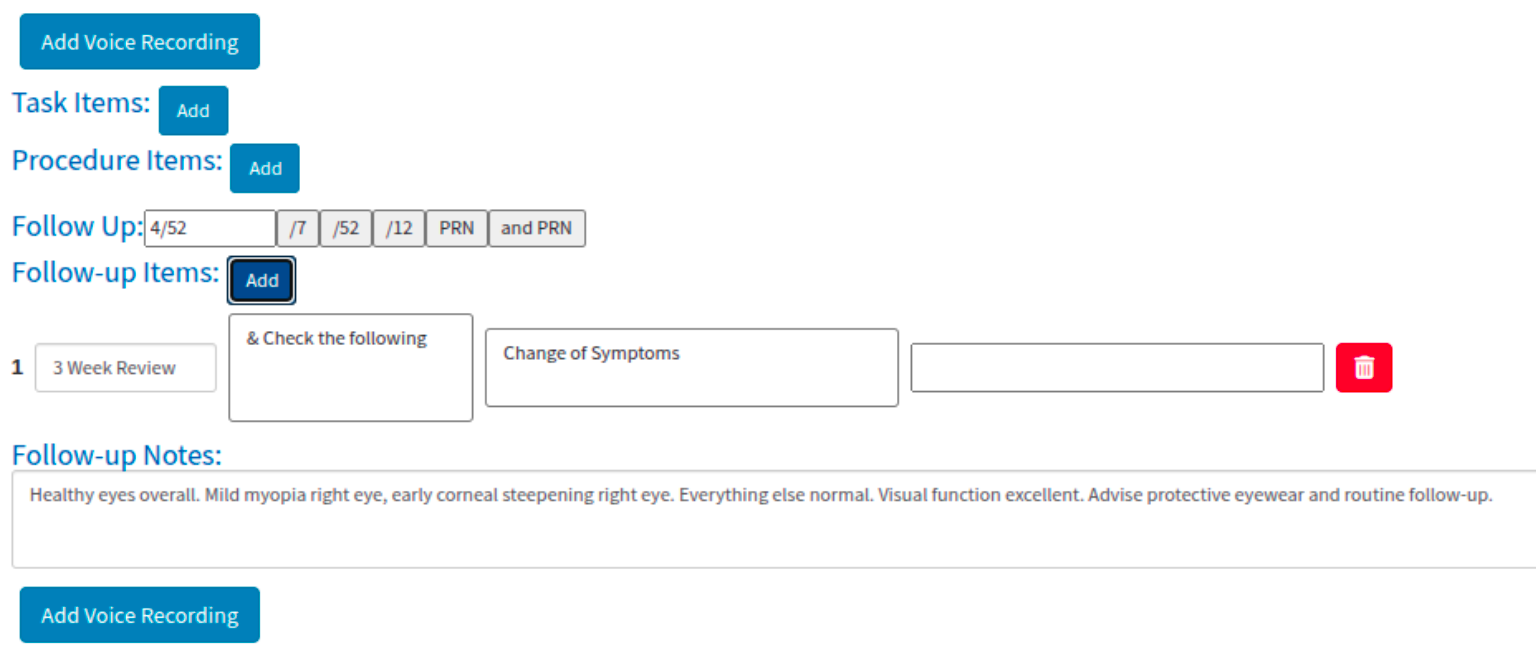
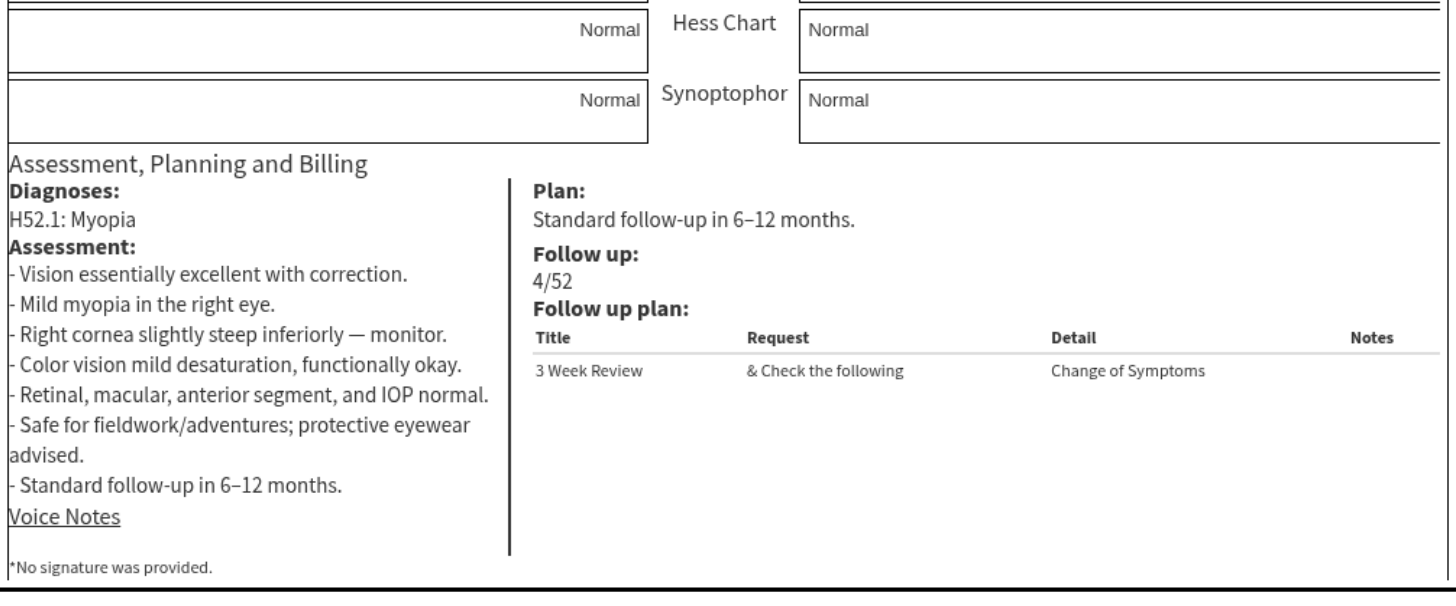
The example below reflects a follow-up scheduled for week 4 (using the /52 week yearly cycle convention), along with notes on what to review based on the highlighted information above. You can view this detail at a glance in the clinical notes' story mode.
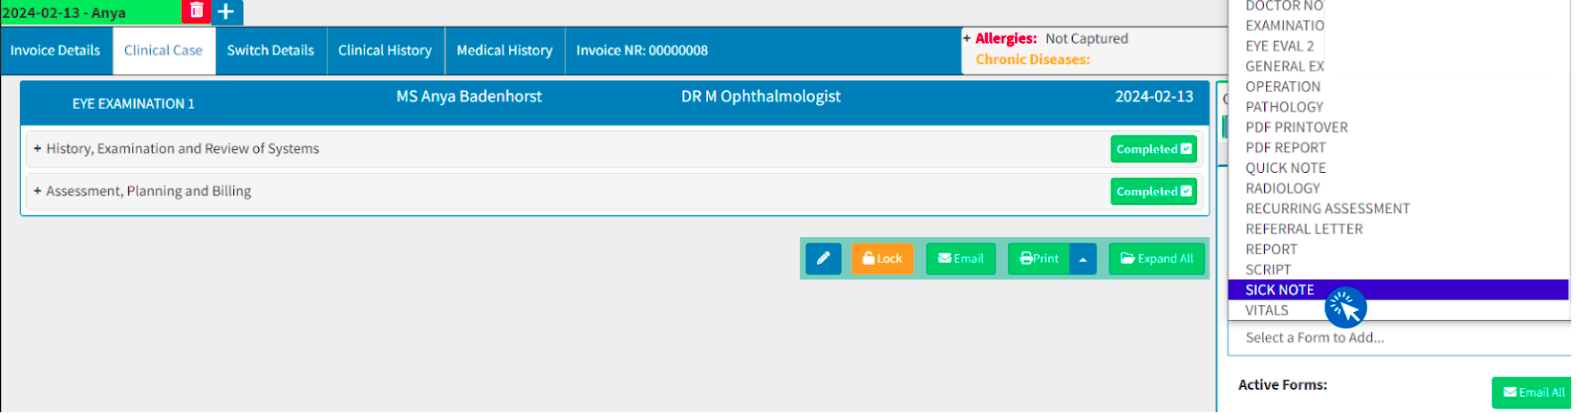
How is a Sick Note generated from an active clinical form?
While you are actively completing your examination, you may need to work on an additional form or aspect, such as creating a sick note for your patient. Additional forms can be added at any time and will be reflected under your "Active Forms" side panel.
All available form types are listed within this scroll menu. If you have pre-existing templates, you can select them from the dropdown menu for that specific form type (e.g., the "Sick Note" clinical form type). Please note that a template can only be selected after you have indicated which form type you intend to use.
Due to the current Protection of Personal Information Act (POPIA), certain details can no longer be automatically populated, though the underlying functionality remains available. When you select the "Sick Note" form type, the ICD-10 codes captured from the linked Eye Evaluation form can display on the sick note for your clinical review and discretion. If the information is correct and you want to include these codes on the final document, select the "Add Diagnosis To Printout" button to apply them to the sick note. However, this action remains entirely at the practitioner's discretion to ensure full compliance with POPIA regulations.
How is a Reference Letter generated from an active clinical form?
At the end of your examination, if you determine that your patient must be referred to another practitioner, you can print a referral letter by selecting the upward menu to reveal the "Print Letter" option. Once selected, the system will prompt you to confirm the specific letter template you wish to use.
This letter will automatically include information from your examination, eliminating the need to duplicate your work.
The letter will auto-populate the predefined clinical data, so the practitioner only needs to review the information carried across to ensure it aligns with their diagnosis and clinical intentions.
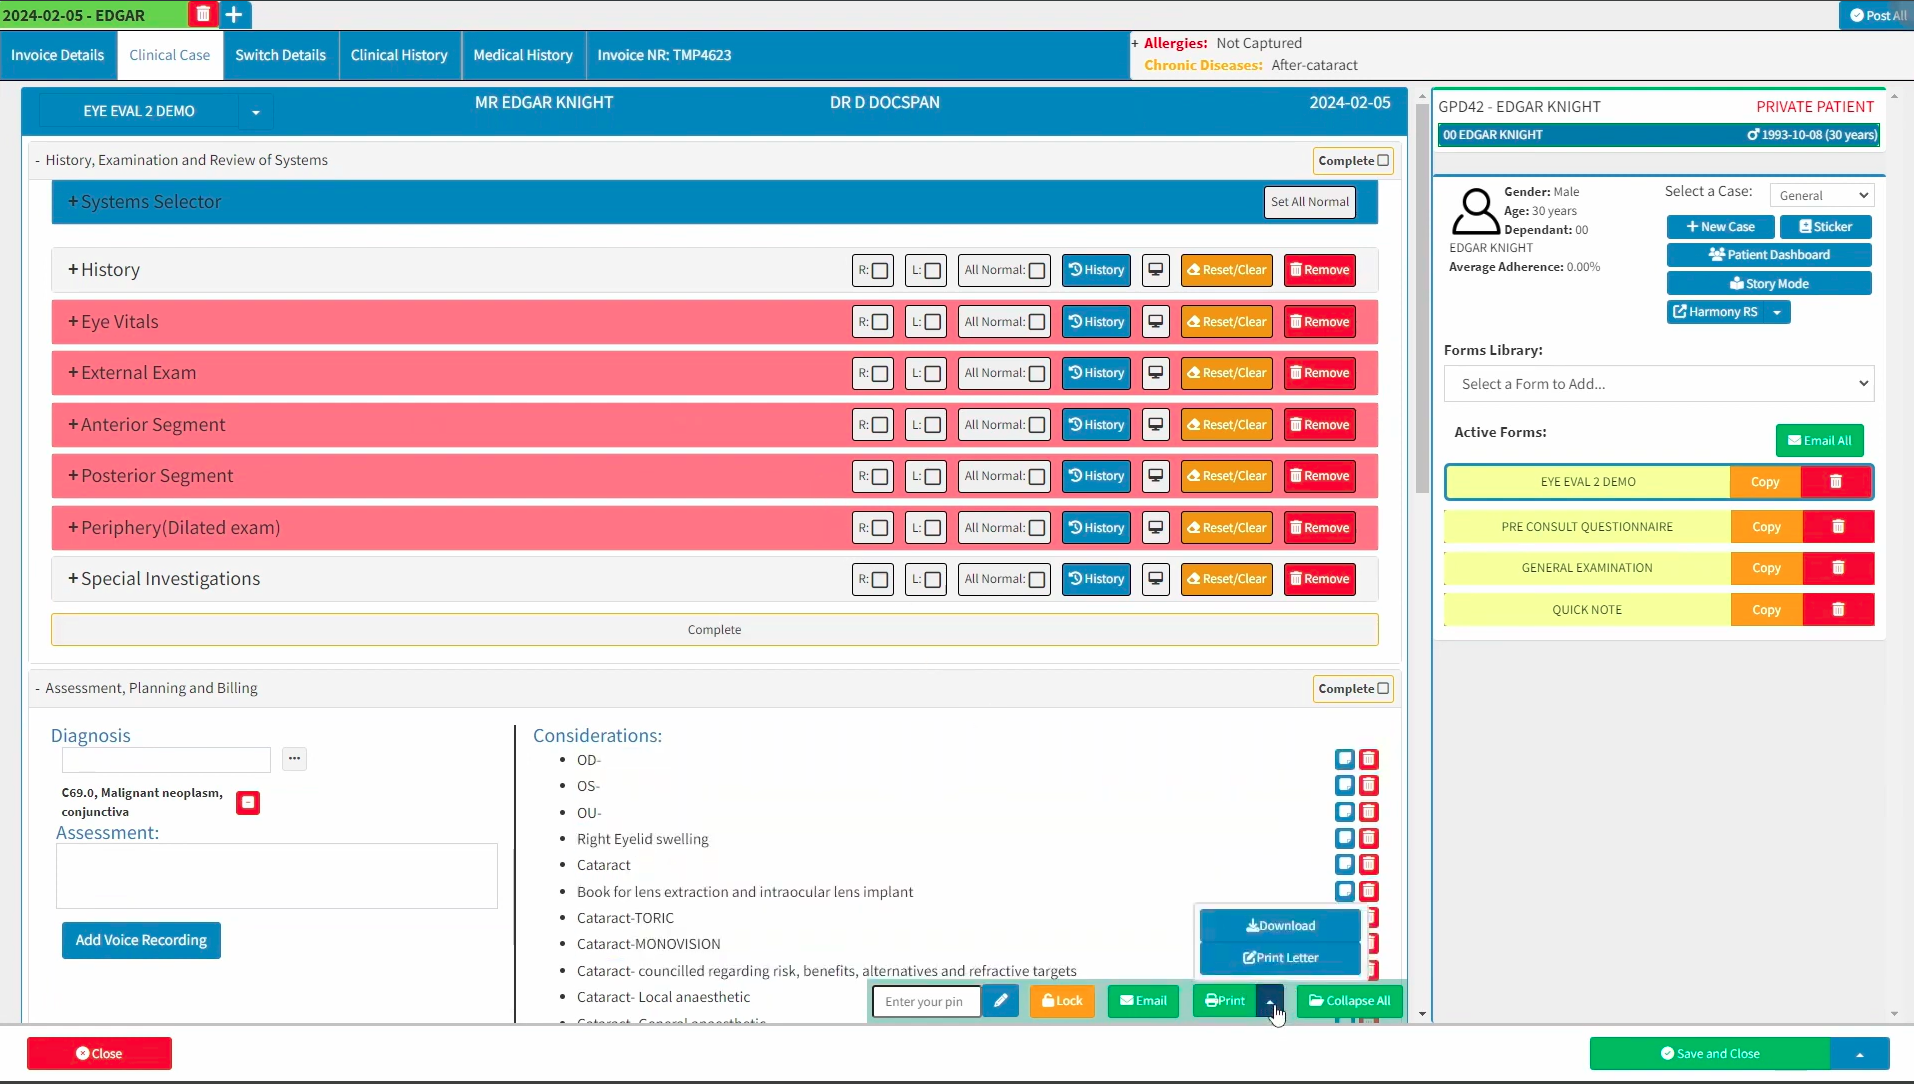
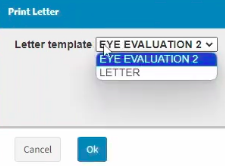
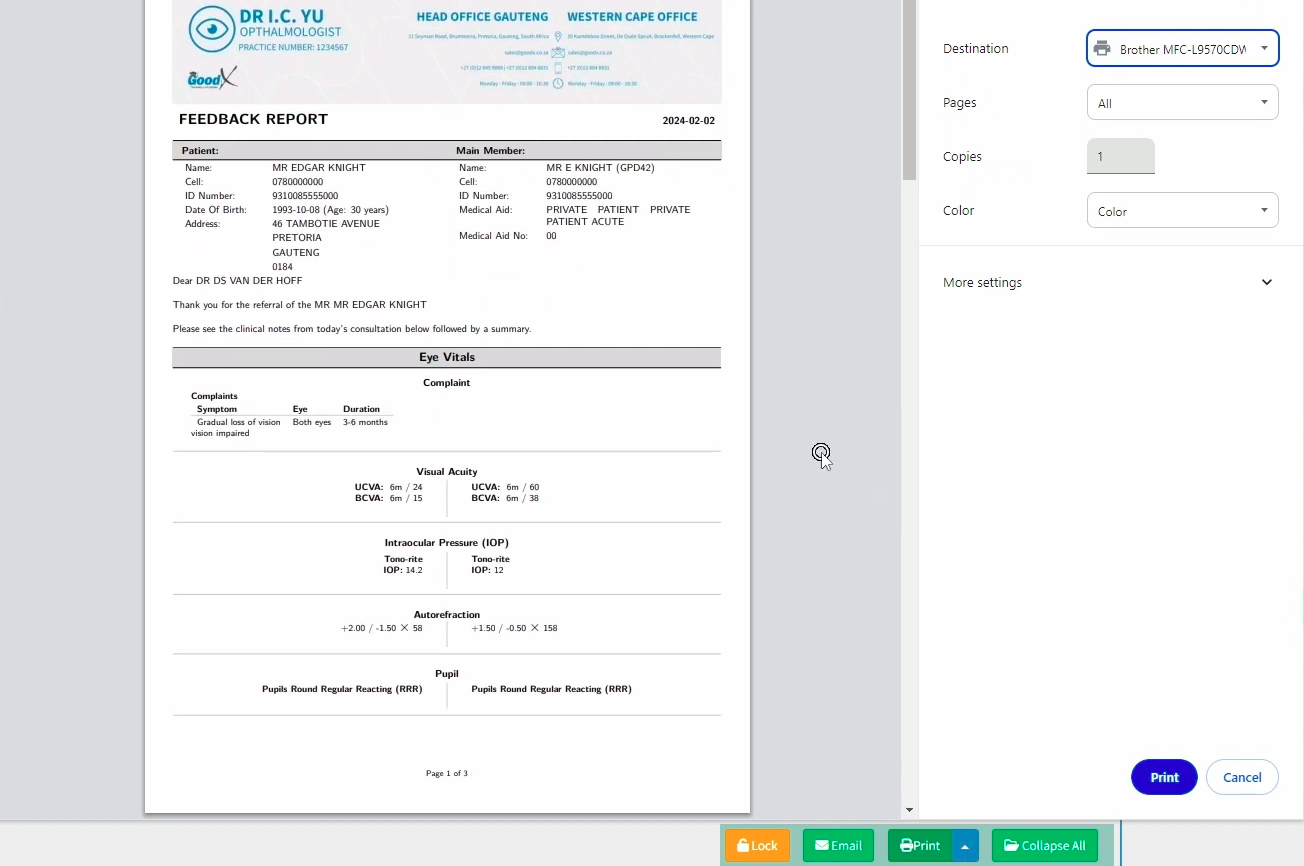
If template changes are needed, you can access the dropdown menu to select a different template. Alternatively, you can edit the text areas directly to ensure the correct tone, context, and general information are conveyed exactly as intended by the practitioner.
Once you are satisfied with the letter, you can print the document or save it as a PDF to email as an attachment to the relevant party.
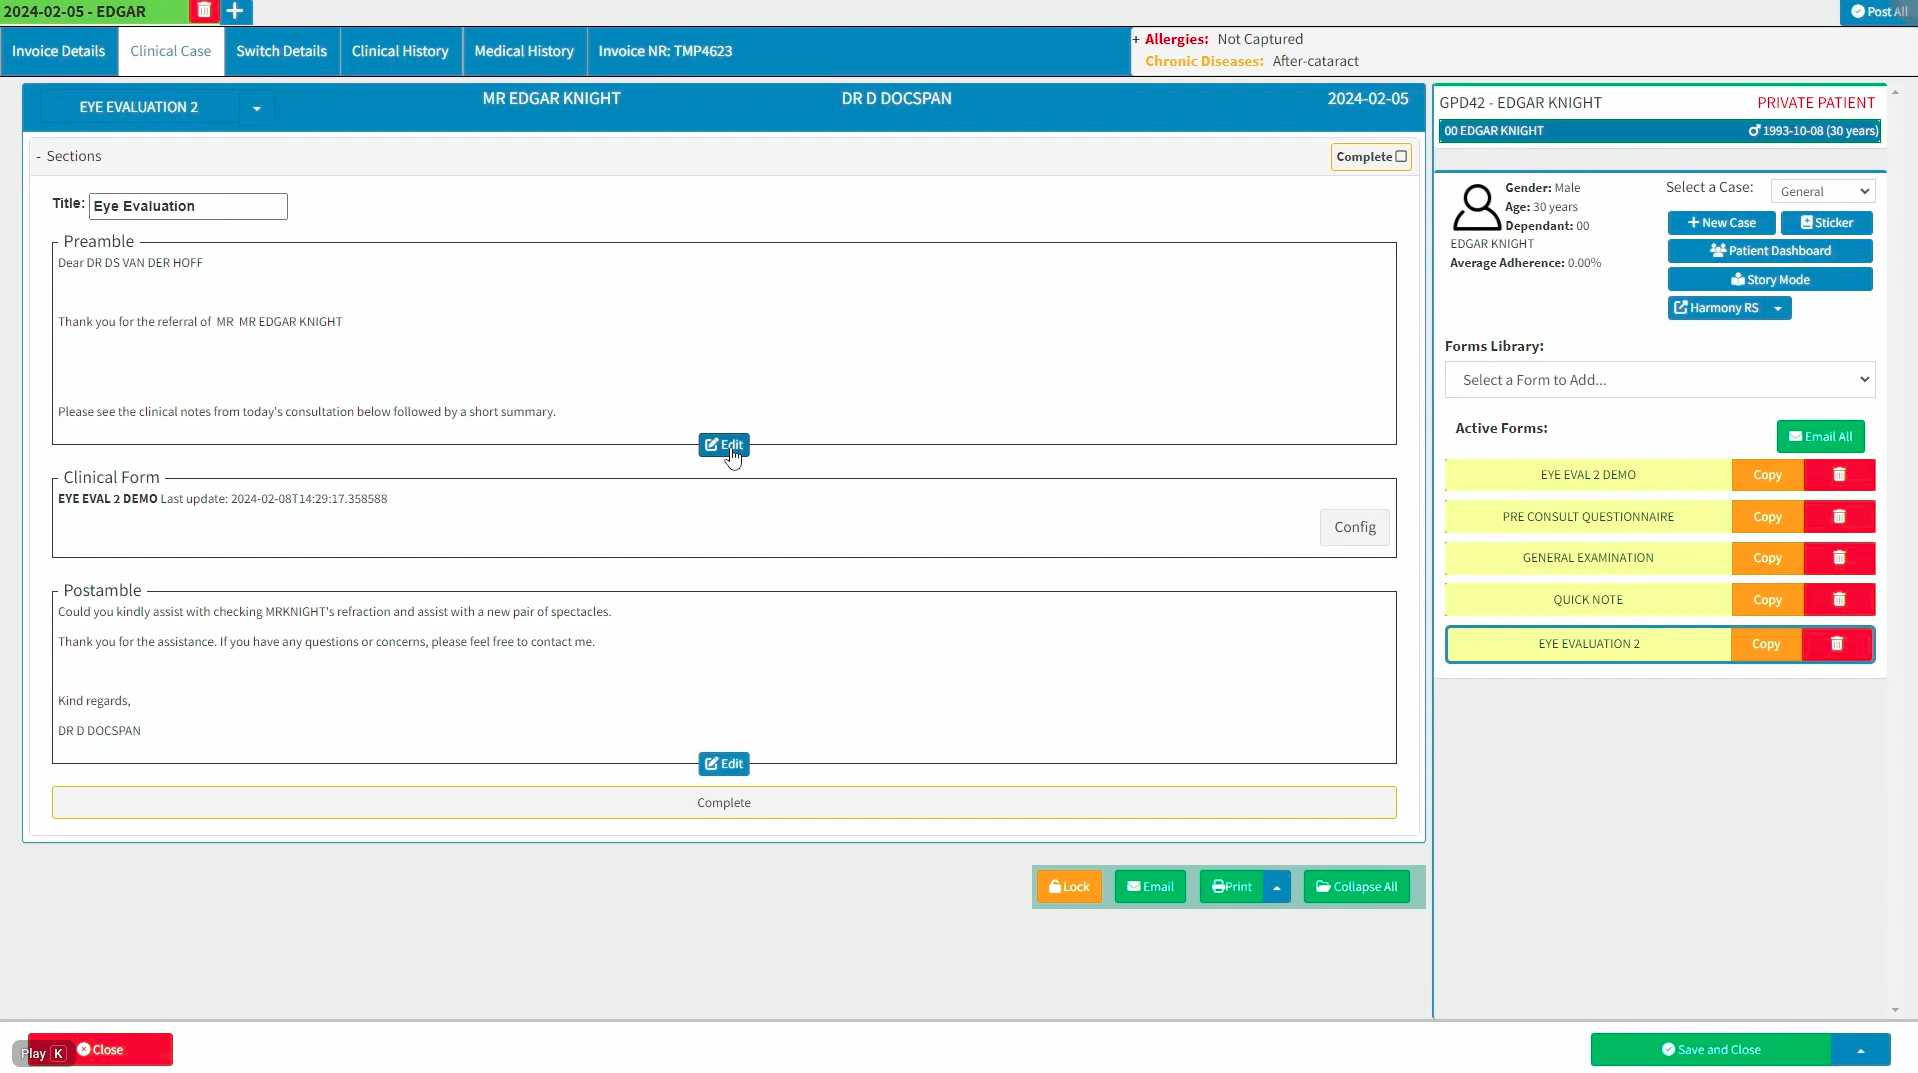
Does the Eye Eval 2 form have special access to other form templates?
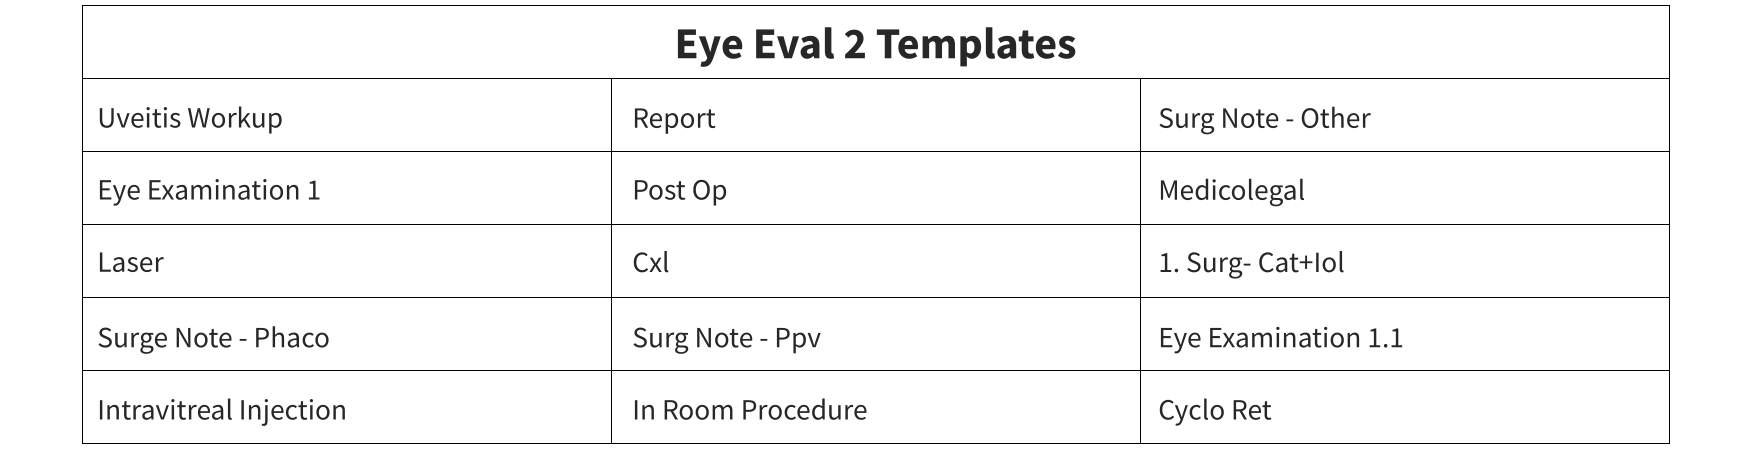
Yes! When you use the Eye Eval 2 form, you can also import these templates and implement PDF Printovers.
Please note that the templates listed below are intended as guidelines and should be customised to suit your specific practitioner and practice preferences. These templates may also change or update over time.


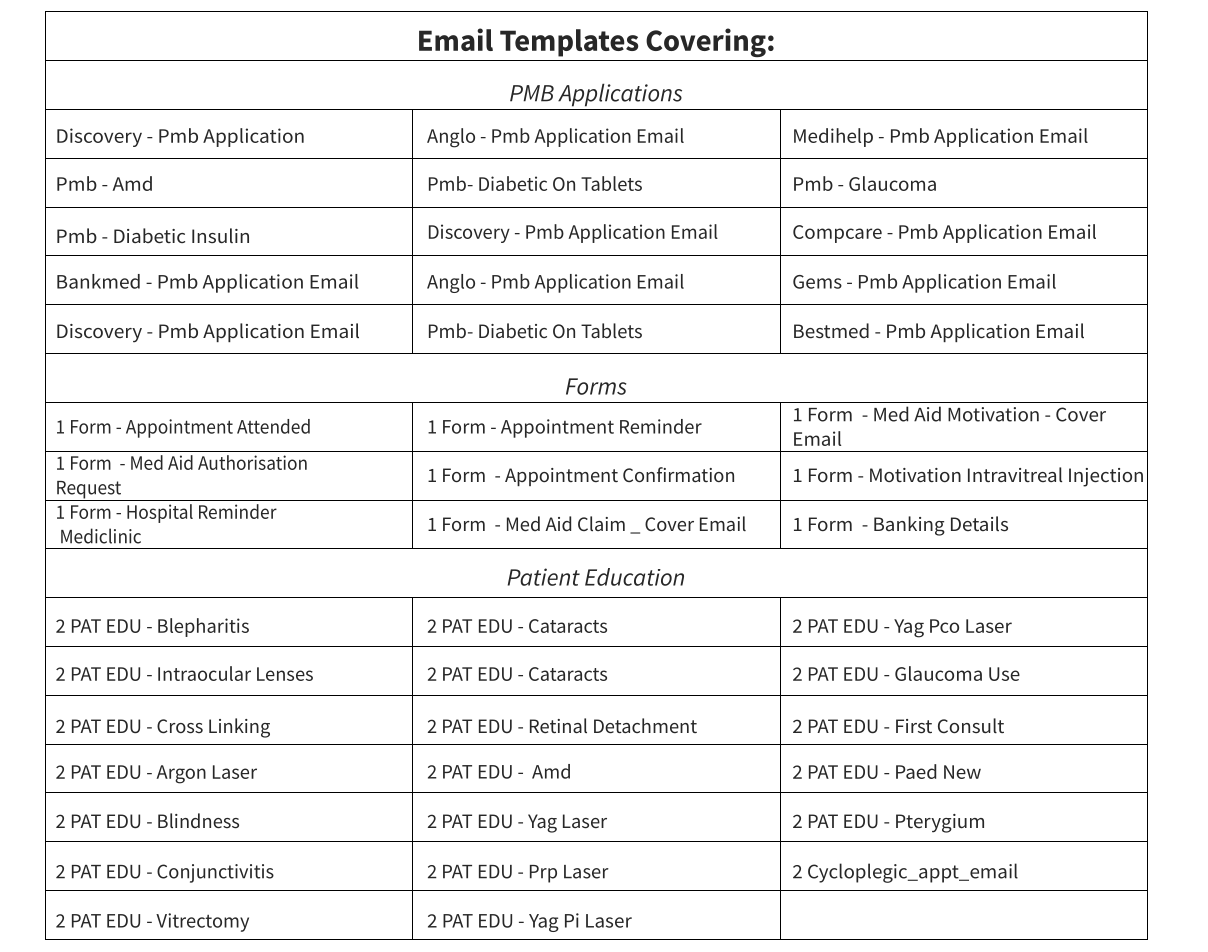
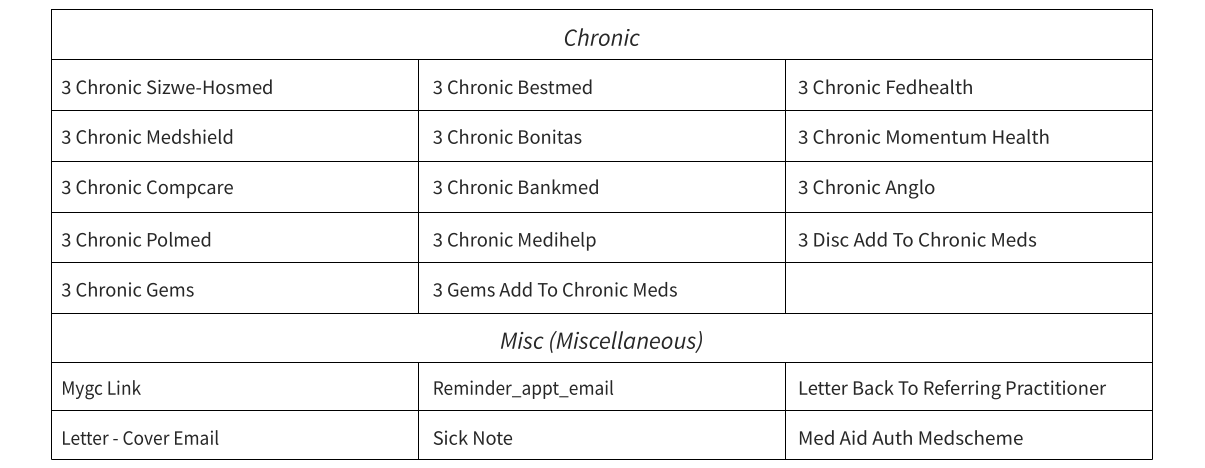
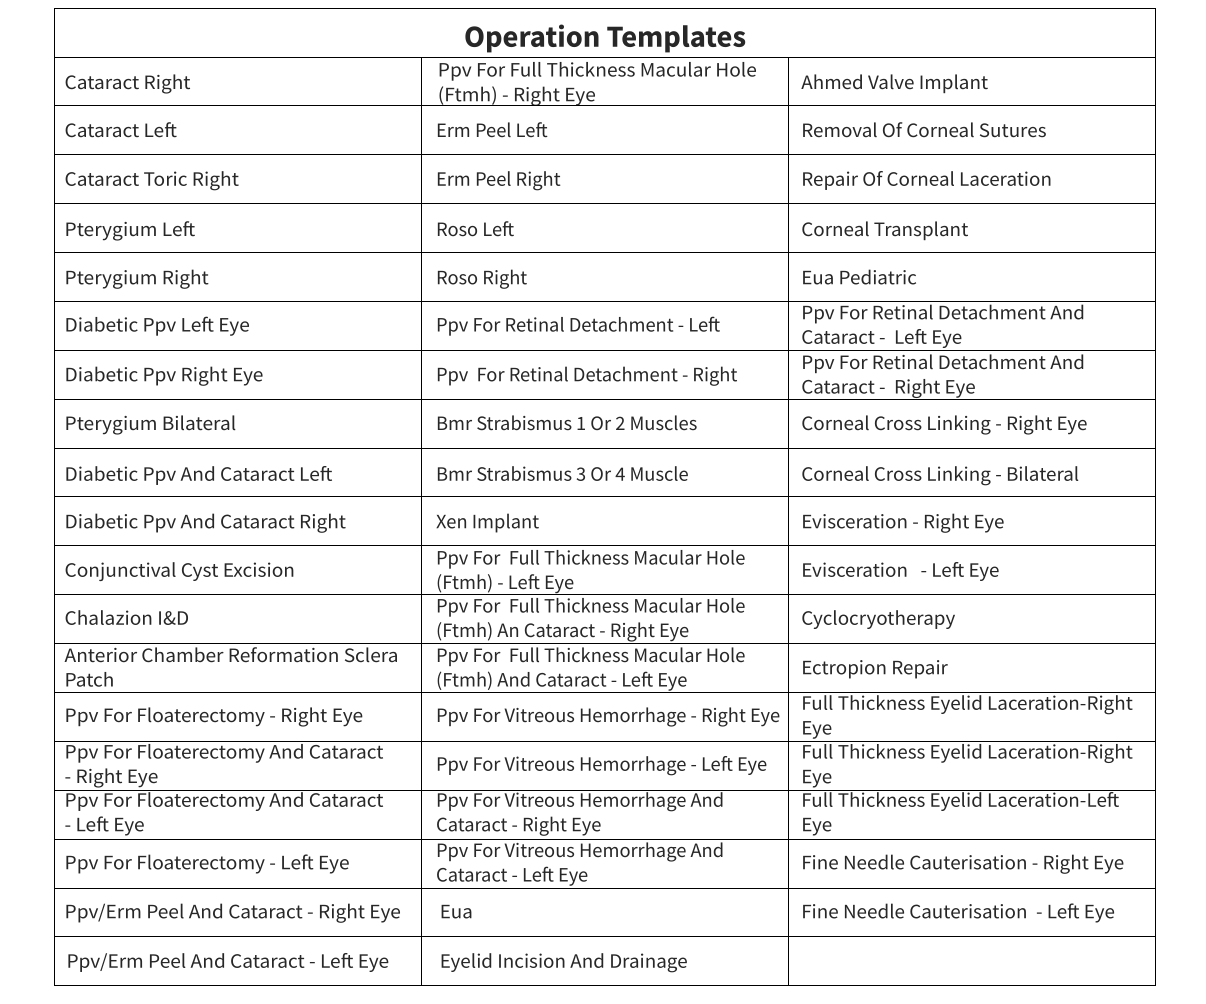
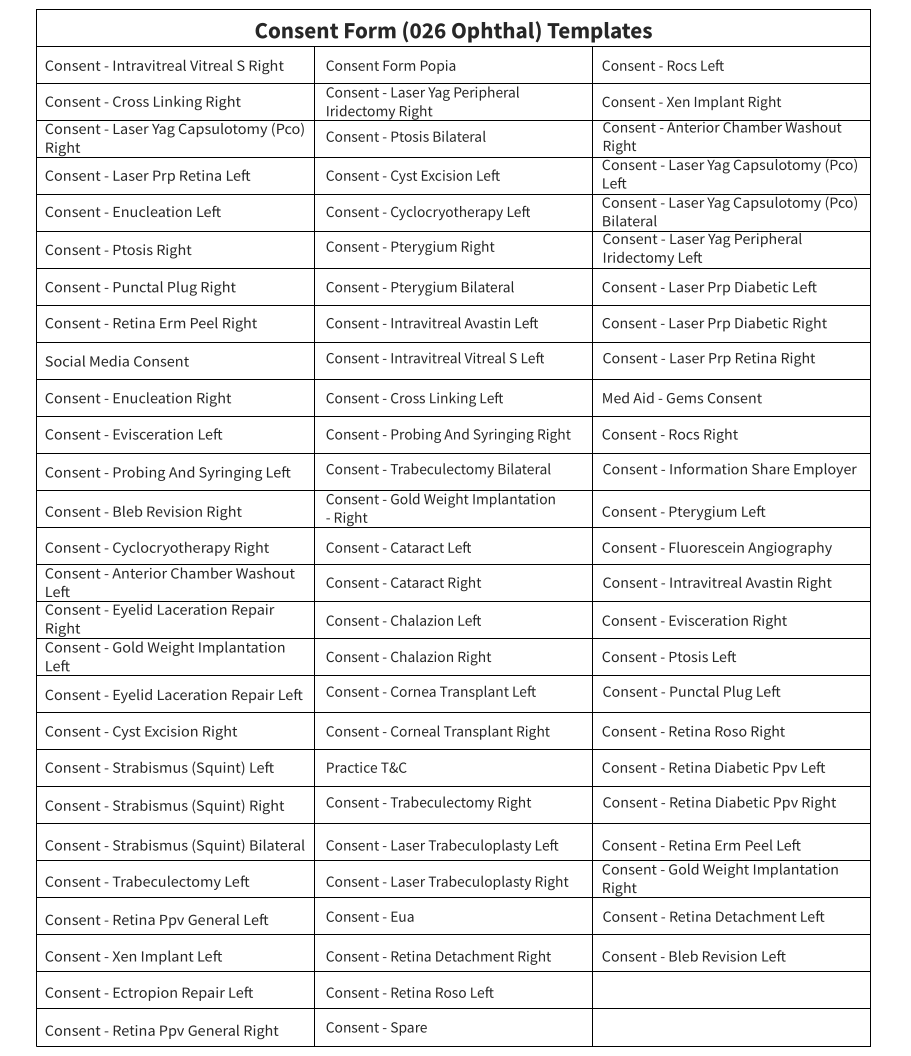
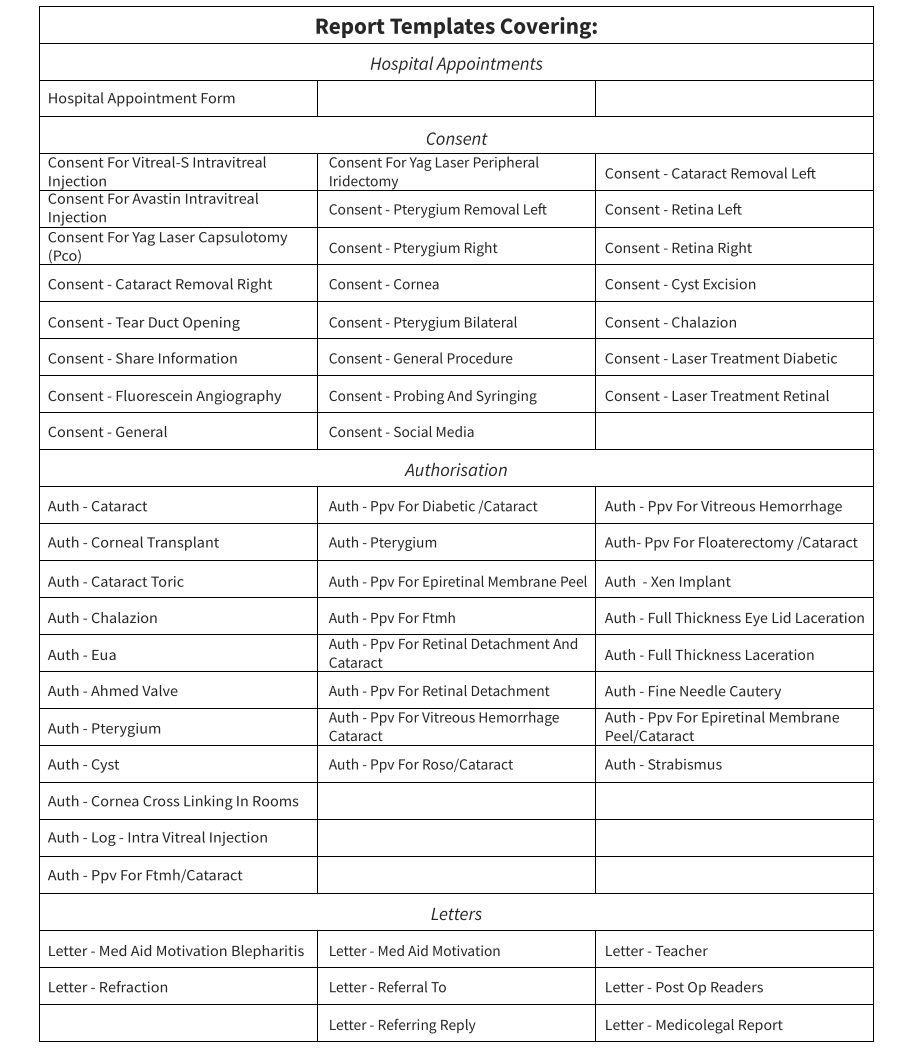
What development is expected around the Eye Eval 2 forms and interface?
GoodX is committed to continuously striving for the most efficient and effective workflows for you and your practice, allowing practitioners more time with their patients and families.
One exciting new development on the way is an internal interface that lets images and integrated machine information populate directly within GoodX forms based on your completed setups. This integration will also make these images visible on patient dashboards, reflecting critical information at a glance.
Where to learn more about Eye Eval 2 & Harmony for Ophthalmologists within GoodX:
The GoodX Click&Learn Courses https://courses.goodx.co.za/
The GoodX YouTube Channel https://www.youtube.com/@GoodXSoftware
The GoodX Learning Centre https://learning.goodx.co.za/
Please note these courses are only modules and are different from the Click&Learn courses. To learn more about Eye Eval 2 & Harmony for Ophthalmologists, you can use these search terms:
| Date of Change | Changes | Editor |
| 2026 05 17 | Established Page | Chendene Barnard |
| 2026 09 22 | Spell-check | Chendene Barnard |

What is VoIP?
VoIP, or Voice over Internet Protocol, enables activated entities to make calls using their internet connection rather than traditional airtime or telephone service providers. The benefits of utilising VoIP include significantly lower costs and superior call quality. For added convenience, you can save completed calls directly to patient profiles so that you can access these recordings or logs at your convenience.
Since calls are recorded, we recommend updating your practice's telephonic introduction to ensure patients are aware. For example: "Please note that this call is being recorded for quality and training purposes."
Please note that the VoIP calling feature is an optional service which requires users to subscribe at an additional fee.
Where do you make a VoIP call through GoodX?
For your convenience, calls can be initiated from the following locations:
Debtors Wheel: Within the Debtor tab, via the Debtor Panel view.
Communication Wheel: Within the Task tab, by selecting a task event linked to the Call Event button.
Debtors Wheel: From the Invoice Management screen, selecting the relevant debtor displays the available call options.
From the Debtor panel view
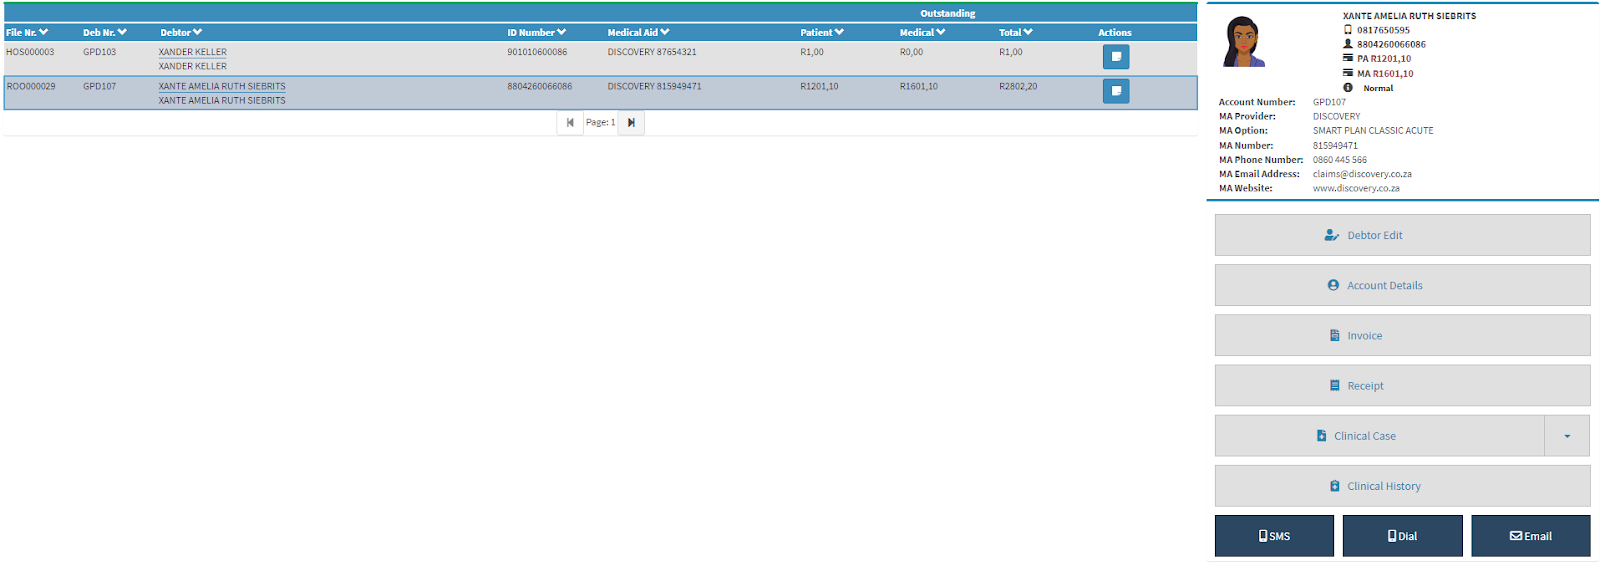
From the Call Event Task
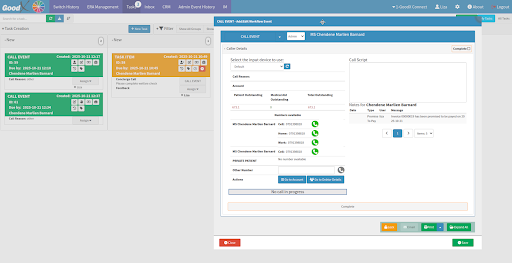
From the Invoice Management Screen
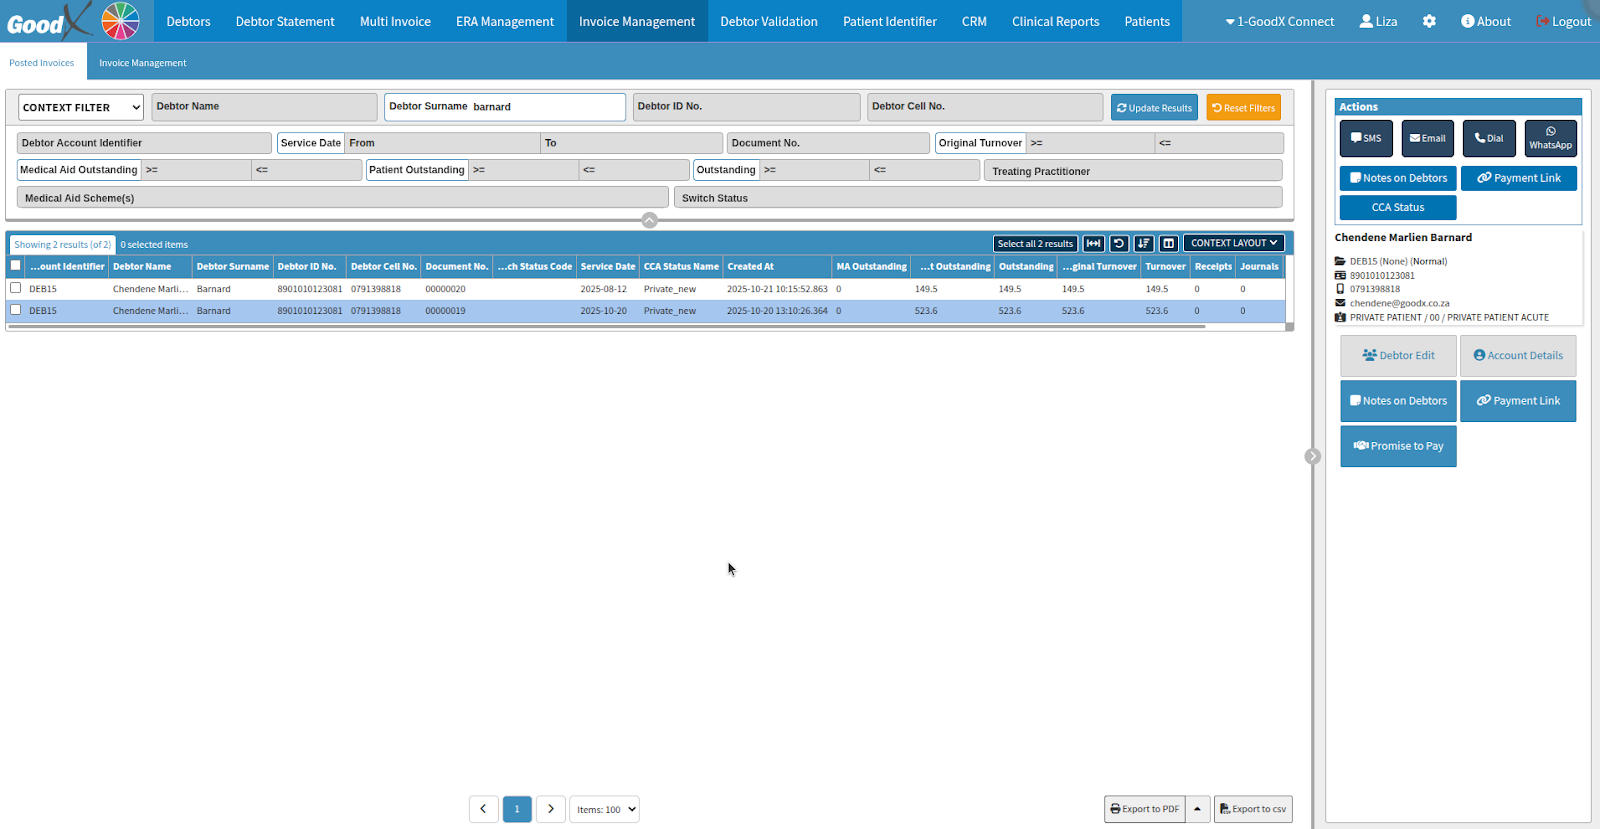
Where do you access the call which was made through VOIP?
VoIP call records can be accessed via the Notebook or through the Admin Event History screen.
From the Navigation Wheel select Debtors
Navigate to the Debtors tab to view the Actions column. Hovering your cursor over an icon will display a tooltip indicating its specific function or destination.

From the Navigation Wheel select Communication
To review specific call records, navigate to the Admin Event History tab. You can refine the view by deselecting irrelevant options to filter for the Call Event type.
Double-click the desired event to open it. Once reviewed, please ensure all call events are marked as Completed to lock the entry and prevent further edits to the notes or event details.
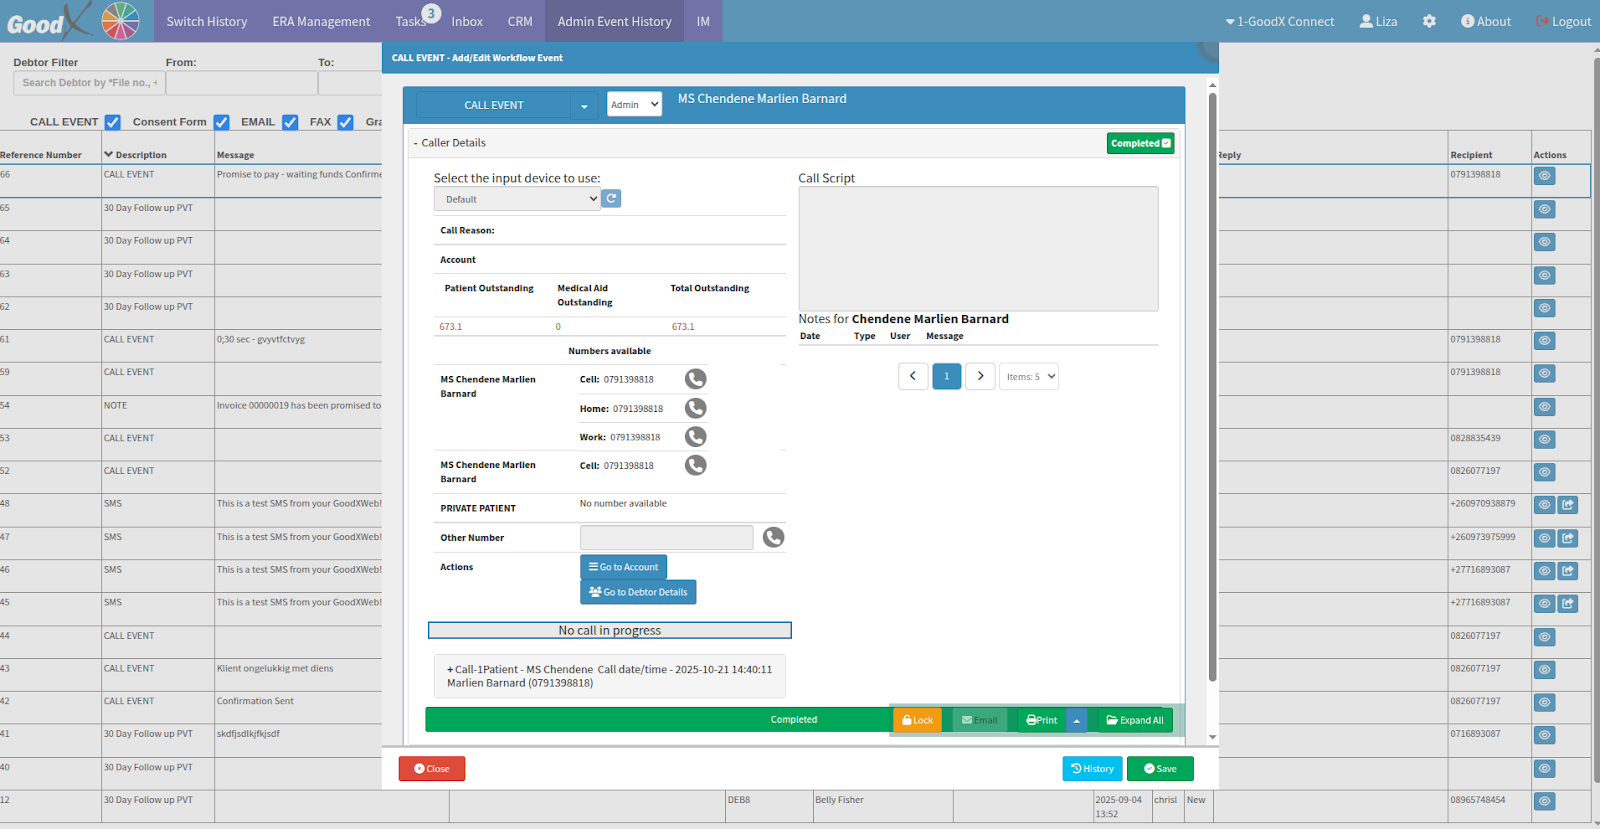
To view more comprehensive details, expand the record by selecting + Call.
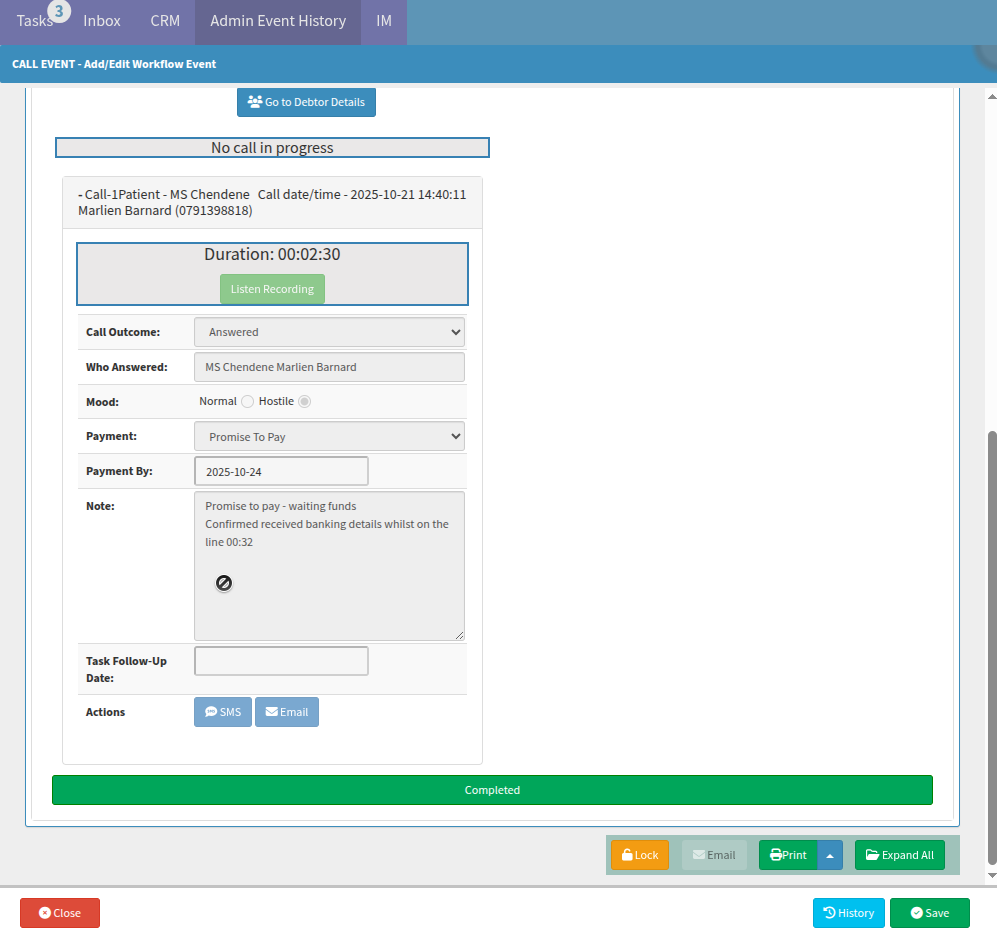
If you need to listen to or download a recording, toggle the call event status by selecting Completed again to unlock it. Then select Listen Recording to open the mini-menu; from there, expand the bulleted options to access the download or playback features.
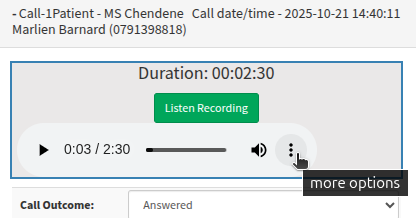
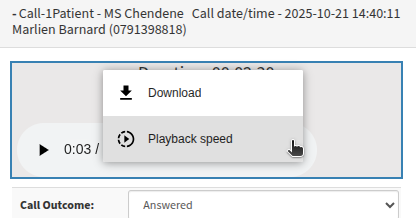
Once finished, please remember to mark the call event as Completed again to prevent any further edits to the notes or event details. If you have updated the original notes, ensure you click Save to apply those changes.
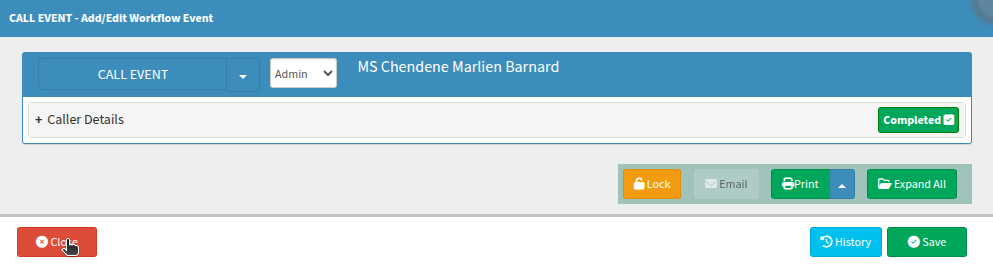
How do you make a VoIP call through GoodX Tasks?
When specific personnel are assigned to particular actions, ToodX lets you create tasks that notify the relevant team to take action. You can leave these tasks unassigned for the next available staff member or assign them to an individual.
You can customise and rename these columns to suit your entity's specific requirements. To manage your workflow effectively, you can filter tasks to view all entries or exclude those already marked as completed. Additionally, tasks are not restricted to a single individual and can be assigned to multiple people simultaneously.
Users can filter the task list to view all entries or exclude those already completed.
From the Navigation Wheel select Communication
Navigate to the Task tab; the default view displays tasks assigned to the currently logged-in user. In this scenario, we will focus on the payment team generating a Call Event task for the reception team to complete.
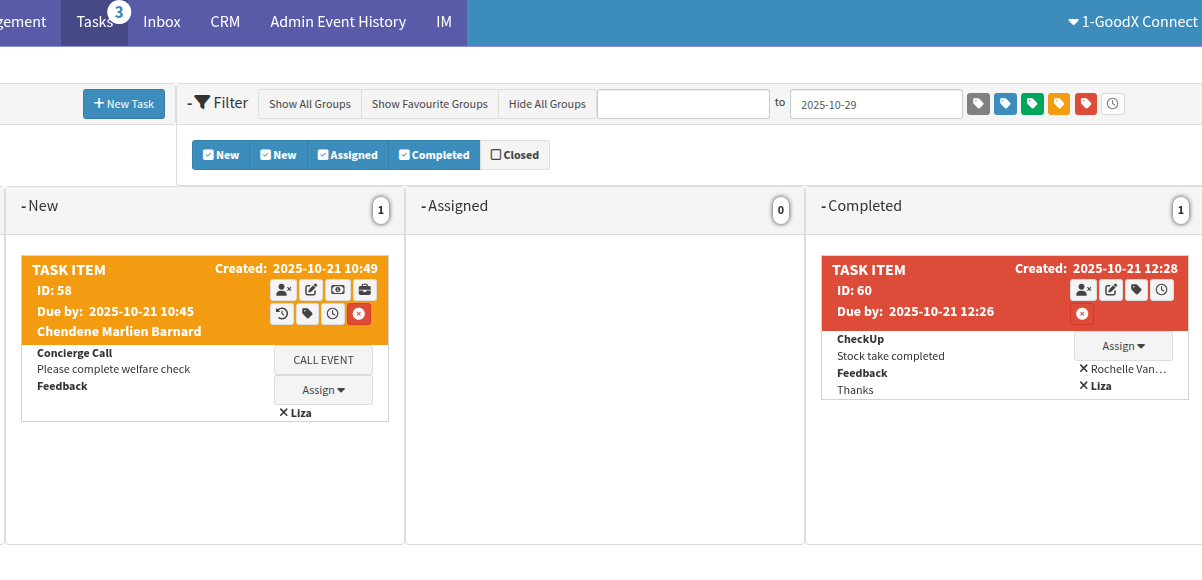
The example below does not require a call, as no call event workflow is linked to the task. Manually created tasks display Task Item as the task type. Conversely, when the Automated Credit Control Management system generates a call request, it will be identified as a Call Event task type.
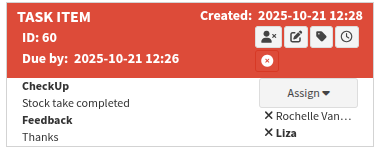
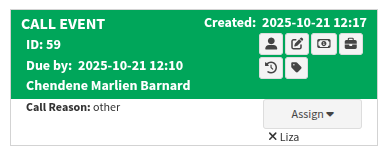
To determine if a call request has been assigned, look for these two indicators:
Assigned Tasks: These display a person icon alongside the name of the designated staff member.
Unassigned Tasks: These display a hand icon.
By clicking the hand icon, you take ownership of the task and assign it to yourself for completion.
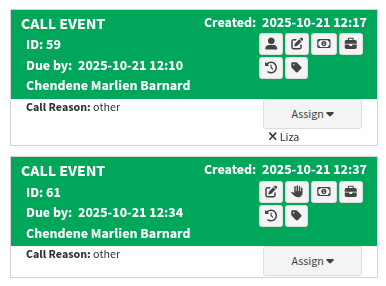
The Automated Credit Control Management system automates repetitive tasks, such as generating call requests to multiple debtors or triggering automated responses to specific actions. The possibilities for streamlining your workflow are virtually infinite.
The Invoice Management tab defaults to displaying patient invoices. To refine your view and filter for specific patient criteria, navigate to the dedicated Invoice Management screen.
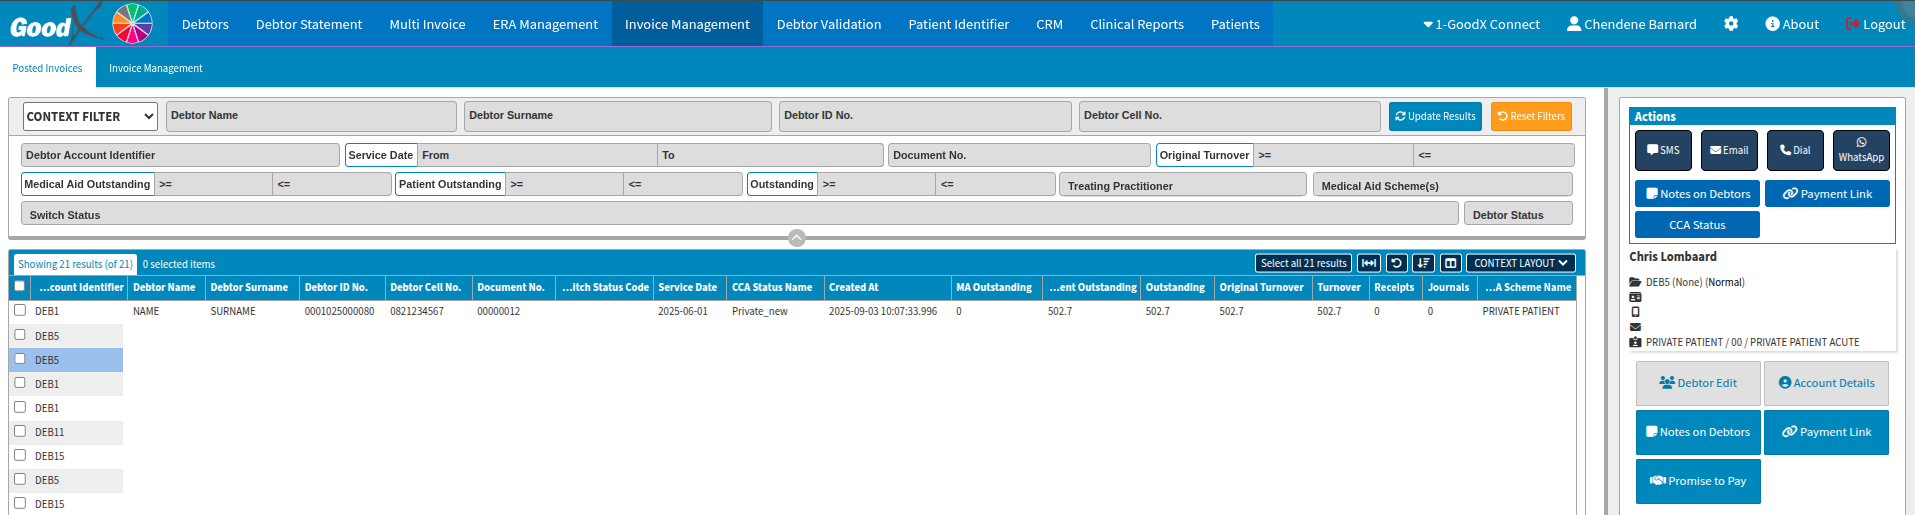

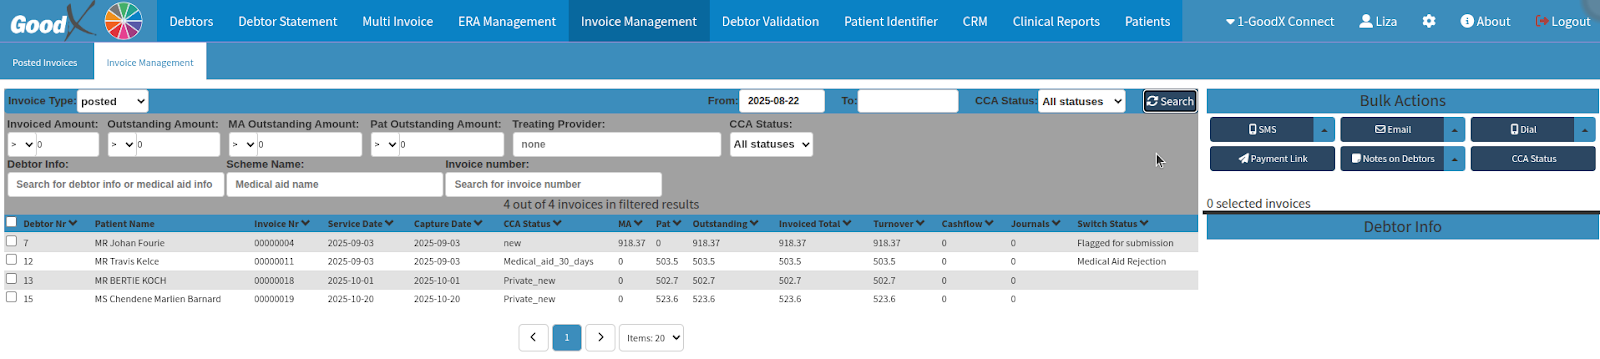
When contacting only specific individuals or a small group of patients, you can use the Dial dropdown to initiate calls for only the selected entries. Alternatively, click the main Dial button to avoid manual selections, as the system will automatically include all patients. In either case, as shown in the prompt, the system will generate only one task per debtor.
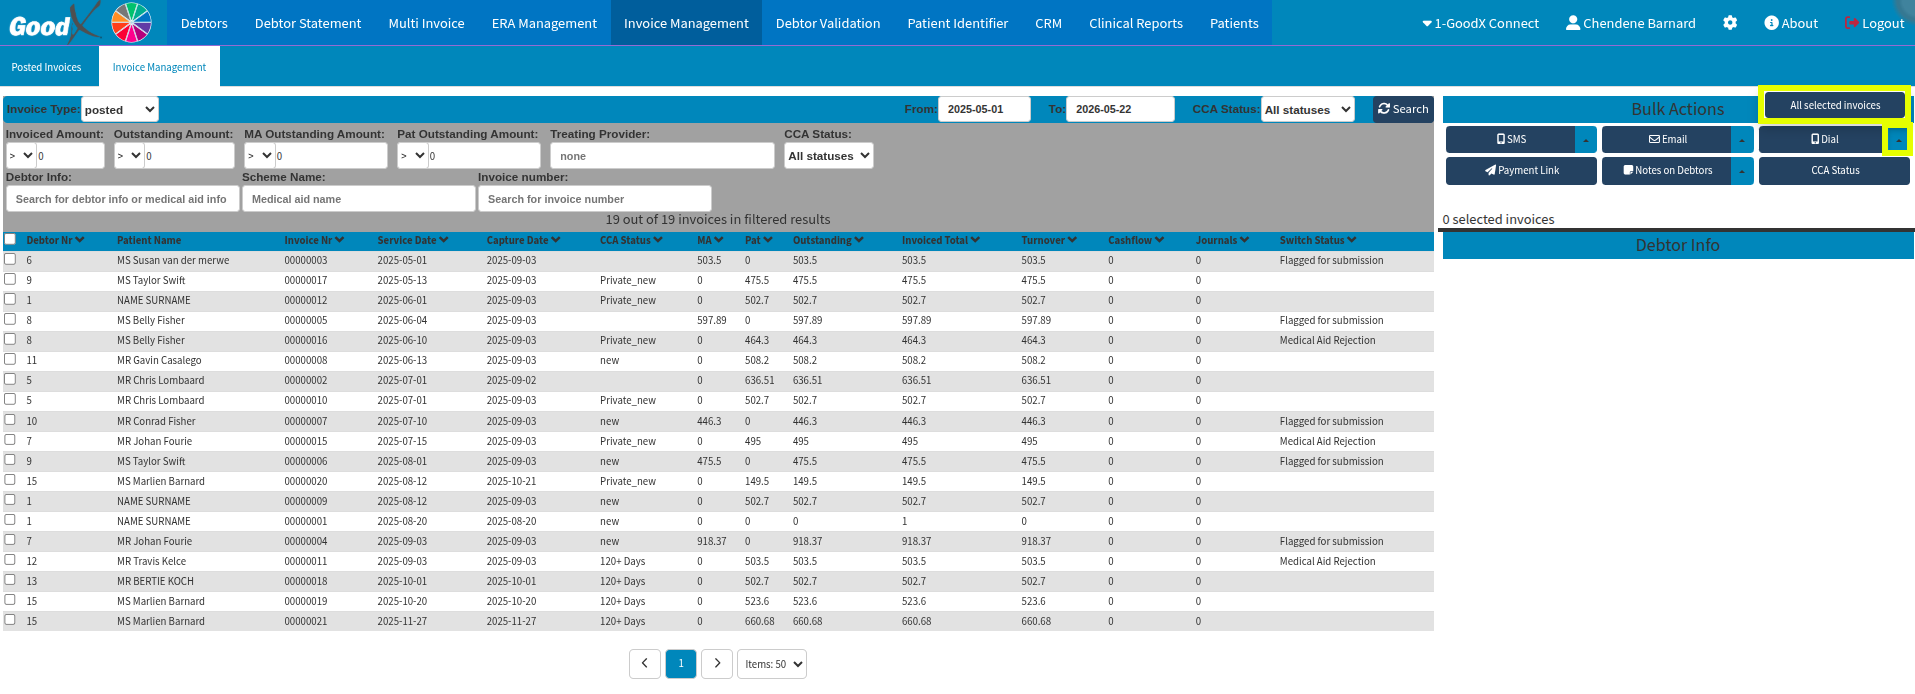
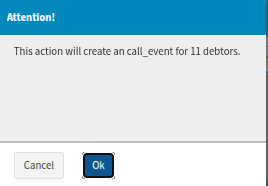
Once you select OK, you can proceed by choosing the appropriate template from the dropdown menu, depending on your practice's specific configuration. If a user was designated within that template, the resulting tasks will be automatically assigned to them for completion.
Because these call requests were generated via the Automated Credit Control Management system, the user can utilise the Auto Dialler session to work through these calls efficiently.
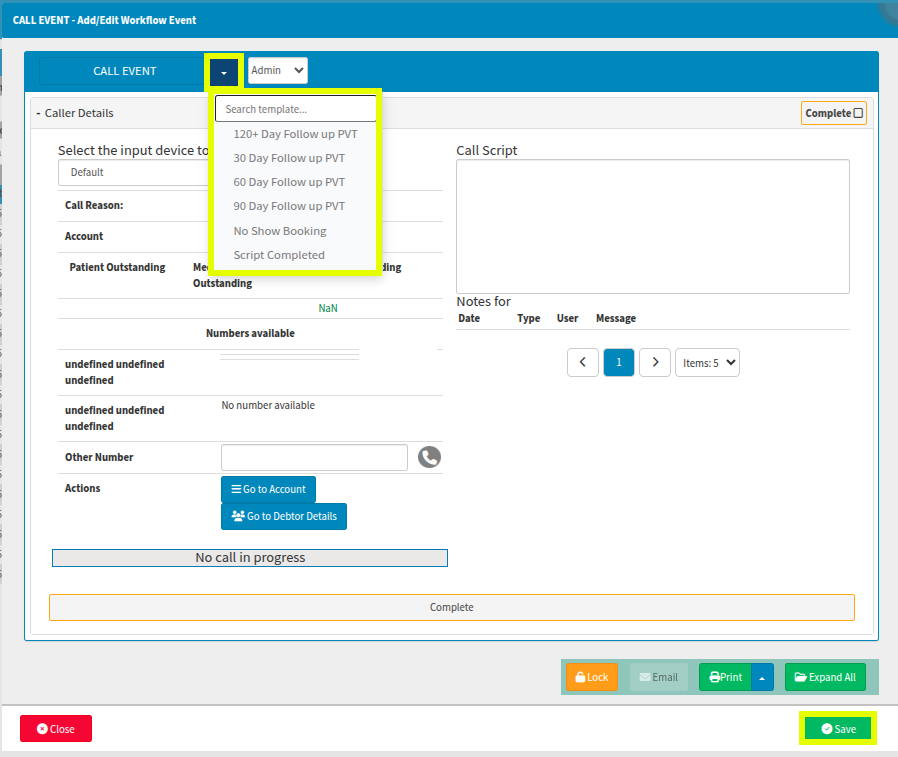
For more information on how to leverage the Automated Credit Control Management system effectively, please contact your client liaison for additional software support. Please note that utilising the Automated Credit Control Management system may incur an extra service fee depending on the specific application. Users may also be required to sign up for this service at an additional cost.
What is the Auto Dialler?
The Auto Dialler is directly integrated with the Automated Credit Control Management system to facilitate seamless, continuous dialling for your call lists.
As a user, you can initiate or pause the session as needed. You must pause or stop before the current call ends. For further details regarding call configuration and use of Call Event templates, please refer to the previous Task section.
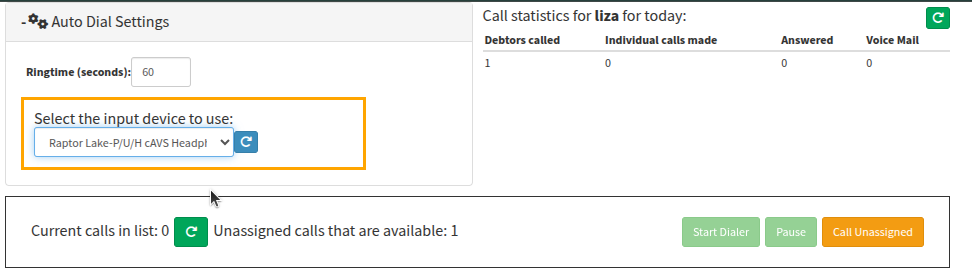
Where to learn more about VoIP within GoodX?
The GoodX Click&Learn Courses https://courses.goodx.co.za/
The GoodX YouTube Channel https://www.youtube.com/@GoodXSoftware
The GoodX Learning Centre https://learning.goodx.co.za/
Please note these courses are only modules and are different from the Click&Learn courses. To learn more about VoIP Connect, you can use these search terms:
| Date of Change | Changes | Editor |
| 2026 05 13 | Established Page | Chendene Barnard |
| 2026 09 23 | Spell-check | Chendene Barnard |

What is the “Diary Automation” feature?
The Diary serves as the foundation of an efficient patient journey. It offers deep customisation, including adjustable time slots, visual colour-coding, and specialised booking types. By utilising integrated auto-events, the system triggers specific actions the moment a booking is selected, ensuring your practice's workflow remains automated and precise.
MyGC works alongside additional features that carry separate costs. While SMS fees are covered under your standard GoodX agreement, services such as VOIP calling and Payment Links are subject to additional charges. Please note that Payment Links require a formal sign-up process before activation.
What makes the “Diary Automation” service convenient
Maximise your Diary Automation by leveraging the MyGC patient portal. This secure, self-service application allows patients to take control of their medical journey by viewing past and current invoices, scripts, and clinical notes in real time. By activating your online presence, you enable patients to book appointments directly through the platform, creating a fully automated and synchronised scheduling ecosystem.
What are the “Diary Automation” applications within your practice?
The feature can be best defined through:
Diary automated actions set on booking types.
Face tag/hash (if added to the patient profiles).
RF ID tags (if set up at the practice).
Left is the card reader.
Right is the light box,s located above the rooms.
Below is an example of the Custom RF ID Tags used at Dr Dean Van Der Westhuizen's room (Lowveld Eye Institute)
Automation can be applied to a wide range of practice functions. If your workflow requires specialised document linking or unique task automation beyond the examples provided, our team is available to assist. If you require specific documents or administrative tasks to be linked to your booking types, please get in touch with your Client Liaison Officer for dedicated assistance in tailoring these automated workflows to your practice.
How is Mandatory Documentation set up as “Diary Automation”?
Transform every phone booking into a streamlined workflow. Once a booking is captured, the system utilises the designated Booking Type to trigger the delivery of relevant forms and questionnaires. Automated SMS and Email confirmations are sent immediately, providing your patients with all necessary information while simultaneously prepping your practice for their visit.
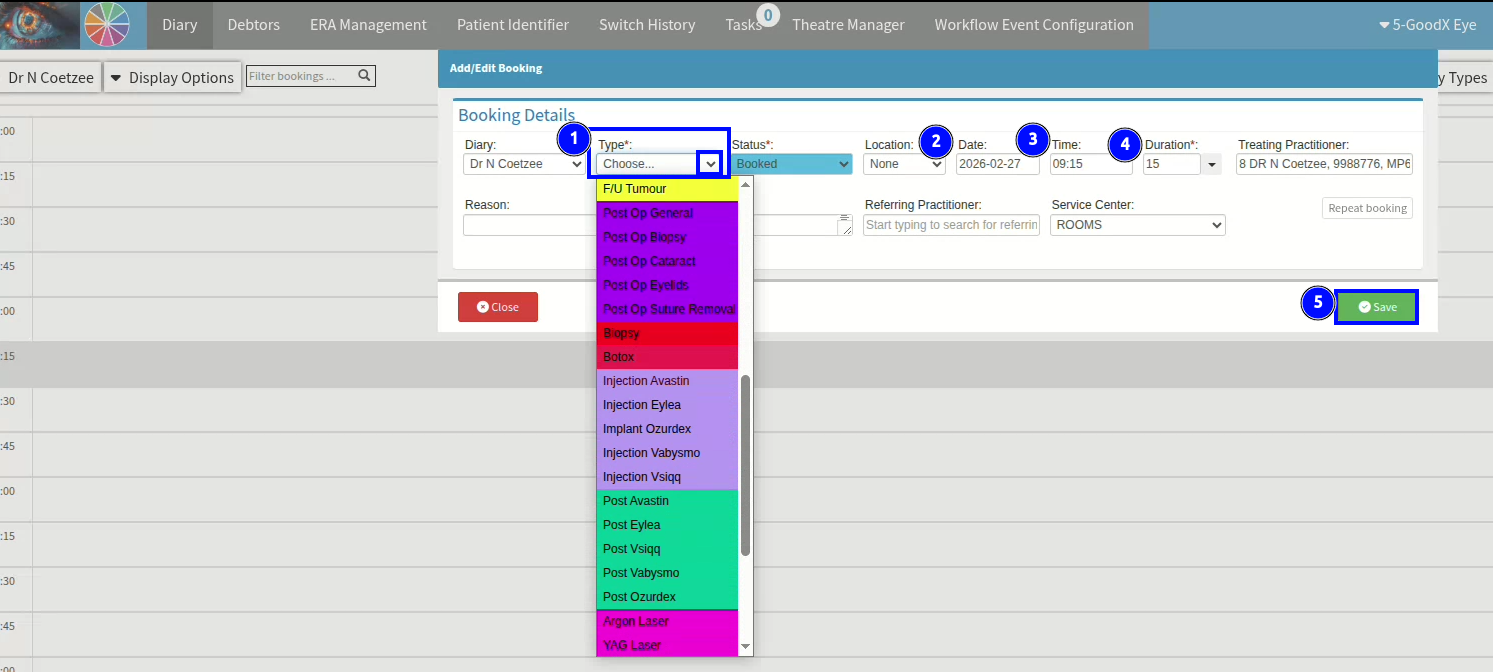
When scheduling a new patient, the system can automate a comprehensive onboarding protocol. This includes immediately sending practice consent and privacy forms, along with any custom documentation required before the appointment. The system also manages a multichannel communication sequence: sending instant booking confirmations via SMS and Email, followed by scheduled reminders two days and one day before the event. These reminders include interactive links that allow patients to confirm their attendance digitally.
Support better clinical outcomes by integrating patient education directly into your workflow. You can map specific care instructions and educational documents to your Booking Types, triggering an automated send at the time of booking or as the appointment approaches. This feature ensures patients are well informed and properly prepared for their visit without requiring manual follow-up.
How is a diary booking made?
A booking can be made by selecting the button on your Diary tab called "New Booking".
For rapid scheduling, you can generate a new booking directly within your preferred time slot by double-clicking any unallocated space in the Diary. This shortcut provides an efficient way to bypass standard menus while still ensuring all automated workflows and Booking Type triggers remain active.
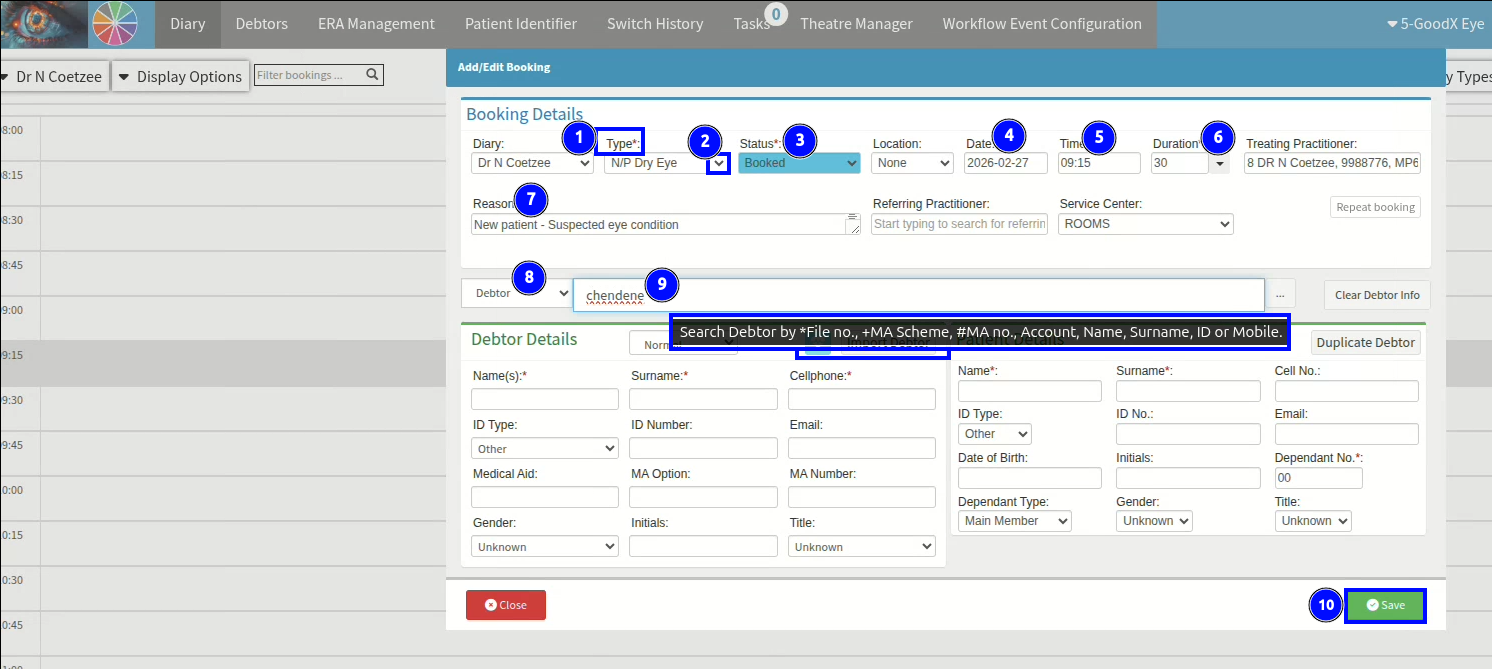
When finalising a booking, ensure the following critical data points are captured to maintain reporting integrity and clinical accuracy. Select the appropriate Booking Type via the dropdown menu, as this categorises the encounter for future practice analytics. The Status field should reflect the patient's current stage in the workflow—such as transitioning from "Booked" to "Arrived" upon their arrival at the practice.
Confirm that the Date, Time, and Duration accurately reflect the intended appointment, adjusting for multi-reason visits where necessary. Utilise the Comments/Notes section to record any telephonic or in-person details that will assist Practitioners or Quality Assurance during the examination. For patient identification, the system allows for comprehensive searches across multiple data points. If the patient is new to the practice, you can create their profile via the Import Debtor function, integrated MyGC data synchronisation, or utilising AI Document Extraction to convert physical PDF/Image uploads into digital files.
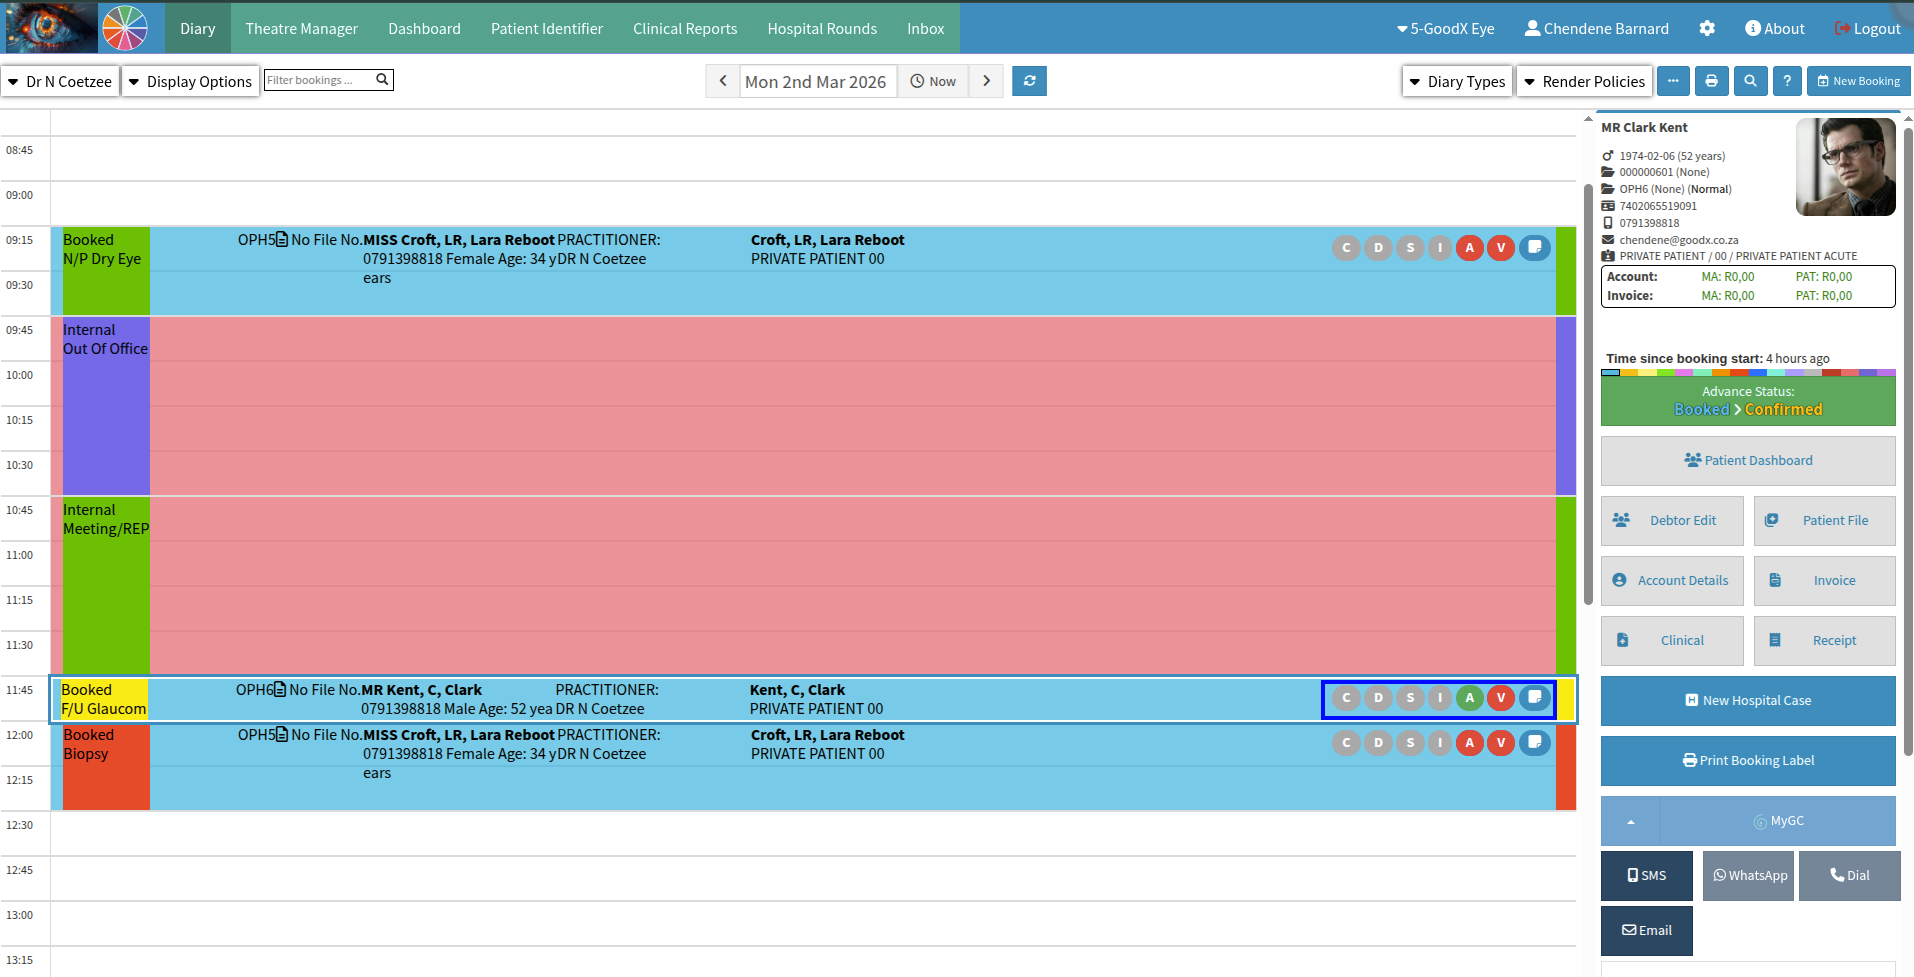
The Diary provides immediate visual feedback regarding the status of a patient's documentation. At a glance, you can monitor documentation compliance in real-time through the booking entry's visual indicators. Active icons highlight outstanding requirements that need your attention, while greyed-out markers represent features or documents that are not required by your practice's unique workflow settings.
To ensure data integrity, the system allows you to designate specific documents as mandatory. You may utilise the pre-configured default templates or define bespoke document types tailored to your practice. These requirements can be enforced across four primary classifications: Case, Debtor, Patient, and Printouts. Setting these as mandatory ensures your team consistently collects the information needed for a complete, compliant patient record.
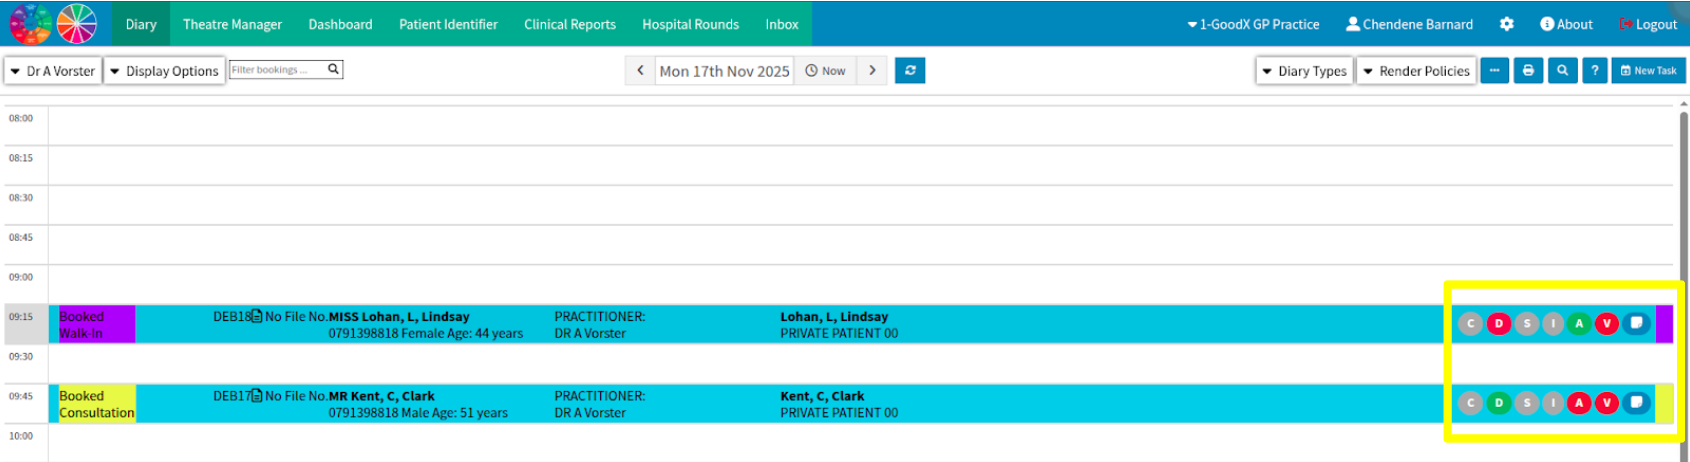
Hovering over the bubble icons activates a contextual tooltip providing a detailed overview of the booking. This dynamic description includes critical administrative notes and real-time status updates—such as "Account Paid"—allowing for immediate verification of the patient's standing without navigating away from the Diary view.
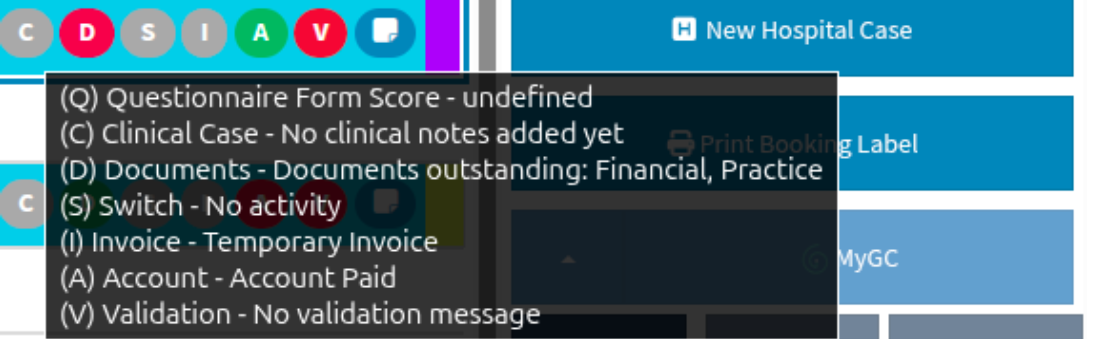
Use the View Notebook icon as a quick-access portal for document management. Once a booking is selected, this shortcut allows you to instantly view existing uploads or add outstanding documents to the file. It's designed to streamline your workflow by keeping all patient-related documentation just one click away from the main Diary.
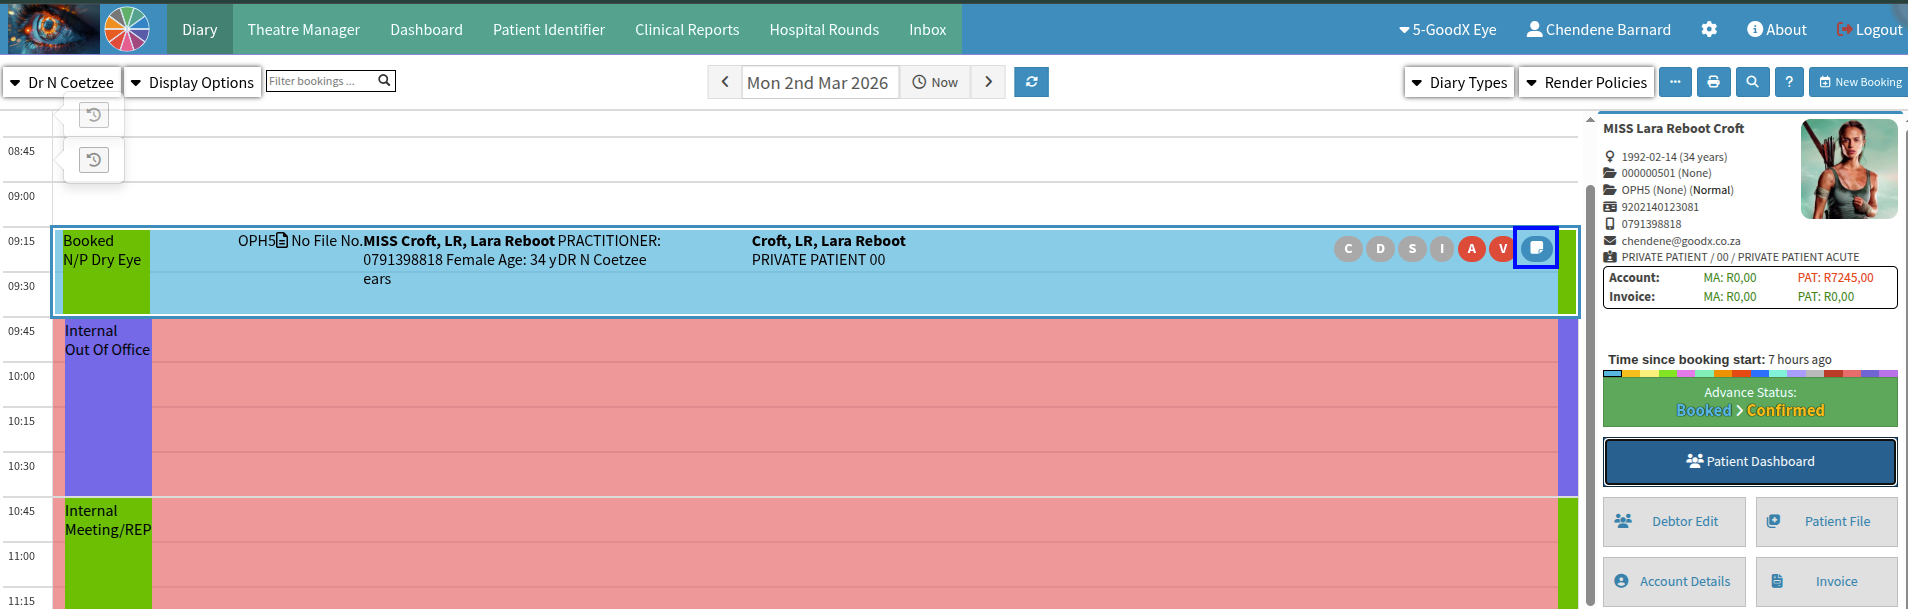
Selecting the Uploaded Documents option will navigate you to a dedicated management screen. This centralised interface allows you to review, organise, and verify all digital files associated with the selected patient or debtor.
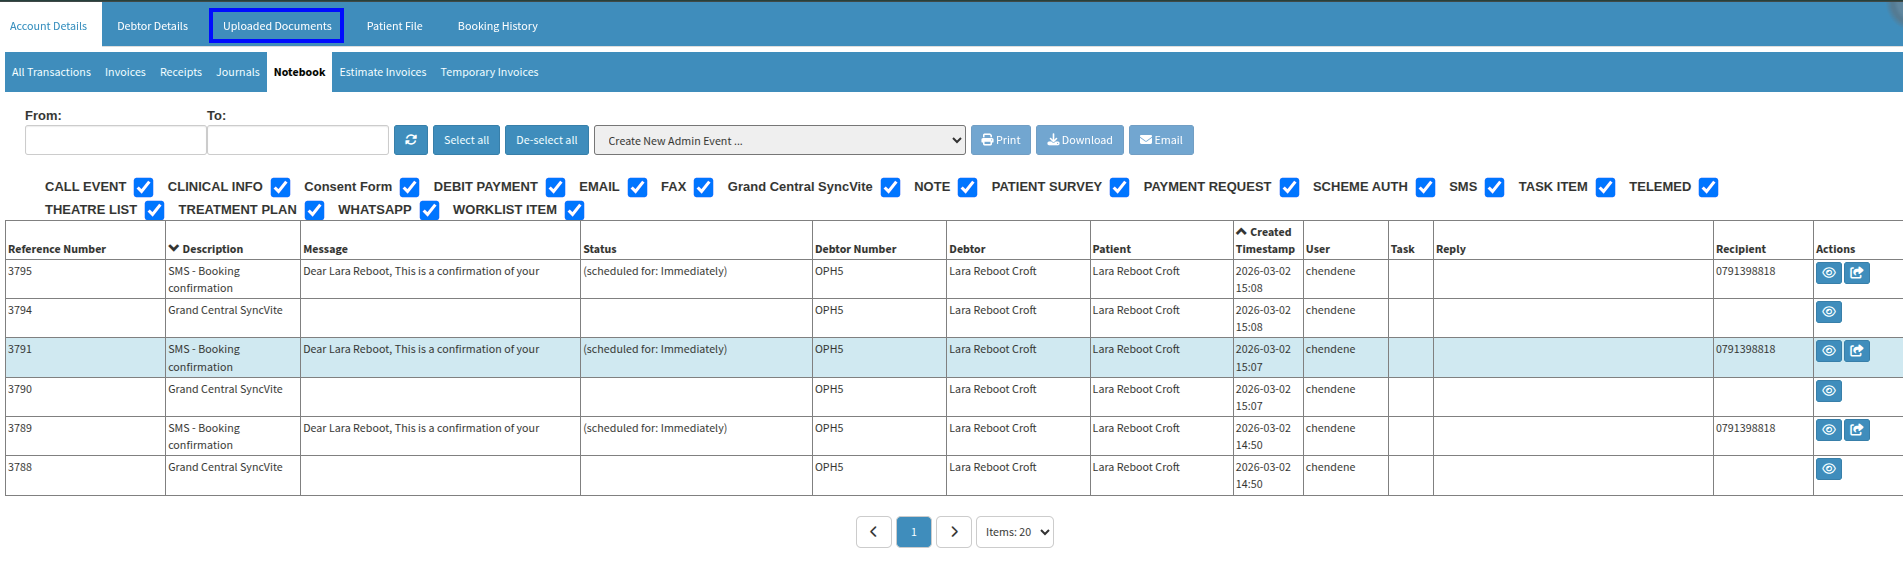
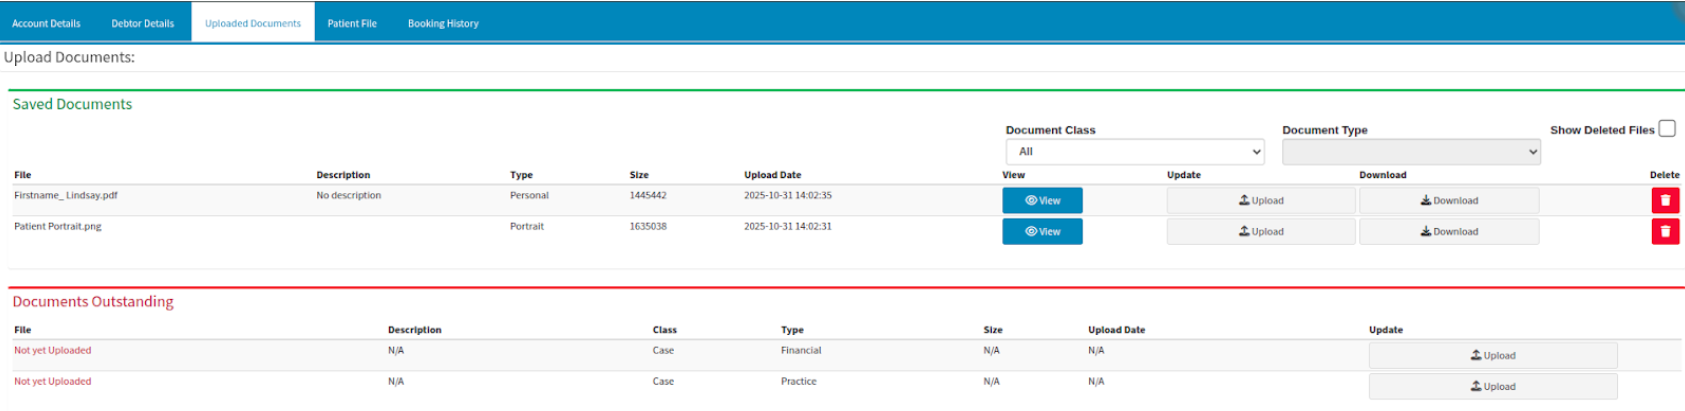
How is Facial Recognition set up as “Diary Automation”?
Experience debtor-less check-in with integrated Facial Recognition. Using your practice camera, the system automatically identifies arriving patients with a profile photo on file. It instantly matches the individual to their specific Diary booking, allowing you to confirm their arrival with a single click. This automated biometric identification ensures a sophisticated and efficient start to the patient journey.
Keeping patient photos up to date is simple. Use the Debtor Edit shortcut on the right side of your Diary to access the image management tools. From there, click the current profile photo to instantly update or clear the image, ensuring your automated check-in and identification features work optimally.

Using the Delete Face Hash option permanently erases the biometric data associated with the patient's profile. This function removes the encrypted mathematical representation used for facial recognition, ensuring all linked identification data is purged from the system. Please note that this action is immediate and irreversible.
When duplicating Debtor records across different entities, follow a specific security protocol before finalising the transfer. Before saving the record in the new entity, you must manually clear both the Profile Image and the Face Hash. Once you remove these biometric markers, you may save the record, successfully establishing the debtor in the new entity's database.
Please ensure that the record is not assigned a Debtor Status that restricts or prohibits cross-entity transfers. Certain administrative flags may prevent the migration of data to maintain financial integrity. If you encounter an error during this process, your Client Liaison can assist by reviewing the Debtor Status List on your GoodX desktop to identify and resolve any active restrictions.
How is Automatic messages set within “Diary Automation”?
The system supports highly customisable automation for booking reminders, birthday greetings, and follow-up notifications. These are managed via Workflow Event Templates, which allow you to define specific triggers based on your practice's unique Booking Types. When configuring these templates, prioritise legibility by ensuring high contrast between background colours and text. For instance, avoid using black text on dark backgrounds (such as purple or navy), as this significantly impairs readability for Diary users.
The system offers granular control over communication frequency, allowing templates to be triggered once per debtor, once per patient, or for every individual booking. To maintain high attendance rates and ensure patients are consistently informed, best practice is to set the trigger to "Every Booking." This ensures that even frequent visitors receive the necessary confirmations and pre-visit instructions for every scheduled encounter.
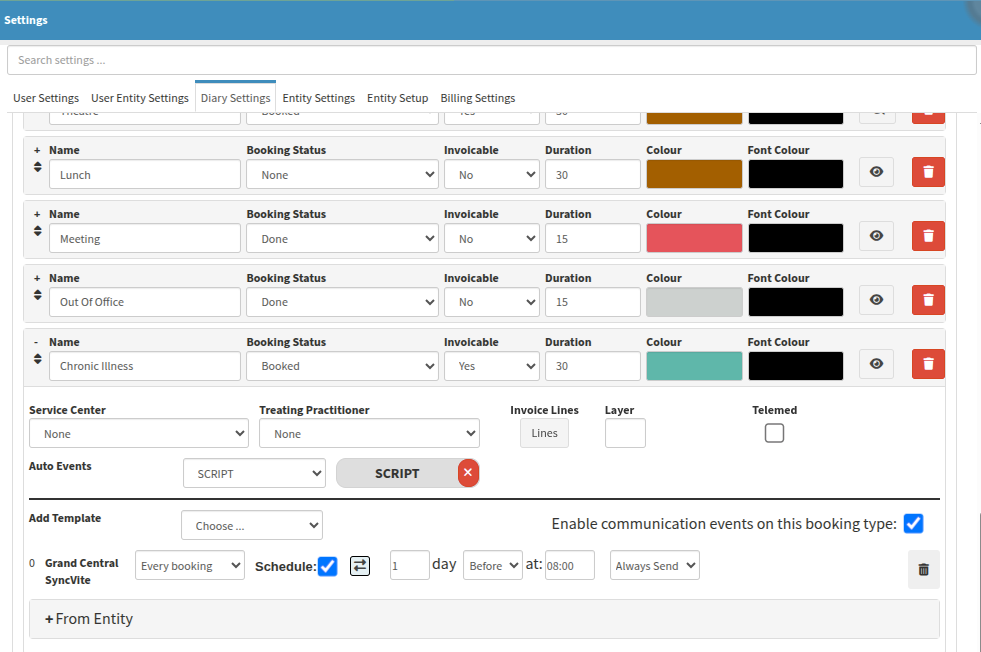
Refine your automated messages using the template selection menu. While the system pre-populates a script based on your triggers, the dropdown allows you to switch between any templates mapped to that event. This ensures the pre-populated script matches the specific patient scenario or booking type.
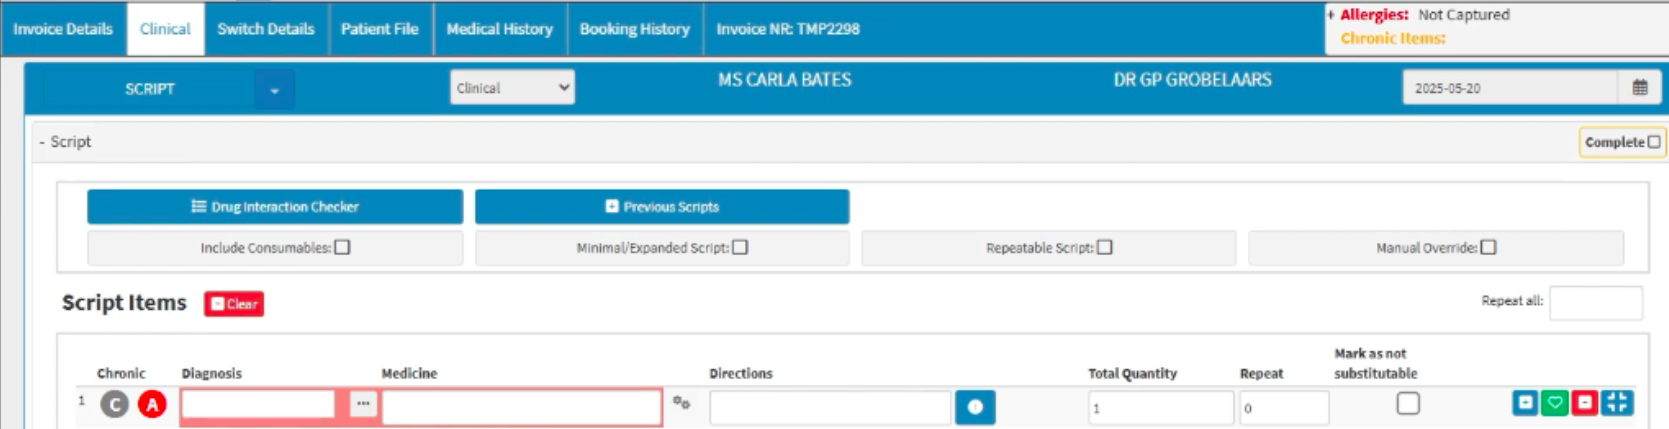
The MyGC icon serves as a real-time status indicator for digital patient intake. A Green icon signifies that the patient has completed all automated forms or questionnaires. Conversely, the Standard Blue icon indicates that the documentation remains pending. If the MyGC icon appears inactive (greyed out), your practice has not yet been configured for an online presence, which is required to enable digital patient onboarding and web-based scheduling for preferred time slots.
Where to learn more about Diary Automation within GoodX:
The GoodX Click&Learn courses :
GoodX Web Implementation for New Client Onboarding https://courses.goodx.co.za/enrol/index.php?id=116
Course: Introducing GoodX Software and the Click & Learn Courses (Version 202412) https://courses.goodx.co.za/course/view.php?id=50
Course: Workflows for Receptionists in the Healthcare Practice (Version 202407) https://courses.goodx.co.za/course/view.php?id=105
The GoodX YouTube Channel: https://www.youtube.com/@GoodXSoftware
GoodX Web App - Search for a Debtor's Booking
GoodX Web Tutorial - How to Create a New Account Whilst Making a Booking
GoodX Web Tutorial - Navigating the myGC Dashboard
GoodX Web - How to Advance the Status of a Booking
GoodX Web App - How to Use Booking Events
GoodX Web App - How To Create Repeat Bookings
GoodX Web App - Copy Booking
GoodX Web App - Move and Copy an Appointment
GoodX Web Tutorial - How to Book a New Patient
GoodX Web App - Change Type of Appointment
GoodX Web - How to Edit a Booking's Information
GoodX Web App - Book Other Appointments
GoodX Web App - Emergency Appointments (Existing Patient)
How to create a Booking for a New Patient on an Existing Debtor
GoodX Web Tutorial - Last Visit Tab: Navigation and Use
GoodX Web App - Booking Icons Explained
GoodX Web - How to Set Up Your Booking Types
GoodX Web - How to Set Up Fields Displayed on Bookings
GoodX Web Tutorial - Booking Confirmation Status Trigger Setup
GoodX Web - How to View the History of a Booking
GoodX Web App - How To Create a New Express Booking
GoodX Web App - How To Book an Insurance Examination
GoodX Web App - How To Book a Walk-In Insurance Examination
GoodX Web App - How to Un-Arrive a Patient
GoodX Web App - Cancel an Appointment
GoodX Web Tutorial - Making a First Available Booking
The GoodX Learning Centre https://learning.goodx.co.za/
Please note these courses are only modules and are different from the Click&Learn courses. To learn more about Diary Automation, you can use these search terms:
| Date of Change | Changes | Editor |
| 2026 04 01 | Established Page | Chendene Barnard |
| 2026 05 12 | Updated to formal British-style English, which is the standard used in South African English. | Chendene Barnard |
| 2026 09 23 | Spell-check | Chendene Barnard |