The Posted Invoices Subtab provides you with a powerful and efficient way to generate and manage Reports of all posted Invoices within the system. It not only allows you to filter data to meet your exact Reporting needs, but also gives you the flexibility to export information as a CSV file or download it in a PDF format. In addition, the sidebar offers quick access to a range of communication and management tools, including the ability to send bulk SMSes, Emails, and Payment Links, make bulk notes on the Debtors File, and manage the CCA Status.
By combining Reporting with direct communication in one place, it streamlines financial administration, saves valuable time, and reduces manual effort, supporting Practices in running a more organised and effective billing process.
The Contents of This User Manual:
Filters
Screen Column Action Buttons
Columns
Posted Invoices Sidebar
Page Options
This user manual will start on the Invoice Management tab, Posted Invoices sub-tab screen.
For more information on how to navigate to the Posted Invoices screen, please refer to the user manual: Reports Segment.
Filters
Filters are tools or functionalities that allow you to narrow down or refine the results displayed on the Posted Invoice screen.
Click on the Context Filter drop-down menu to select the filter style you wish to use.
Click on the Debtor Name field to filter on the Debtor's name.
Click on the Debtor Surname field to filter on the Debtor's surname.
Click on the Debtor ID No. field to filter on the Debtor's ID number.
Click on the Debtor Cell No. field to filter on the Debtor's cellphone number.
Click on the Debtor Account Identifier field to filter on the Debtor's account identifier.
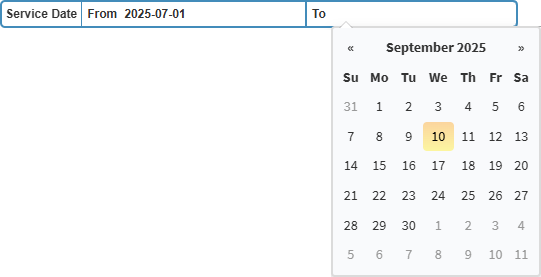
Click on the Service DateFrom field to filter on the start date from the date picker that becomes available.
Click on the Service Date To field to filter on the end date from the date picker that becomes available.
?Please Note: An error will appear if the To date is set earlier than the From date.
Click on the Document No. field to filter on the document number.
Click on the Original Turnover (>=) field to enter the starting value for the range.
Click on the Original Turnover (<=) field to enter the ending value for the range.
Click on the Medical Aid Outstanding (>=) field to enter the starting value for the range.
Click on the Medical Aid Outstanding (<=) field to enter the ending value for the range.
Click on the Patient Outstanding (<=) field to enter the starting value for the range.
Click on the Patient Outstanding (<=) field to enter the ending value for the range.
Click on the Outstanding (<=) field to enter the starting value for the range.
Click on the Outstanding (<=) field to enter the ending value for the range.
?Please Note: An error will appear if the To value is set lower than the first value.
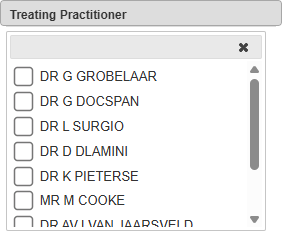
Click on the Treating Practitioner drop-down menu to select the Treating Practitioner you wish to filter on.
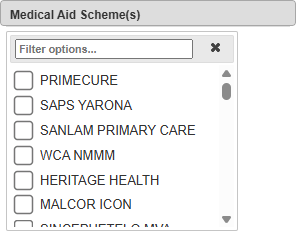
Click on the Medical Aid Scheme(s) drop-down menu to select the Medical Aid Scheme(s) you wish to filter on.
Click on the Switch Status drop-down menu to select the Switch Status you wish to filter on.
Click on the CCA Status drop-down menu to select the CCA Status you wish to filter on.
Click on the Update results button to filter for your results based on your filters.
Click on the Reset Filters button to clear all the filters you entered.
Screen Column Action Buttons
Several additional options are available for the Columns. These additional options are to help you adjust the List, refine the Search and give more specific results.
Click on the Select All Results button to select every line in the column.
Click on the Expand Widths button to auto-fit the column width to the information within all columns.
Click on the Reset Widths button to restore the original widths after any modifications were done.
Click on the Sort Columns button to sort the Columns in the order that you desire.
Click on the Context Filter drop-down menu to select the type of layout that will be used for the screen.
Columns
All the information on the Posted Invoice screen is divided into Columns to logically group related information together.
Tick the checkboxes you wish to be part of the Bulk Actions on the sidebar.
Account Identifier: Unique code linked to the Debtor account.
Debtor Name: The first name of the Debtor.
Debtor Surname: The last name of the Debtor.
Debtor ID No.: Identification number of the Debtor.
Debtor Cell No.: Mobile phone number of the Debtor.
Document No.: The system-generated number for the Invoice.
Switch Status Code: Indicates the current submission status of the claim.
Service Date: The date when the service was rendered.
CCA Status Name: Displays the current Credit Control Assistant status.
Created At: The date and time the record was created in the system.
MA Outstanding: Amount owed by the Medical Aid on the account.
Patient Outstanding: Amount owed by the Patient on the account.
Outstanding: Total balance currently due (Medical Aid plus Patient portions).
Original Turnover: The amount originally billed before any adjustments.
Turnover: The billed amount recorded for reporting, after any adjustments.
Receipts: Total payments received against the account.
Journals: Accounting entries applied to the account for adjustments or corrections.
Medical Aid Scheme Name: The name of the Patient’s Medical Aid scheme.
Invoice Management Sidebar
The Posted Invoices screen sidebar is located on the right-hand side of the Posted Invoices screen and contains additional options for the selected invoices.
All the additional options that are available for the page.
Click on the Previous button to navigate to the previous page.
Click on the Page Number button to navigate to the desired page.
Click on the Next button to navigate to the next page.
Click on the Items drop-down menu to select the number of items that will be displayed on the screen.
Click on the Export to PDF button to save a PDF file of all the data as a comprehensive report.
Click on the Export to PDF drop-up menu to access the Export Consolidated PDF option that allows you to generate a single document that combines all the data from multiple sources to provide an overview.
Click on the Export to CSV button to save the Report in a CSV format.
Last modified: Monday, 29 September 2025, 12:28 PM