Journal Actions: Debtor Journals (Batch)
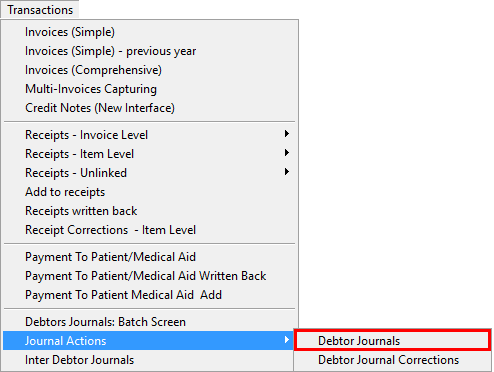
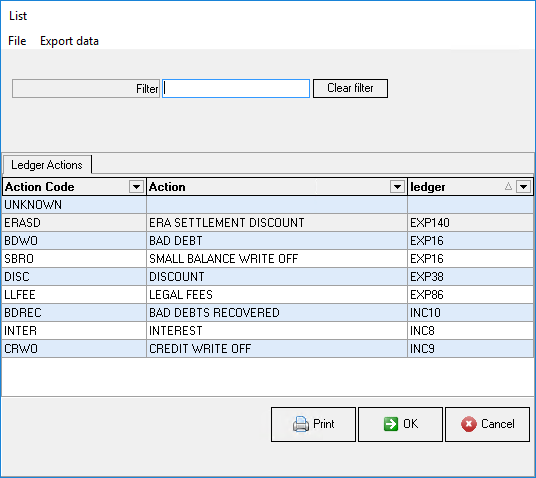
Journal Actions are specified Journal Transactions which are pre-defined for ease of use. Journal Actions have fixed pre-defined Ledger Accounts and Descriptions. Journal Actions are set up to post only as a Credit or Debit amount. On the Batch screen, the user will need to indicate whether the amounts are Credit (+) or Debit (-) amounts, in order for the system to calculate correctly. The system will use the correct information as indicated by the user to process the Journal Actions as defined by the Practice Manager, which keeps the transactions neat and avoids mistakes.
Please Note: Journals are not to be used to rectify incorrect invoices or receipts. Using Journals to fix errors will cause incorrect reporting, as Journals do not correct turnover and cashflow reports.
- There are six reasons that a user will post a Journal:
- Small Balance Write-Off: The account balance is under a certain amount and the Practice is clearing the account. Small balances are written off because the resources needed to collect them, outweigh the value of the balance and therefore can't be justified. Each Practice will use their own discretion in determining what amounts will be written off.
- Settlement Discount: The Debtor/Patient wishes to settle their account in full and by doing so the Practice has granted a discount on the account.
- Bad Debt Write Off: No payment has been received toward the account. The Practice has decided that they would rather write the debt off as they have tried all avenues to collect the debt without success. The Practice does not foresee that the payment will be recovered.
- Bad Debt Recovered: Debt that was previously written off, due to non-payment. The Practice thought that the money would not be recovered, but has now been paid.
- Hand Over: The account has been handed over to a third party in order to collect the funds that are owed. The Practice hopes that by paying for third-party collection services, the outstanding funds will be recovered.
- Interest: A fixed percentage of the outstanding amount based on how long the account is overdue. Interest that has accumulated due to late payments will need to be allocated to the correct ledger, to advise where the funds came from.
- Log in to the GoodX Desktop using your GoodX username and password.
- From the Navigator, Double Click on the MedDebs Module.
- The Debtor Manager screen will open.
- Click on Transactions on the Menubar.
- Click on Journal Actions on the sub-menu.
- Click on Debtor Journals on the second sub-menu.
- The Debtor Journals screen will open.
- An explanation will be given for each option on the Debtor Journal screen:
- Open Batch: Advises the system on which type of batch to open. A batch is a group of transactions that are posted simultaneously.
- Select an option by clicking on the relevant radio button:
- New Batch (Alt+N): Opens a new batch that enables the user to create and post Journal Actions.
- Existing Batch (Alt+B): Allows the user to continue working on a previously saved batch.
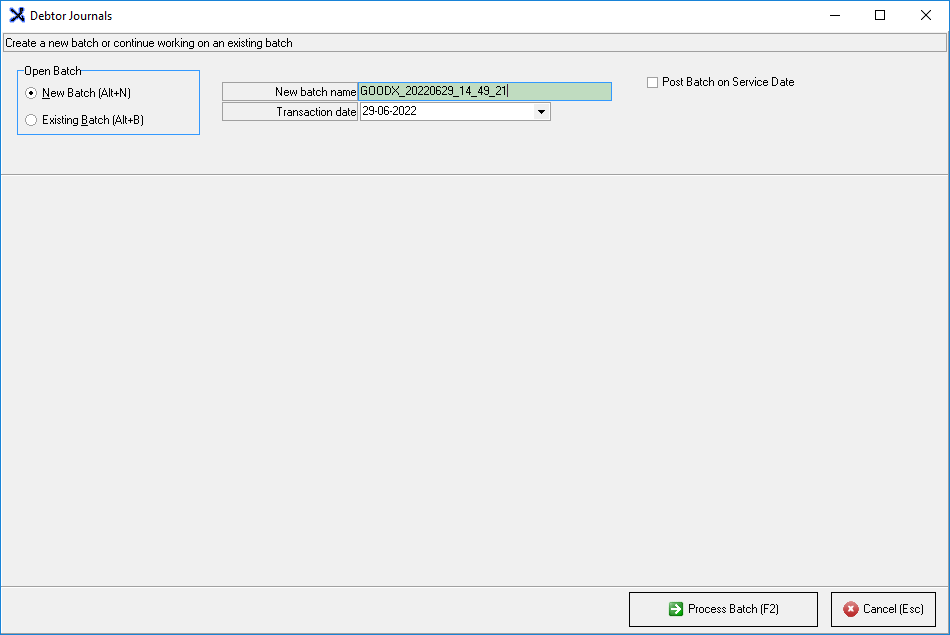
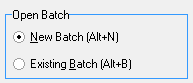
Please Note: Only one Open Batch option can be selected and the user is able to toggle between the two options. If the user has already proceeded to the next screen the user is not able to change their selection.
- New Batch Name: A description that relates to the name of the new Journal Action batch.
- Click on the New Batch alphanumeric field to enter a custom name.
Please Note: The system will automatically add a name for the batch in the format: GoodX_Date (YYYYMMDD)_Time (HH_MM_SS).
- Transaction Date: The day, month and year (DD-MM-YYYY) when the transaction took place and the date on which the journal will be posted.
- Click on the Transaction Date field to open the date picker, should the user want to change the date.
- Click on a date to make a selection.
- Click on the Today button to jump to today's date.

- Click on the Clear button to clear the Transaction Date field.
- The chosen date will populate in the Transaction Date field.
- Post Batch on Service Date: Processes the Journal Action on the same date that the Patient visited the Practice, as indicated on the posted invoice. The service date and the date that the Journal Action is posted will correlate with one another.
- Tick the Post Batch on Service Date checkbox to activate the setting.
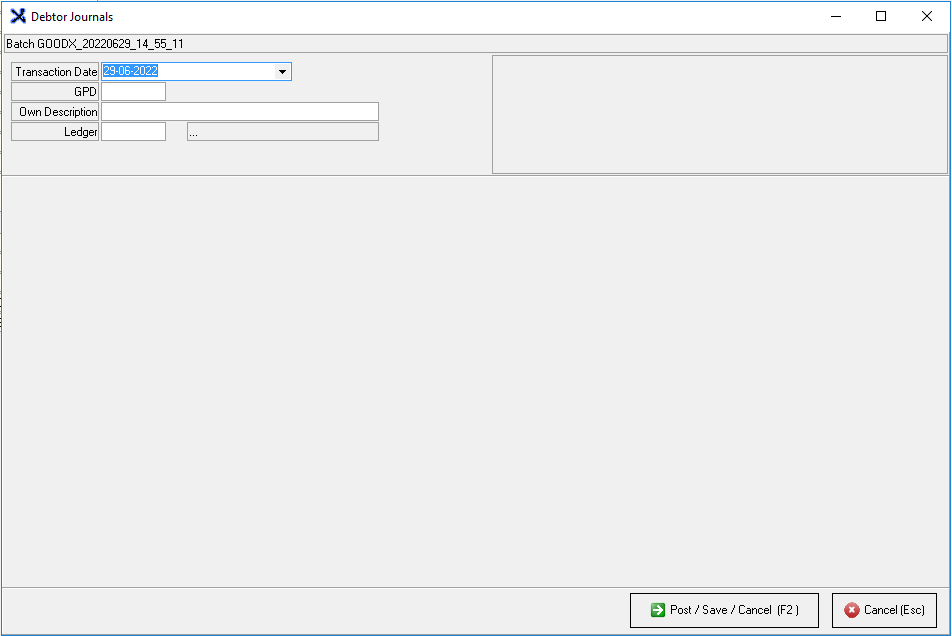
Please Note: If the Post Batch on Service Date option is selected. The Debtor Journals screen will change. The date field is removed and the batch will post on the Service Date.
Please Note: The Post Batch on Service Date is only available for Practices that use the Full Financial Month End system. For more information regarding the Month End process, please refer to the user manual: Month End.
- Click on the Cancel (Esc) button or press the Esc key on the keyboard to close the Debtor Journal screen and return to the Debtor Manager screen without creating a new batch.
- Click on the Process Batch (F2) button or press the F2 key on the keyboard to continue to create a new batch.
- The Debtor Journal screen of the newly created batch will open.
- An explanation will be given for each option on the Journal Actions batch screen that has been created:
- Transaction Date: The day, month and year (DD-MM-YYYY) when the transaction took place. The date will be automatically populated from when the batch was created. The user is able to change the date if they would want to.
- For more information regarding how to change the date, please refer to the first explanation of Transaction Date in this user manual.
- Click on the Debtor Number field (in this case GPD) to enter the Debtor number, if known, of the Debtor for which the user will post a Journal Action.
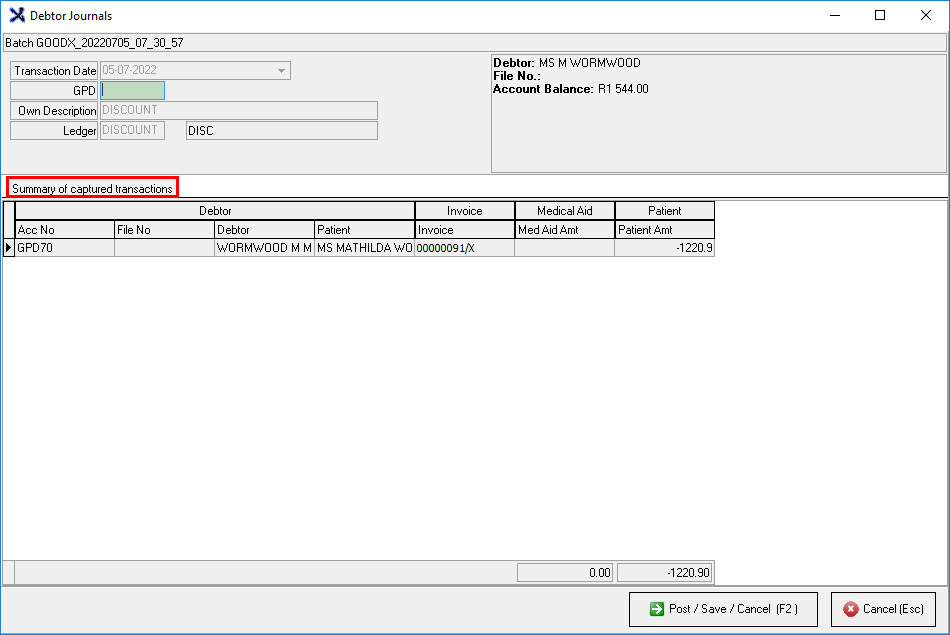
Please Note: The Debtor Number prefix can be set up to suit the needs of the Practice. The Practice will need to communicate with the install team as to what the Debtor Number prefix will be. The Debtor Number prefix for the examples in this user manual is GPD (General Practitioner Debtor)
- Or Press the Tab key on the keyboard to open the Debtor List on the Main Member Input screen from which the user is able to search for and select the desired Debtor.
- For an extensive explanation of how the Main Member Input screen works and how to search for the desired Debtor please refer to the user manual: Debtor List.
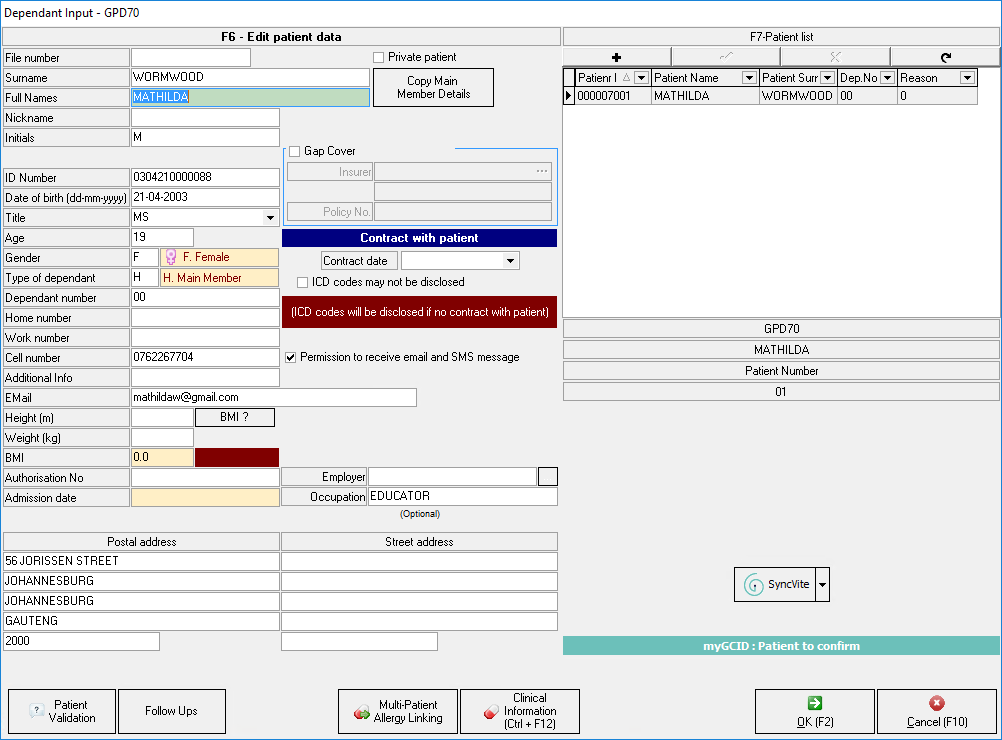
Please Note: If the Debtor has been chosen off the Debtor List the Depentant Input screen will open, where the user is able to change/update the details of the Patient. If the Debtor was added by entering the known Debtor number without the prefix, for example, 70, the Dependant input screen will not appear.
- For an extensive explanation of how the Dependant Input screen works, please refer to the user manual: Add Dependants.
- The details of the chosen Debtor will be imported to the screen.

- Click on the Own Description free text field to enter a custom description to identify the Journal Action.

- Click on the Ledger field to enter the ledger number, if known, to which the Journal Action will be allocated.
- Or Press the Tab key on the keyboard to select a ledger from the predefined list.
- The List screen will open.
- Click on the desired Journal Action that the user will use to process on the selected Debtors account. The Discount option will be used as an example.
- Click on the Cancel button to close the List screen without making a selection.
- Click on the Ok button to continue to select the Journal Action.
- The user will be returned to the Debtor Journals batch screen, where a list of all open invoices with outstanding amounts will display.
- The Journal Action that has been chosen will be pulled through to the respective fields.

- Type the amount in the Medical Aid/Patient Amt column, that the user wants to add/remove in the corresponding line. Please ensure that the journal is captured on the correct side, where the Journal Action will apply.
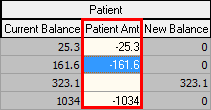
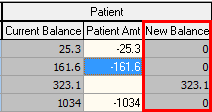
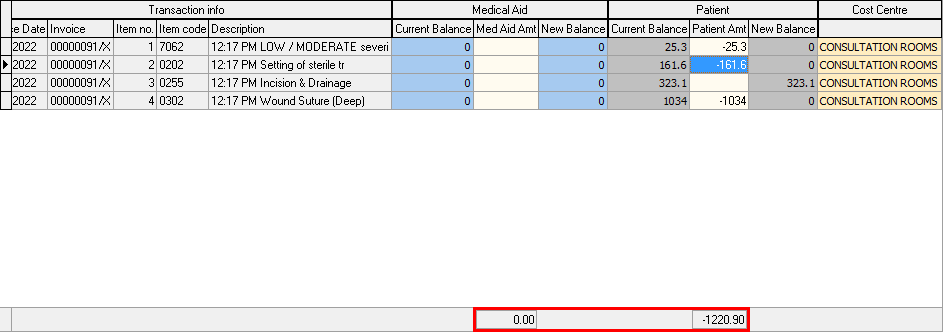
Please Note: If the user is going to deduct the amount, type a minus symbol (-) in front of the amount. To add an amount to the account, type the amount without any mathematical symbol.
- As the user captures the desired adjuments the New Balance column will adjust accordingly.
- The Total amounts at the bottom of the screen will also update as the user captures the adjustments.
- Click on the Next Debtor button to capture a Journal Action for another Debtor/Patient.
- The Debtor Journals screen will open and the created Debtor Journal transaction that has been created will display on the Summary of captured transactions tab.
- Click on the Debtor Number field (in this case GPD) to enter the Debtor number, if known, of the Debtor for who the user will post the same type of Journal Action as previously selected.
- Follow the same steps as explained in this user manual to capture more Journal Actions for more Debtors/Patients.
- Click on the Post/Save/Cancel (F2) button or press the F2 key on the keyboard once the user is satisfied with the Journal Actions that have been captured, for more options.
- The Batch screen will open.
- An explanation will be given for each option that is available on the Batch screen:
- Print batch journal: The user is able to print a hard copy of the details of the batch that has been processed.
- Click on the Print journal batch checkbox to select the option.
- Click on the Return to batch (F3) button or press the F3 key on the keyboard to return to the Debtor Journal screen without doing anything to the transaction.
- Click on the Cancel (Esc) button or press the Esc key on the keyboard to cancel and delete the transactions on the batch without saving.
- An Information pop-up will appear to ask if the user would like to delete the batch.

- Click on the No button to ignore the request. The batch will not be deleted. The user will return to the Debtor Journals screen.
- Click on the Yes button to delete the batch and return to the Debtor Manager screen.

- Click on the Save Batch button or press the F4 key on the keyboard to save the batch in order to be able to work on the batch at a later stage. All screens will close and the user will return to the Debtor Manager screen.
- Click on the Post button or press the F2 key on the keyboard to process and save the captured transactions on the list.
- The Specify financial period screen will open.
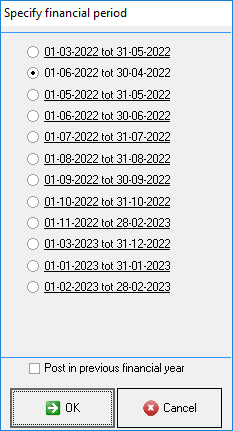
Please Note: The financial period that is automatically selected is the financial period that the user is currently in.
- Click on the Cancel button to cancel the posting of the transaction and return to the Debtor Journals screen.
- Click on the Ok button to continue to post the Journal Action transaction.
- The Journal summary screen will open with a summary of the Journal Transactions that have been captured.
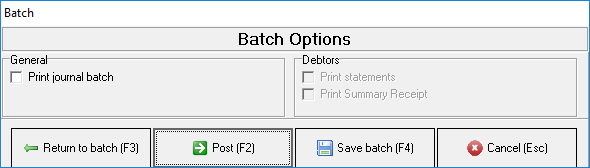
Please Note: Several options will be available at the bottom of the screen, which enables the user to Print and Email the summary. For more information, please refer to the user manual: Options to Print.
- Click on the Close button to close the summary screen, and return to the Debtor Manager screen.