Statement Parameters
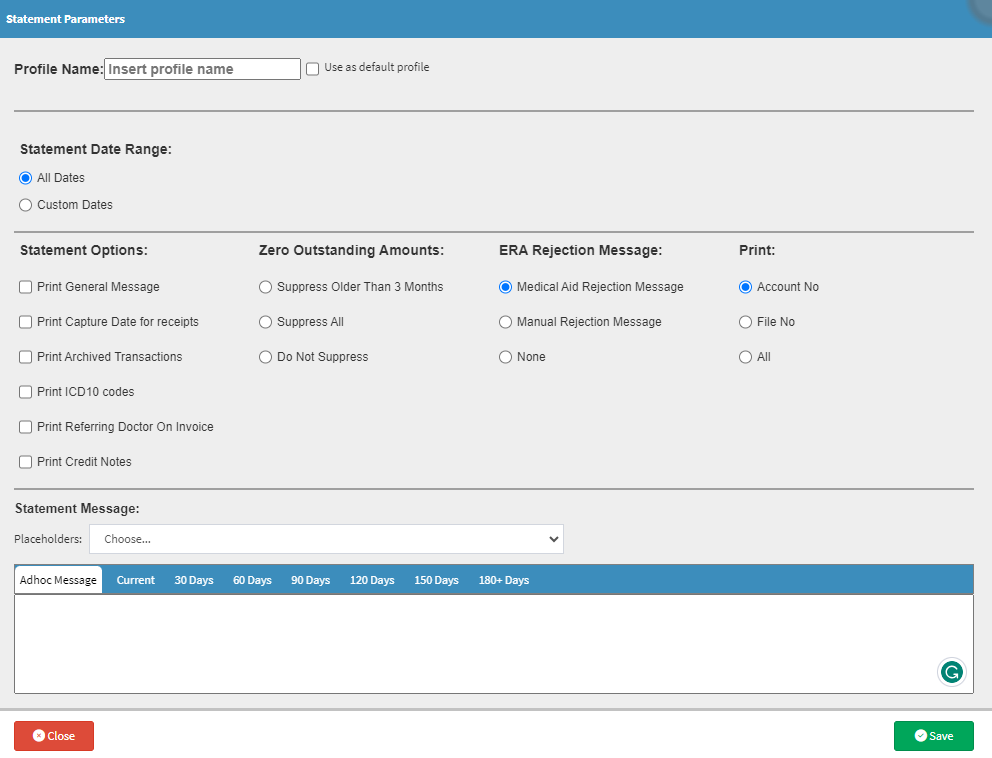
Statement Parameters are specific criteria or options used to customise the content and format of a Statement. These parameters determine what information is included when a Statement is generated. Setting up parameters for the Statements allows the Practice to tailor their Statements to meet their specific needs and provide clear and accurate information to Debtors/Patients. By adjusting the parameters, Practices are able to generate Statements which are consistent with their accounting processes and provide the relevant information to the Debtor/Patient.
- The contents of this user manual will consist of the following information:
- This user manual will start on the Statement Parameters screen.

- For more information regarding where to access the Statement Parameters screen, please refer to the user manual: Debtor Statement Profile List.
- An explanation will be given for each field and option on the Statement Parameters screen:
Profile Name
The name used to identify the Profile when the Statement is being generated.- Click on the Profile Name field to enter the relevant name for the profile.
![]()
- Tick the Use as Default Profile checkbox to mark the profile which the system will select by default when a Statement is generated.
![]()
Statement Date Range
The specific period of time of the statement which will be generated. The start and end dates for which the statement provides information about transactions, balances, and other financial transactions.

- Select an option by Clicking on the relevant radio button:
- All Dates: Includes the dates of all transactions on the Debtors' account.
- Custom Dates: Transactions between two specific chosen dates. For example, if the dates are from 1 January 2023 to 31 January 2023, only transactions within the selected timeframe will appear on the report, once generated.
Please Note: Custom Date options will open the dates section where the user can select the dates.
- From: The date on which the data on the report will start.
- Click on the From drop-down menu to select the desired start date from the date picker.
- To: The date on which data included in the report will end.
- Click on the To drop-down menu to select the desired end date from the date picker.
Statement Options
Print Preferences as selected by the user indicating if certain information will be included on the Statement, once generated.Statement Options

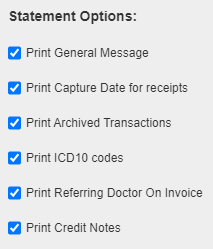
- Select an option by ticking the relevant checkbox.
- Print General Message: The preset Statement Message as set up on the Desktop App, will appear on the Statement. For more information regarding how to set up the General Statement Message, please refer to the user manual: General Statement Message.
- Print Capture Date for Receipts: The date the receipt transaction was captured on the system will be printed on the Statement.
- Print Archived Transactions: Transactions which were previously archived will be printed on the Statement.
- Print ICD10 Codes: All diagnosis codes which were added to the transactions will print on the Statement.
- Print Referring Doctor On Invoice: The referring Practitioner as added to the Debtor file will print on the Statement. If no referring Practitioner was added the system will automatically print: No Referring.
- Print Credit Notes: Credit Notes transactions which were posted to the account will be printed on the Statement.
Zero Outstanding Amounts

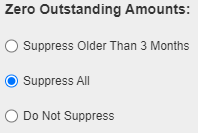
- Select an option by Clicking on the relevant radio button:
- Suppress Older Than 3 Months: All transactions which are more than 3 months old with a zero total will not be included on the Statement.
- Suppress All: All transactions with a zero total will not be included on the Statement.
- Do Not Suppress: All transactions with a zero total will be included on the Statement.
ERA Rejection Message
When a transaction is rejected by the Medical Aid, a message will on the Electronic Remittance advice will advise why the transaction was rejected.
- Select an option by Clicking on the relevant radio button:
- Medical Aid Rejection Message: The message as provided by the Medical Aid for the reason why the transaction was rejected will display on the Statement.
- Manual Rejection Message: A custom message can be added for the rejection of the transaction.
- None: No rejection message will display on the Statement, as the reason why the transaction was rejected.
Print
Information reading the Debtors account which will be printed on the Statement.

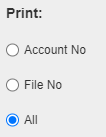
- Select an option by Clicking on the relevant radio button:
- Account No: The Debtor number for who the Statement is, will print on the Statement.
- File No: The number which is associated with the account holder's hard copy file, will print on the Statement.
- All: Both the Account Number and File Number of the Debtor will be printed on the Statement.
Statement Message
Additional information which the Practice would like to communicate to the Patient regarding the Statement.

Please Note: Users will not be able to make changes to the messages which appear on each tab, when generating the Statement. Changes to the message can be made by editing the profile. For more information regarding the setup of Statement Profiles, please refer to the user manual: Debtor Statement Profile List.
- Placeholders: Allows the system to auto-fill the Patient's information to customise and personalise documents.
- Click on the Placeholders drop-down menu to select the relevant placeholder which the user would like to use. For an extensive explanation regarding what each placeholder is used for, please refer to the user manual: Workflow Event (WFE) Placeholders.
Please Note: The placeholders will be added to the tab on which the user is currently. To add placeholders to a different tab, users will first need to click on the desired tab in order to add the relevant placeholders.
- Click on the relevant tab to access the different messages.
![]()
- Adhoc Message: A General default message which will display on all Statements. The General Statement Message as set up in the Desktop App will be displayed by default. For more information regarding how to set up the General Statement Message, please refer to the user manual: General Statement Message.
- Current: A custom message which will appear on the Statement, if there are any Current amounts outstanding.
- 30 Days: When the age of the amount reaches 30 days the message will be printed on the Statement.
- 60 Days: When the age of the amount reaches 60 days the message will be printed on the Statement.
- 90 Days: When the age of the amount reaches 90 days the message will be printed on the Statement.
- 120 Days: When the age of the amount reaches 120 days the message will be printed on the Statement.
- 150 Days: When the age of the amount reaches 150 days the message will be printed on the Statement.
- 180+ Days: When the age of the amount is older than 180 days the message will be printed on the Statement.
Please Note: If an account has multiple outstanding amounts with different ages, all the relevant messages will be printed onto the Statement.
- Click on the Close button to exit the Statement Parameters screen, without saving.
![]()
- Click on the Save button to save changes. The Statement Parameters screen will close and return to the Debtors Statement Profiles screen.
![]()