Patient Invoice: Assistant Code

This Manual will explain how and where to select the Assistant on the Invoice screen.

Please Note: The Assistant Code manual will only be about the Assistant code on the Invoice Screen. For a detailed explanation please click on the related button or link to open the Invoice Screen manual.

The invoice function is used when a patient was seen by the practitioner or has been treated by the practitioner and must be billed for the treatment or consultation. This will post an invoice on the Main member's account.
The invoice will be in the main member's name and the patient information will also be on the invoice.
An invoice will be created per visit with all the consultation, procedures, medication or consumables that was used on the patient.
An invoice will have an amount per line and a total for all the lines items. An invoice can be used for tax purposes.
The invoice can also be used to show the patient how much he must pay for the visit.
We also call the invoice a Tax invoice, this will indicate the VAT rate and VAT amount.

Assistants conduct physical exams, diagnose and treat illnesses, order and interpret tests, counsel on preventive health care, assist in surgery, and can also write prescriptions. The purpose of the Assistant is to assist the Treating Doctor in certain procedures in the Practice or in Theater. The Assistant is mandatory on the Invoice screen when the Assistant modifier is used.

  • Log in to the GoodX WebApp using your GoodX username and password.
  • The main Diary screen will open.


  • Click on the correct Patient booking.


    • The Sidebar will appear on the right-hand side of the screen.
  • Click on the Invoice button.


  • The Invoice screen will open.


Please Note: For a detailed explanation please click on the related button or link to open the Invoice Screen manual.

  • Capture the diagnosis (ICD-10) and procedure codes in the Invoice Lines.


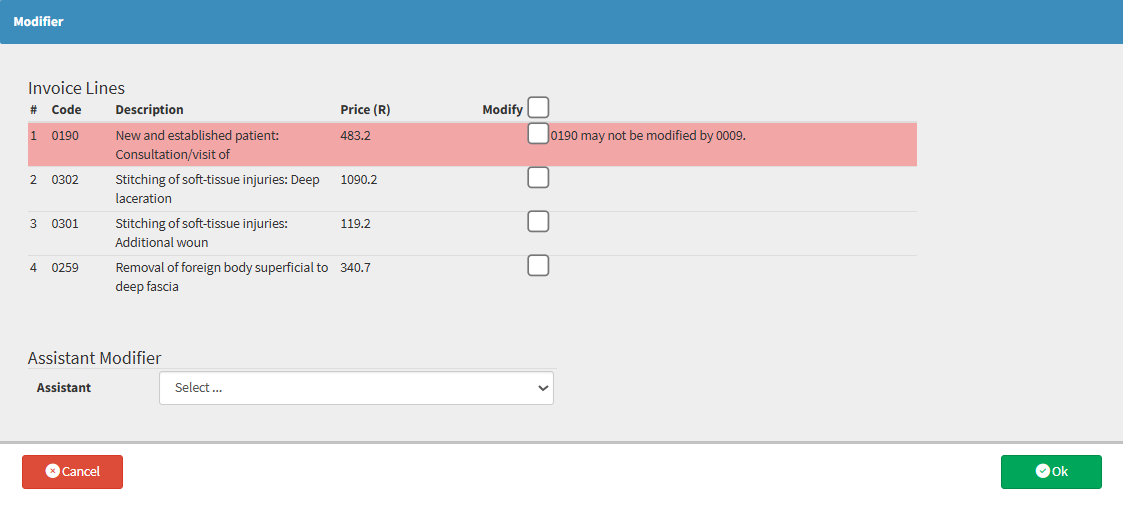
  • Capture the 0009 Assistant modifier procedure code (the Modifier screen will automatically pop up)

Please Note: The Assistant Modifier is applicable to ALL modifier codes, not only the 0009. Depending on the speciality of the Practitioner, the assistant modifier will differ. The assistant modifier code will apply to the following modifier codes 0008, 0008S, 0009O, 0011A, 0029, 0076S, 0874 too.


  • The Modifier screen will open. 

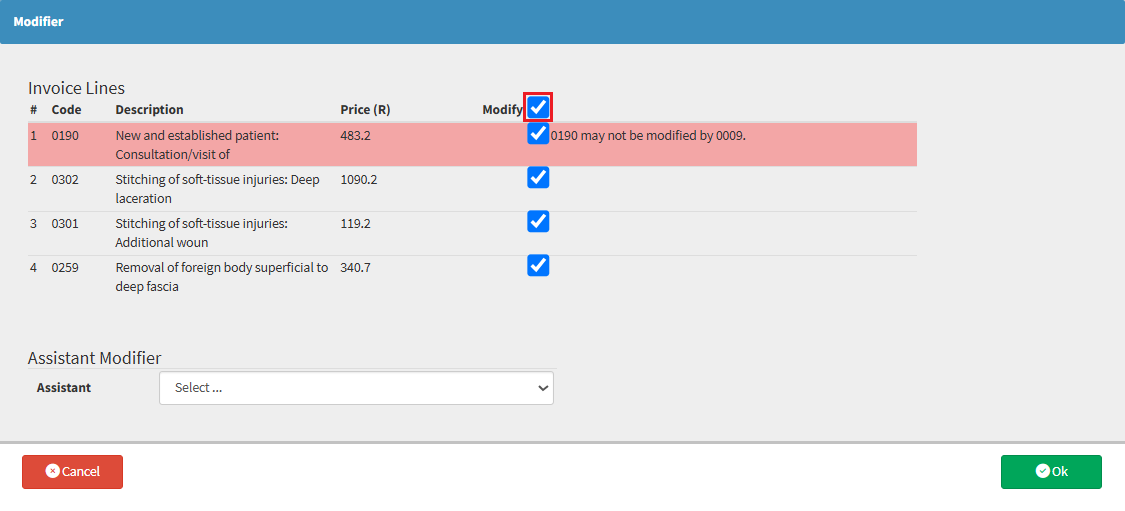
    • Tick the procedure codes in the Modify column that the assistant modifier needs to apply to. 

    • Click on OK when the procedure codes for the modifier are selected.


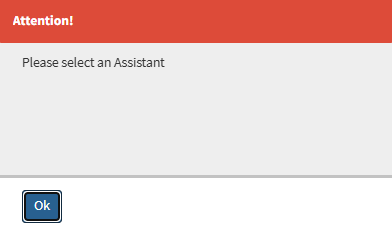
    • The system will pop up a Warning message. The pop up will warn the User that an Assistant needs to be selected. The Assistant is mandatory when the 0009 or any other Assistant modifier code are billed.

    • Click on OK to continue.


  • Below the Assistant Modifier, select the Assisting Doctor from the Assistant drop-down menu.


    • Click on OK to continue.

  • The Invoice screen will open and display the modifiers and the lines it was applied to. 


    • The Assistant's Name and Surname will be added and displayed below the 0009 Assistant Modifier code.

  • Click on Post and Switch after all the line items and modifier code is captured. The Post and Switch option will switch the Invoice to the Medical aid without waiting for the response. 


  • Click on the Post and Switch drop-up arrow if you want to send the claim to the Medical Aid and wait for a response or post the Invoice as a private Invoice: 


    • Post Only: The Post Only option will post the invoice as a Private Invoice and not switch it to the Medical Aid.
    • Post (Await Response): The Post (Await Response) option will switch the Invoice to the Medical Aid. The user will wait for the response to see immediately if the claim has been approved, rejected or short paid.

  • Click on the Close button to exit the invoice screen without saving the Invoice.


    • Click on the Save and Close  button to save and close the information captured on the invoice screen without posting it to the Patient account.


    • Click on the Save and Close drop-up arrow for more options: 

      • Click on the Save button to save the information captured on the Invoice. The Invoice screen will stay open or, 
      • Click on the Save Lines To New Macro button to save the lines captured as a Macro.
    Last modified: Tuesday, 25 May 2021, 1:45 PM