The Statement button on the main screen is for use with Medical practices and is not set up for hospitals or day clinics.
- Sign in to the GoodX Desktop using your GoodX username and password.
- From the Navigator Double Click on the MedDebs Module

TAKE NOTE: Please DO NOT click on the Statement icon on the main screen

- Navigate to Case Screen. If you don't know how to click on the link.
- Click on the statement button at the bottom of the screen.
- The statement of the selected case will be shown for use.

Statements have the following information captured on it:
Practice information:
- Practice Nr,
- VAT Nr,
- Company Nr,
- Telephone Nr,
- Fax Nr,
- Email address,
- Postal address,
- Banking Details: Bank, Branch Code, Account Name, Account Nr
Patient Details:
- Initials and Surname,
- Medical Aid Name and Nr.
- Postal Address
Case Details:
- Patient Name And Surname
- Date of Birth
- Dependant Nr
- Procedure type
- CPT and ICD10
- Admitting Dr
- Admitting Dr Practice Nr
- Admission Date
- Discharge Date
Case Age Analysis
Account Summary:
- Admission/Ward Fees
- Theatre time
- Ward Medication
The Full breakdown of Admission/Ward Fees, Theatre time, Ward Medication follows on the next page.
New Description Feature
- Sign in to the GoodX Desktop using your GoodX username and password.
- From the Navigator Double Click on the MedDebs Module
- From the Menu bar, Click on Transactions
- Click on Payment to Patient/Medical Aid

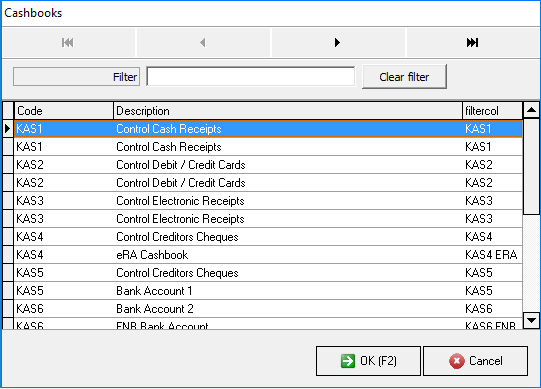
- You will be directed to a Cashbooks pop-up screen
- Choose the desired cash book
- Click on OK to proceed
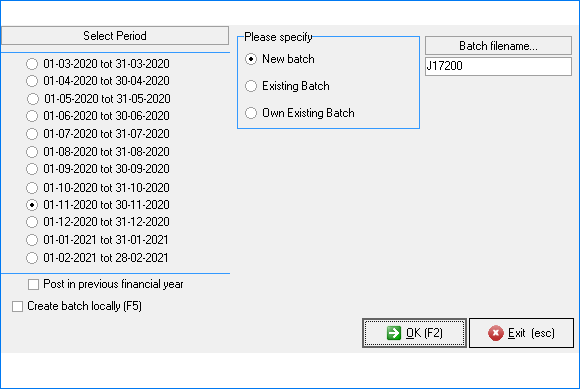
- Select the period
- Choose in the Please specify section
- New Batch
- Existing Batch
- Own Existing batch
- Give the Batch a file name in the Batch Filename Text box
- When satisfied with your selections, click on OK to proceed
You will be directed to your Cashbook Screen
- Date: Select the date in the period previously chosen
- Transaction: Select the type of payment from the dropdown list
- Normal
- Patient Refund
- Medical Aid
- Creditor
- RD Cheque
- Description: Add the description that you want to show on the statement (NEW FEATURE)
- Payment: Which form of payment was used to pay, select from the dropdown
- K. Cash
- Q. Cheque
- C. CreditCard
- E. Electronic
- P. Postal Order
- D. Debit Order
- L. Linking
- T. Debit Card
- Reference Number: A unique number that can be referenced back to the specific transaction
- Branch Code
- Bank Statement Dt
- Amount: The amount that you want to pay
- When you are done and satisfied with the transaction, click on Report

The following box will appear on the Cashbook screen below where you filled the info in of the transaction

- Receipt : This will be the receipt number generated by the system
- Account: Press Tab on the keyboard to open the debtor list to select the debtor
- File Number: After selecting the debtor the file number will appear automatically
- Amount : This will be the amount you would like to pay back to the patient
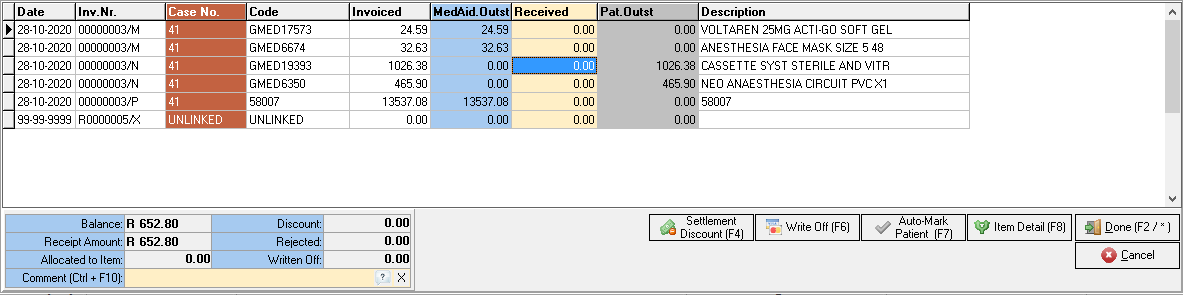
- Case: Link the payment to a specific case by Pressing Tab on the keyboard
After Pressing tab in the Case Field the following Section will appear on the Cashbook screen below the previous section
Last modified: Tuesday, 17 November 2020, 12:27 PM