The Theatre App allows users to bill Debtors for Operations, Consultations, and Emergency procedures. Billing can only be done once the respective procedure has been completed.
Please Note: In order to use this function a Theatre List and an Operation will first need to be created. For more information regarding how to create a Theatre list and add an Operation, please refer to the following user manuals: Theatre App: Add Theatre List and Theatre App: Add Operation.
The contents of this user manual will consist of the following information:
Navigate to the GoodX Theatre Appwebsite by typing /app/gxtheatre/ at the end of the GoodXWeb App URL (Uniform Resource Locator) and Pressing the Enter key on the keyboard.
This user manual will start on the GoodX Theatre screen with a Theatre List created and an Operation added.
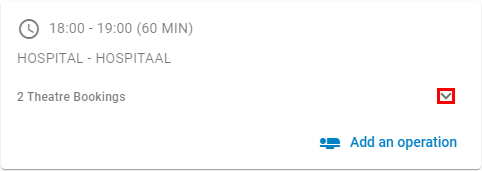
Click/Tap on the drop-down menu of the desired Theatre List where billing needs to be done.
Please Note: Billing is done per Theatre List.
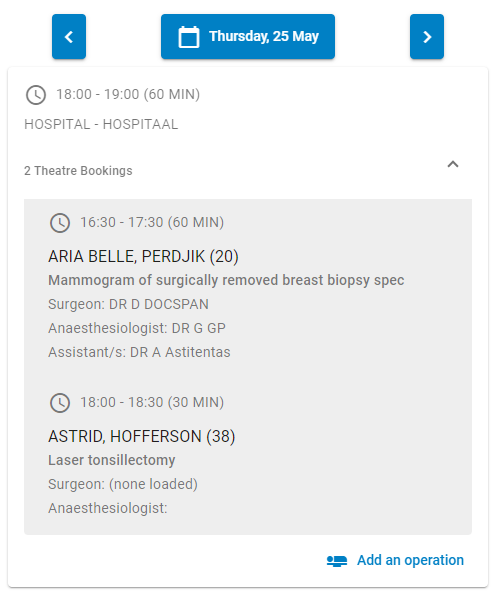
The Theatre List drop-down menu will open, showing the details of Operations made on the selected Theatre List.
Click/Tap on the Operation booking.
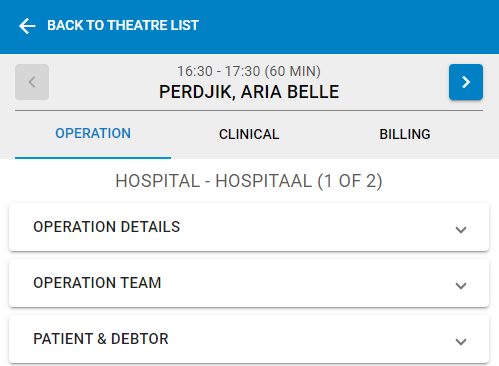
The Operation screen will open.
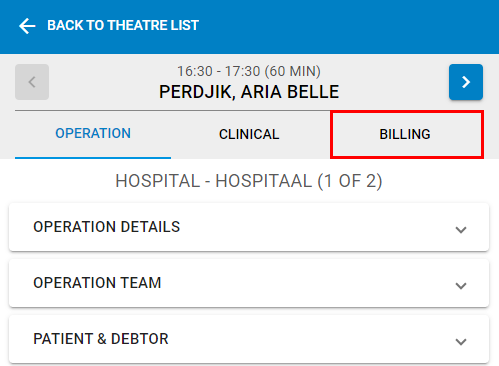
Click/Tap on the Billing tab.
The Billing screen will open.
An explanation for each panel on the Billing tab will be given:
Checklist
Outlines a set of tasks, procedures, and items to be completed or verified before, during, and after a surgical procedure.
Click/Tap on the Checklist panel.
The Checklist panel will open.
An explanation will be given for each field and option on the Checklist panel:
Add Images
Click/Tap on the Add Images button to upload images from your device. You are able to select an image or use your camera to take an image.
Please Note: Users can write down the billing codes used, take a picture thereof and upload the image so that billing can be done at a later stage.
Once the images have been uploaded they will display below the Add Images button.
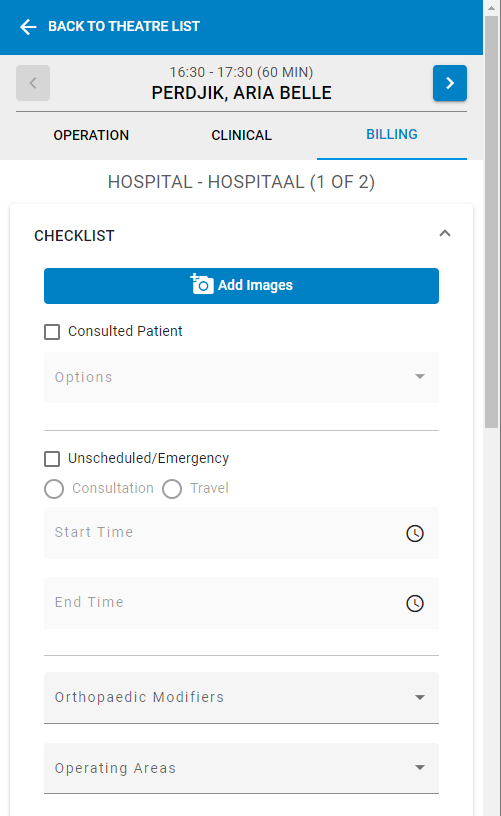
Consulted Patient
Click/Tap on the Consulted Patient checkbox if the Practitioner consulted the Patient before the surgery.
The Consulted Patient section will become available once the Consulted Patient checkbox is ticked. Select the relevant billing code from the Options drop-down menu.
Please Note: The information added to the Consulted Patientsection will automatically add the correct billing codes to the Billing Summary.
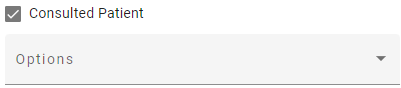
Unscheduled/Emergency
Click/Tap on the Unscheduled/Emergency checkbox if the Practitioner needed to unexpectedly provide the Patient with medical care before the operation due to an emergency.
The Unscheduled/Emergency section will become available once the Unscheduled/Emergency checkbox is ticked. Enter the relevant information in the appropriate filed.
Please Note: The information added to the Unscheduled/Emergency section will automatically add the correct billing codes to the Billing Summary.
Modifiers
Orthopaedic Modifiers: Modifiers are added to the primary procedure code to indicate that the procedure has been altered by different factors regarding where the procedure was done. Proper use of orthopaedic modifiers helps ensure that the reimbursement reflects the complexity and resources required for the procedure, optimising revenue for the Practice.
Click/Tap on the Orthopaedic Modifiers drop-down menu to Select the relevant modifier.
Operating Areas: When a procedure is done in specific high-risk or more complex areas, modifiers can be added to indicate the risk or complexity.
Click/Tap on the Operating Areas drop-down menu to Select the relevant area.
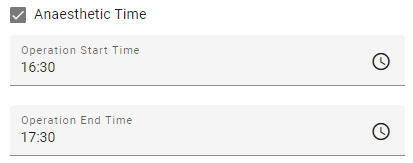
Anaesthetic Time
Click/Tap on the Anaesthetic Time checkbox if the Patient received anaesthesia during the operation.
The Operation Start Time field and Operation End Time fields will become available.
The Operation Start Time field and Operation End Time field will be filled in automatically according to the details that were filled in when the operation was created.
Please Note: The times can be changed if the procedure was shorter or longer than the scheduled time.
ASA Physical Status: Assesses and indicates a Patient’s pre-anaesthesia medical co-morbidities.
Click/Tap on the ASA Physical Status drop-down menu to Select the relevant option.
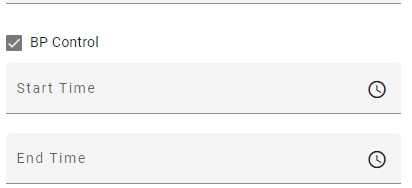
BP Control
Click/Tap on BP Control checkbox if the Surgeon had to control the Patient's blood pressure during the surgery.
The Start Time and End Time fields will become available.
Enter the Start and End Times (HH:MM) the Practitioner controlled the Patient's blood pressure.
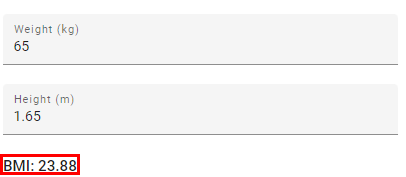
Patient Measurements
Click on the relevant field to add the Patients Weight (kg) and Height (m).
Please Note: When both the Weight and Height fields are completed the BMI will calculate automatically.
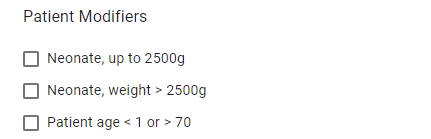
Patient Modifiers
Tick the checkbox of therelevant Patient Modifiers which best suits the Patient.
Assistant
Assistant: When an Assistant is part of the procedure the 0029 modifier will be added to the Billing Summary when an Assistant is added.
Click/Tap on the Assitant field to open the list of Assistant Practitioners and Selectthe relevant Assistant from the list.
Please Note: The Assistants that appear on the list are the Assistants that have been set up at the Practice. If the name of the Assistant doesn't appear, they will need to be added to the List of Doctors at the Practice. For more information regarding how to add an Assistant, please refer to the user manual: Add an Assistant Doctor.
Click/Tap on the Save button to save the information which was added to the Checklist panel.
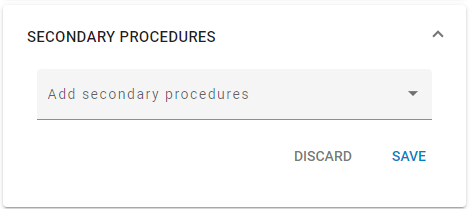
Secondary Procedures
Additional surgical procedures done whilst the Patient is undergoing the primary procedure, for example, an unexpected finding or additional problem that needs to be addressed will be considered as a secondary procedure. Secondary procedures are typically performed to optimise the Patient's outcome or prevent future complications.
Click/Tap on the Secondary Procedures panel.
The Secondary Procedure panel will open.
Click/Tap on the Add Secondary Procedures drop-down menu.
Select the relevant Secondary Procedure that will be billed for the operation from the drop-down menu.
Please Note: The Secondary Procedures that appear on the list are the procedures which have been set up on the GoodX Web App. For more information regarding Secondary Procedures, please refer to the user manual: Secondary Procedures.
Click/Tap on the Save button to save the information entered in the Secondary Procedure panel.
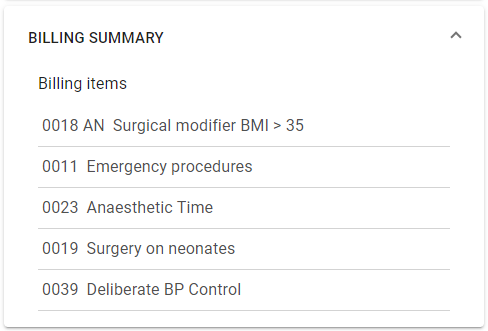
Billing Summary
The Billing Summary panel will allow the user to view all the billing codes that will be used to bill The Patient. The billing codes will be made up of all the saved information in the Checklist and Secondary Procedure panels.
Click/Tap on the Billing Summary panel.
The Billing Summary panel will open.
A summary of the Billing Codes which have been added will display.