Debtor Status
A Debtor Status allows the Practice to display a preset up warning on a Debtors' file. The warning will be displayed every time a booking is made. An icon will also display on the booking timeslot when a booking is made for a patient to whom the Practice has allocated a status. Statuses can be set up to suit the needs of the Practice. For example, a status can be added to indicate that the Debtor is a slow payer, the Patient has a payment arrangement, is eligible for discounts/special rates, pays on time or the Debtor's account has been handed over for collection.
- The contents of this user manual will consist of the following information:
- Add Debtor Status
- Debtor Status on New Bookings
- Debtor Status Indication on Diary Screen
- This user manual will start on the Debtor Details screen.

- For more information regarding how to Navigate to the Debtor Details screen, please refer to the user manual: Create New Debtor.
Add Debtor Status
Allows the user to allocate a desired status to the Debtor. For example, Normal, Discontinued, Slow payer etc.
- Click on the Select... drop-down menu at the top of the screen to select the status that the user would like to allocate to the Debtor.
![]()
Please Note: All Debtors will by default have their status set as Normal until the user makes changes to the status.
- Select an option from the list that has become available.

- Normal: Default status that is allocated to all Debtors.
- Discontinued: The Debtor is not active at the Practice and their file is no longer in use.
Please Note: All other Statuses are custom statuses that are set up to suit the needs of the Practice and will depend on the user's preference. For more information regarding how to set up custom statuses, please refer to the user manual: Debtor Status List.
- Click on the Close button to return to the previous screen without saving.
![]()
- An Attention! pop-up will appear to advise the user that they might have unsaved changes and if they would like to exit anyway.

- Click on the Cancel button to ignore the request to close without saving changes and return to the Debtor Details screen.
![]()
- Click on the Ok button to exit the screen without saving and return to the previous screen. The changes that were made will be lost.
![]()
- Click on the Save button to save all changes that have been made to the Debtor.
![]()
- The new status that has been allocated to the Debtor will appear on the Debtor List to indicate which status has been given to the Debtor.

- For more information regarding the Debtor List please refer to the user manual: Debtor List.
Debtor Status on New Bookings
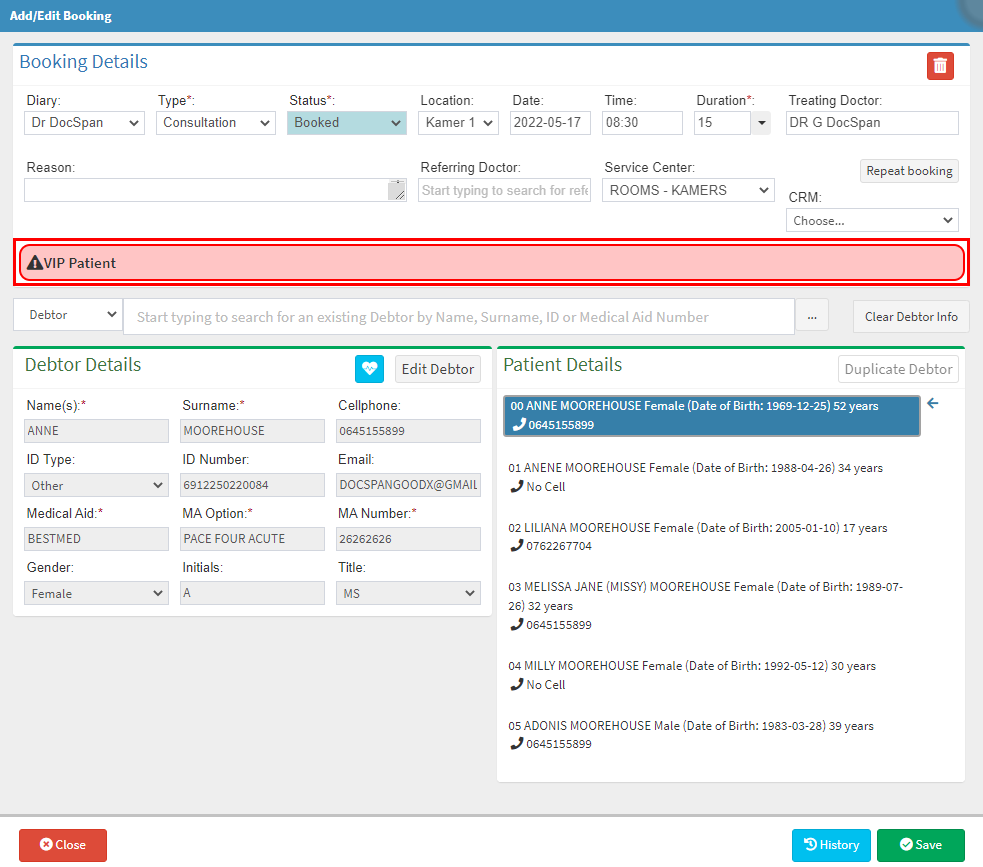
When a user makes a booking for a Debtor who has been assigned a status, the user will be notified during the booking process.- A red warning message will appear on the Add/Edit Booking screen to advise the user of the Debtor Status that has been allocated to the Debtor for whom the user is making a Booking.

- For more information on how to create a booking, please refer to the user manual: Book Existing Patient.
- Click on the Close button to cancel the booking and return to the Diary screen without saving.
![]()
- An Attention! pop-up will appear to advise the user that they might have unsaved changes and if they would like to exit anyway.

- Click on the Cancel button to ignore the request to close without saving changes and return to the Debtor Details screen.
![]()
- Click on the Ok button to exit the screen without saving and return to the previous screen. The changes that were made will be lost.
![]()
- Click on the Save button to save the booking and return to the Diary screen.
![]()
Debtor Status Indication on Diary Screen
Indicates the Debtor Status that has been allocated to the Debtor when a booking has been made on the Diary.
- The Debtor Status will appear on the Diary booking illustrated by a thunderbolt icon.

- Hover over the Thunderbolt icon to see the type of Debtor Status that has been allocated to the debtor for whom the booking is.
