WA: Treatment Planning Mode
The Observation / Diagnosis and Treatment Planning Chart is a graphical tool / function for organising all the important information about the Patients teeth and mouth (Imperfections, Fillings, Replacements) when the Doctor does the Consultation and Billing before, during and after the Appointment.
- The contents of this User Manual will consist of the following information:
- Treatment Planning Mode
- The Teeth can be marked with the following Treatment Options on the Dental Chart
- Restoration and Replacement Options in Treatment Planning Mode
- Creating the Estimate and Treatment Plan
- Completing the Treatment Plan
- Log in to the GoodX WebApp using your GoodX username and password.
- From the Diary screen, click on the correct Patient booking.

- The Sidebar will open on the right-hand side of the screen.

- Click on the Dental button.
![]()
Please Note: The Dentist can still access the Clinical screen from the Diary Sidebar. Click on the drop-up arrow to open the Clinical button.

- The Diagnosis / Observations screen will open.

Treatment Planning Mode
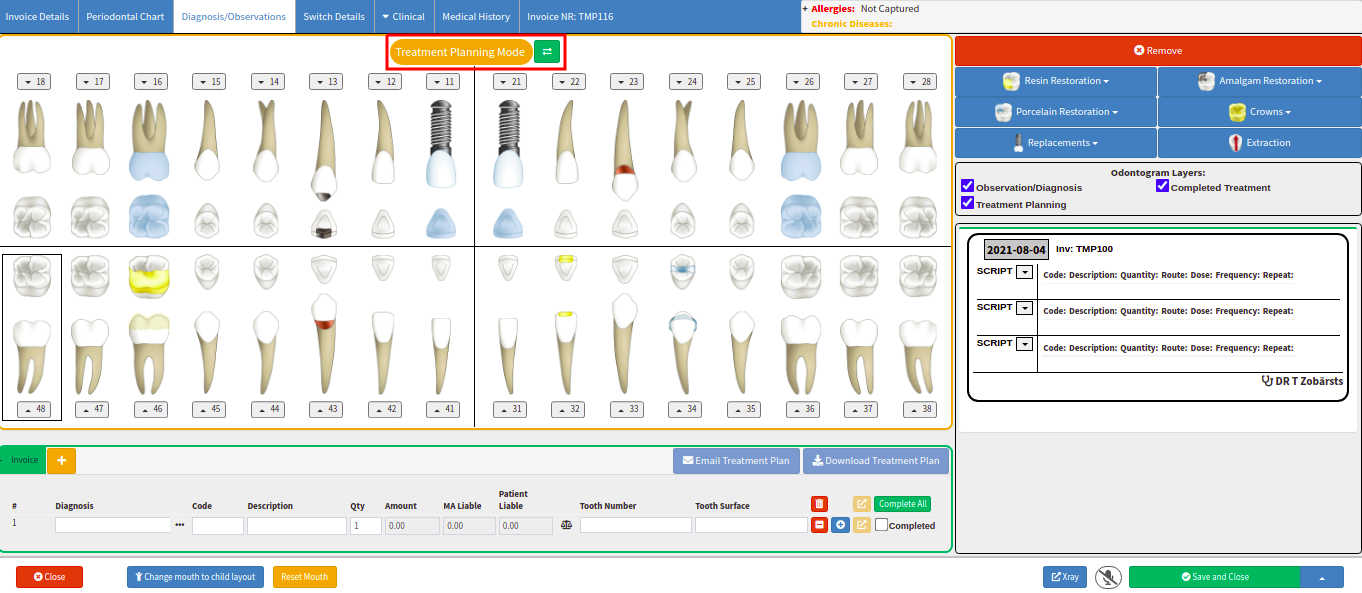
- Click on the orange button next to the Observation / Diagnosis Mode heading to change the mode to Treatment Planning Mode.
![]()
- The Treatment Planning Mode screen will open.

Please Note: The Observations and Diagnosis that were made and completed on the Dental Chart will display on the Treatment Planning Mode screen. The Dentist can now decide where and what to start with.
The Teeth can be marked with the following Treatment Options on the Dental Chart:
- Click on the drop-down arrow next to the tooth number.

- A drop-down menu of options will appear. The options can be applied to a Tooth where applicable:

- Please refer to the Observations / Diagnosis Mode section for more details on the different options from the drop-down arrow that can be applied to the Teeth on the Dental Chart.
Restoration and Replacement Options in Treatment Planning Mode:
The following Restorations / Replacements options are available for the Dentist to use in the Treatment Planning Mode. The Dentist can use these options to indicate what fillings / crowns / implants or extractions need to be done in the Patients mouth and where.

- Please refer to the Observations / Diagnosis Mode section for more details on the different Restoration and Replacement options and what they will look like on the Dental Chart.
On the Dental Chart, in the Treatment Planning Mode select the tooth numbers and mark what needs to be done on them with the options on the sidebar eg. Resin Restorations or Crowns etc.

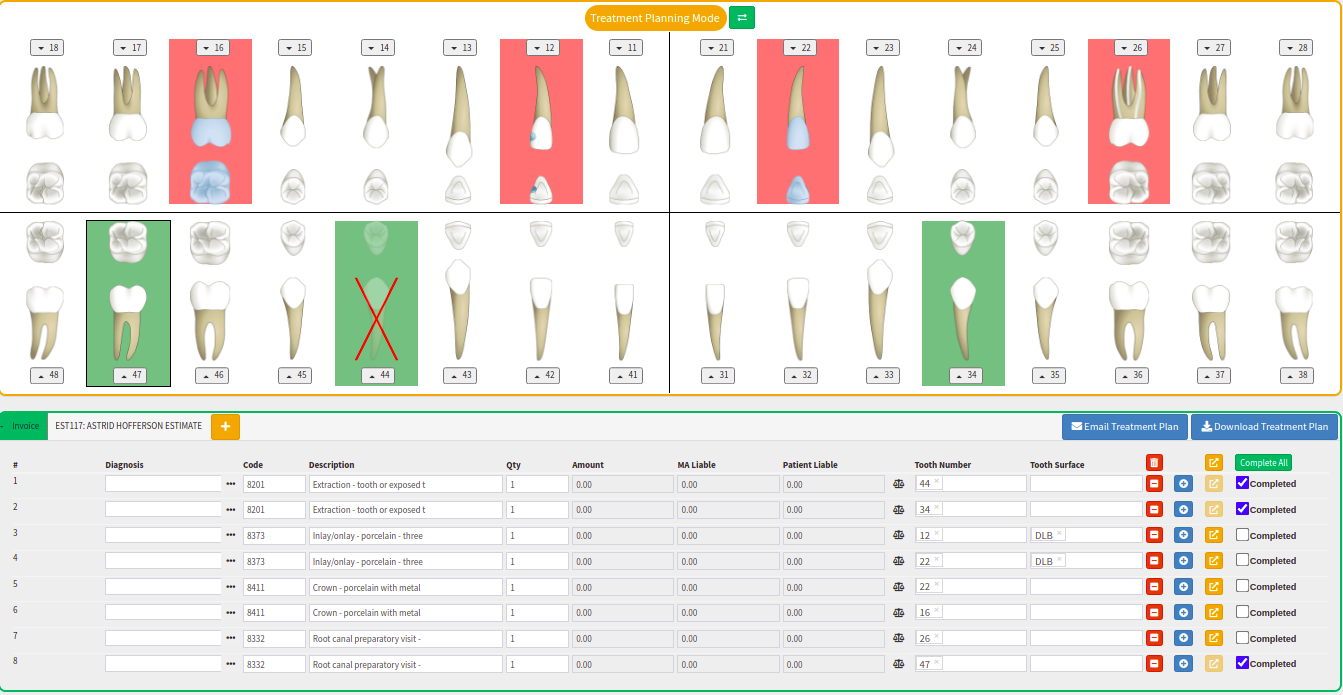
- The selected Teeth will turn red to indicate that it was marked to have dental work done.

- The Treatment Plan (Invoices) will display below the Dental Chart. As soon as you select a tooth and click on an option eg. A filling it will automatically appear on the Treatment Plan Invoice. You need to manually type in a Diagnosis (ICD-10 code). All the work that is selected on the Dental Chart above is appearing on the Invoice lines here.

- #: The # will indicate the number of lines on the Invoice section. If there are 10 lines, the # will be numbered from 1 to 10.
- Diagnosis: The Diagnosis field will display the ICD10 Code for the Patients diagnosis. ICD-10 - International Classification of Diseases, Tenth Revision. ICD-10 codes are used to indicate the diagnosis of the patient's illness or problem. In basic terms, what is wrong with the patient? In health care, coding systems are used to differentiate diagnoses and procedures in virtually all treatment settings. Diagnostic and procedural codes are connected to nearly every system and business process in health plans and provider organisations, including reimbursement and claim processes.
- Code: The Code field will display the Tariff Code that the Doctor billed. A Tariff Code is a code allocated to a procedure or consultation with an amount linked to the code. Tariff codes are normally received from the medical aids with a description and an amount per speciality.
- Description: The Description field will display the name of the tariff Code that was billed.
- Qty: The Quantity field will display how many of these specific items or procedures will be added and billed to the invoice.
- Amount: The Amount field will display the price that is linked to the specific item or procedure on the pricelist.
- MA Liable: The Medical Aid Liable field will display the amount that will be posted to the Medical Aid for which they will be liable on the specific procedure or item.
- Patient Liable: The Patient Liable field will display the amount that will be posted to the Patient account for which they will be liable on this specific line.
- Tooth Number: The Tooth Number field will display the number of the tooth that the Doctor worked on (Maxilla or Mandibula, from left to right).
- Tooth Surface: The Tooth Surface field will display the specific surface on a tooth that the Dr worked on:
- O: stands for occlusal, which is the top surface of a back tooth.
- I: stands for incisal, which is the biting edge of incisors and canines (the front teeth).
- B: stands for buccal, which is the surface of the tooth that faces the cheek.
- L: stands for lingual, is the surface towards the tongue.
- Click on the red dustbin button to Clear All the Invoice Lines that were added in the Invoice section.
![]()
- Click on the Complete All button to mark all the Invoice lines as Completed. The Complete All button will indicate that the work was done in the Patients mouth.
![]()
- Click on the red (-) button to delete / remove only the specific Invoice line that were added.
![]()
- Click on the blue (+) button to add a New Invoice line to complete.
![]()
- Click on the orange Move button to Move the specific Invoice line to another Estimate that was previously created and saved.
![]()
- Tick the Completed tickbox if the specific Procedure was completed. The Procedure will turn the tooth number green on the Dental Chart when the Completed box is ticked.
![]()
- Click on the Orange (+) button next to the green Invoice tab to Save the Estimate for the Patient.
![]()
- An Attention! pop up will open. Enter a name for the Estimate. This will appear on the Estimate when you Email or Print it for the Patient.

- Click on the Cancel button to close the pop-up and not Save the Estimate.
![]()
- Click on the Ok button to continue and Save the Estimate.
![]()
- The Treatment Plan will now be saved as an Estimate with an Estimate number and name.
![]()
- After the Estimate was created, the user can Email the Treatment Plan or Download and Print the Treatment Plan for the Patient.

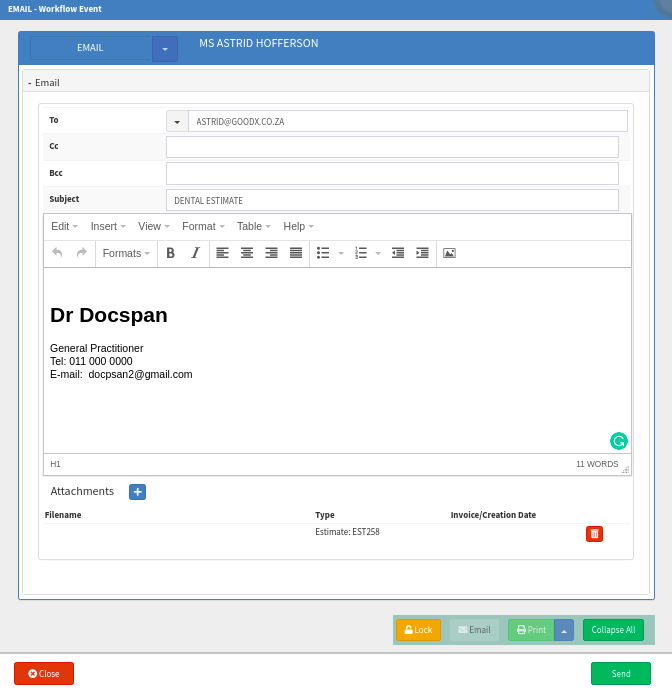
- Click on the Email Treatment Plan. The Email button will allow the Dentist to email the Estimate for the treatment in *pdf format.
![]()
- The Email Workflow Event screen will open. The patient's email address will automatically be completed as the recipient and the Estimate will be attached. The user can complete a subject for the email and click on Send.

Download & Print
- Click on the Download Treatment Plan. The Download button will allow the Dentist to download the Estimate for the treatment plan in *pdf format.
![]()
- The Treatment Plan will download and open as a *pdf document. The user can Print the Estimate from this screen.
Please Note: The Estimate Invoice can be billed once the Patient accepts the Estimate and the Doctor starts with the Treatment.

Completing the Treatment Plan
The Dentist will Complete the procedures once they are done. The Dentist can mark the procedures as Completed to make it easy to see what's been done on the Patient and what still needs to be done.
- Tick the Completed checkbox to mark which Procedures have been done by the Dentist after the Patient accepts the Estimate and the Dentist starts the work.

- If the tooth is highlighted in RED it indicates that the work hasn't been completed yet.
- If the tooth is highlighted in GREEN the work has been done (The tooth will turn green if you tick the Completed block in the Invoice line at the bottom of the chart.

Please Note: The Procedure codes will automatically pull through to the Invoice screen from the Dental Charting screen. Refer to the Invoice screen link or related button to open the Manual for more information on How the Invoice screen works.
- Click on the Close button to exit the Treatment Planning screen without saving the Invoice.
![]()
- Click on the Save and Close drop-up arrow for more options:

- Click on the Save button to save the information captured on the Treatment Planning screen.
- Click on the Save Lines To New Macro button to save the lines captured as a Macro.
- Click on Save and Close to save the Invoice or the changes made.
![]()