Code Statistics Report
The purpose of the Reports is for the Practitioner to draw a Report for bookkeeping purposes. A report is a document that presents information in an organized format for a specific audience and purpose. In this case for the Practice and the Doctors.
- GoodX Reports communicate information which has been compiled as a result of data generated by the system.
- GoodX Reports can cover a wide range of data.
- Most of the GoodX Reports are accurate, objective and complete when its generated correctly.
The Code Statistics Report gives an objective description of all the Codes billed in the Practice, presented in a
statistical table. The purpose of the Code Statistics Report is to provide the Doctor with Statistics on how many procedure codes, material codes, or consumable codes were billed in a specific time frame. It will also show the Turnover, Cashflow, VAT incl/excl, the total paid by Medical Aid and Private Patients per Code. It is meaningful to see how many patients were treated and what codes were billed the most and paid in full to know if the practice is growing. The Doctor can also determine from the code statistics report if some codes are not paid in full or rejected by Medical Aids to know if they should rather bill an alternative code in the future or switch the code over to a Private/Cash code.
How and Where to access the GoodX Web Code Statistics Report:
- On the Menu Bar, click on the Admin tab

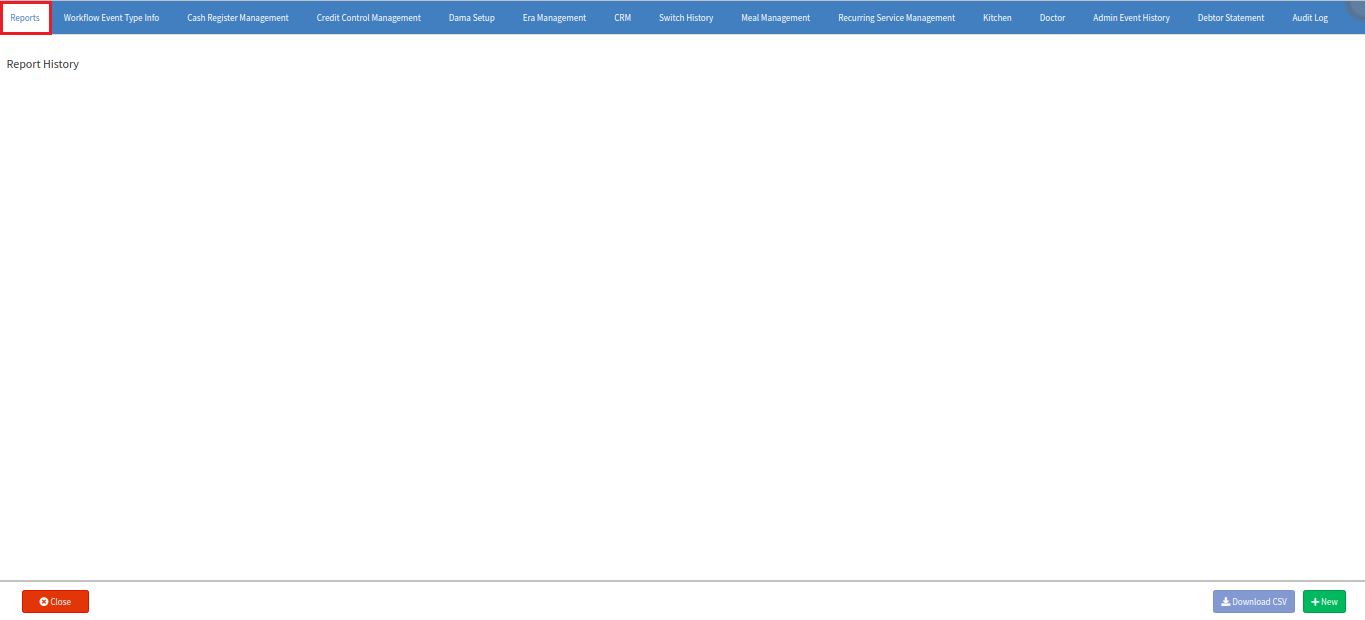
- The Reports tab will be the first tab under the Admin screen. All previous reports that were generated will display here.

- To generate a New Report, click on the green '(+) New' button in the bottom right corner.
![]()
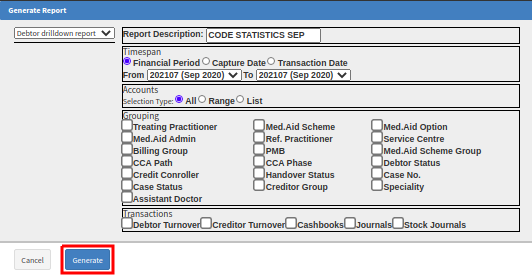
- A 'Generate Report' pop-up will appear. You need to select the Type of Report from the drop-down list that you want to generate. In this case, the Debtor Drilldown Report.
- Click on 'Generate' after selecting the type of Report.

- Further details will open on the right-side of the Generate Report that you need to complete. This is your Report Setup.
- After completing the report setup, click on the 'Generate' button to create and open the report.

- Report Description: This is the name of the Report. You can name the report anything to your own preference eg. Code Statistics September etc.
- Timespan: Select the Timespan for Report:
- Select the Financial Period.
- Select the From Period: The beginning of the transactions that must be included in the report.
- Select the To Period: The end date or financial period that must be included in the report OR
- Select the Type of Dates (From the beginning when the system was used until the date in this section).
- Capture Date: The date the transaction was captured on the system.
- Transaction Date: The date the patient was treated and when the treatment took place.

- Accounts: Select the type of accounts to print.
- ALL: This option will display all the accounts for the timespan selected.
![]()
- RANGE: This option will display a range of accounts according to a number, name or file number from and to a date selected.
![]()
- LIST: This option will display a list of accounts according to the option you choose:
- Search: The Debtor Search screen will open. You can search for specific debtors and only display the accounts for that list of debtors.
- Previous Report: A pop up will appear. You can select a previous report from the drop-down list and use the information generated on that report to display on the list.
- Raw Text: Enter a list of debtor ids to search and display only a list of the specific id numbers searched. ID numbers are sequences of numbers, separated by non-numeric characters. For example, comma or space separated ids are allowed, and prefixes are also allowed.

- Grouping: Select the Grouping Options to choose how and what the report should display.
- Per Treating Practitioner: Grouping the accounts according to the Practitioner who did the treatment. This grouping assists in follow up on the outstanding accounts on the treating doctor when it is a Group Practice.
- Per Medical Aid Administrator: Group the accounts according to the Medical Aid Administrator.
- Per Billing Group: Grouping the accounts according to the Billing Group what the invoice was done on. The billing group is for example 300% on the standard rate.
- Per Credit Control Assistant: Grouping the accounts according to the Credit control assistant what is linked to the account. The Credit Control assistant must be set up before this Grouping can be used.
- Per Credit Control Path: Grouping the accounts according to the Credit control assistant path set up. The Path the account follows in the Credit control assistant. The Credit Control assistant must be set up before this Grouping can be used.
- Per Case Status: Grouping the accounts according to the case credit control status that is set up on the Case.
- Per Assistant Doctor: Grouping the accounts according to the Dr who assisted the treating practitioner.
- Per the Medical Aid Scheme: Group the accounts according to the Medical Aid Scheme, this grouping assists in following up on all the outstanding account that is at the same medical aid.
- Per Referring Practitioner: Grouping the accounts according to the Dr who referred the patient to the practice.
- Per Prescribed Minimum Benefit: PMB - Grouping the accounts according to if the account is a PMB or not.
- Per Credit Control Phase: Grouping the accounts according to the Credit control assistant phase the accounts are in. The Credit Control assistant must be set up before this Grouping can be used.
- Per Handover status / Per third-party status: Grouping according to the handover process.
- Per Medical Aid Option: Group all accounts according to the plan or option the invoice was posted.
- Per Service Centre: Grouping the accounts according to the Service centre the patient was treated in.
- Per Scheme Group: Grouping the accounts according to the grouping on the Medical aid schemes that are set up. The Medical scheme can be linked to a group to assist in allocating a group of schemes to one person to follow up on the outstanding accounts.
- Per Debtor Status: Grouping the accounts according to the status the Debtor is linked to.
- Per Case Number: Grouping for hospitals and when cases are used.
- Per Speciality: Grouping the accounts according to the speciality of the treating practitioner.

- Transactions: Select the type of transactions to display on the Debtor Drilldown.
- Debtor Turnover: This option will display the invoices and credit notes of the Debtor.
- Creditor Turnover: This option will display the invoices and credit notes of the Creditor.
- Cashbooks: This option will show all cashbook (KAS) transactions. All the Receipts and Receipt Written backs.
- Journals: This option will display all journals that were done on the Debtors account eg. Bad Debts, Small Balances Write-Offs and Settlement Discounts.
- Stock Journals: This option will display all stock related journals.
- After selecting Generate on the report setup, the new report will be created under the 'Report History' showing the date it was created and the name that you created it with.
- Transaction Type: This is the type of transaction on the Debtor account eg. Invoices.
- Item: This is the item (code) that were billed eg. 8101.
- Quantity: This is the amount that was billed of the specific item (code) for the period selected.
- Count: This is the amount that was billed of the specific item (code) for the period selected.
- Amount (Excl): This is the total amount in rand excluding of VAT for the items billed.
- VAT: This is the total VAT amount charged for the items billed. (VAT is a consumption tax placed on a product whenever a value is added at each stage of the supply chain, from production to the point of sale. The amount of VAT that the user pays is on the cost of the product, less any of the costs of materials used in the product that has already been taxed.)
- Amount (Incl): This is the total amount in rand including of VAT for the items billed.

TAKE NOTE: Once a Report was generated it CANNOT be edited or changed. Every time you want to view a New Code Statistics you need to generate a NEW Debtor Drilldown Report. All previous reports that were created will display as follow:
