Age Analysis Report
The purpose of the Reports is for the Practitioner to draw a Report for bookkeeping purposes. A report is a document that presents information in an organized format for a specific audience and purpose. In this case for the Practice and the Doctors.
- GoodX Reports communicate information which has been compiled as a result of data generated by the system.
- GoodX Reports can cover a wide range of data.
- Most of the GoodX Reports are accurate, objective and complete when its generated correctly.
The Age Analysis Report displays all the Outstanding balances of the Debtors on the system and the Age of the outstanding balance as per the information selected from the
Report set-up.
The Age Analysis Report indicates all the outstanding accounts for both Medical Aid and Private Patient outstanding accounts.
The Age Analysis Report assists in following up with the Medical Aid or the Patient on outstanding amounts. It can also assist in limiting Bad Debts if the amounts are followed up and collected regularly before 60 days of Age.
How and Where to access the GoodX Web Age Analysis:- On the Menu Bar, click on the Admin tab

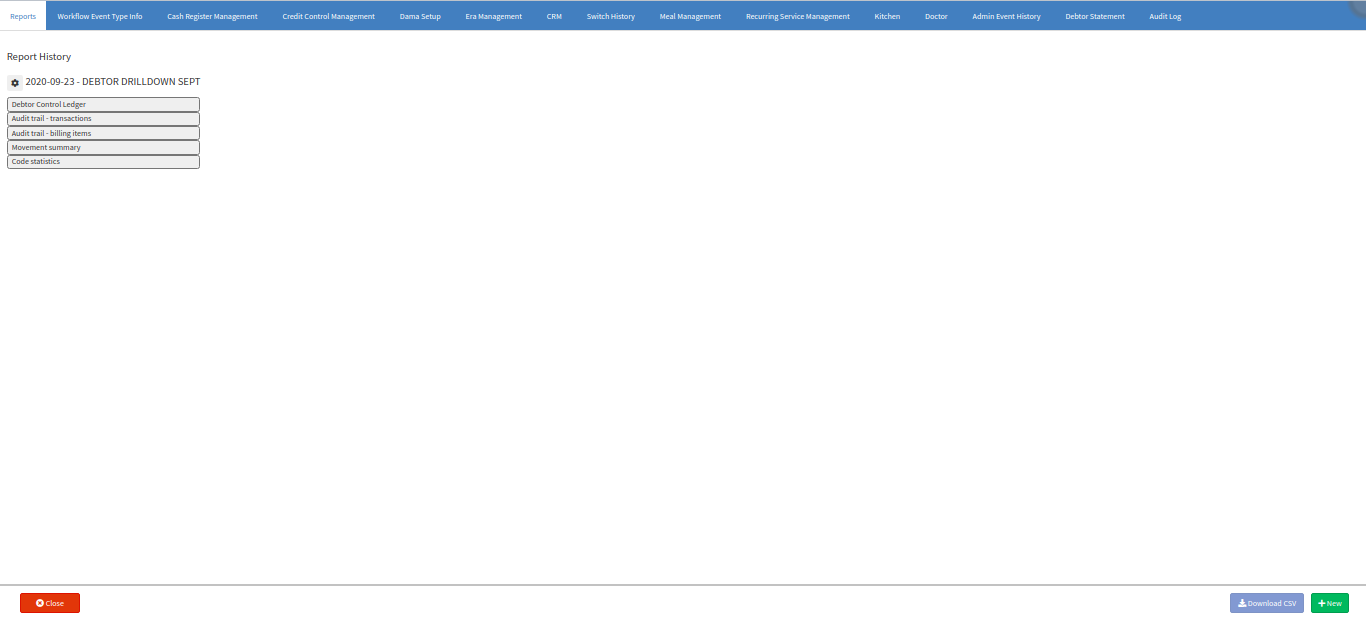
- The Reports tab will be the first tab under the Admin screen. All previous reports that were generated will display here.

- To generate a New Report, click on the green '(+) New' button in the bottom right corner.
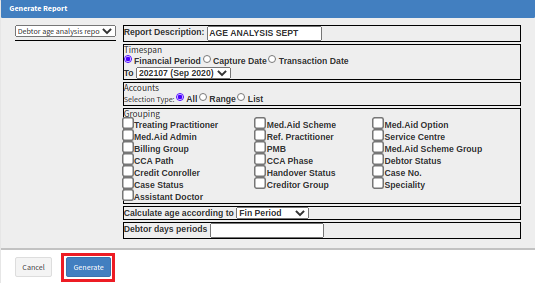
- A 'Generate Report' pop-up will appear. You need to select the Type of Report from the drop-down list that you want to generate. In this case, the Debtor Age Analysis Report.
- Click on 'Generate' after selecting the type of Report.

- Further details will open on the right-side of the Generate Report that you need to complete. This is your Report Setup.
- After completing the report setup, click on the 'Generate' button to create and open the report.

- Report Description: This is the name of the Report. You can name the report anything to your own preference eg. Age Analysis September etc.
- Timespan: Select the Timespan for Report.
- Select the Financial Year (Select the To Period - Age analysis can only be pulled until a period or specific date and not between periods or between dates. The age of the transactions can only be calculated from the beginning of when the transaction took place.) OR
- Select the Type of Dates (From the beginning when the system was used until the date in this section).
- Financial Period: This will be for all dates (The financial period).
- Capture Date: The date the transaction was captured on the system.
- Transaction Date: The date the patient was treated and when the treatment took place.

- Accounts: Select the type of accounts to print.
- ALL: This option will display all the outstanding accounts for the timespan selected.
![]()
- RANGE: This option will display a range of accounts according to a number, name or file number from and to a date selected.
![]()
- LIST: This option will display a list of accounts according to the option you choose:
- Search: The Debtor Search screen will open. You can search for specific debtors and only display the outstanding accounts for that list of debtors.
- Previous Report: A pop up will appear. You can select a previous report from the drop-down list and use the information generated on that report to display on the list.
- Raw Text: Enter a list of debtor ids to search and display only a list of the specific id numbers searched. ID numbers are sequences of numbers, separated by non-numeric characters. For example, comma or space separated ids are allowed, and prefixes are also allowed.

- Grouping: Select the Grouping Options to choose how and what the report should display.
- Per Treating Practitioner: Grouping the accounts according to the Practitioner who did the treatment. This grouping assists in follow up on the outstanding accounts on the treating doctor when it is a Group Practice.
- Per Medical Aid Administrator: Group the accounts according to the Medical Aid Administrator.
- Per Billing Group: Grouping the accounts according to the Billing Group what the invoice was done on. The billing group is for example 300% on the standard rate.
- Per Credit Control Assistant: Grouping the accounts according to the Credit control assistant what is linked to the account. The Credit Control assistant must be set up before this Grouping can be used.
- Per Credit Control Path: Grouping the accounts according to the Credit control assistant path set up. The Path the account follows in the Credit control assistant. The Credit Control assistant must be set up before this Grouping can be used.
- Per Case Status: Grouping the accounts according to the case credit control status that is set up on the Case.
- Per Assistant Doctor: Grouping the accounts according to the Dr who assisted the treating practitioner.
- Per the Medical Aid Scheme: Group the accounts according to the Medical Aid Scheme, this grouping assists in following up on all the outstanding account that is at the same medical aid.
- Per Referring Practitioner: Grouping the accounts according to the Dr who referred the patient to the practice.
- Per Prescribed Minimum Benefit: PMB - Grouping the accounts according to if the account is a PMB or not.
- Per Credit Control Phase: Grouping the accounts according to the Credit control assistant phase the accounts are in. The Credit Control assistant must be set up before this Grouping can be used.
- Per Handover status / Per third-party status: Grouping according to the handover process.
- Per Medical Aid Option: Group all accounts according to the plan or option the invoice was posted.
- Per Service Centre: Grouping the accounts according to the Service centre the patient was treated in.
- Per Scheme Group: Grouping the accounts according to the grouping on the Medical aid schemes that are set up. The Medical scheme can be linked to a group to assist in allocating a group of schemes to one person to follow up on the outstanding accounts.
- Per Debtor Status: Grouping the accounts according to the status the Debtor is linked to.
- Per Case Number: Grouping for hospitals and when cases are used.
- Per Speciality: Grouping the accounts according to the speciality of the treating practitioner.

- Calculate Age according to: Select the Age of the accounts to display. This option will display on what age to display the outstanding accounts.
- Fin. Period: The financial period age will display ALL the ages in separate columns eg. Current, 30 Days, 60 Days, 90 Days etc.
- Invoice Date: The treatment date, when the patient was treated. This will filter the accounts according to the Invoice date.
- Capture Date: The date on which the transaction is captured onto the system (is not necessarily the same as the transaction/invoice date). This will filter the accounts according to the Capture date.
- Debtor days periods: This will filter accounts according to the number of days you manually enter eg. 40 Days or 100 Days etc.
- After selecting Generate on the report setup, the new report will be created under the 'Report History' showing the date it was created and the name that you created it with.
- Entity: This will display the entity number where the account is outstanding on. This is helpful when there is more than one entity at a Practice where multiple Doctors on different specialities work.
- Debtor Id: This is the Account/Debtor account number as saved on the system when the debtor was created eg. DEB100 or DEB112. It will only display the number of the account without the account prefix (DEB).
- Current: The current balance is the total outstanding amount of funds on the Debtor account that is not older than 30 days.
- 30 to 270+ Days Ages: The 30 Days to 270+ Days Ages is the balance of the total outstanding amount of funds on the Debtor account according to the Age it is outstanding in eg. 30 Days or 60 Days etc.
- Balance: The balance is the total amount outstanding on the Debtor account after all amounts are calculated together. The account balance is always the net amount after factoring in all debits and credits.
- Acc. Number: This is the Debtor account number as saved on the system when the debtor was created eg. DEB100 or DEB112.
- Debtor: This is the actual Debtor/Patient on the account on which the outstanding amount is on.
- Dummy:

- From the Age Analysis, when hovering on a Debtor line, you'll see two icons appear.
- Call Debtor (Telephone Icon): This option will allow you to call the Debtor/Patient from the age analysis screen.
- When you click on the Call Debtor Icon the Call Event - Workflow Event Template will open. You can complete the event with the necessary details and click on Save when done.

- Open Account (Round black-figure Icon): This option will open the Account Details screen and allow you to view all account-related screens (Invoices, Receipts, Journals, Notebook etc.)
- When you click on the Open Account Icon the Account Details screen will open. You can view/edit/update any account related issues on this screen and click on Close when done.

Summary: This tab will display a summary of the age analysis report with the outstanding account information in percentage value according to the age and debtor days outstanding.

- Grouping/Filter: All the columns can be dragged up to the top grey Partition area to group the information according to an Age for example. The columns can be dragged back to the bottom if the grouping must be cancelled. The columns can be dragged and drop to change the order of the columns too.

TAKE NOTE: Once a Report was generated it CANNOT be edited or changed. Every time you want to view a New Age Analysis you need to generate a NEW Age Analysis Report. All previous reports that were created will display as follow:
