Text size
Line height
Text spacing

What is the “Eye Eval 2 & Harmony” feature for an Ophthalmologist?
This is a powerful medium from which to complete your examinations, and it is fully linked to various aspects within the GoodX software system to ensure a smooth, integrated practice management experience.
Please Note: Utilizing Eye Eval 2 & Harmony for Ophthalmologists with GoodX is an optional premium service. Users must sign up for this feature at an additional fee, which is calculated based on the specific features and integration needs selected for your practice.
The GoodX “Eye Eval” fields feature self-learning capabilities, allowing you to either type new information or select from a saved list of items that automatically updates based on your previous entries. You can easily manage these lists by removing any duplicate or inconsistent data that you do not want the system to retain.
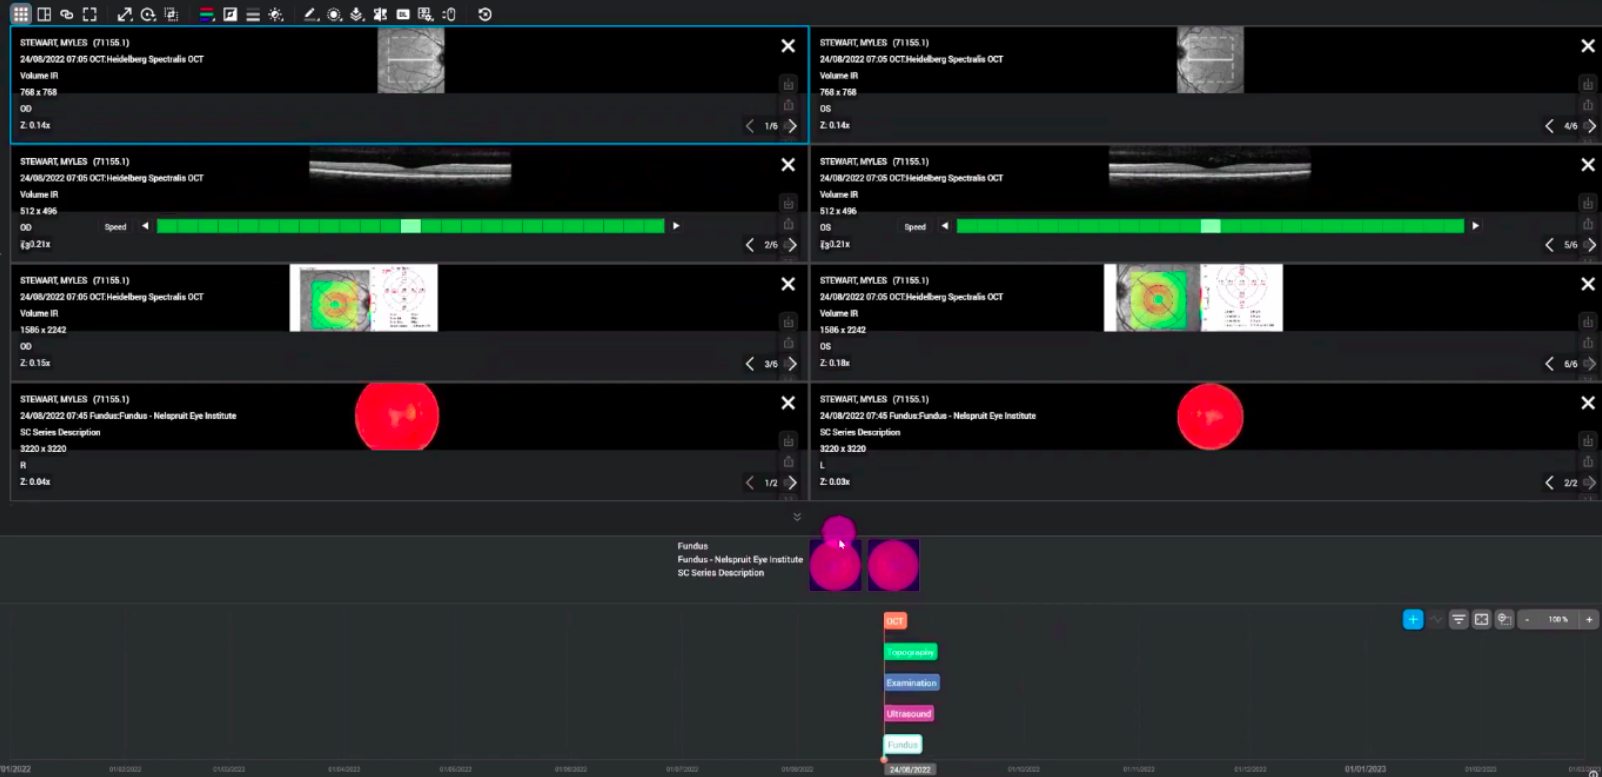
Currently, GoodX integrates with DICOM-compatible diagnostic equipment in conjunction with Harmony RS, which requires an active Harmony subscription. DICOM (Digital Imaging and Communications in Medicine) is the international standard used for storing, transmitting, and exchanging medical images and related data, thereby ensuring seamless interoperability between imaging devices from various manufacturers.
What are the “Eye Eval 2” clinical form functions or features?
The primary benefits of the Eye Eval 2 clinical examination forms include the ability to invoice with ease, complete various form sections effortlessly, and utilise custom pills straightforwardly. Furthermore, the system facilitates streamlined communication and report generation directly from the platform.
When preparing medical aid motivations, you have access to a fully customisable Patient Dashboard which draws its information from your clinical forms. This dashboard can be tailored to your practice needs, allowing you or your team to efficiently review the most recent patient history and activities at a glance.
Invoicing with ease
The clinical “Eye Eval 2” form is a comprehensive and robust tool designed to record every aspect of a patient's eye examination in a simplified yet thorough manner. This form integrates seamlessly with your Harmony RS machine results and automatically populates linked invoice line items and ICD-10 codes based on the clinical information completed during the assessment. For your convenience, these ready-to-bill line items are displayed at the bottom of the examination form, prepared for immediate transfer to an invoice if desired.
You are free to add additional invoice items to be transferred to the patient's invoice before finalising the examination. The examination is officially completed once the practitioner's signature is added. Please note that any changes or additions made after the signature has been applied will not have the option to be pushed to the invoice.

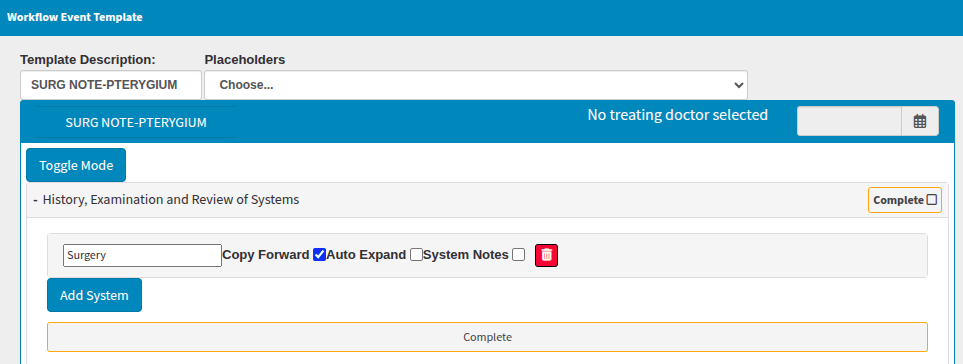
Completing form sections with ease
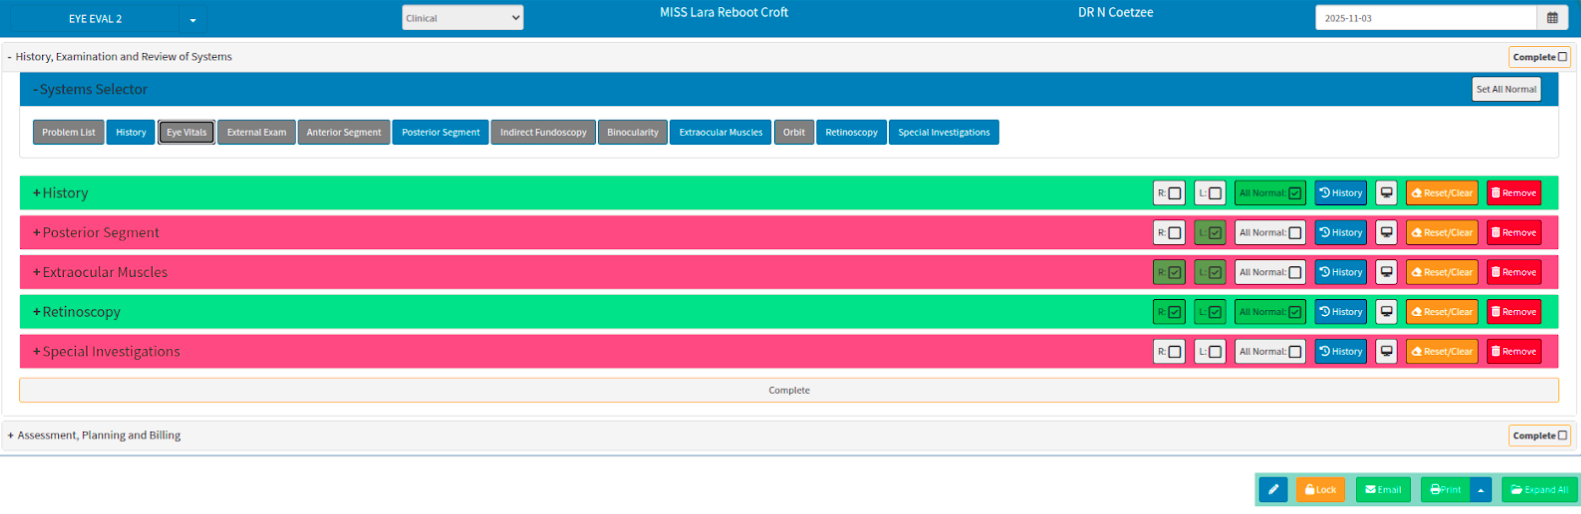
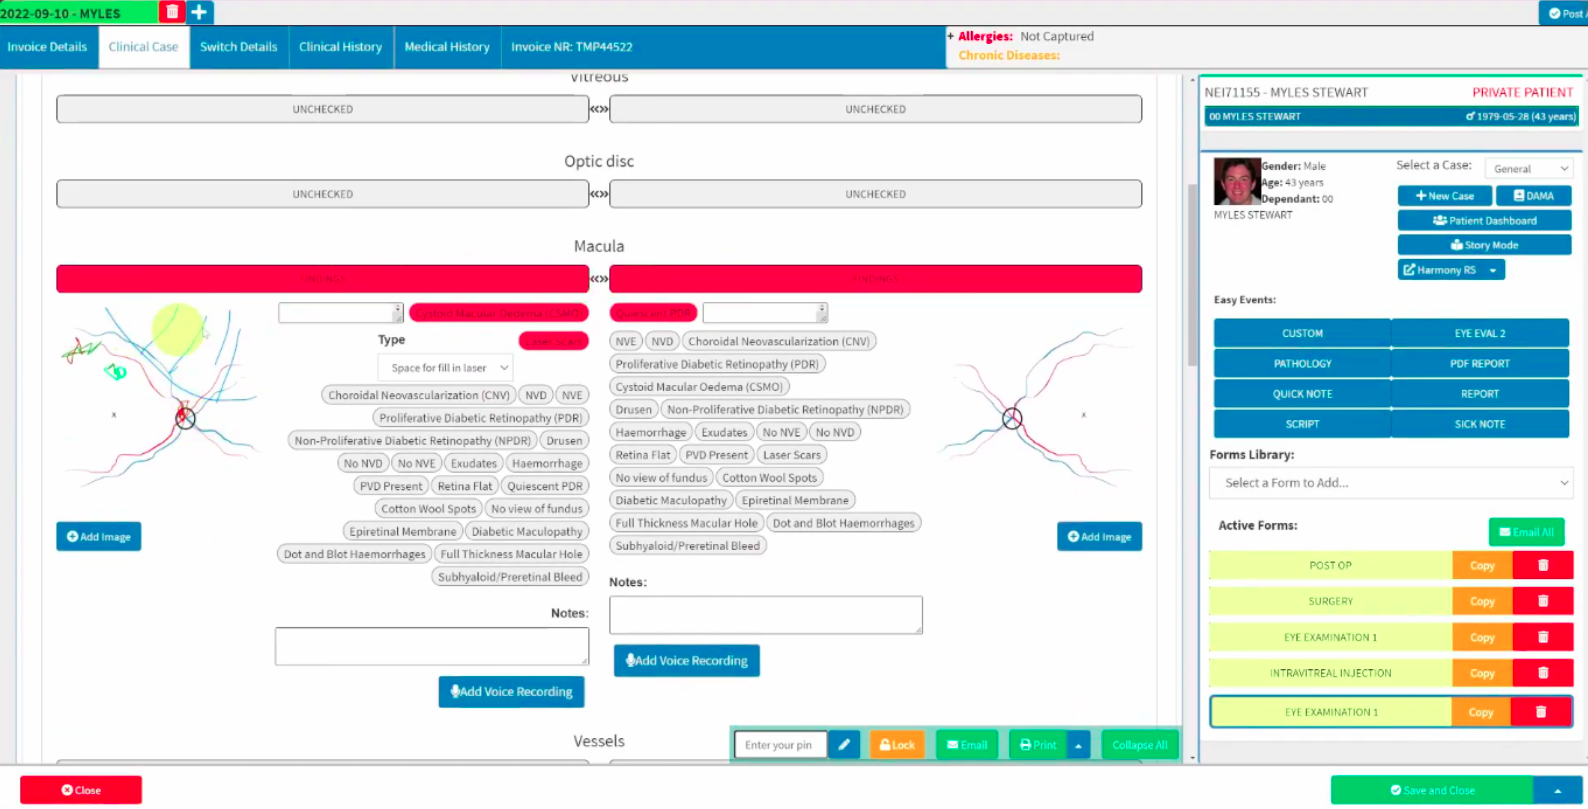
The “Unchecked” status is set by default and can be toggled continuously between “Unchecked”, “Normal” (or the field-specific equivalent to normal), and “Findings”.
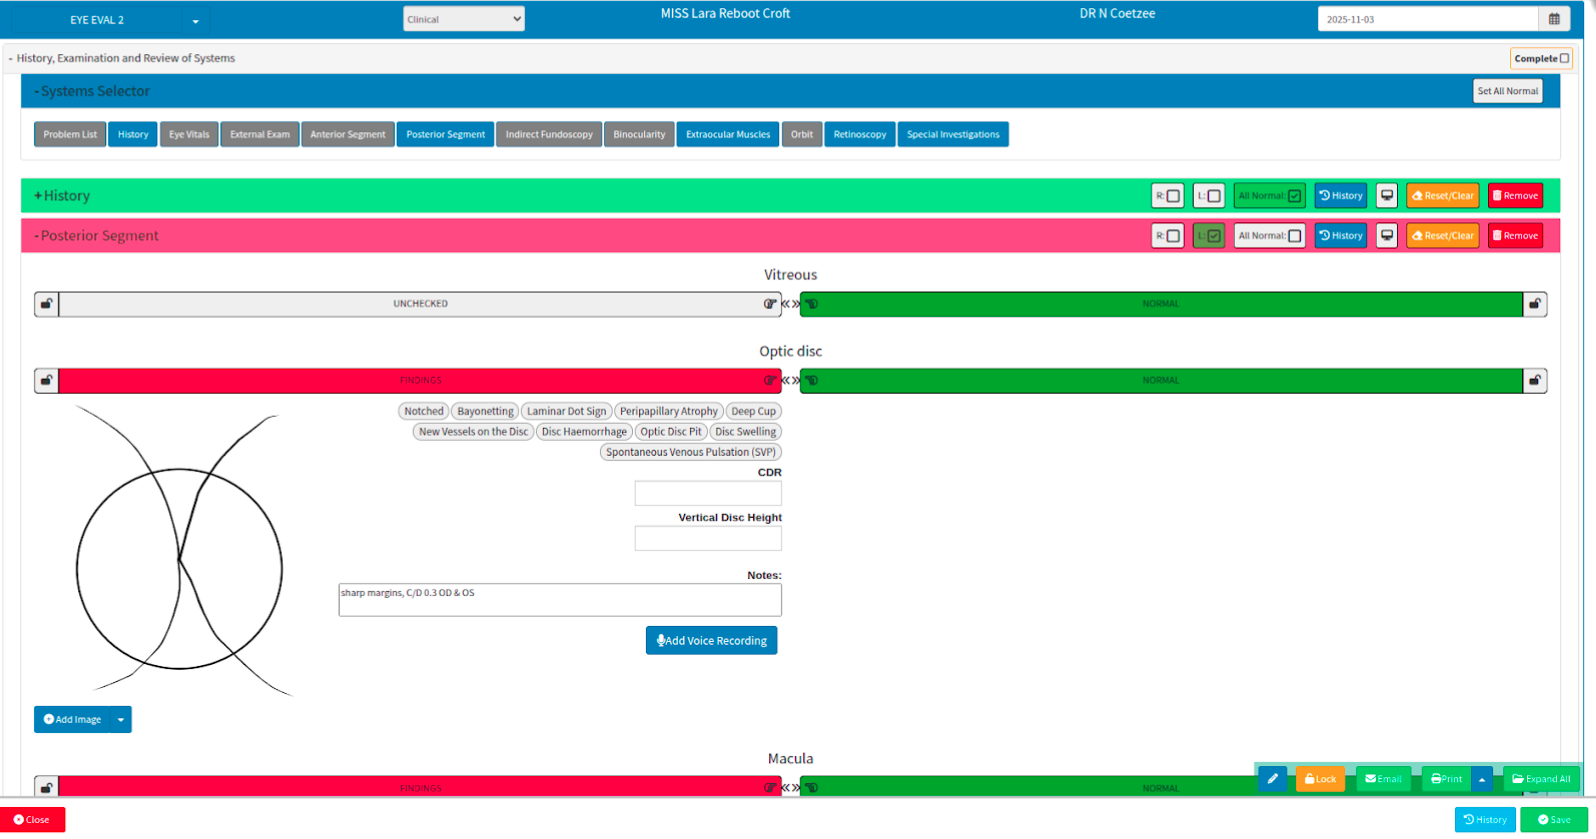
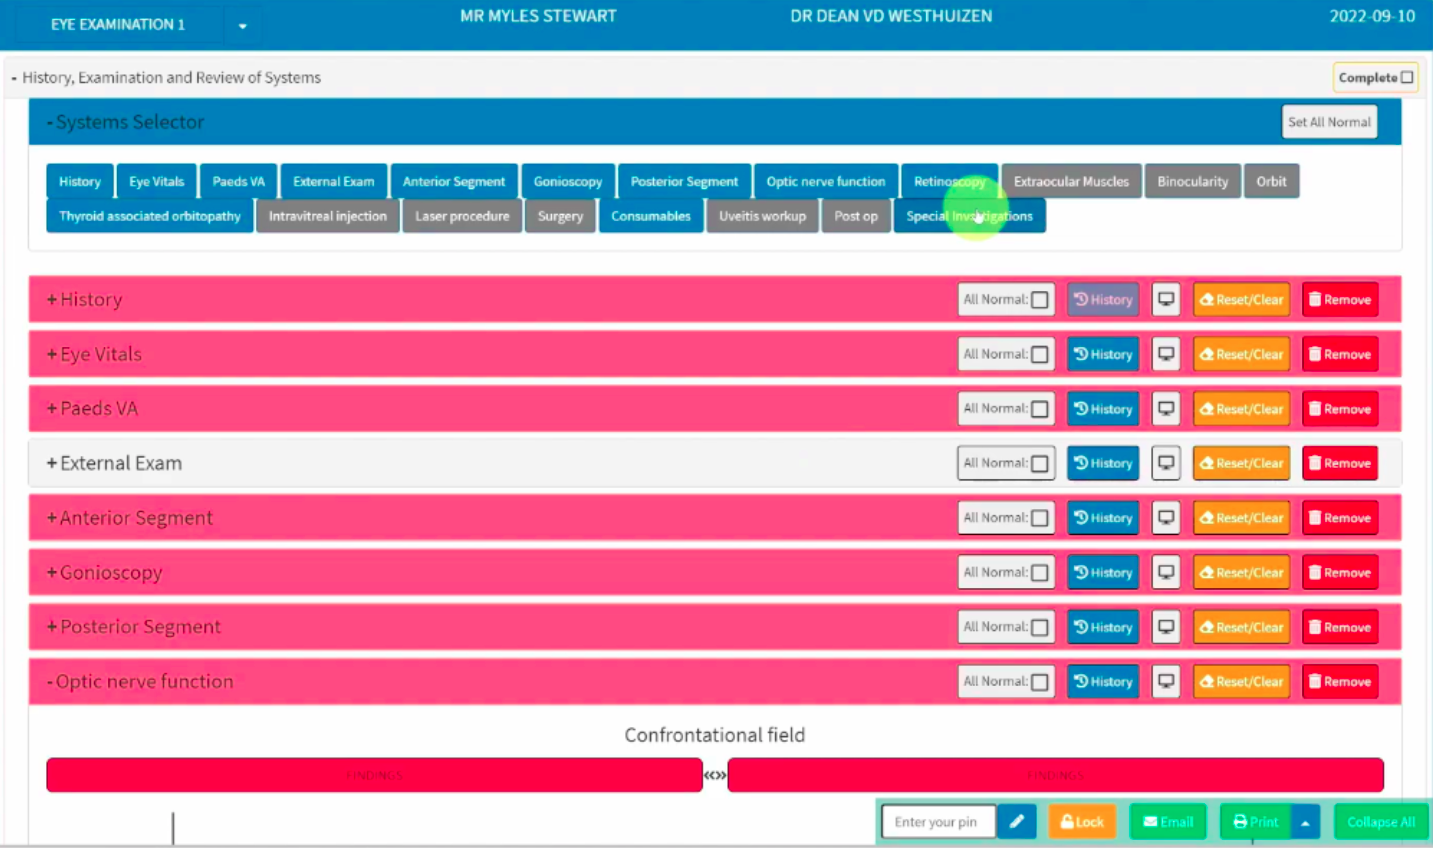
The form view menu is managed using the “+ Systems Selector” option. This feature allows you to hide various selected sections from the current view, with the options expanding or collapsing in an accordion fashion as they are toggled. Selecting a section once will grey out the button and hide that specific section from the form layout. Reselecting the same option will restore the section, making it visible on the form once again. Expanding this menu allows you to see at a glance if any options are currently hidden, enabling you to conceal sections that are not required for the specific examination.

The "pills," or default selections visible on the form, are fully customisable to align with your specific practice preferences. The images can be drawn on for reference notes. The pills are fully customisable. The configuration and ease of use regarding custom pills linked to the Eye Eval 2 form are discussed in detail in the latter part of this guide.
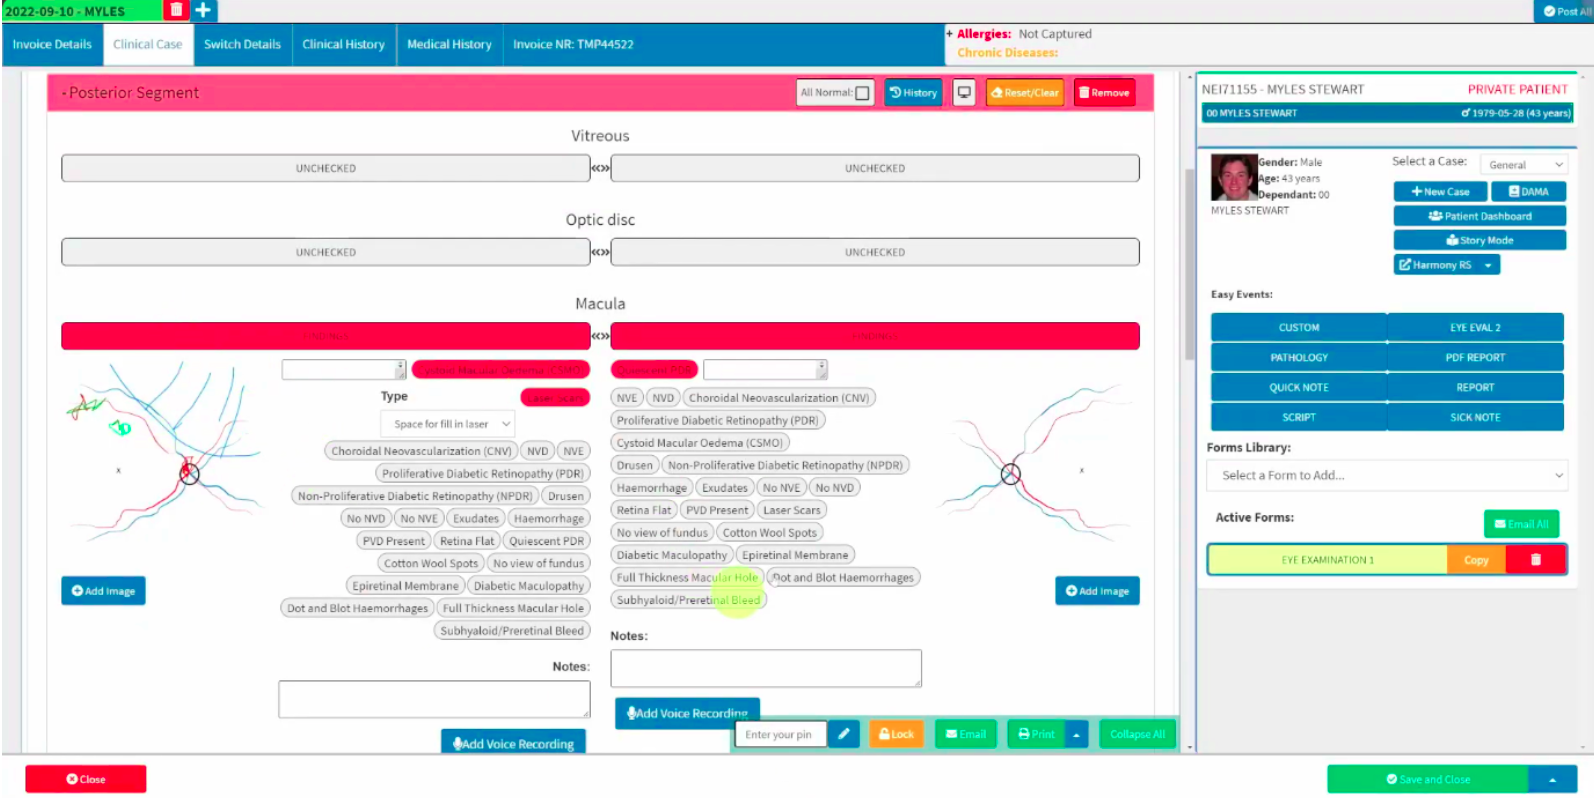
Example of custom form preference options on the Eye Eval 2 form
What are the unique aspects possible within the “Eye Eval 2” clinical form?
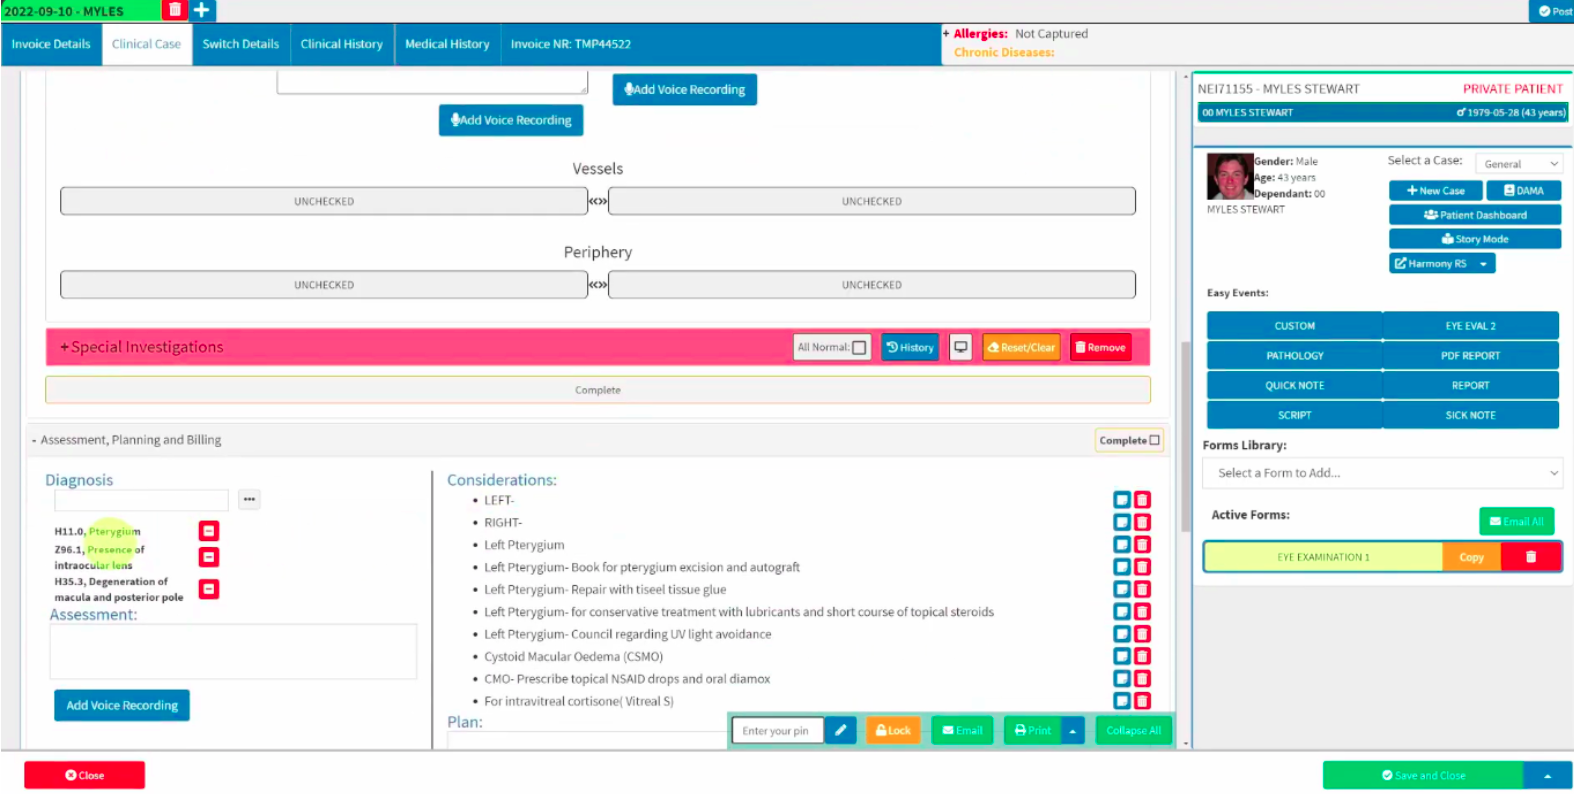
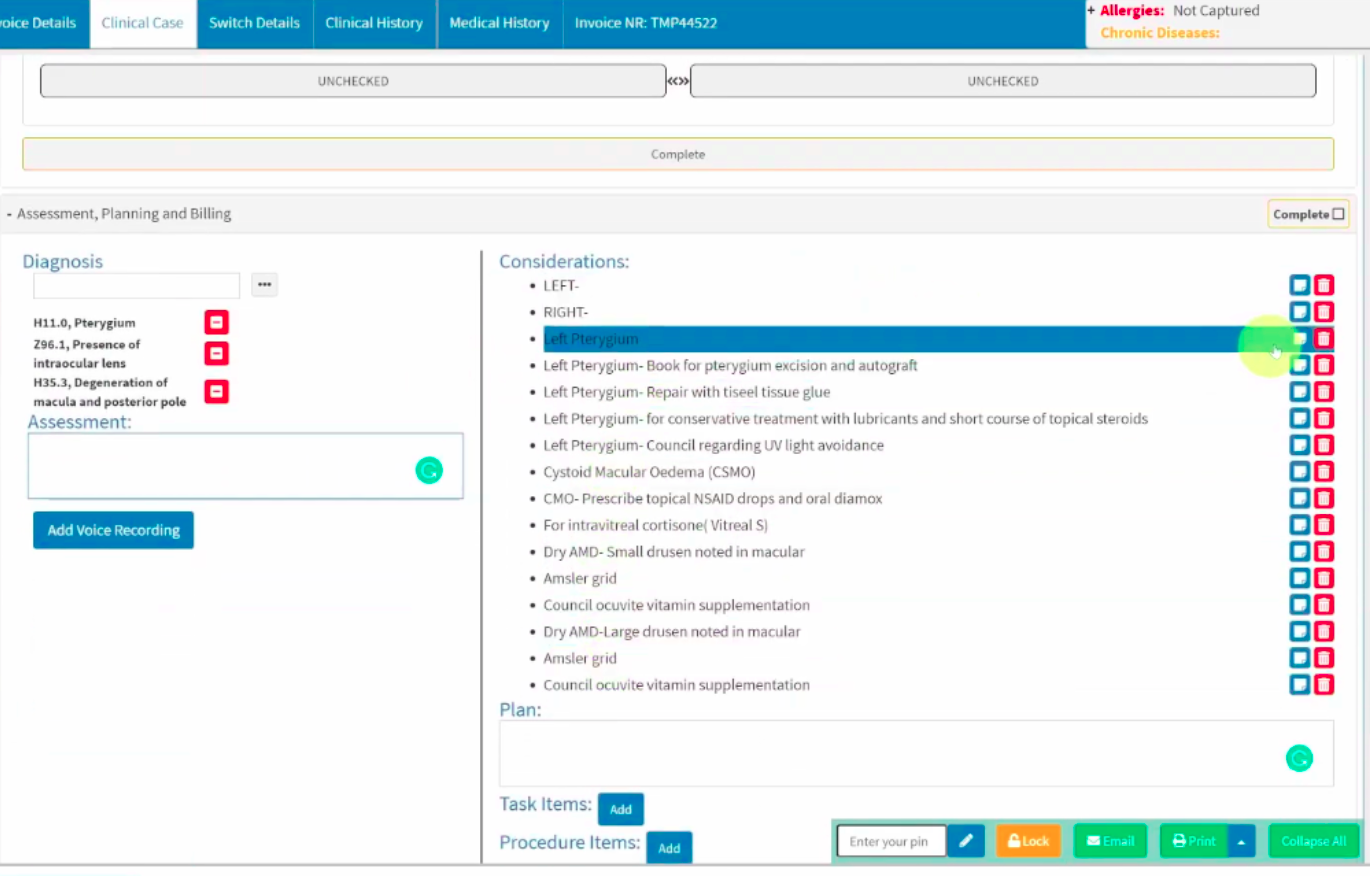
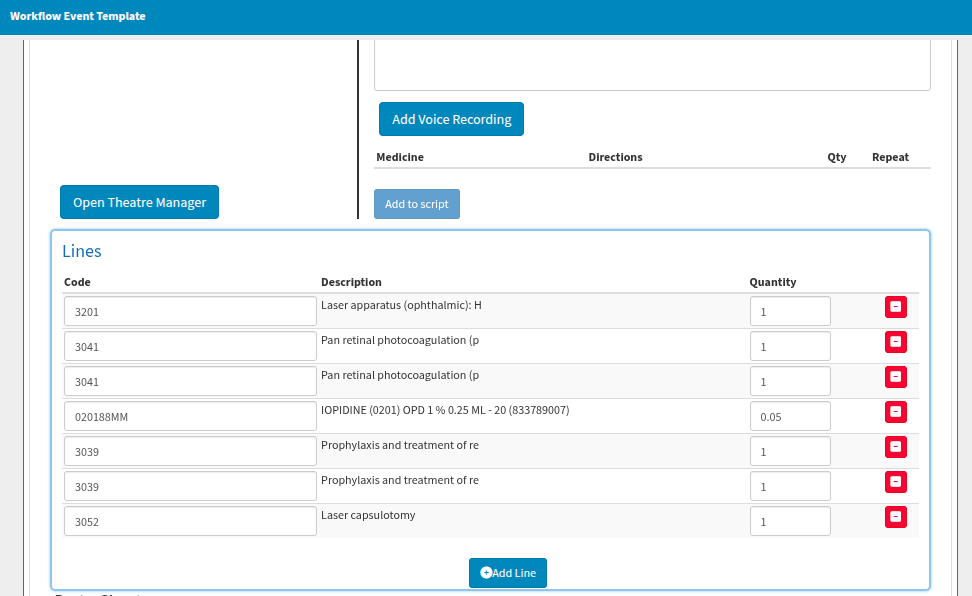
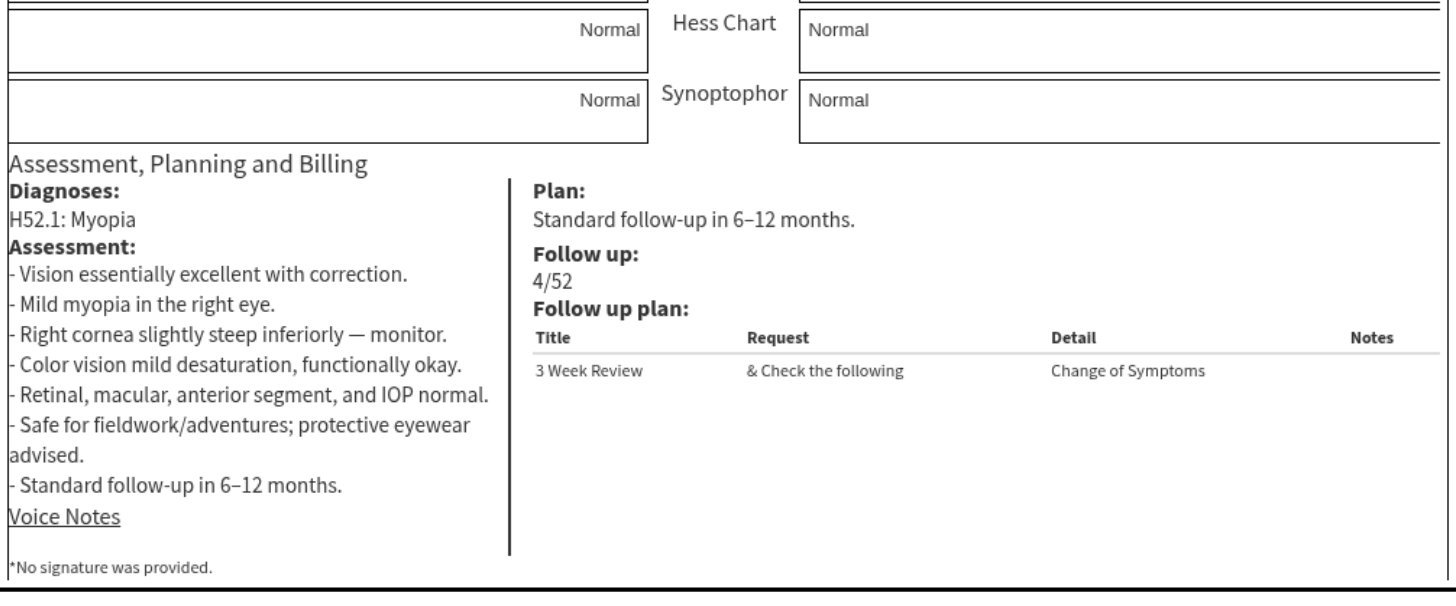
As you progress through the form, the associated ICD-10 codes will automatically populate at the bottom of the form under the “Assessment, Planning and Billing” section based on your selections. You can add additional ICD-10 codes at any stage by selecting the ellipsis menu in the blank area located below the Diagnosis section.
Similarly, the expected billing line items will be populated automatically, allowing you to add them to the patient's invoice before finalising the form with the practitioner's signature. You can easily navigate to the “Invoice details” tab to toggle between the clinical form and the active invoice screen for the current patient.

Where feedback is required for an invoice that has been “posted (await response)” to see if the medical aid will cover the items, you can navigate to the “Switch Details” tab. In scenarios where the medical aid supports real-time feedback, this tab displays the medical scheme's response to the proposed invoice, indicating whether the switch transaction will be rejected or accepted based on the available information.
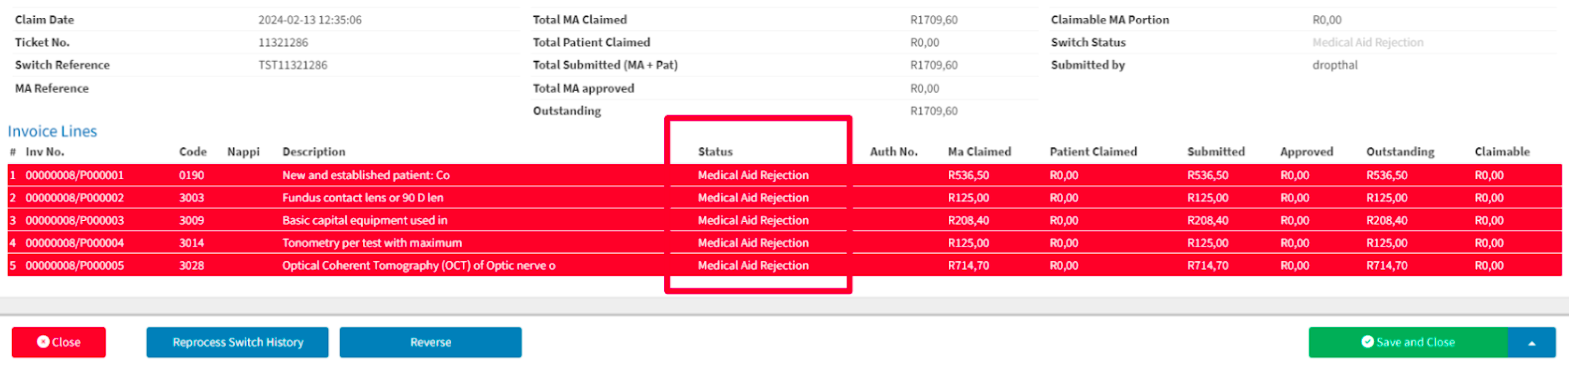
If mistakes are made with the ICD-10 codes on the user side, you can reverse and resubmit the claims. In cases where the patient is not covered for the claims, the practice must decide on the appropriate way forward with the patient. Additionally, the “considerations” that appear based on the selected “pills” are also fully customisable.
Selecting the blue note icon button next to a line item will send that specific item directly to the “Assessment” section. Once in this section, clicking directly on the bullet name will transfer the line item to the “Plan” section located below it.
Where columns of options are available throughout the Eye Eval 2 form, your practice has two setup options.
If your options are limited and there is no requirement for self-learning, the Eye Eval 2 form lists can be preset with predetermined line items for the practitioner to select from. With this approach, any additional items must be manually added to the source list, as they will not be automatically remembered upon use. Please note that the Eye Eval 2 forms are administrative-intensive at inception, as all defaults and lists must be set up initially to ensure ease of selection at a later date. Everything should be configured to align with your unique practice needs, and your dedicated GoodX liaison is ready to assist should any queries arise during this initial setup.
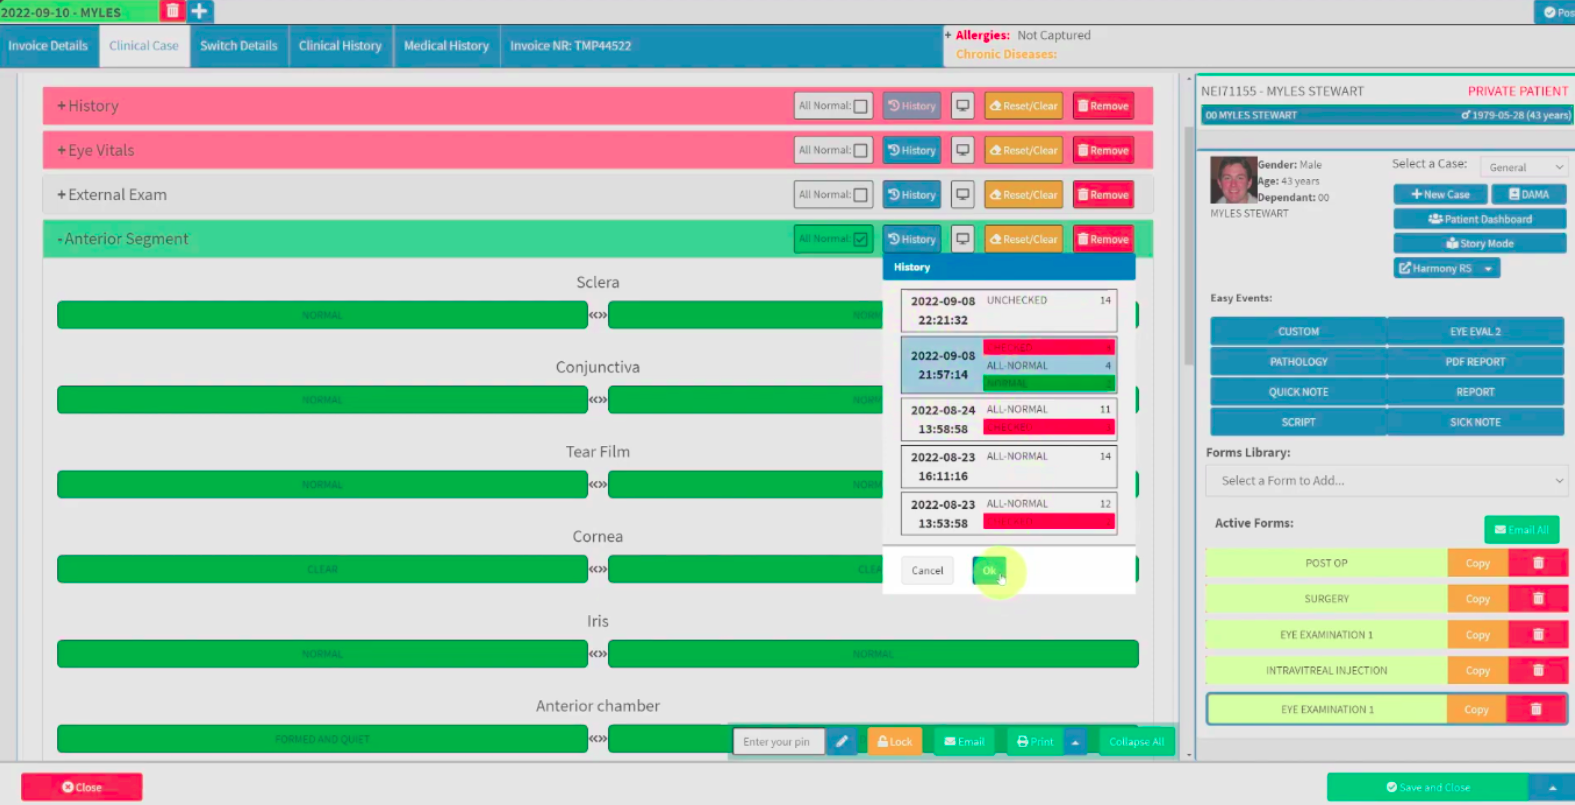
Alternatively, fields can be configured as self-learning, meaning the system will remember all previously completed entries. Please note that this option is case-sensitive, which may lead to multiple spelling variations being saved. However, you can easily clean up the list by selecting the “x” next to the incorrect option and clicking “OK”. The self-learning model will then remember your preference and permanently remove that specific item from the list.
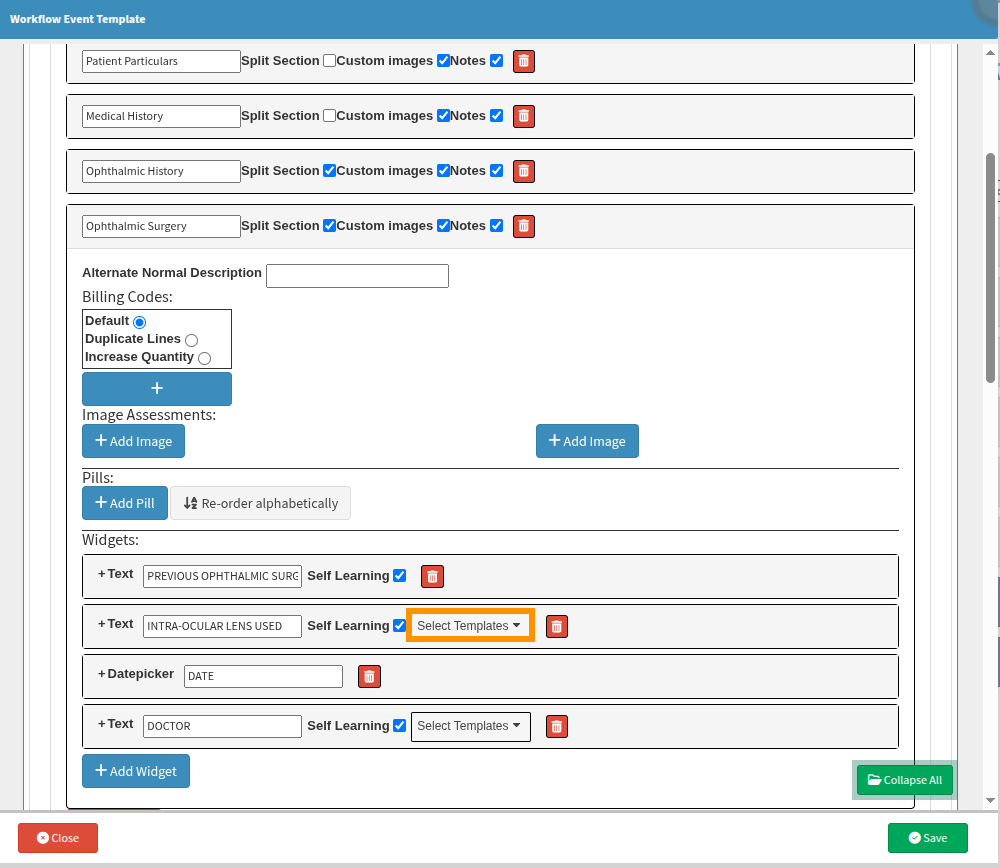
When building a custom examination form within the Eye Eval 2 module, you can link self-learning fields if you have added three or more of them to the form. Once linked, any data completed in one field correlates directly with the other selected self-learning fields. This allows you to easily choose from previously saved self-learning items without having to manually recreate the list for each section individually.
However, these fields should be linked with caution, as adding or removing items from one list will automatically update all other linked fields. If you are uncertain whether the fields should share identical data, it is best to leave these configurations blank.
Please note that these dropdown options will only appear automatically once you have added and saved at least three self-learning fields. Upon returning to the customisation screen, the configuration options will become visible as shown in the image.
Can the “Eye Eval 2” form information be viewed at a glance?
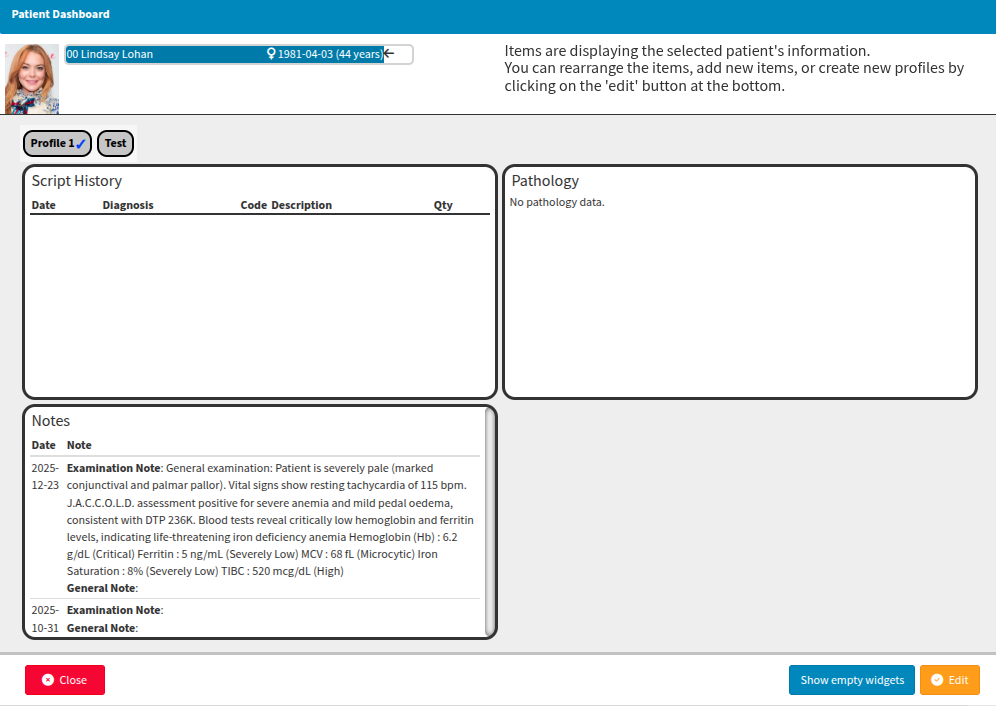
For your convenience, it is possible to configure patient dashboards to review past surgeries, clinical notes, or specific Eye Eval 2 results, among multiple other available options, at a glance. This provides a clear overview of the patient's clinical history and enables comprehensive consultations without the need to sift through various folders or files to identify relevant key points and clinical notes.
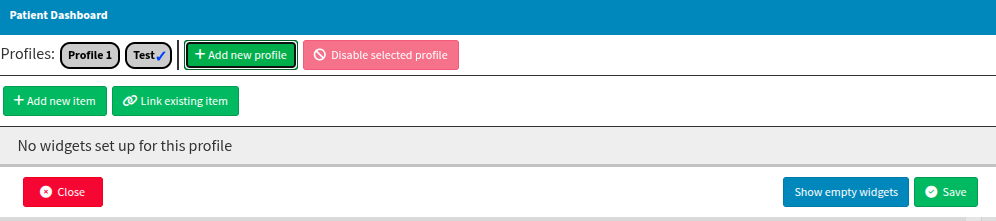
You can also set up profiles on specific dashboard items that you prefer to view simultaneously. These profiles can be tailored to practitioner preferences or specific clinical conditions and saved with unique profile names. You can instantly toggle between these visible profiles, with a blue tick next to the profile name reflecting the profile currently in view.

In the event that the patient dashboard needs to be updated with additional sources of information or new profiles, you can simply select the “Edit” option to modify your configuration.
While the initial profile setup may seem daunting at first, please feel free to connect with your GoodX liaison to relay your expectations regarding preferred colours and views (with graph options including line, scatter, text, or image) and to receive guidance and recommendations on your desired patient dashboard configurations.
Always select Save to retain your changes or updates, as closing the window without saving will discard any actions completed. It is also important to note that the graphs can only display information if it was explicitly recorded and saved within the specific forms being referenced.
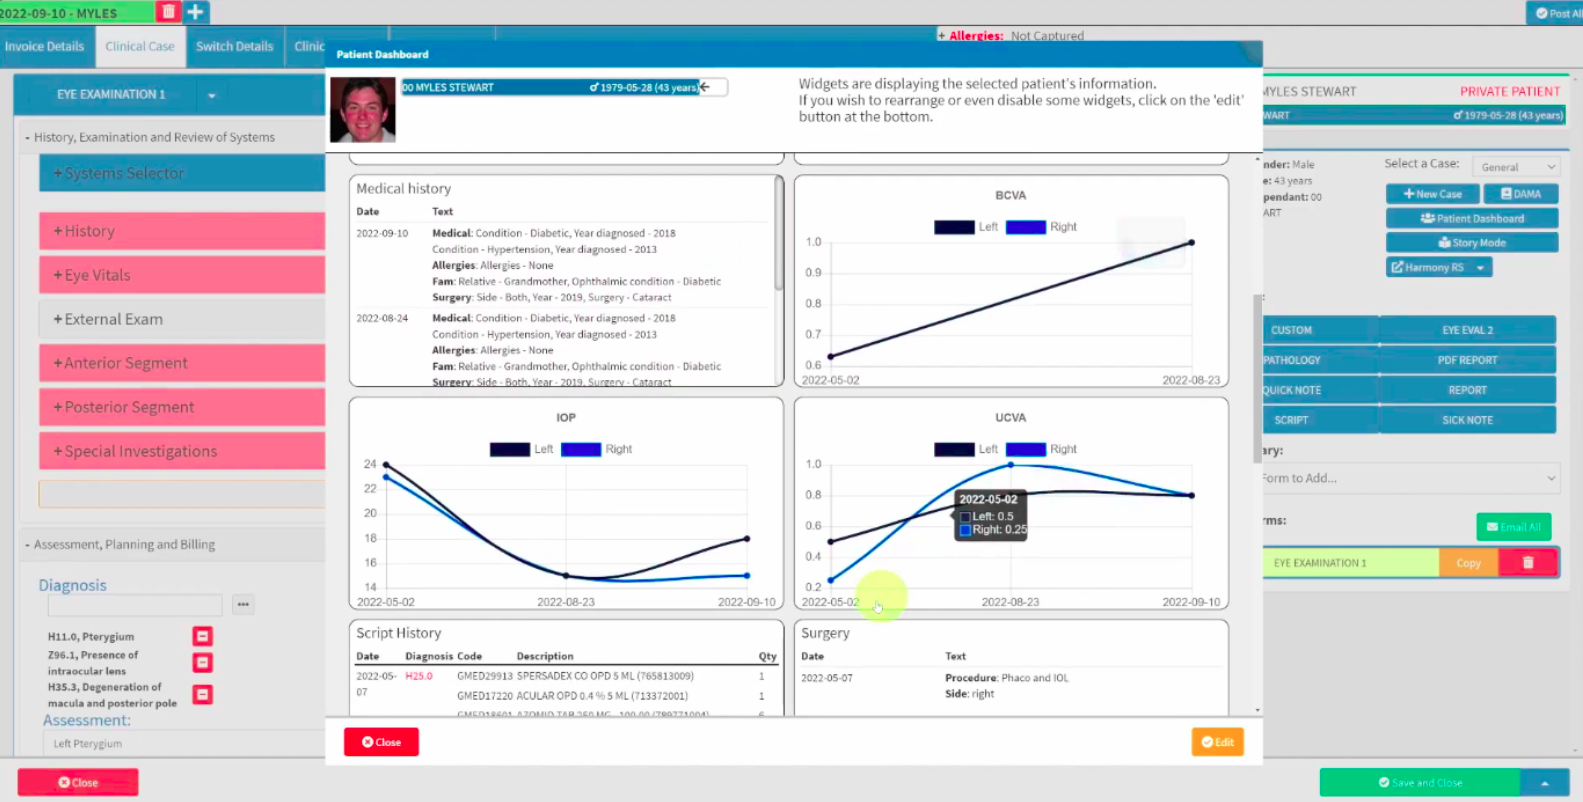
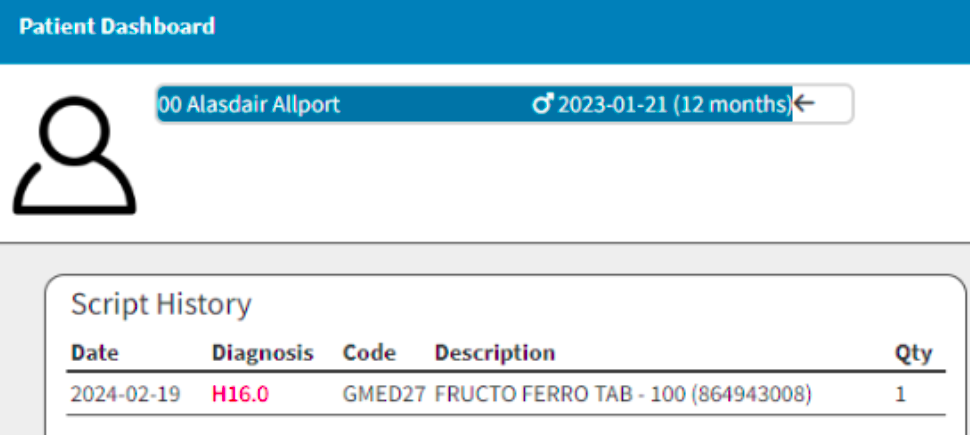
Examples of what can be viewed from the “Patient Dashboard”
From selected form templates, you can choose to display specific clinical information on the dashboard. For instance, using data captured in the “Eye Examination” template, your patient dashboard could potentially reflect the following:
The summary notes recorded during previous examinations for the form type specified during your initial setup.
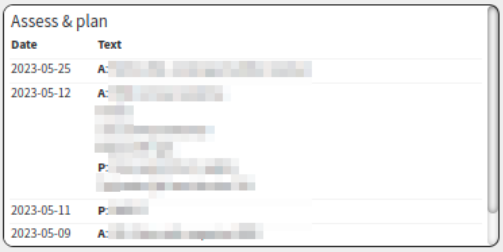
The specific Assessment (A) and Plan (P) notes pulled directly from the dedicated clinical form.
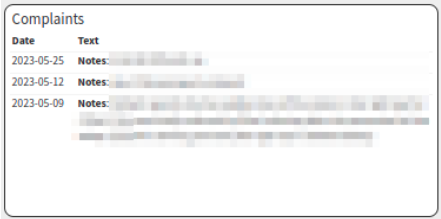
The historical record of patient complaints as reflected in the case history notes.
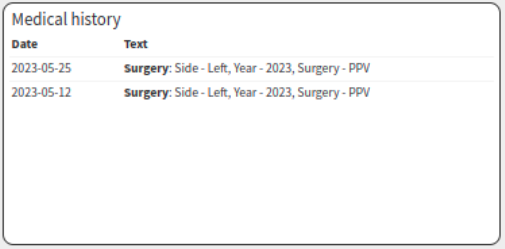
The medical history can be configured to reflect recorded medical conditions, allergies, family history, or any ophthalmic surgeries documented within the form.
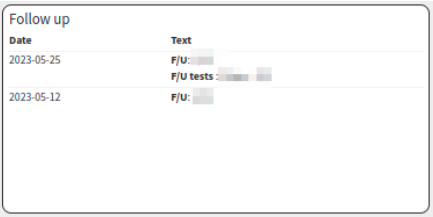
The system can display scheduled follow-up tests, specific line items, or general follow-up notes that have been recorded.
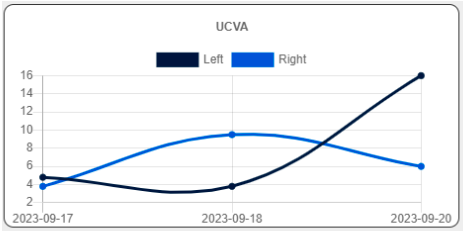
The UCVA (Unaided Visual Acuity) for both eyes can be tracked and viewed over the historical timeline recorded.
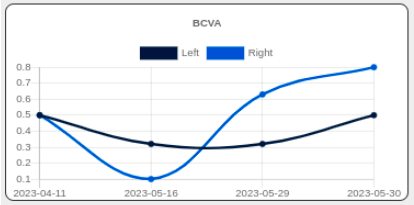
The BCVA (Best-Corrected Visual Acuity) for both eyes can be tracked and viewed over the historical timeline recorded.
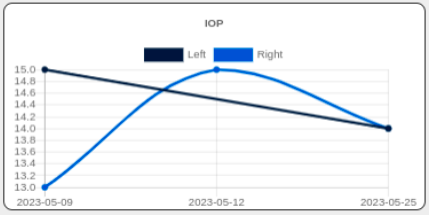
The IOP (Intraocular Pressure) values, reflecting essential eye vitals, can be monitored across the various times recorded.
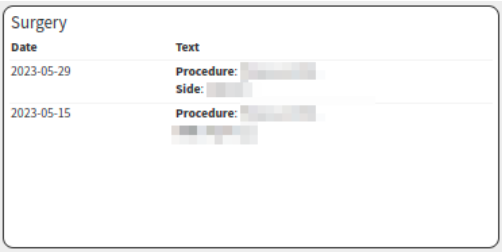
The completed procedures, along with the specific side or eye operated on, can be reviewed where they have been recorded on the forms.
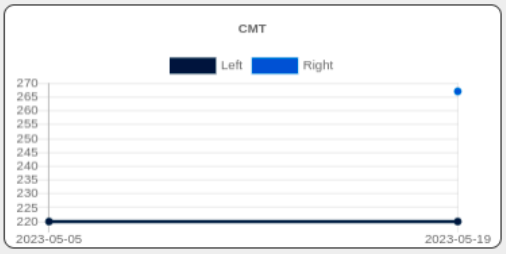
You can keep your special investigations visible, such as the CMT (Central Macular Thickness) for both eyes, or alternatively, display the Corneal Topography for both eyes as a "Pentacam" graph.
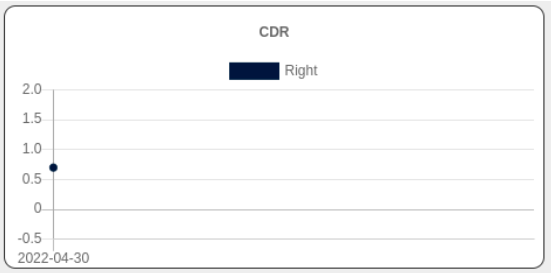
The optic disc information will only be displayed when data is available; for example, the graph monitors both the left and right sides, but will only reflect recorded information such as the right CDR (Cup-to-Disc Ratio).
Detailed information notes relating specifically to patient pathology can be displayed.
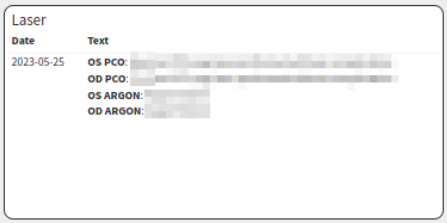
Laser procedures can be viewed at a glance, with direct reference to a "YAG Posterior Capsule Opacity" or an Argon procedure performed.
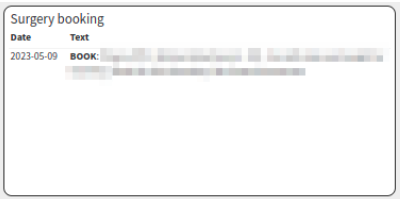
Even surgery booking procedure items can be viewed at a glance where they have been recorded on the completed eye examination forms.

If a section you frequently use is not presently available, you can connect with your GoodX liaison to determine whether that specific form section already exists and can be added to your profile, or whether it is a feature that is currently still in development.
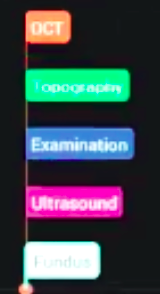
The dashboard view defaults to a royal blue theme. However, you can also colour-code your forms or related clinical notes using the Harmony colour palette, which is particularly useful when displaying multiple results on a single graph:
OCT: Orange
Topography: Green
Examination: Blue
Ultrasound: Violet / Purple
Findings: White
Where can the “Patient Dashboard” be accessed?
From the diary booking screen
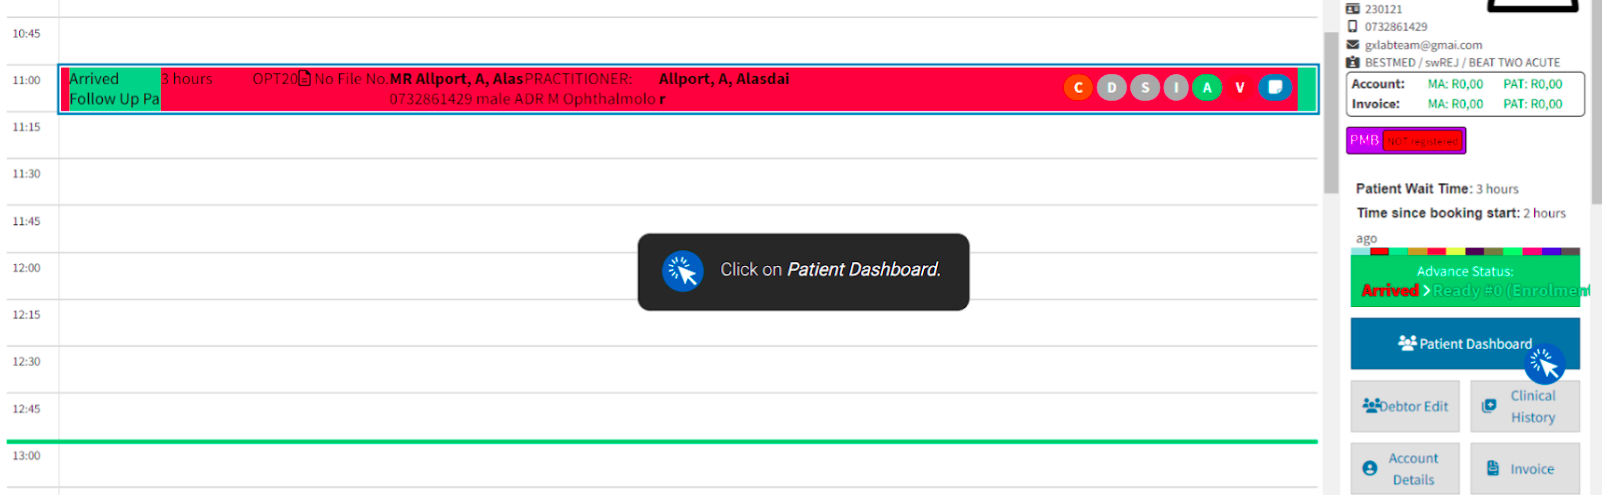
The patient dashboard can be located by selecting “Diary” from the main GoodX wheel. From the diary tab, click on the relevant patient booking, which will display the patient's information on the debtor panel alongside the booking, together with other quick-access shortcuts on a side panel. From this side panel, select “Patient Dashboard” while ensuring that the arrow indicator points to the correct patient. Once selected, your configured dashboard profiles will be displayed. Where clinical information has been completed for the patient, the linked data will be reflected according to that specific user profile set up.
Always ensure that the arrow next to the patient's name is correct, as this arrow indicates that the clinical data currently being reflected belongs specifically to that patient.
From the debtor panel
Alternatively, the patient dashboard can be located by selecting “Debtors” from the GoodX wheel and navigating to the “Debtors” tab to search for or select the debtor of interest.
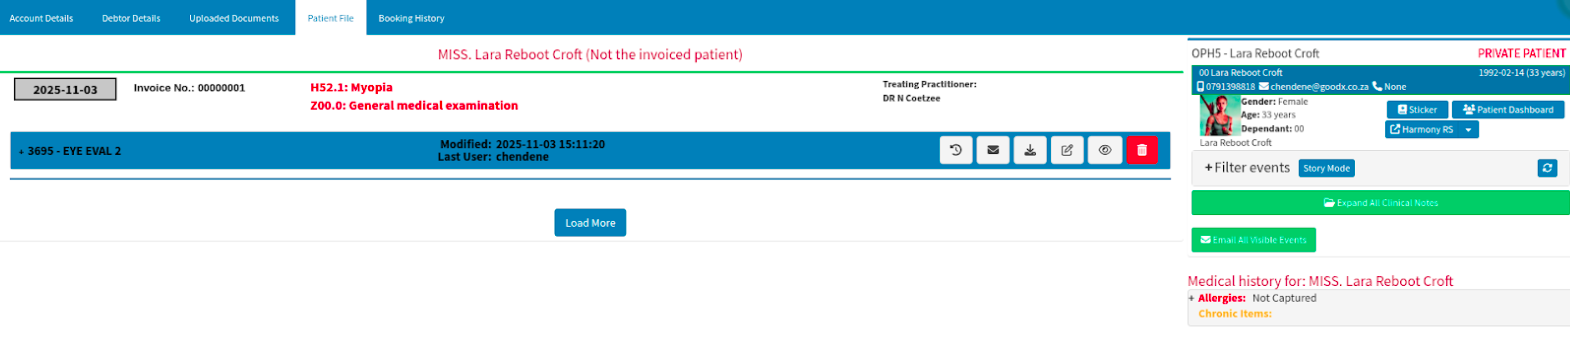
If you use a single click to select the desired debtor, a new panel view will appear. From here, navigate to the “Clinical” button on the right side panel, and then select the “Patient File” tab on the top panel. This will reveal a side panel containing quick-access buttons, including the patient dashboard feature button.
If you double-click on the desired debtor, a new window view will open. From this view, navigate directly to the “Patient File” tab on the top panel to reveal the side panel containing the quick-access buttons and the patient dashboard feature button.
How can the Eye Eval 2 form be managed?
The patient's history can be configured to copy forward automatically, or you can choose to manage this via manual selection. This clinical information will always copy forward between sequential follow-up consultations.
Manually copy forward history
By selecting a specific date from the form history, the completed information recorded on that day will populate directly into the current form you are working on. This historical data can continue to copy forward automatically until you choose to change the setting.
The clinical findings from the previous examination on that selected date will be copied forward. Please note that even when this historical data is brought forward, any images and notes can still be cleared, edited, or completely removed. This ensures you can easily update the record if changes are observed or if new information needs to be noted alongside the copied data.
Automatically copy forward history
To configure the system to copy information forward automatically, you can review the setup directly within the specific active workflow event. Simply ensure that the correct template form is selected from the available workflow events.
Each section of the form will be visible as a distinct subsection that can be selected for automatically copying forward previously saved information. By ensuring the “copy forward” option is enabled on the relevant fields, the system will carry the data forward for the practitioner to review and edit where required.
These configuration settings become visible after selecting the blue “Toggle Mode” button, which reveals the custom options available for that specific form's sections.
Custom pills to the Practitioner’s workflow
A wonderful feature of the system is the extensive functionality that a pill can hold. The pills visible within the template sections can be linked not only to ICD codes but also to your most frequently used medicine combinations based on the clinical evaluation in progress. The customisable suggestions that can be linked to a pill are highlighted below.
These pills function similarly to a billing macro, where selecting the pill will automatically populate the linked medicines and ICD codes configured in accordance with the workflow event template. The pill name itself serves as a quick identifier of these linked components.
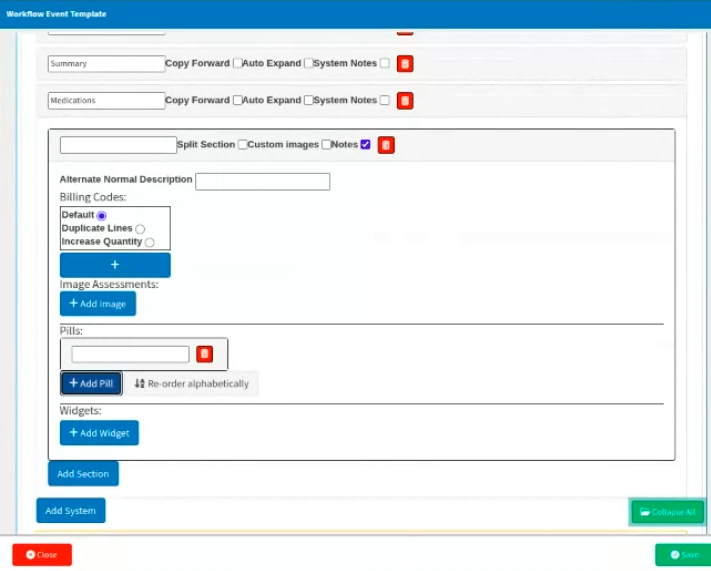
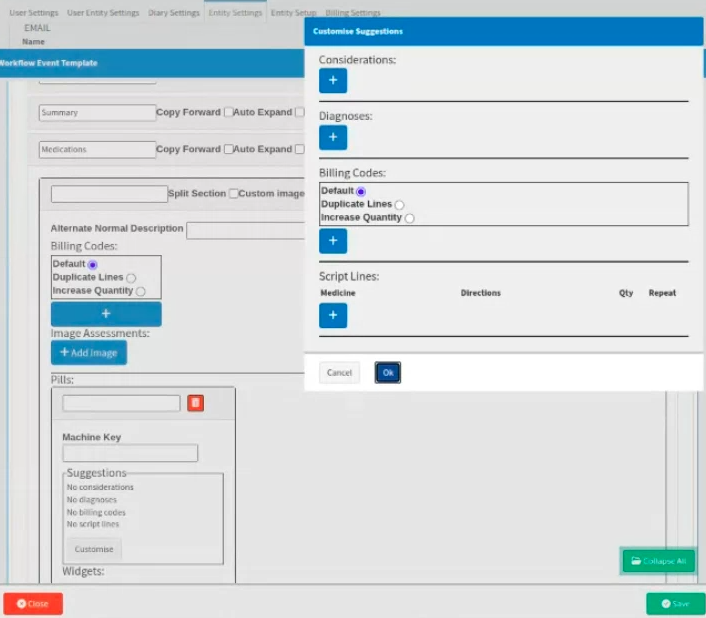
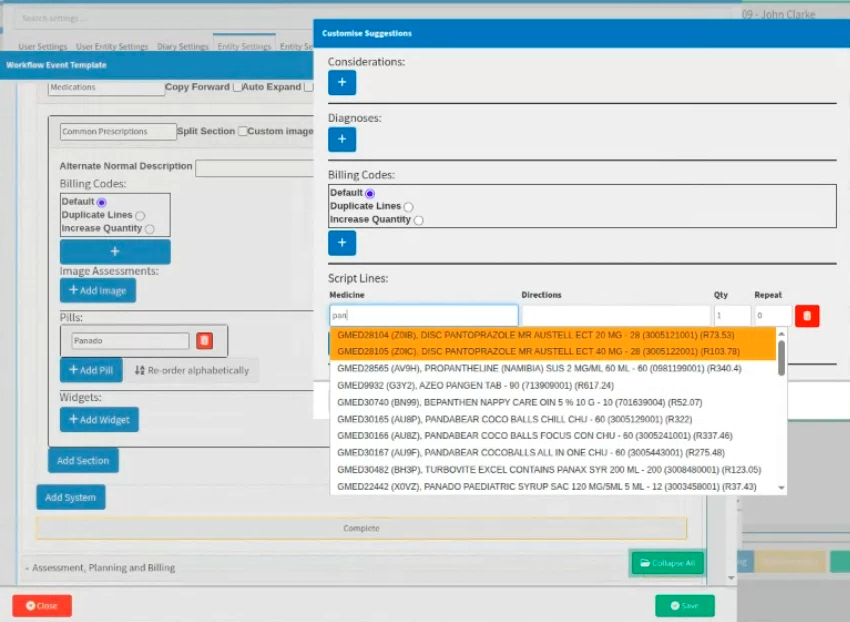
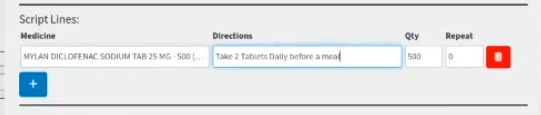
Example of a custom pill: “Common Prescriptions”
For this example, the pill name would be “Common Prescriptions,” featuring a shorthand list of the medicines under the pills section. A more detailed selection of the specific medicine to be linked to this form is highlighted below, followed by an example of the clinical directions to be completed for the added medicines.
The medicines, along with their clinical instructions, will be visible within the "Medicine" section of the form, directly above the proposed billing line items to be invoiced.
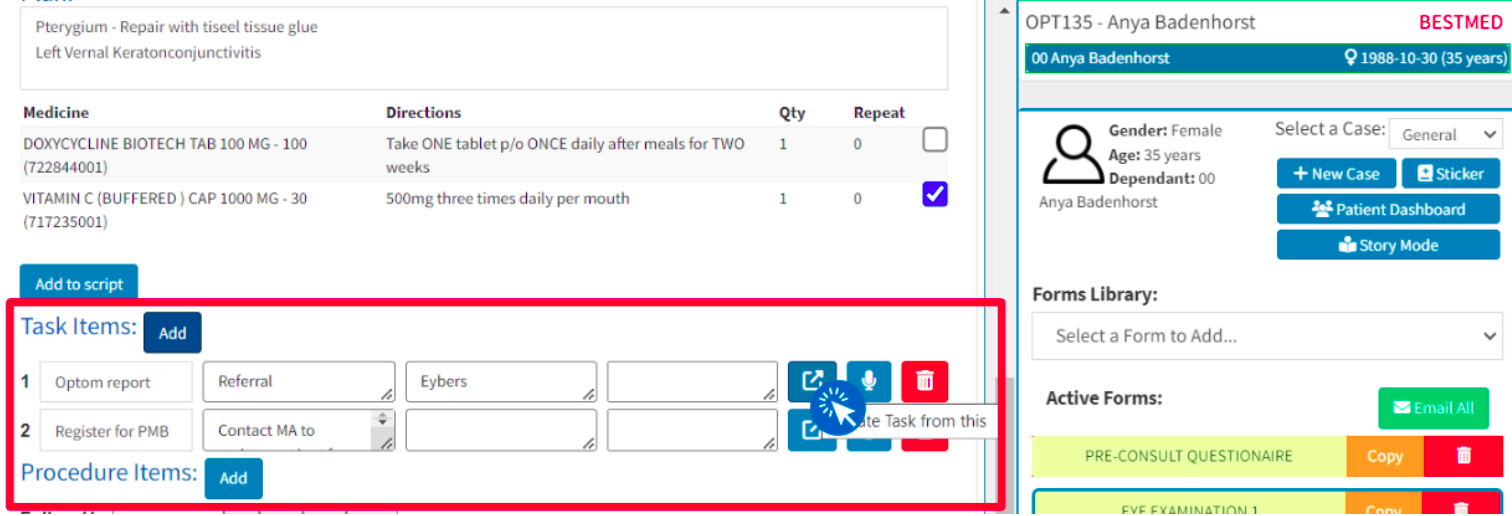
Example of creating a task from your examination clinical form
Where your practice needs a representative to complete additional tasks, you can create these tasks directly from the Eye Evaluation clinical form. After the details have been added, remember to select the “pop-out icon”—which displays the hover message “Create Task from this”—to generate the task and assign it to the relevant practice representative for completion.
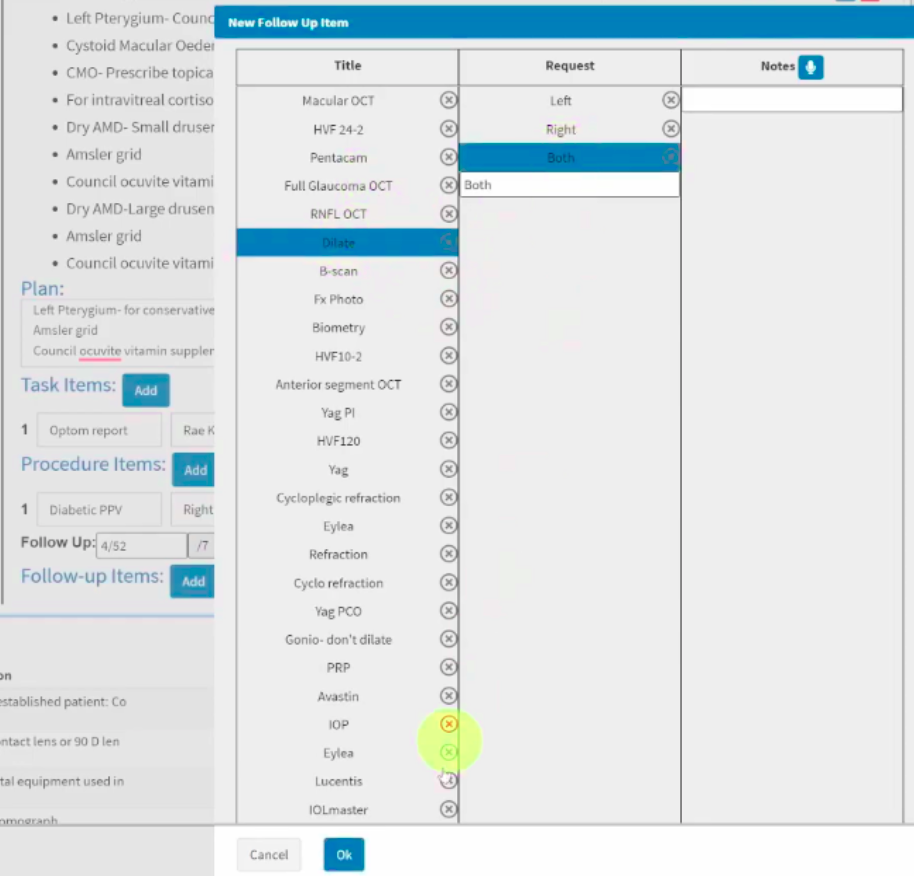
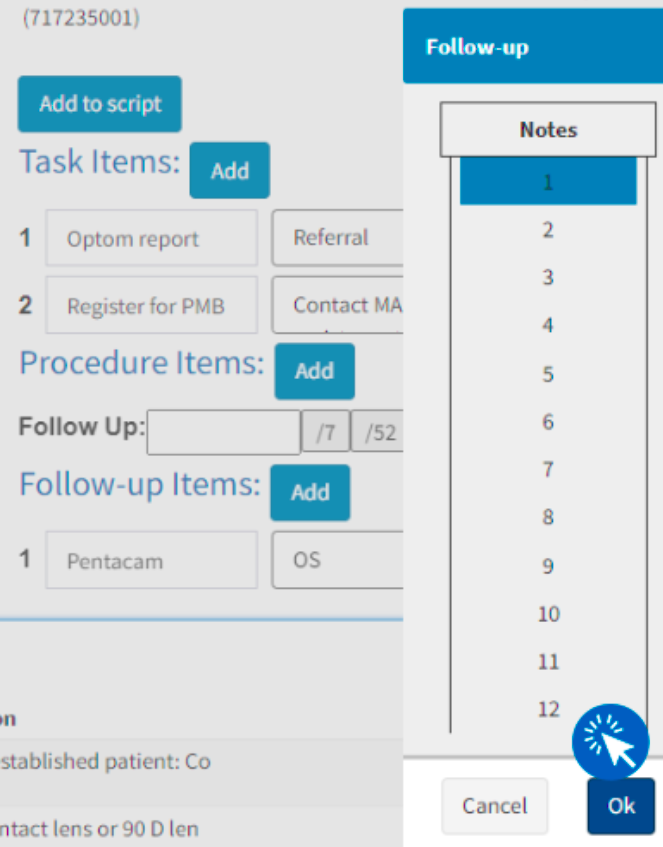
Example of follow-up periods
The number selected represents the exact interval of days, weeks, or months after which the patient must return for their follow-up. You can also choose to add specific procedures or the type of review needed for that next scheduled visit, serving as a helpful clinical reminder to your future self.
You can ensure a follow-up is clinically noted by scheduling it according to the following standard shorthand conventions:
/7 (Days)
/52 (Weeks)
/12 (Months)
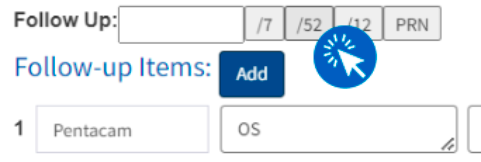
Example of follow-up self-learning items
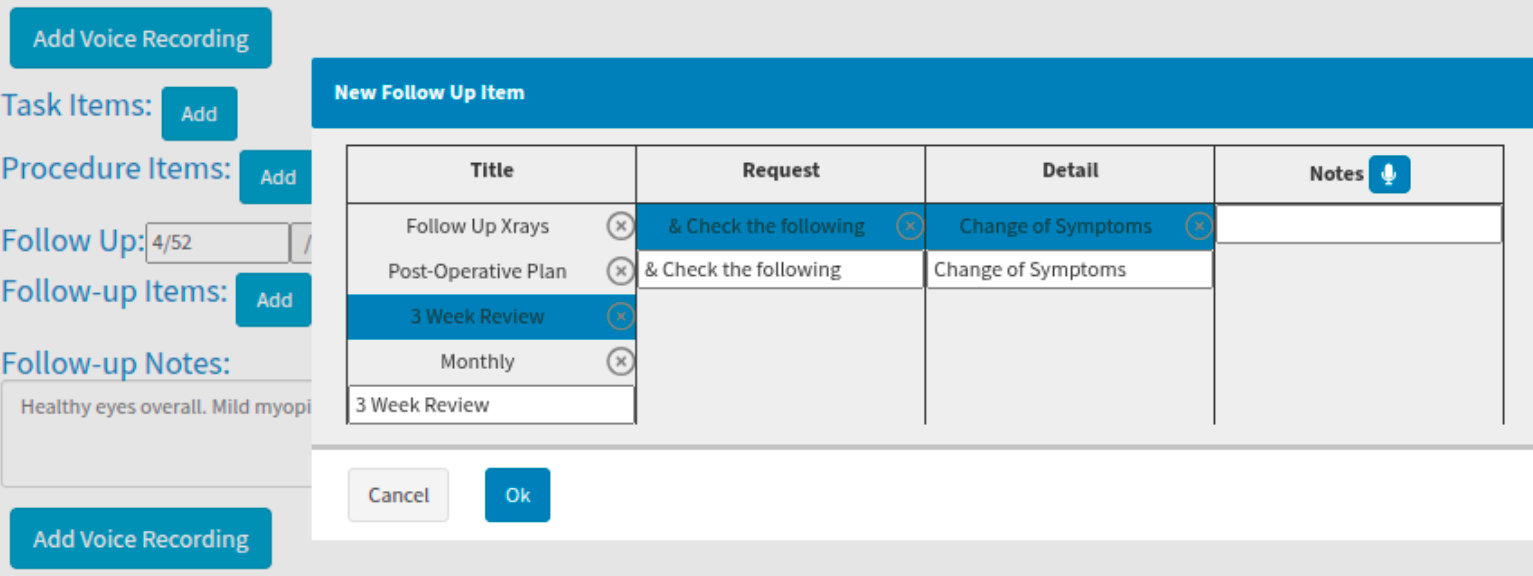
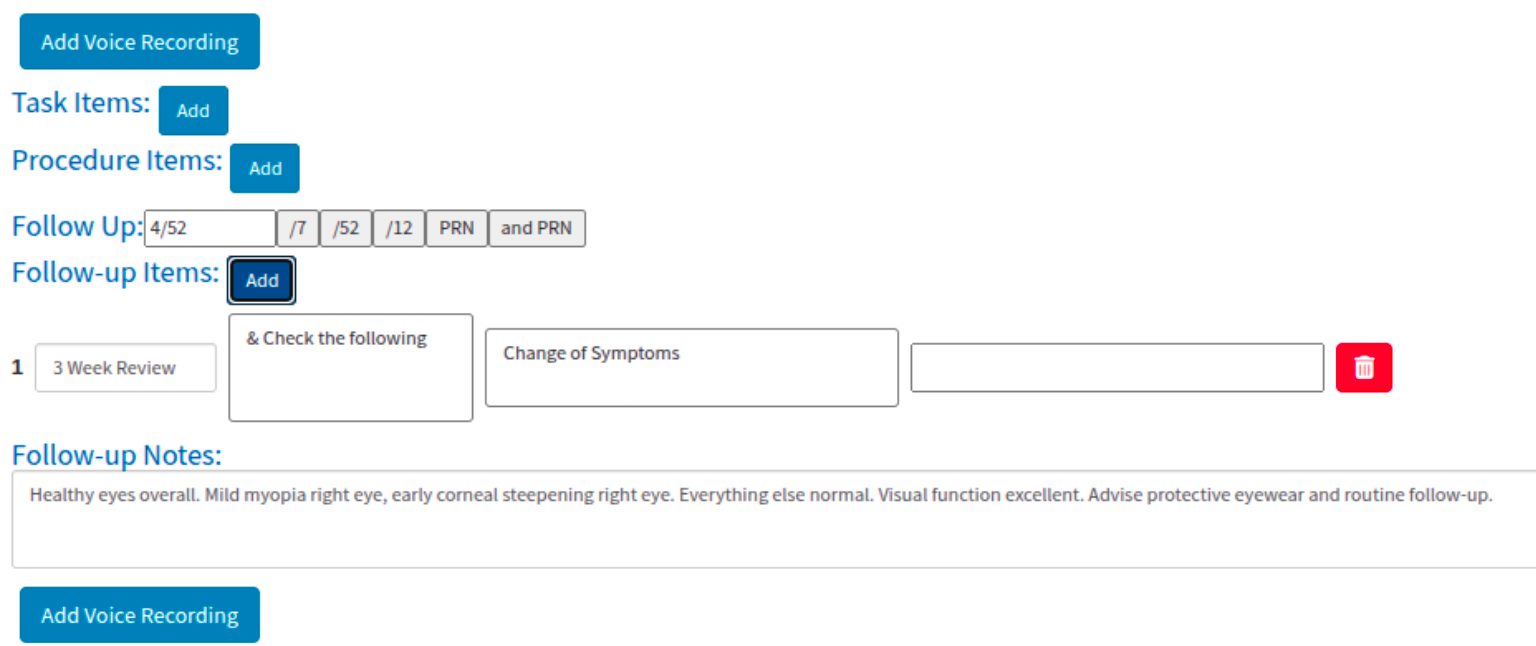
The example below reflects a follow-up scheduled for week 4 (using the /52 week yearly cycle convention), along with the specific notes on what should be reviewed based on the highlighted information above. This detail can be viewed at a glance within the clinical notes' story mode.
How is a Sick Note generated from an active clinical form?
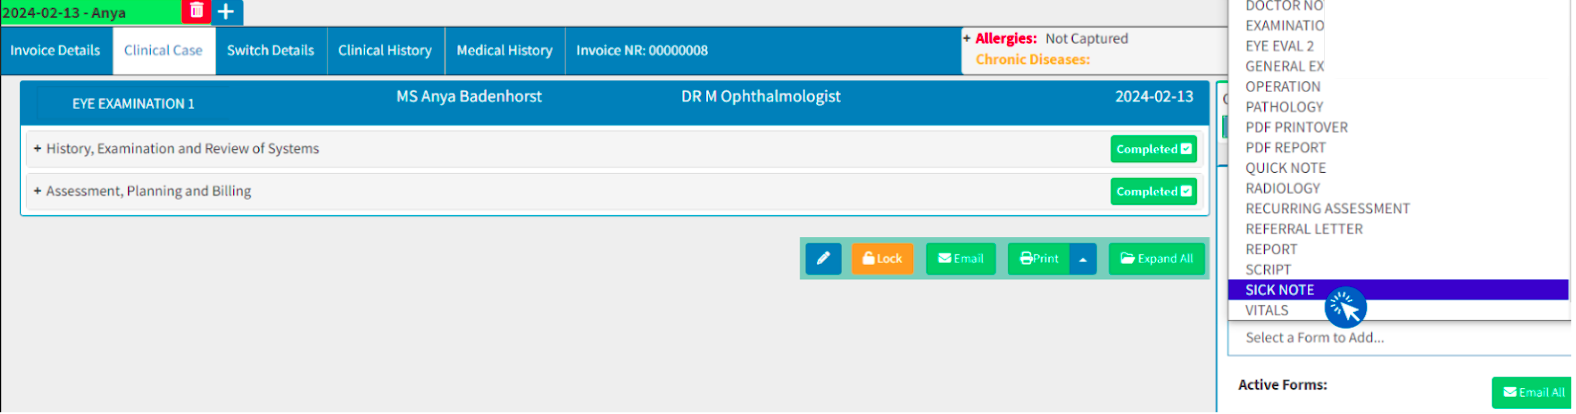
While you are actively completing your examination, you may need to work on an additional form or aspect, such as creating a sick note for your patient. Additional forms can be added at any time and will be reflected under your “Active Forms” side panel.
All available form types are listed within this scroll menu. If you have pre-existing templates, they can be selected from the dropdown menu of that specific form type (e.g., the “Sick Note” clinical form type). Please note that a template can only be selected after you have indicated which form type you intend to use.
Due to the current Protection of Personal Information Act (POPIA), certain details can no longer be automatically populated, though the underlying functionality remains available. When you select the "Sick Note" form type, the ICD-10 codes captured from the linked Eye Evaluation form can display on the sick note for your clinical review and discretion. If the information is correct and you wish to include these codes on the final document, you may select the "Add Diagnosis To Printout" button to apply them to the sick note. However, this action remains entirely at the practitioner's discretion to ensure full compliance with POPIA regulations.
How is a Reference Letter generated from an active clinical form?
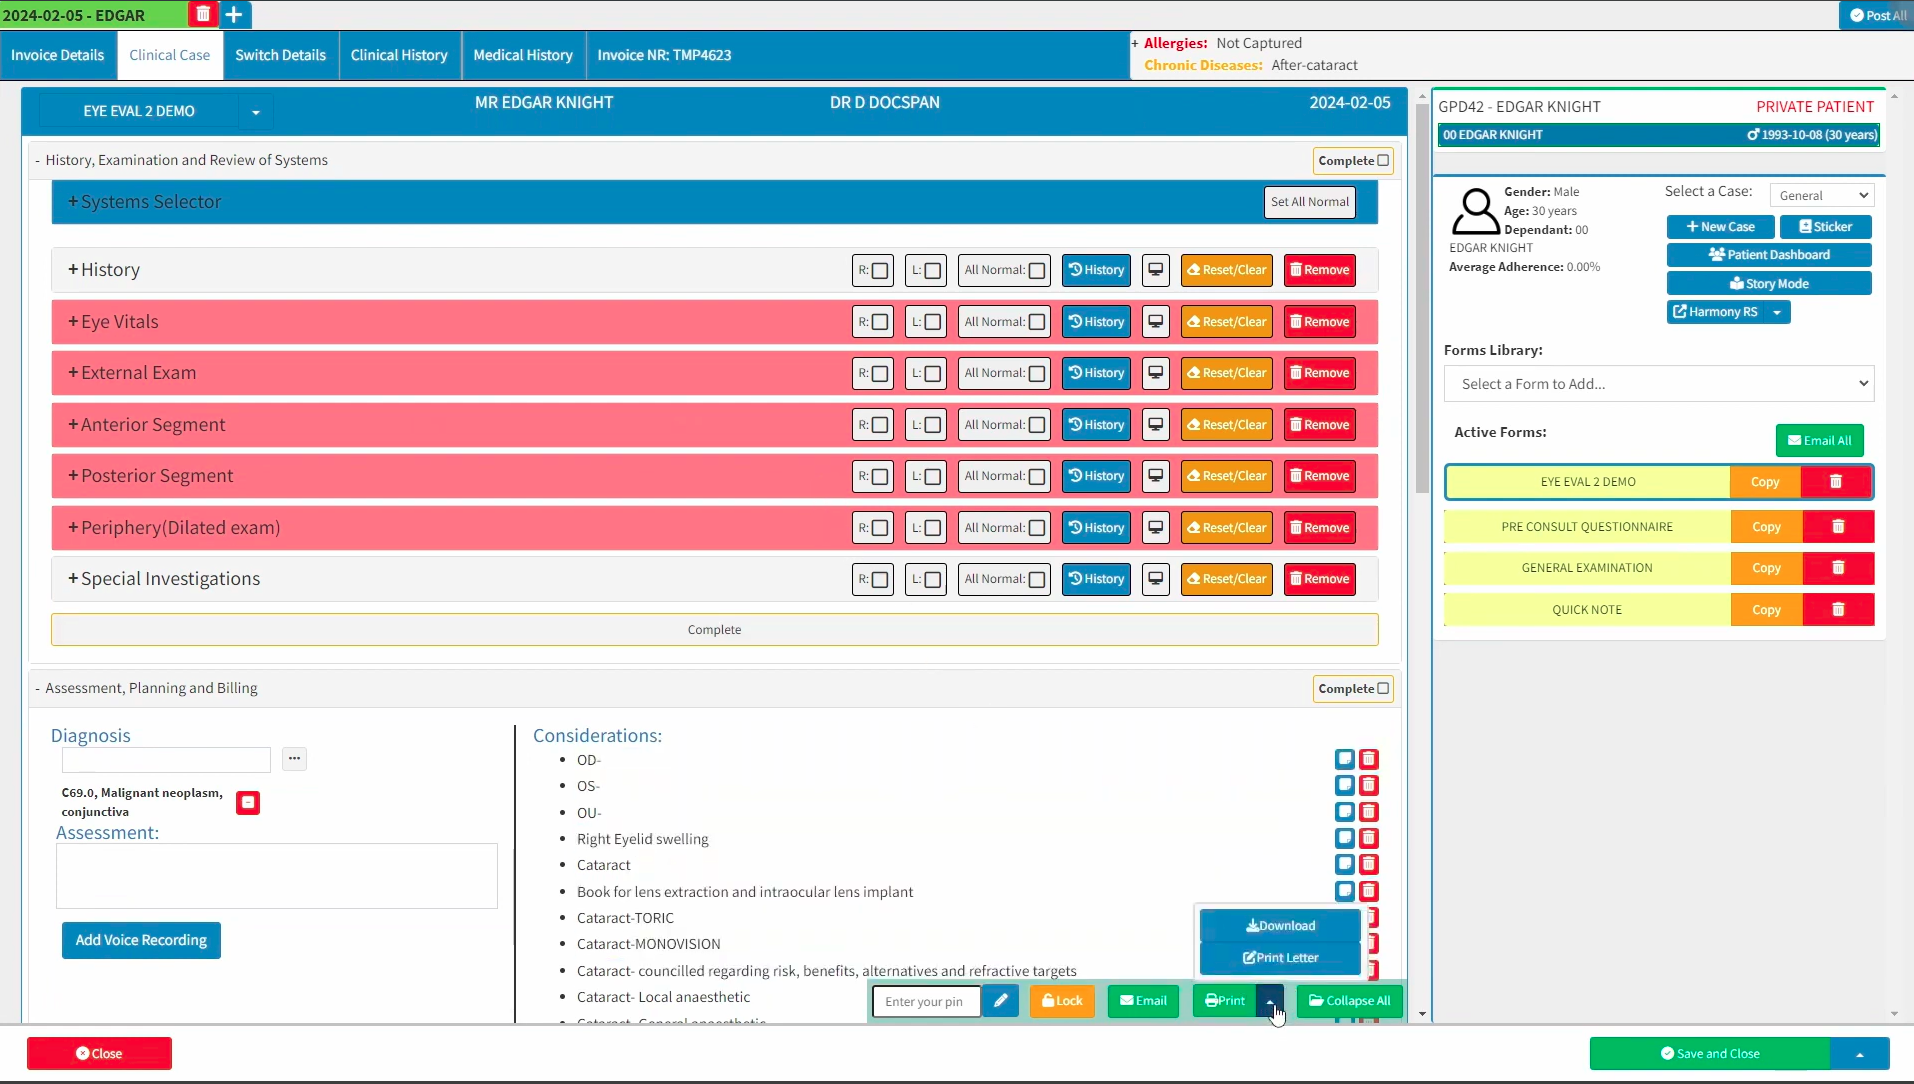
At the end of your examination, if it is determined that your patient must be referred to another practitioner, you can print a referral letter by selecting the upward menu to reveal the “Print Letter” option. Once selected, the system will prompt you to confirm the specific letter template you wish to use.
This letter will automatically include information from your examination, completely eliminating the need for duplicating your work.
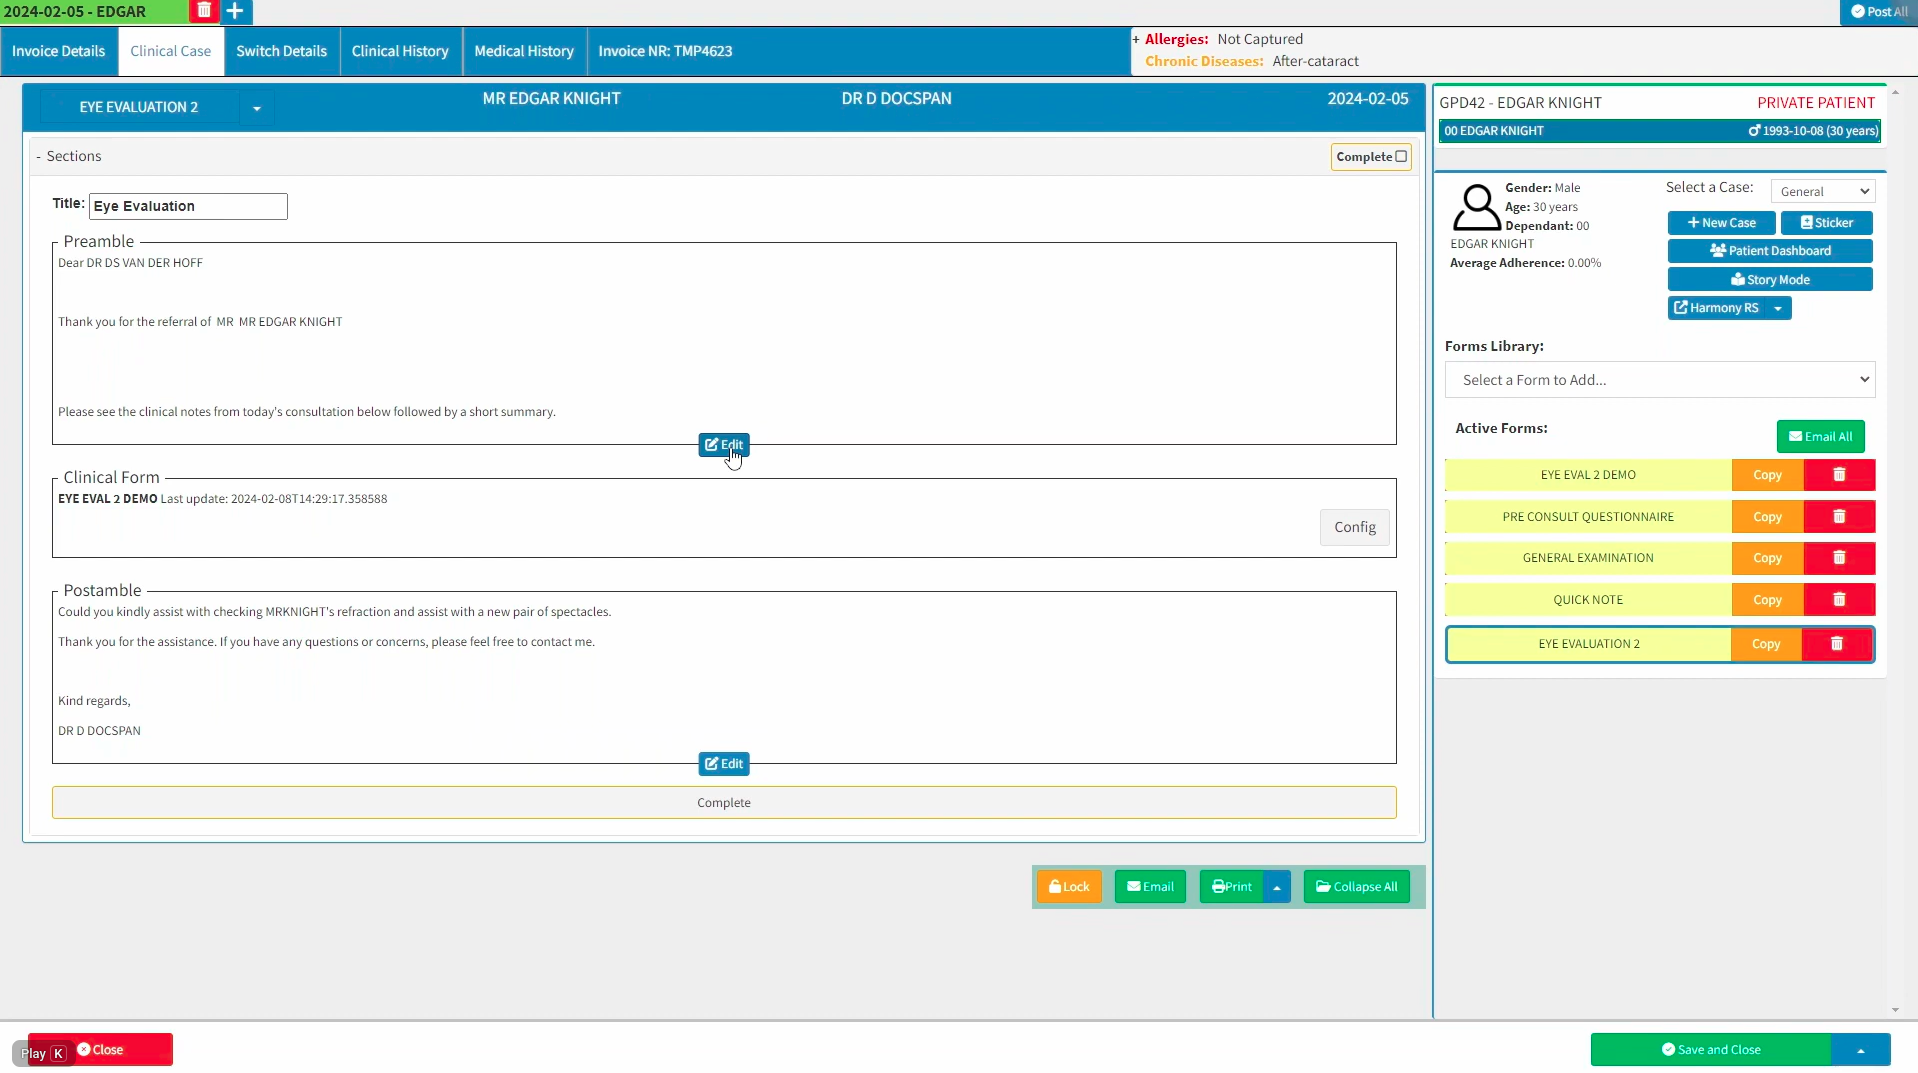
The letter will auto-populate the predefined clinical data, meaning the practitioner only needs to review the information carried across to ensure it is fully in line with their diagnosis and clinical intentions.
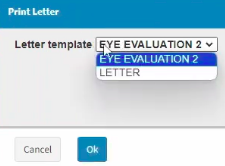

Where template changes need to occur, the dropdown menu can be accessed to reselect an entirely different template. Alternatively, the text areas can be edited directly to ensure the correct tone, context, and general information are conveyed exactly as intended by the practitioner.
Once you are satisfied with the letter, the document can be printed to a physical printer, or saved as a PDF to be emailed as an attachment to the relevant party.
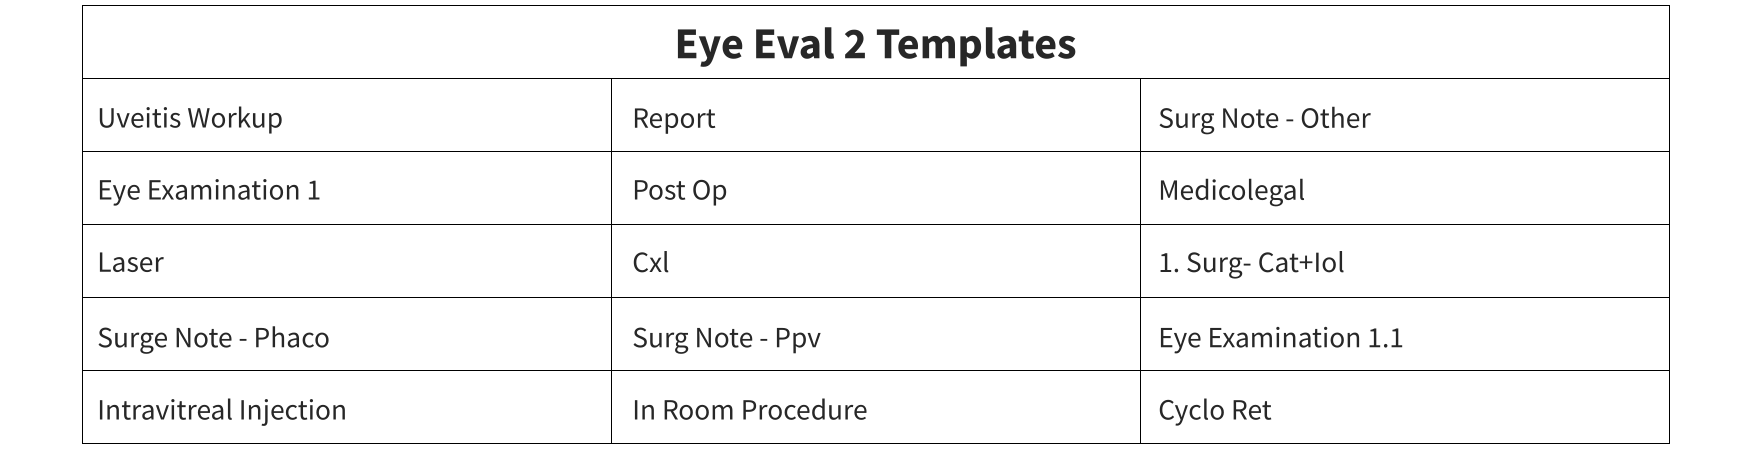
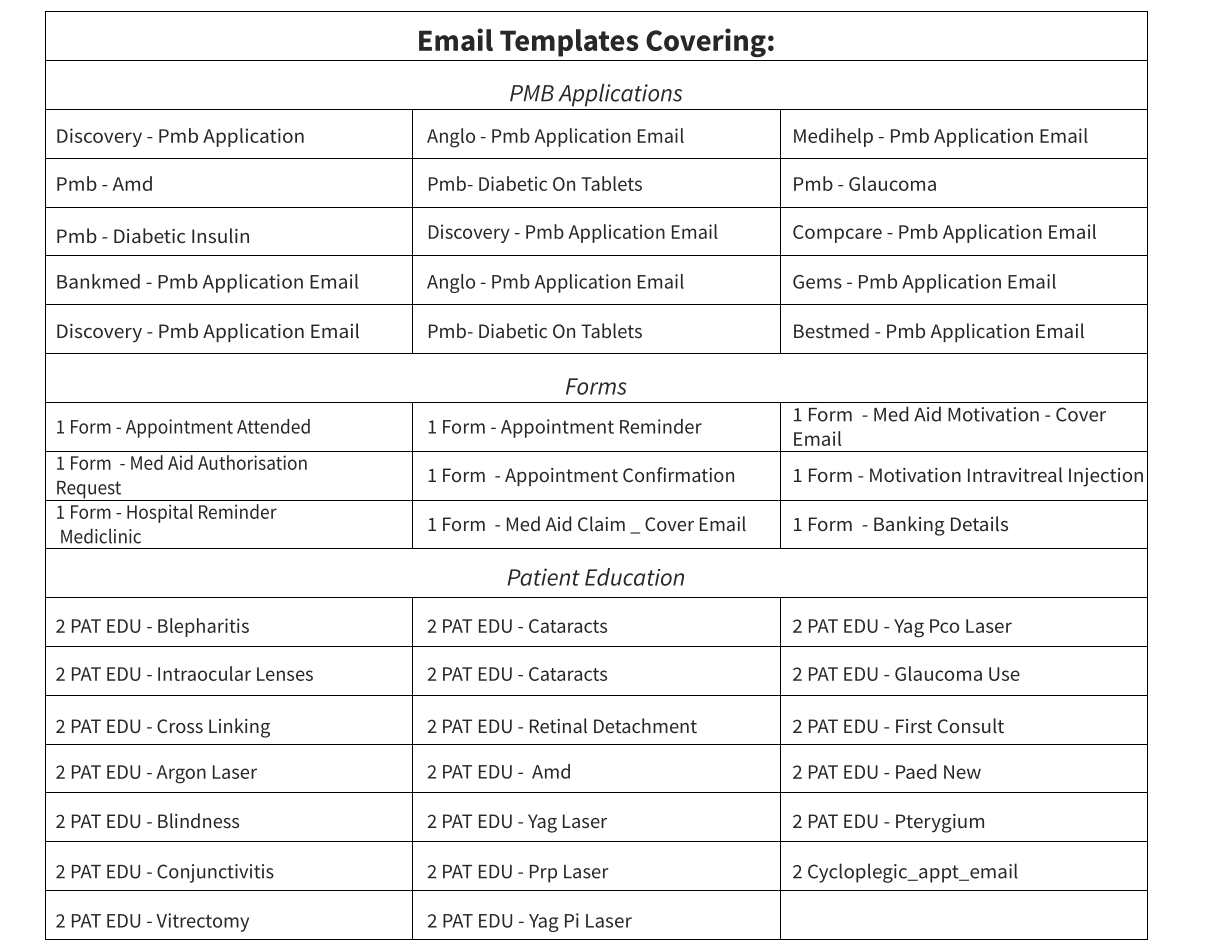
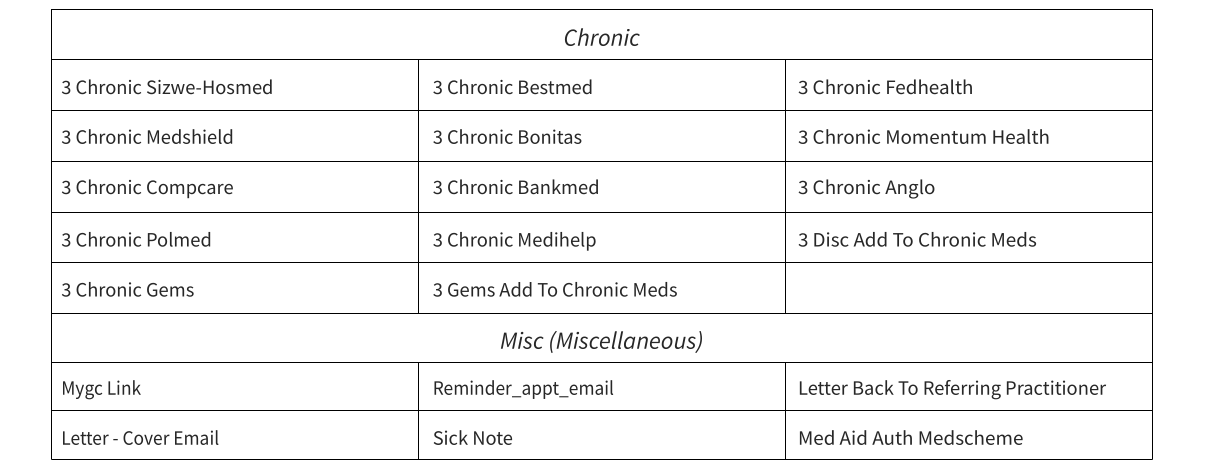
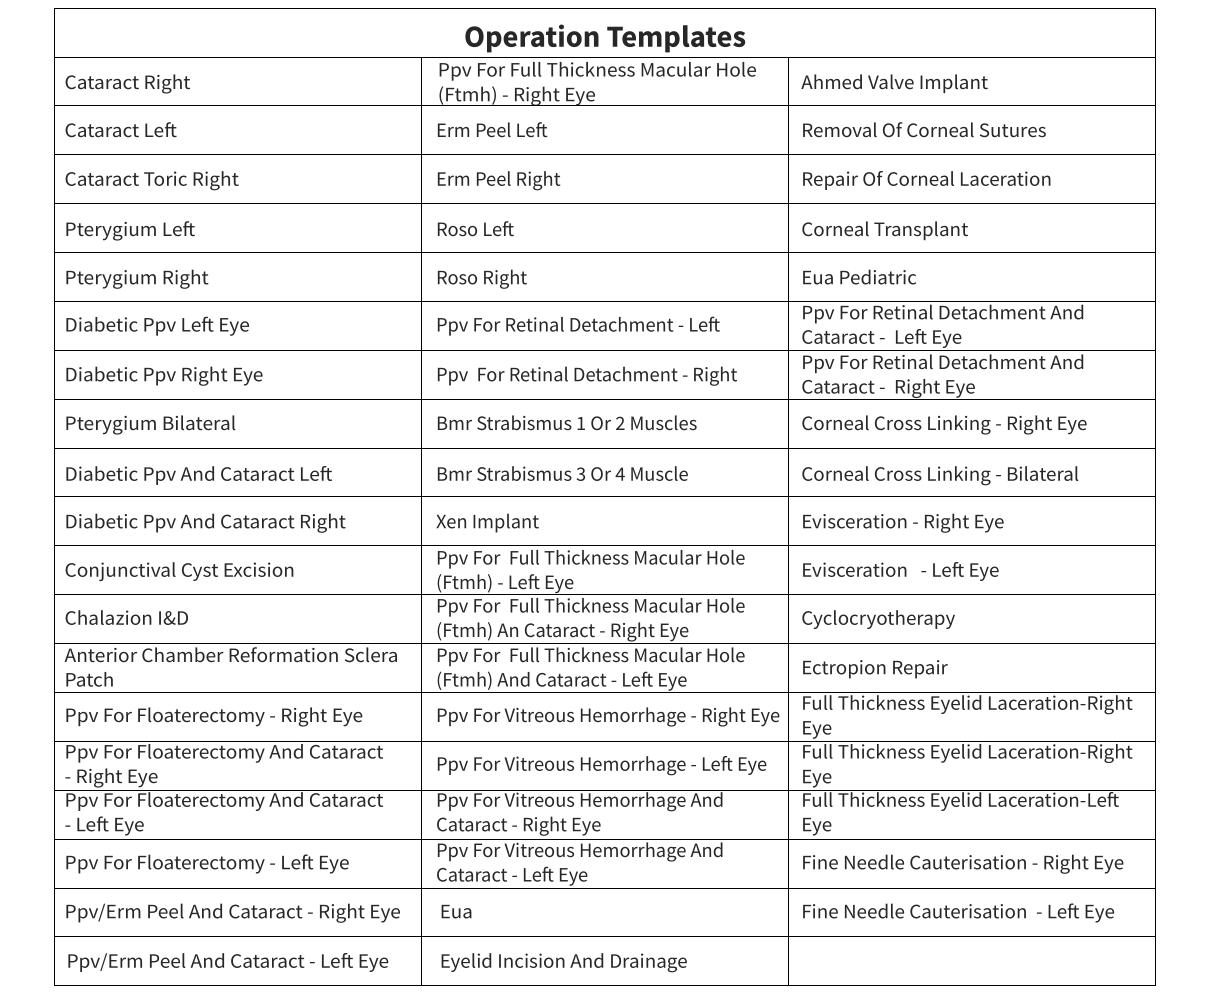
Does the Eye Eval 2 form have special access to other form templates?
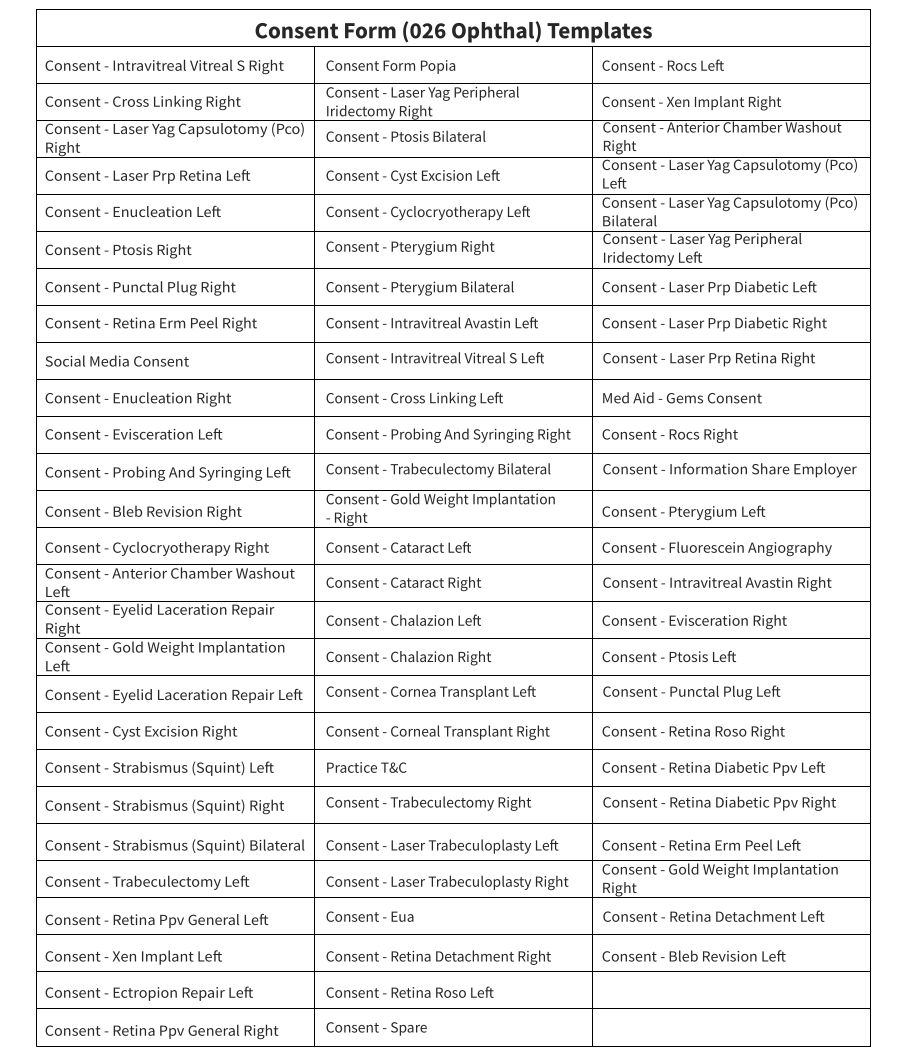
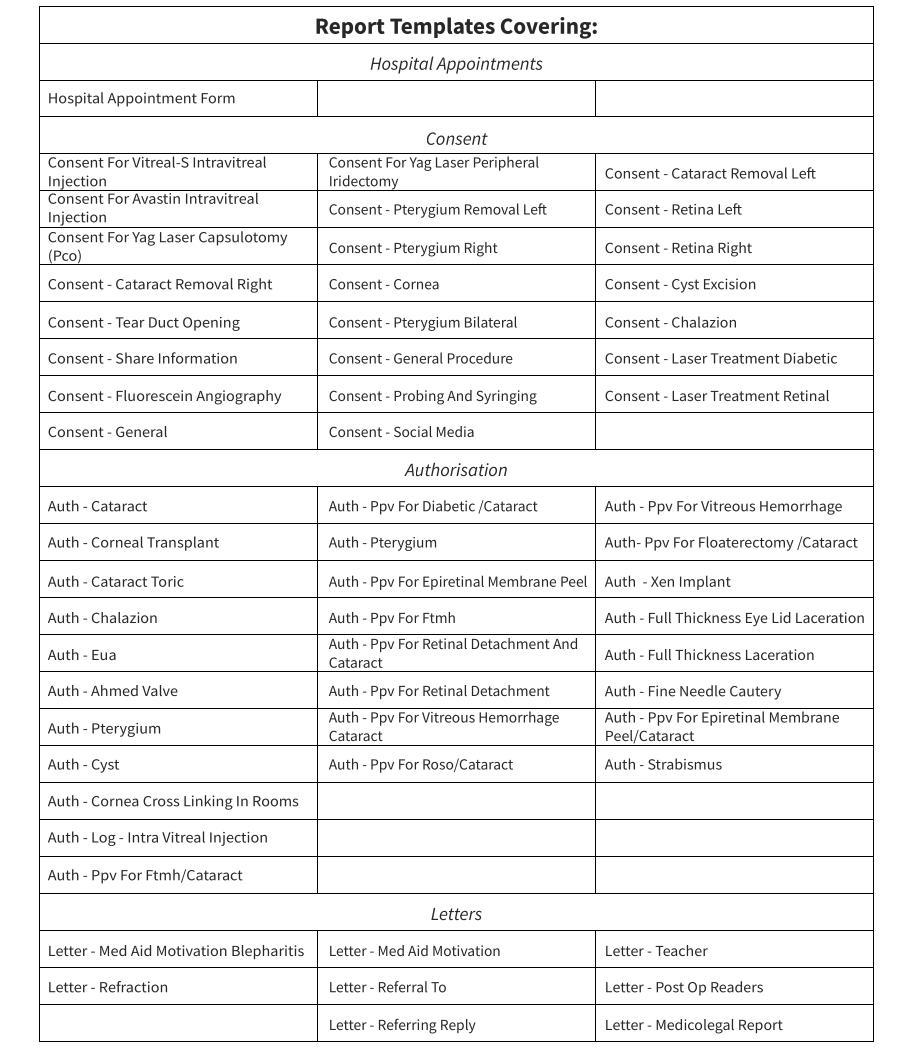
Yes! When you choose to make use of the Eye Eval 2 form, you have the option to import these templates as well, along with the ability to implement PDF Printovers.
Please note that the templates listed below are intended as guidelines and should be customized to suit your specific practitioner and practice preferences. These templates may also change or update over time.


What development is expected around the Eye Eval 2 forms and interface?
GoodX is committed to continuously striving for the most efficient and effective workflows for you and your practice, allowing practitioners more time with their patients and families.
One of the exciting new development aspects on the way is an internal interface designed to allow images and integrated machine information to populate directly within GoodX forms based on your completed setups. This integration will also allow these images to be visible on patient dashboards, reflecting critical information at a glance.
Where to learn more about Eye Eval 2 & Harmony for Ophthalmologists within GoodX:
The GoodX Click&Learn Courses https://courses.goodx.co.za/
The GoodX YouTube Channel https://www.youtube.com/@GoodXSoftware
The GoodX Learning Centre https://learning.goodx.co.za/
Please note these courses are only modules and are different from the Click&Learn courses. To learn more about Eye Eval 2 & Harmony for Ophthalmologists, you can apply these search terms:
| Date of Change | Changes | Editor |
| 2026 05 17 | Established Page | Chendene Barnard |