Text size
Line height
Text spacing

What is the “Smart Stickers” feature?
Smart Stickers serve as clinical protocols designed for the rapid identification of essential patient care and priority details. These indicators are configured to provide a clear, at-a-glance overview, ensuring that critical information is immediately visible to facilitate effective and safe patient management.
Smart Stickers enable practitioners to establish formal medical guidelines that outline specific clinical processes. These protocols are designed to guide the investigation of particular findings or dictate the appropriate methodology to follow based on a specific patient scenario or diagnosis. By implementing these guidelines, the practice ensures a standardized approach to care that is triggered by the patient's unique clinical presentation.
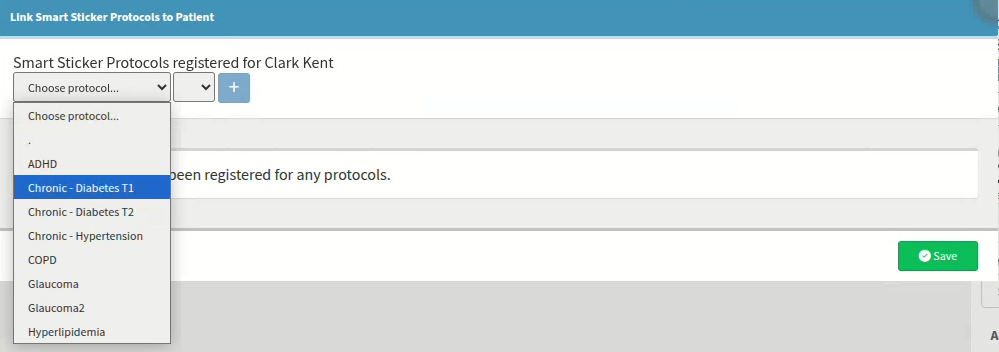
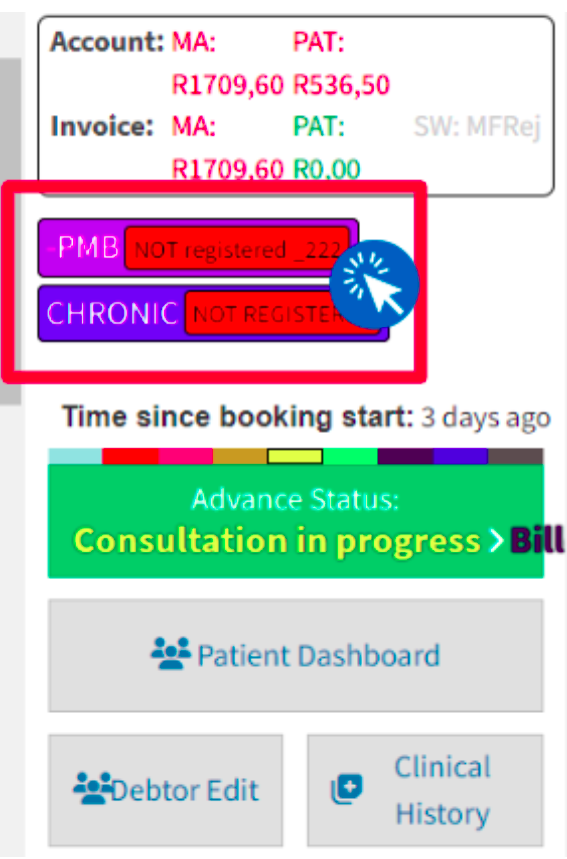
Smart Stickers facilitate the use of bespoke treatment plan reminders and progress tracking, as well as the delivery of personalized plans and communications directly to the patient. These stickers can be configured to trigger an automated alert based on specific ICD-10 codes recorded, or they can be manually assigned to a patient's record. To apply a sticker manually, navigate to the clinical screen and select the "Sticker" button located within the debtor clinical interface.

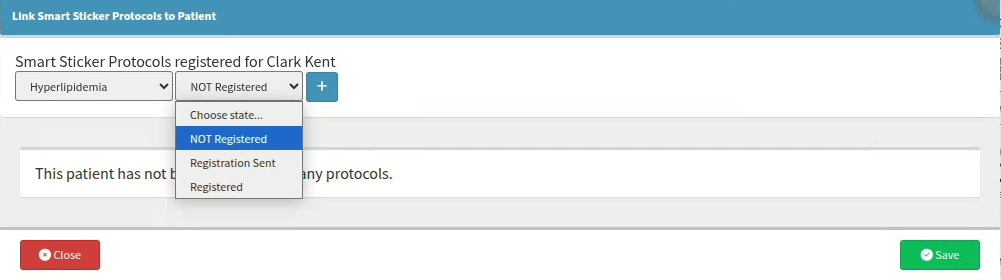
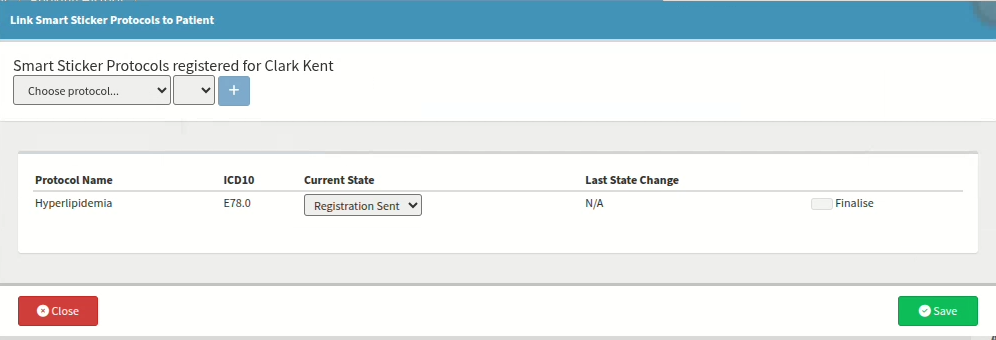
The dropdown menu provides access to all previously configured protocols and their associated statuses. Once the relevant options have been identified, selecting the "+" icon will assign the protocol to the current patient's record. It is essential to select "Save" to ensure the protocols are successfully applied, as selecting "Close" will exit the screen without retaining any of your selections.
Similarly, any sticker protocol can be finalised to conclude the process and end any associated communications or tasks linked to it. When you initiate this action, the system will prompt you to confirm the finalization; if this confirmation is not provided, the protocol will remain active and the action will not be completed.
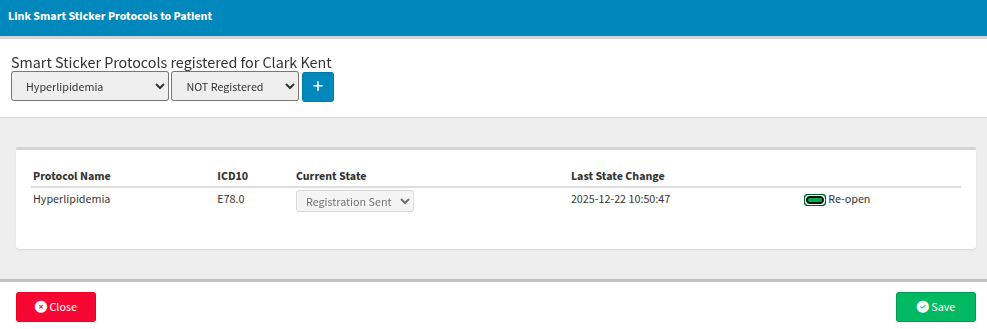
Should the protocol be required again in the future, it can be re-enabled by selecting the "re-open" option. You will receive a system prompt requesting confirmation to re-open the protocol; the action will only proceed once confirmed. After re-enabling, please ensure that the correct status is selected to accurately reflect the patient's current clinical needs.
What is a “Smart Stickers” feature status
The status function serves as a sub-selection within the Smart Sticker protocol feature, providing a clear indication of the protocol's current stage at a glance. For example, this can be utilised to update a PMB protocol status from “Not registered” to “Registered,” ensuring the patient's progress is accurately reflected.
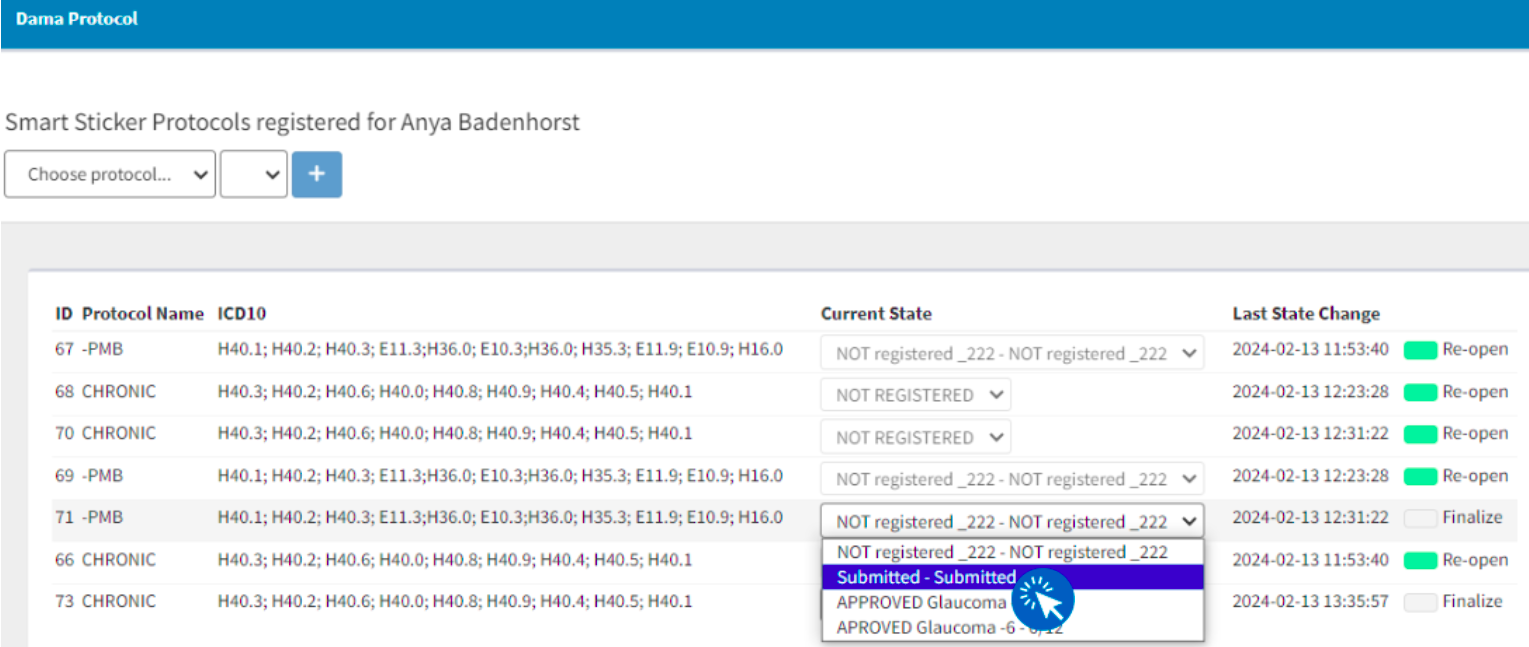
By selecting the relevant sticker, you will be redirected to the Smart Sticker Protocols page, where you can view a complete list of active protocols for that patient. From this screen, the updated status for a specific protocol is selected using the drop-down menu of the desired active entry.
These statuses can be automatically applied based on the practice’s predefined protocol conditions. Alternatively, when specific actions must be performed by the practice team, the status can be manually updated as the agent completes each designated task. It is important to note that failure to manually update the status will prevent the protocol from proceeding, as the system requires this input to recognize that the task has been finalized.
It is possible to have multiple sticker protocols assigned to a single patient. These active sticker protocols are clearly visible directly on the patient dashboard.
When new protocols are added rather than updated, the full history of protocols remains visible simultaneously. Please note that while these protocols cannot be filtered at a patient level, a report can be generated to provide a comprehensive overview of all smart sticker protocols across the practice.
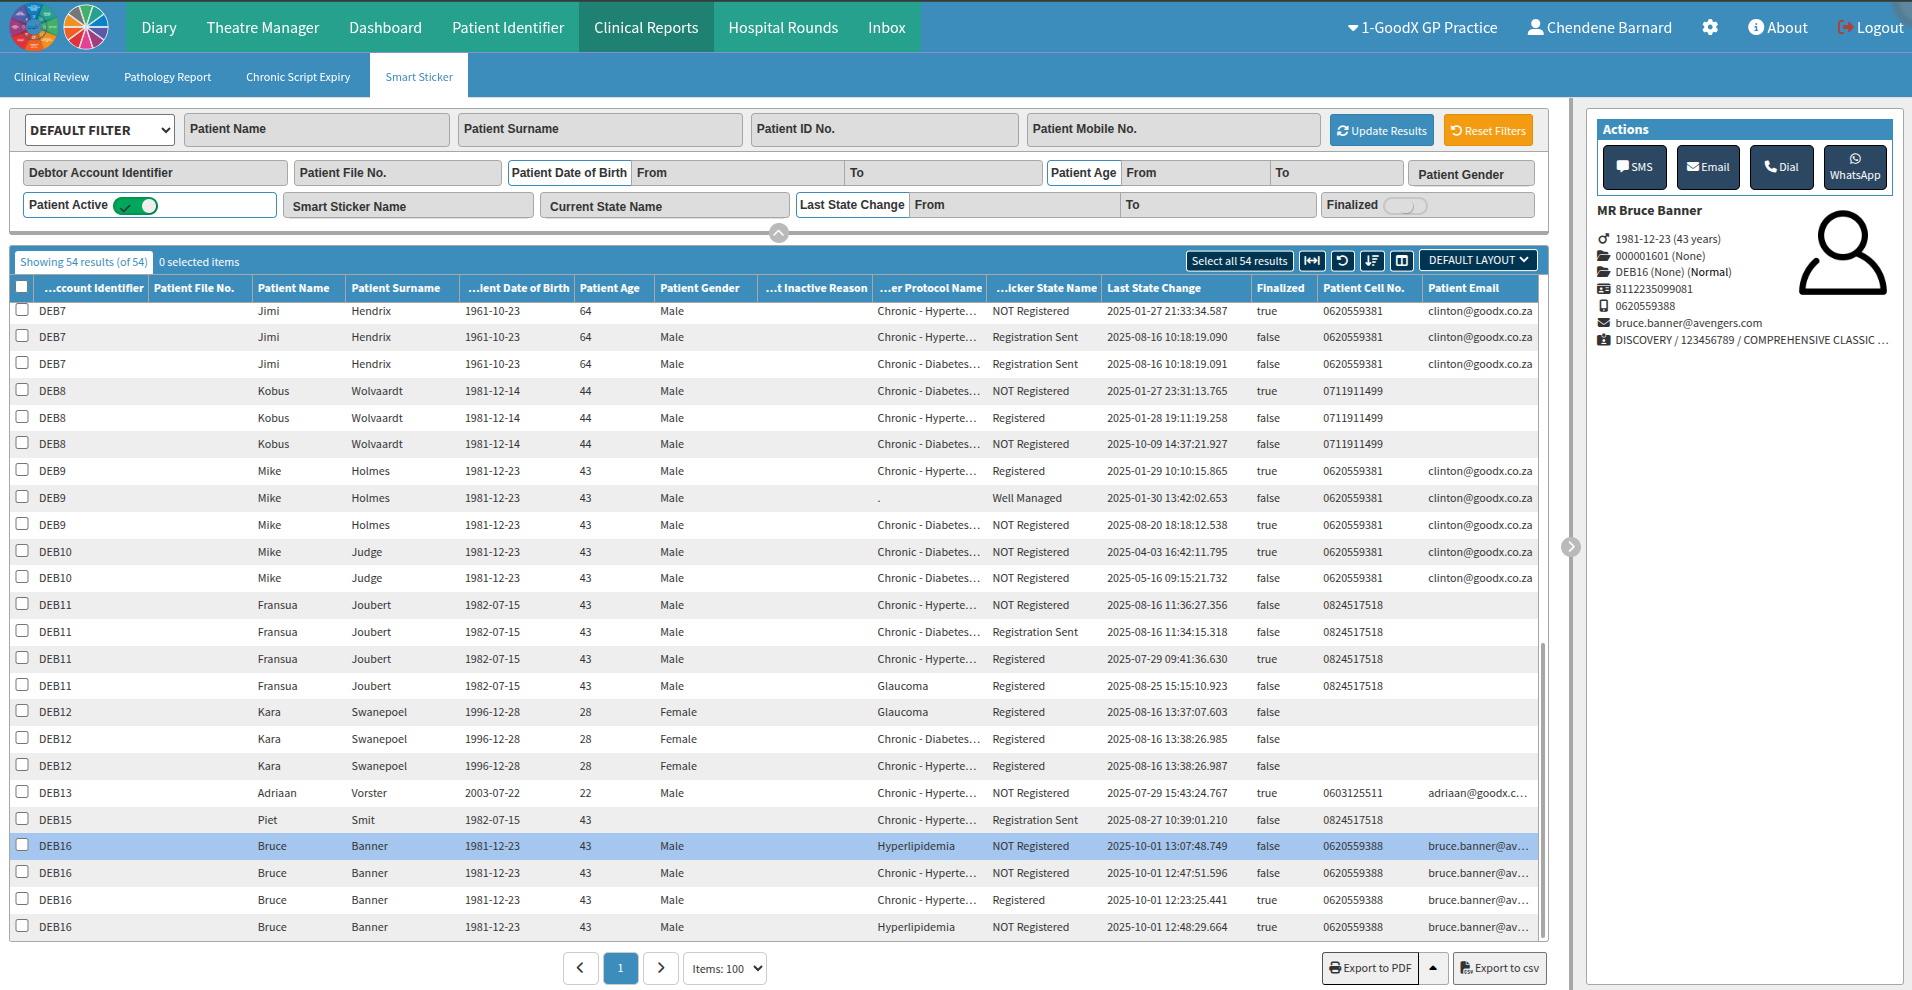
Are there “Smart Stickers” feature reports?
From the GoodX wheel, select "Reports" and navigate to the "Clinical Reports" tab. Within this section, locate the "Smart Sticker" sub-tab, which allows you to filter, view, and manage protocols according to your practice requirements. All these protocols can be compiled into a report, enabling you to send the desired communication directly to the patient from the report screen.
How are the “Smart Stickers” feature set up?
The Smart Sticker feature can be configured by creating protocols tailored to your practice’s specific requirements. These protocols are added by selecting the GoodX navigation wheel, choosing the "Configuration" option, and navigating to the "Smart Sticker Setup" tab.
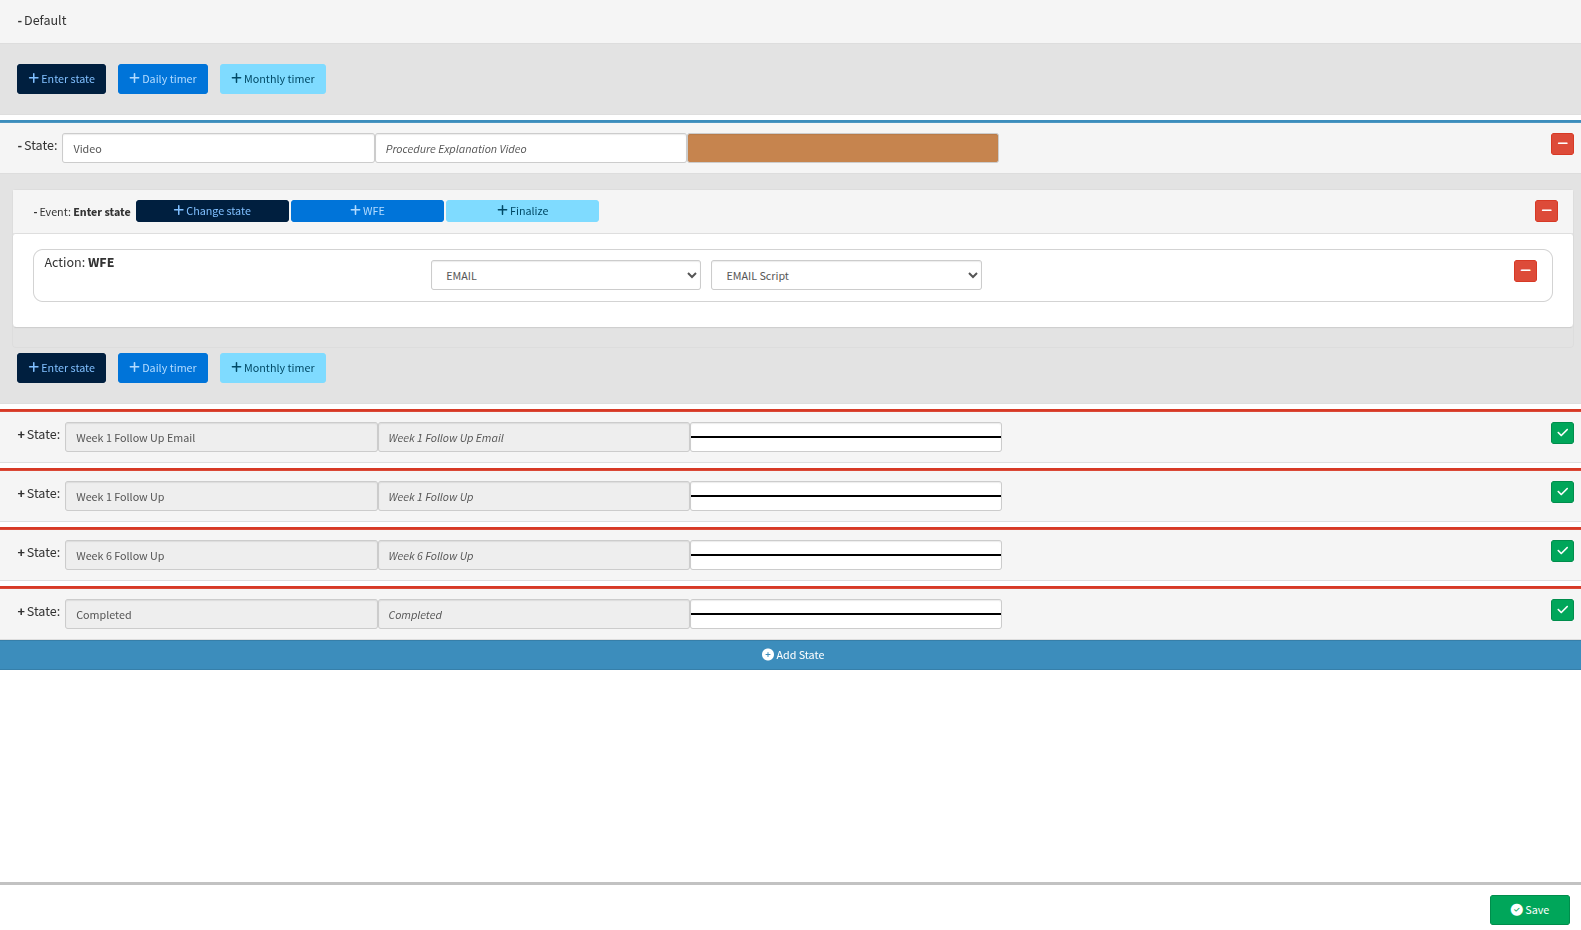
A sticker state must be defined before the protocols can be saved. These states typically represent what you require your patient to receive, review, or be informed about at predefined intervals or based on set conditions. Furthermore, these states can function as trackers for processes such as PMB applications, payment plans, or similar scenarios involving multiple sub-stages.
Once the protocol is selected, a new window will appear where the envisioned protocols and steps can be added. It is important to ensure that all workflow events, including templates, tasks, and questionnaires, have been designed and completed beforehand.

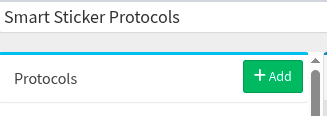
From this screen, you can incorporate the preferred protocols based on your practice requirements by selecting the “+ Add” button. A blank protocol will be provided, allowing you to define the specific requirements for your practice.
The protocol name serves as the primary identifier, allowing the key aspect of the protocol to be recognized at a glance. The description is used to briefly explain the purpose or specific details of that identifier. It is recommended to keep both the name and description as concise as possible, as this information is reflected directly on the patient profile for quick reference.
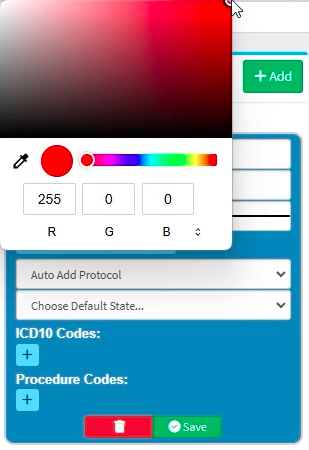
Smart Stickers can be easily identified or grouped by colour to improve visual organisation. By default, the colour selector displays a box with a line through it; selecting this box opens a colour picker from which you can choose your preferred shade. Once you click outside the colour selector, the chosen colour will be saved automatically as the preferred setting for that protocol.
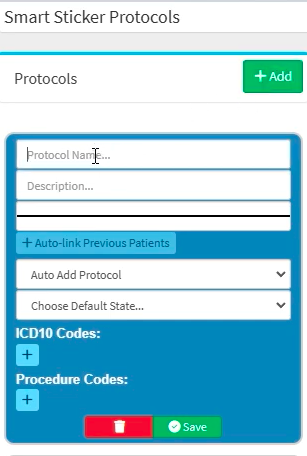
These protocols can be configured to "auto add" based on the ICD-10 codes used, or to trigger a pop-up prompt whenever a specific ICD-10 or procedure code is utilized. Care should be exercised when linking these codes, as the prompt will appear with every application of that code across all patients.
What are the core ideas which should be known before deciding on the “Smart Sticker” protocols?
It is recommended to review your practice's requirements and identify which communication processes can be automated. To ensure you have fully prepared the necessary content, it is advisable to draw a mind map detailing what information patients should receive and the specific timelines for each interaction. Use these insights to assign unique and clear template names, ensuring that the protocols accurately reflect the intended information and deliver the expected communication.
These protocols can be utilized to communicate disease awareness on a weekly or monthly basis depending on the practice’s needs, or based on the ICD-10 codes used during billing. In accordance with your protocol setup, billing can trigger an automatic reminder to add the relevant sticker protocol.
Please bear in mind that the pop-up will appear each time the linked code is utilized. Alternatively, unique trigger codes can be created specifically for scenarios where you require the associated processes to be completed, which are then linked to the protocol. If these codes do not currently exist, please communicate with your GoodX liaison to add your preferred custom codes. This ensures you can use the protocols only when desired, particularly when standard ICD codes might overlap between different conditions.
Establishing accurate and clear naming conventions will simplify any future changes, corrections, or alterations to your templates. By using a consistent naming structure now, you ensure that locating and updating specific protocols remains a straightforward task as your practice evolves.
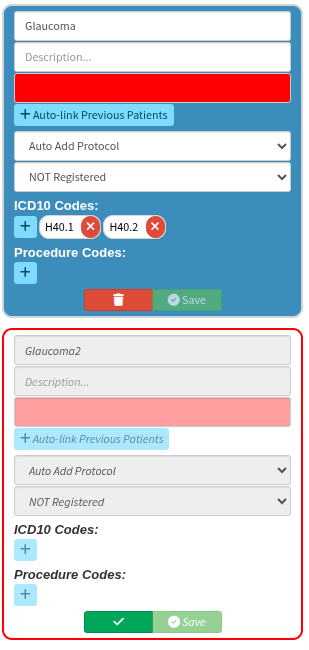
Please note that entries cannot be permanently deleted from view; instead, they will be marked as inactive, indicated by a red line through the item. If you wish to re-enable a specific line item, you can simply select the green tick to make it active again.
If mistakes are made on an entire protocol, please be aware that the entry cannot be permanently removed from the interface. Instead, it can be marked as inactive by clicking the "trash" icon.
Once deactivated, the protocol will appear greyed out to distinguish it from your active workflows. Should you need to restore it, simply select the green tick icon and follow the confirmation prompts to re-activate the protocol.
The key questions which need to be answered during your protocol setup:
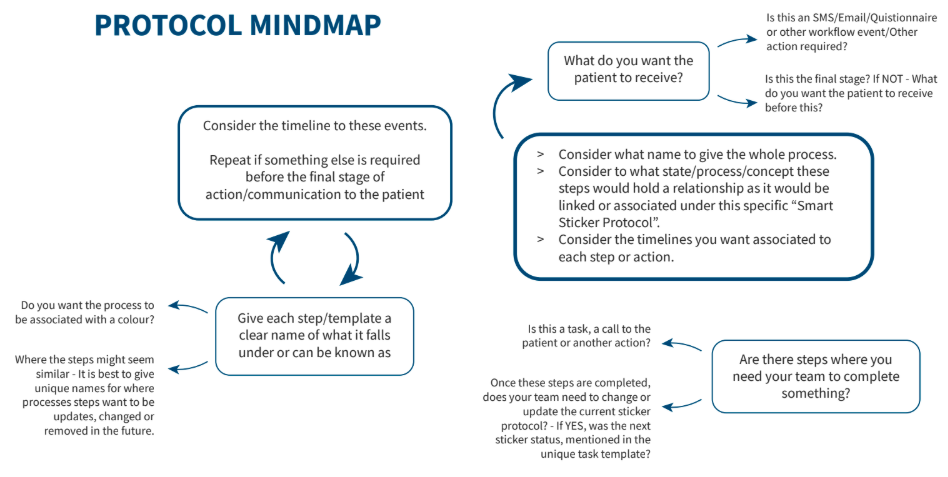
Example of a mindmap for the Smart Sticker Protocols to manage the PMB registrations:
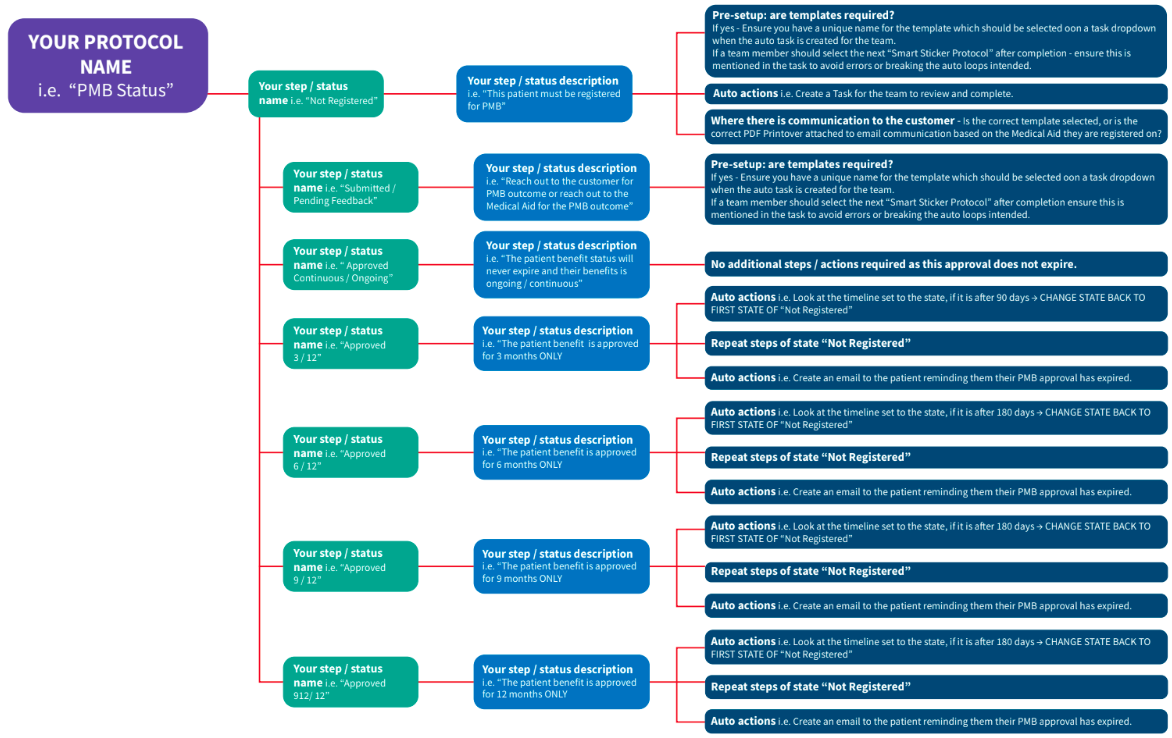
PMB approvals can vary from patient to patient. If the practice prefers to focus on the period of validity, communication should be developed for when these PMB approvals expire. Similarly, the practice needs to maintain awareness of these statuses, which represent the different states of a protocol. These states can include the following:
Not registered
Submitted / Pending Feedback
Approved 3/12
Approved 6/12
Approved 9/12
Approved 12/12
Approved Continuous / Ongoing
However, these shorthand references may have different meanings to different staff members at a glance. Having a clear but concise description for each protocol state name helps avoid misinterpretation or incorrect application. Without adequate descriptions to ensure full comprehension of the linked actions, agents may select the wrong state due to differing definitions, ultimately resulting in incorrect information being communicated to the patients.
Having clear descriptions will assist in creating and selecting the correct templates from the dropdown options. Please note that the templates intended for use within task requests, emails, or SMSes should also be considered beforehand during your mind mapping process. These details should be finalised and worded according to practice preferences before requesting assistance from the GoodX client liaison. It is best to maintain a separate PDF document that clearly confirms the names and wording your practice envisions for the smart protocol setups, alongside the expected outcomes of each of the states or steps.
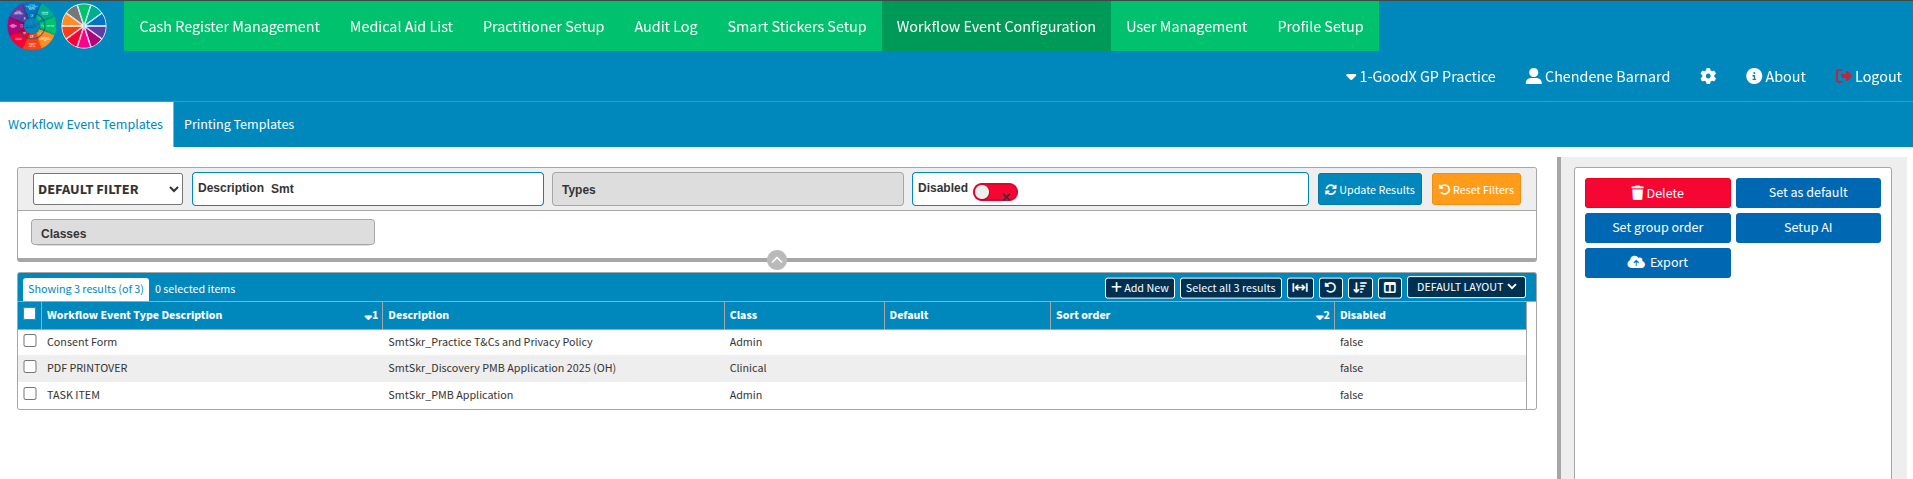
Below is an example of the dedicated forms set up for "Smart Sticker" protocol use only. Notice how the description starts with the application grouping, followed by the template name with its intended purpose. This approach assists in filtering your active protocol templates and allows your dedicated GoodX Client Liaison to assist efficiently with any updates or corrections when your protocols change or require specific information to be reviewed.
Your practice can decide whether these protocol colours should be grouped by concept, such as utilising one colour where actions are required and another colour where steps are automated. Alternatively, different colours could represent different procedures. The colour scheme should be clearly decided beforehand for ease and comfort whenever an association between colours is required or preferred.
It is recommended to have your GoodX liaison assist you until you have a full understanding of the protocol setup. Please note that utilising this feature can be complex, and we will be more than happy to assist you in achieving your desired outcome within the software's functionality.
During a smart sticker setup, you can review the various protocols in the left column. This column cannot be minimized, nor can it be viewed in a list format. Furthermore, these protocols cannot be reordered or filtered to display currently active entries only. However, a scroll bar is available to navigate through your created protocols.
When a protocol is selected, the right side of the screen will reflect the specific details and states associated with that protocol.
You can edit an existing protocol if you so desire; however, if fewer steps are required in the new protocol, or if the steps vary in general, the setup may become visually chaotic. This is because any additional states or line items would need to be deleted. As a gentle reminder, a deleted state is not removed completely from view, but will instead reflect with a red line through it. Therefore, it is recommended to review your mind map for protocol setups, note down all the steps, and consider any potential actions required around these protocols beforehand.

Below you can see we have created a protocol to address a PMB application which is directed at the standard 271 PMB conditions. When this protocol was created, only three templates existed to address our smart sticker protocol needs for this PMB. These protocol states reflect the actions required from staff members to complete the PMB application for the specific patient and medical scheme.
In this section, we must now instruct the protocol regarding the actions that are expected next. Your practice will need to decide on the following options:
Do you finalize the protocol because nothing else is required?
Are additional communications required?
Does it move to a next state?
Are there additional actions required from the practice’s team?
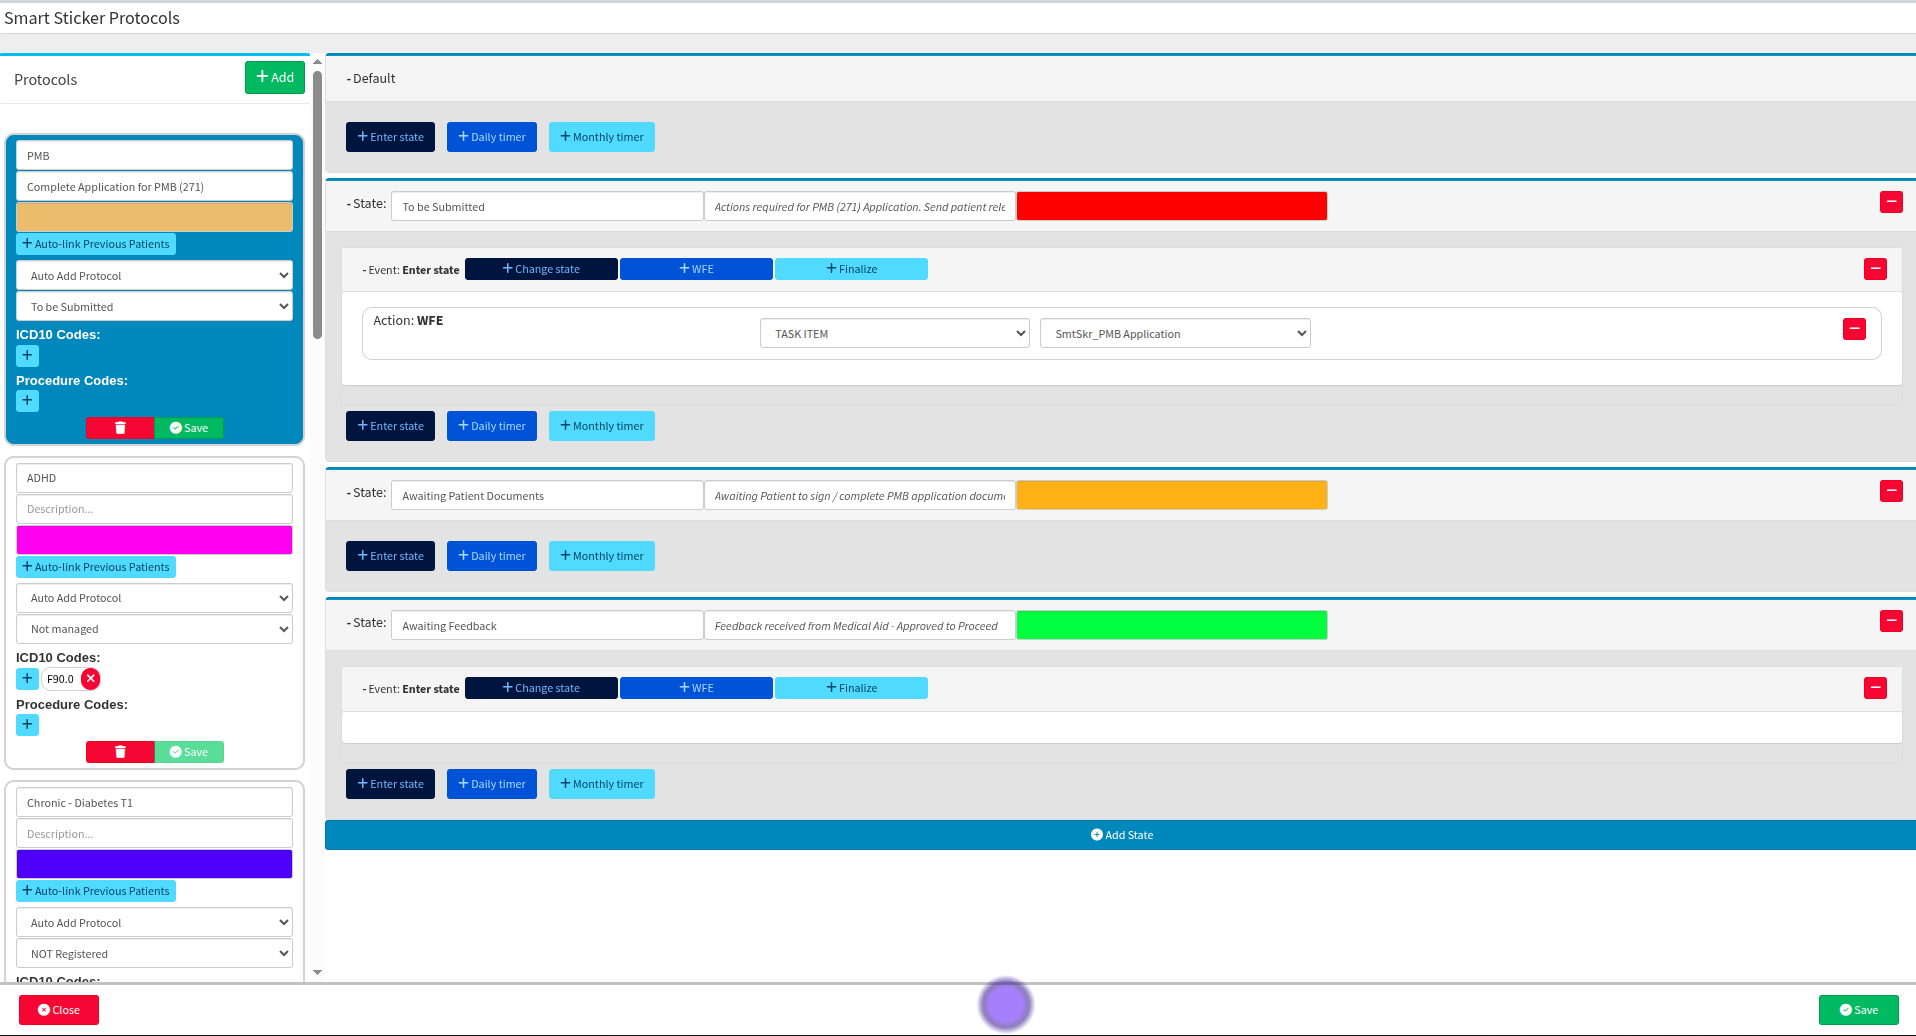
However, while setting up this specific protocol above, there is a potential logic flow issue regarding what happens when a PMB application is declined. If there are actions required from the team, or if the doctor must review an aspect of the application, templates should be created to ensure consistency in communication and completeness of the information requested or shared. This reduces the amount of time the team spends on completing repeated tasks and communications, allowing the practice to achieve a successful smart sticker protocol run up to the point of finalization.
Where to learn more about Smart Sticker Protocols within GoodX:
The GoodX Click&Learn Courses https://courses.goodx.co.za/
The GoodX YouTube Channel https://www.youtube.com/@GoodXSoftware
The GoodX Learning Centre https://learning.goodx.co.za/
Please note these courses are only modules and are different from the Click&Learn courses. To learn more about Smart Sticker Protocols, you can apply these search terms:
| Date of Change | Changes | Editor |
| 2026 05 14 | Established Page | Chendene Barnard |