Text size
Line height
Text spacing

What is the “PDF Printover” feature?
The PDF Printover feature allows custom or unique forms to be completed electronically by the patient. Essentially, it transforms non-editable documents into interactive files that clients can easily fill out digitally.
The PDF Printover Form feature enables your practice to create an unlimited number of templates, allowing you to complete forms digitally rather than printing and filling them out manually.
This is particularly effective when importing third-party documents or using custom practice forms, as the system can be configured to automatically populate the patient’s details directly into the form.
Custom forms designed for client completion are typically linked to the myGC application, which is provided free of charge. This platform serves as a centralised portal where patients can review account details, clinical data, or general forms required by the practitioner prior to a consultation. While these specialized forms are discussed more comprehensively in the clinical files section, you are encouraged to contact your liaison to discuss any unique requirements specific to your practice.
Please note that extensive support for clinical PDF Printovers may be considered an additional service, which could incur a service fee for the user.
What are the capabilities and applications of the PDF Printover Feature?
The potential of this feature is vast. Sensitive personal information is securely protected from damage and unauthorized access, ensuring patient privacy and strict compliance with data protection regulations, such as the POPI Act. Furthermore, the system allows for the creation of PDF printovers to facilitate the registration of Prescribed Minimum Benefits (PMBs) on behalf of the patient.
The risk of incomplete or misfiled information remains a significant concern in environments where physical files have historically been prioritized, especially during office relocations or displacements. Maintaining an accurate and detailed digital clinical history is therefore invaluable, as it ensures the treating practitioner can make well-informed decisions regarding patient care and treatment.
These preferred forms can be submitted for conversion through the PDF Printover feature, which allows the practice to maintain the original aesthetic of the document. This transition eliminates concerns regarding handwriting legibility and the loss of physical paperwork, while significantly reducing the risk of misfiling documents.
What benefits does PDF Printover hold?
Software providers and healthcare practices can implement stringent access controls and encryption protocols to safeguard the integrity and confidentiality of electronic medical records. When stored in the cloud, these records are further protected by robust security measures designed to ensure comprehensive data safety.
In cases where multiple practitioners or teams collaborate on a patient's care, electronic medical records enable seamless access to and sharing of vital information. This functionality fosters collaboration, enhances clinical decision-making, and ultimately improves the standard of patient care. In instances where different practice management systems are utilized, practitioners maintain the ability to receive, download, and send files securely as PDF documents.
How does the manual PDF Printover work?
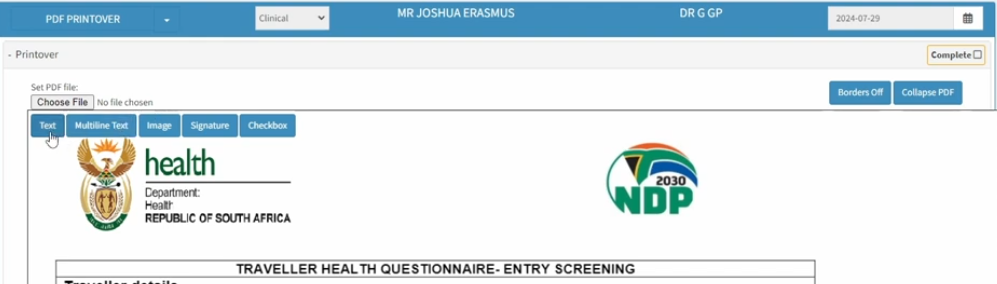
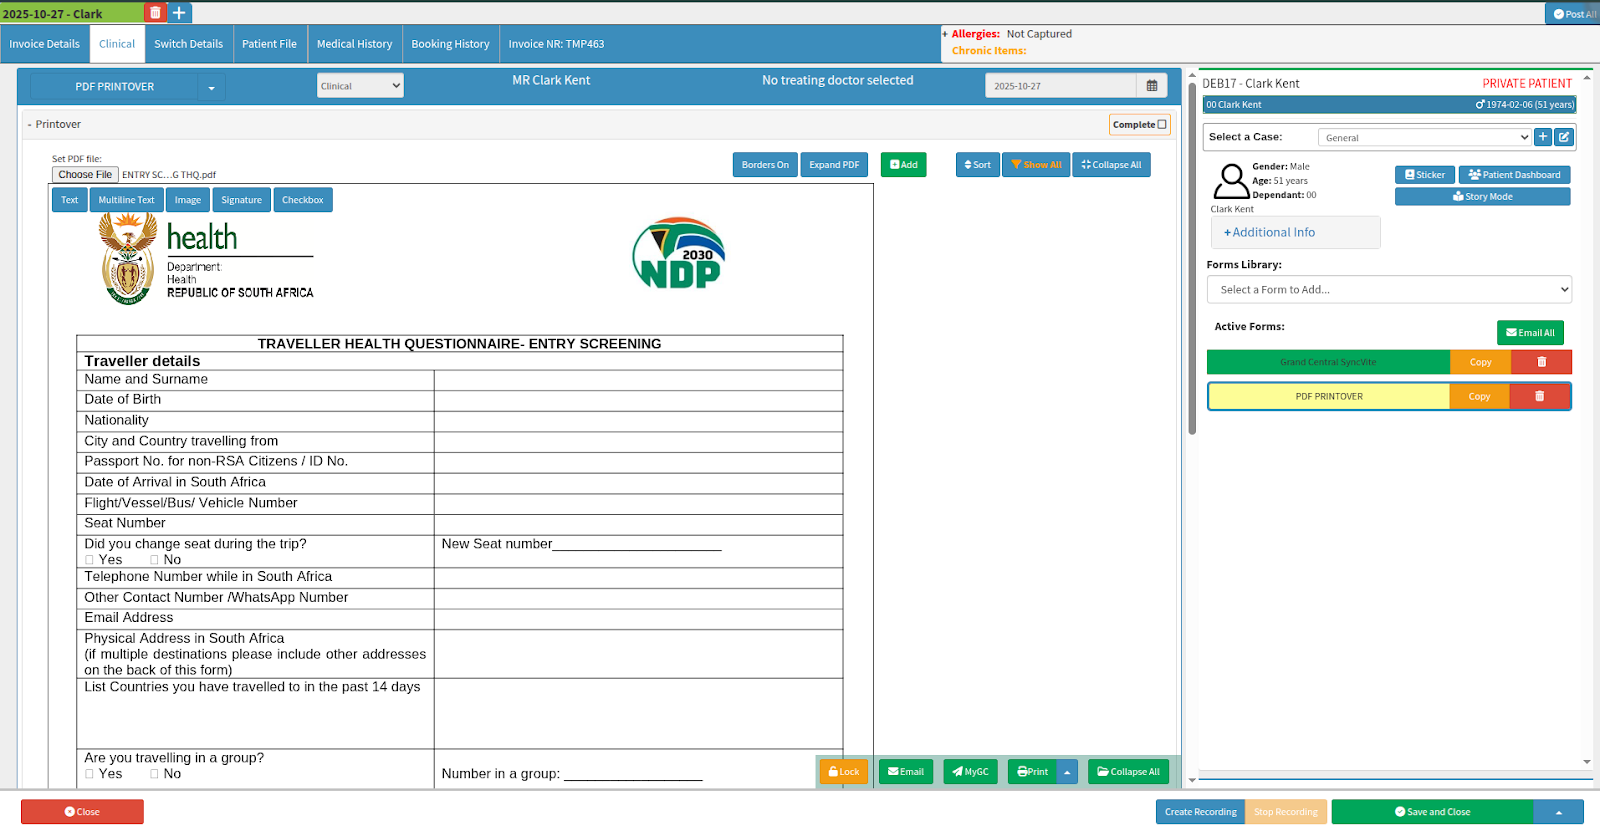
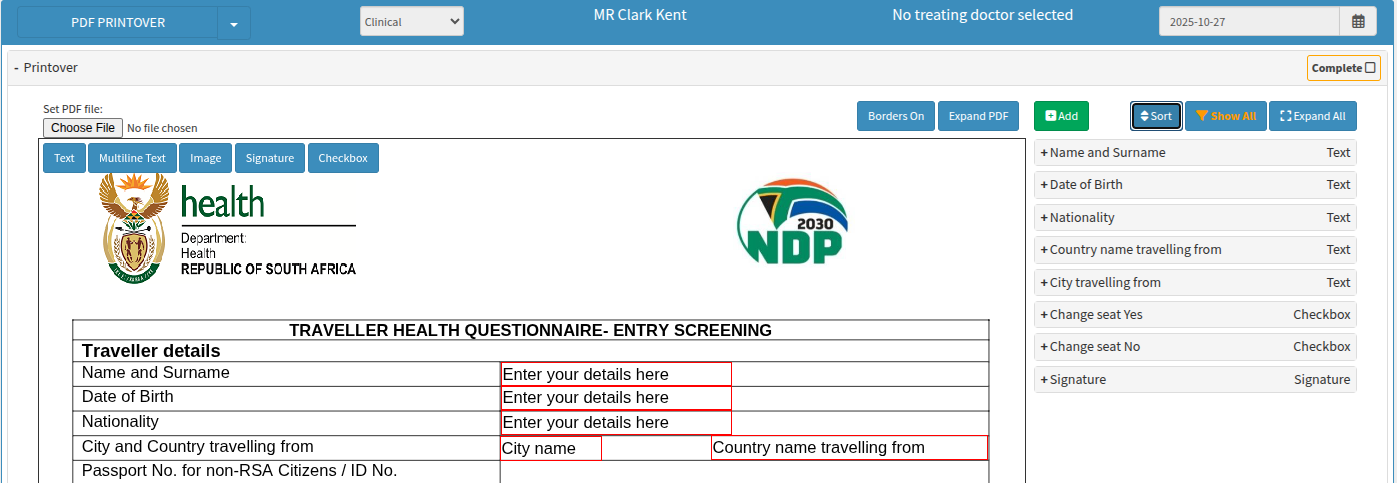
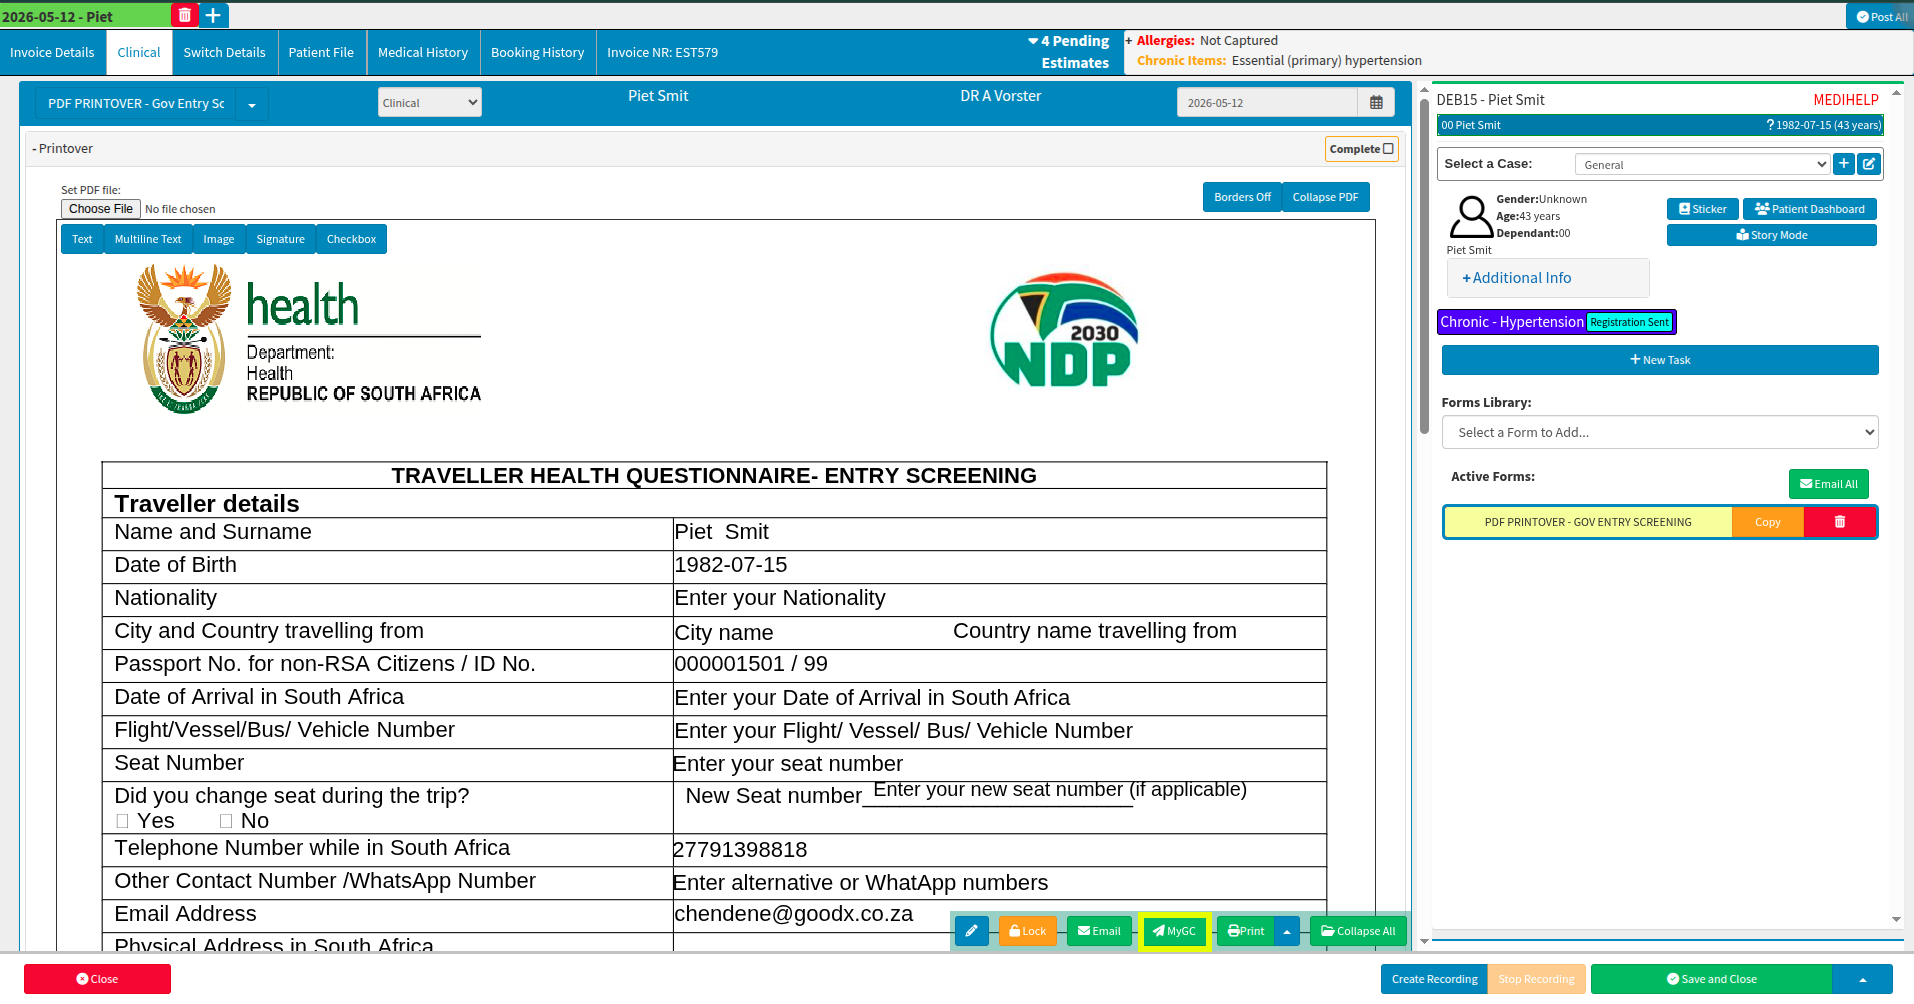
Should you receive a non-editable document that is reflected under your clinical documents, you can convert it into an editable format by selecting the "+ Create PDF Printover" button.

Alternatively, you can import a non-editable document by selecting "PDF Printover" from your clinical forms library and then choosing the required file from your desktop or the device where it is saved.
Once you have selected the specific form from your device to import as a PDF Printover, the document will be displayed, allowing various fields to be added, adjusted, and configured in accordance with the needs of the practice.
The form must be manually configured to define fields for manual entry or to specify where patient information should be automatically populated. This ensures consistency for the specific form or PMB being created. You will have access to specialised tools to ensure the necessary fields are available for the patient to complete, while preventing them from entering information in fields that are irrelevant or not required.
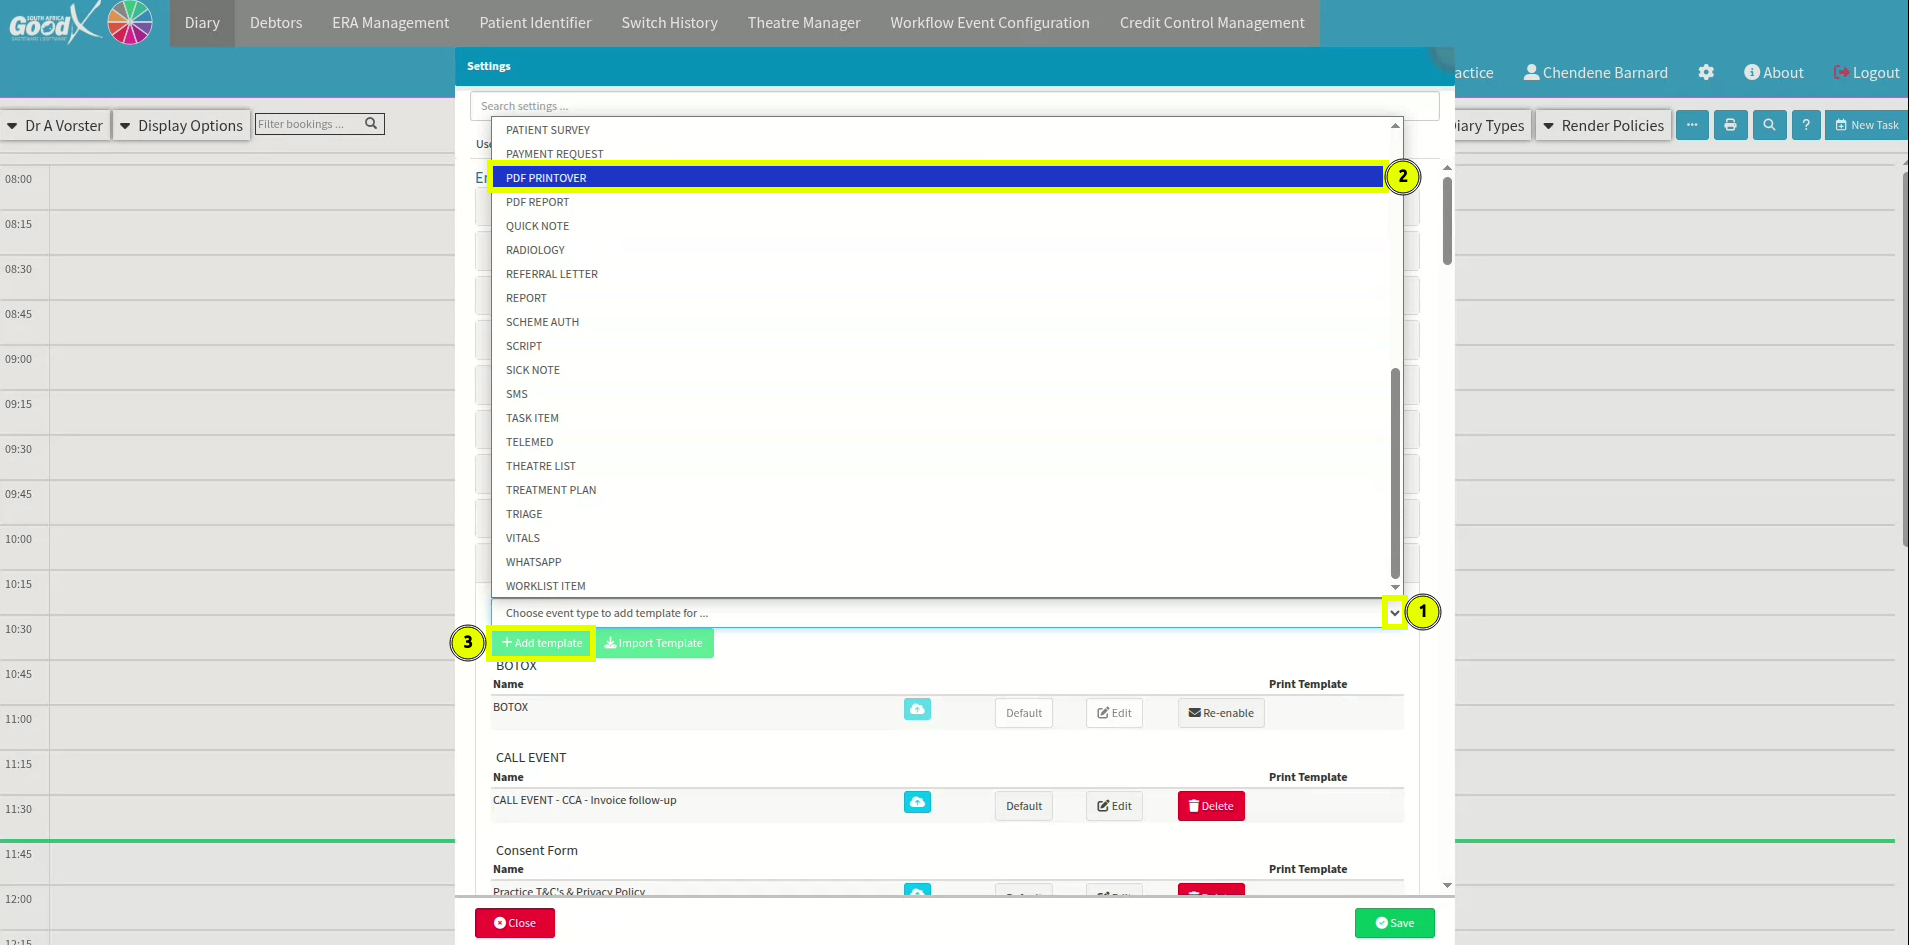
How do I add a new PDF Printover?
To add a new PDF Printover, select the Site Settings icon located at the top right of your screen, adjacent to the "About" section. Select the Entity Settings tab, then navigate to the Workflow Event Settings section and expand it. Within the library, use the dropdown menu to locate and select the PDF Printover template. Once identified, select the + Add Template button to complete the process.
How do I edit the once-off manual PDF Printover?
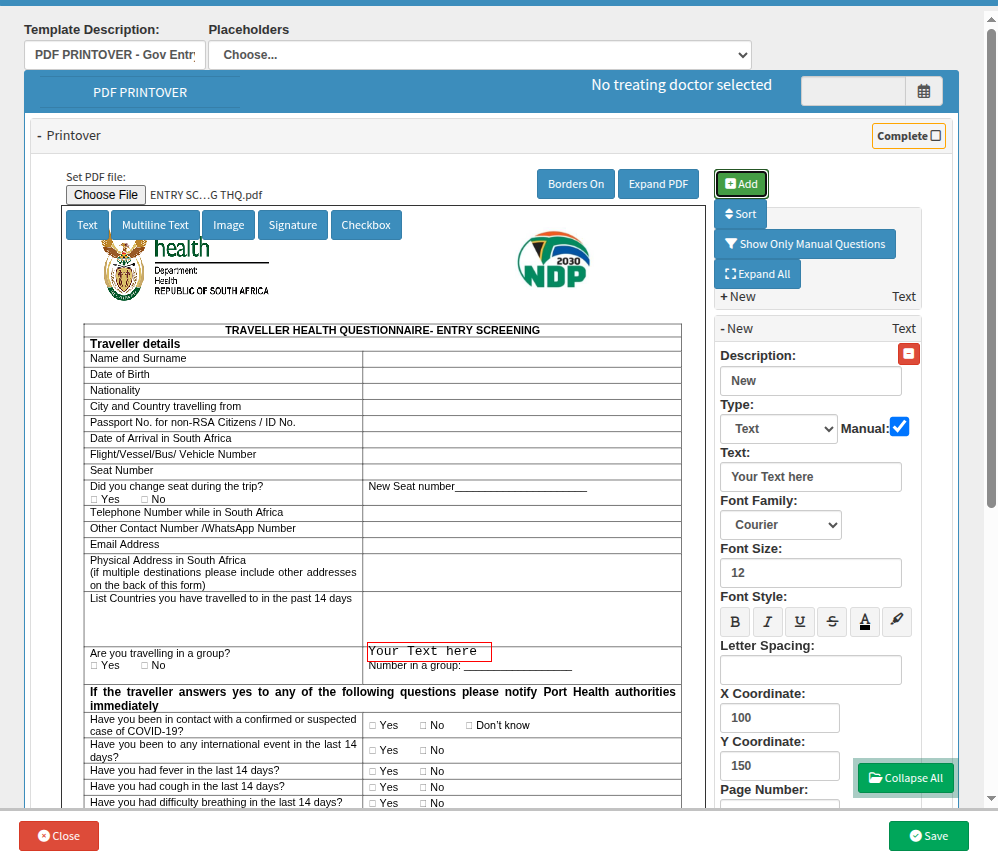
Pre-populated fields eliminate the necessity for patients to complete the same document multiple times due to misplaced or incomplete data. Should you require any assistance with a form, please do not hesitate to contact your liaison for additional guidance. You have the option to add text fields, image spaces, signature prompts, or checkboxes to denote relevant options. Once your document has been imported, the file will be displayed alongside the available edit menu.
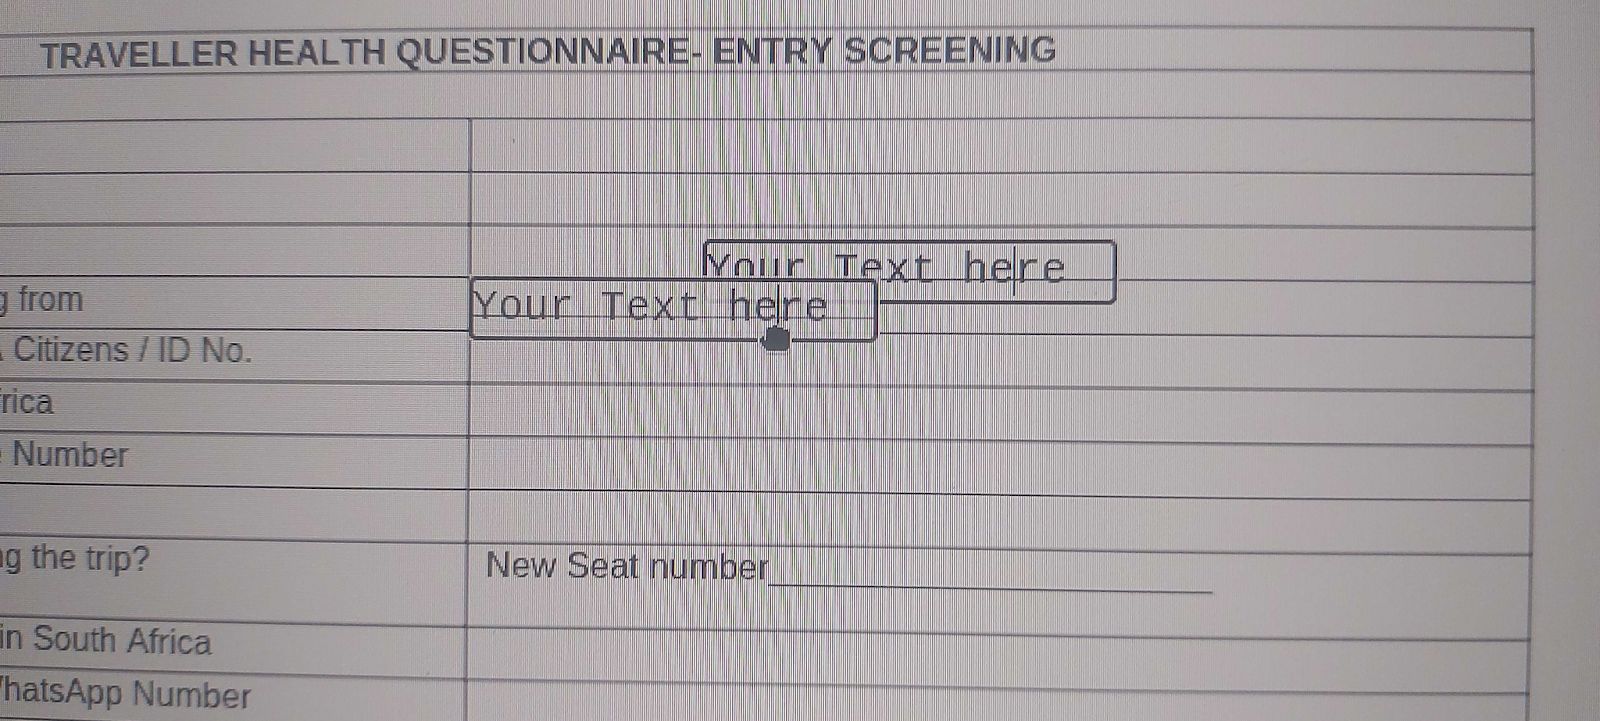
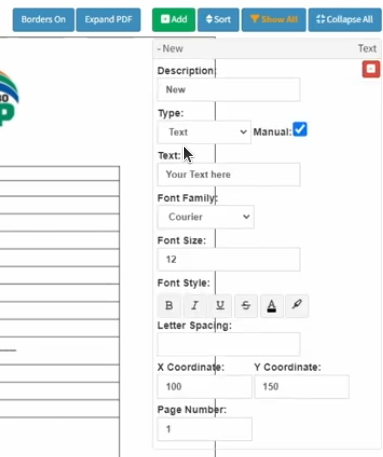
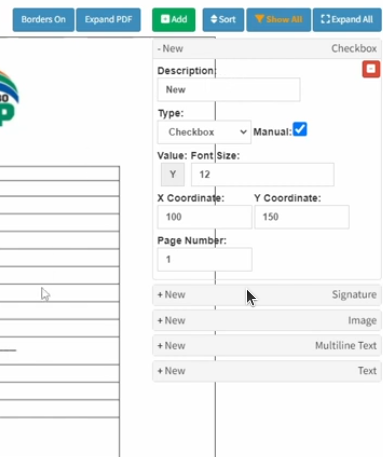
Selecting the Text button automatically generates a menu item and adds a text area to the document. This field must be positioned using a drag-and-drop action to the specific area where the patient is required to enter information.
While there is no distinct highlight around the box to indicate it can be moved, clicking and holding the mouse within the text area will activate a grab icon to reposition the text box in the template setup. This allows you to accurately reposition the box to the desired location on the form for the patient to complete.
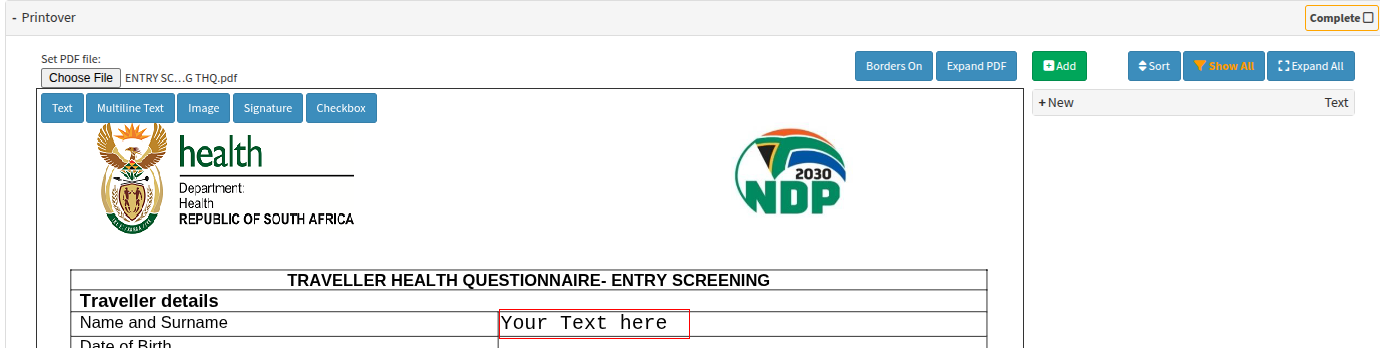
Selecting the + New menu option provides access to the editing settings for that specific text area. To remove the red outline, you can select the Borders On button, which toggles the visibility of the text area's boundaries. Please note that when a new item is added, the borders are automatically set to visible by default; it is therefore recommended to toggle this setting once the form layout has been finalized.
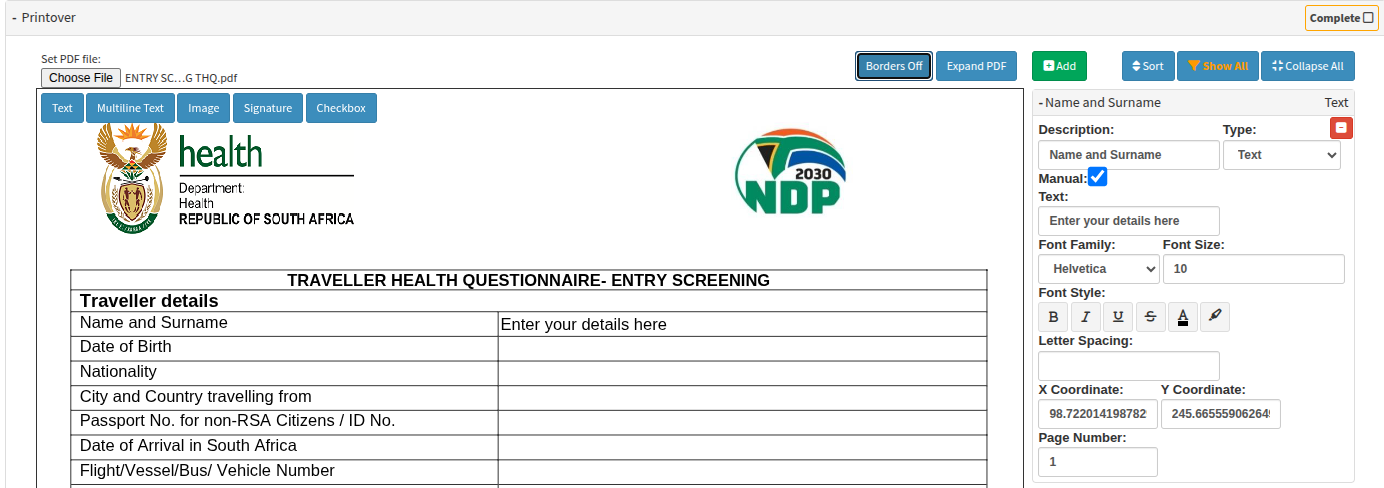
As you populate the document with entry fields, it is highly recommended to rename each item to match its corresponding field on the form. This practice allows you to see at a glance if any sections have been missed and makes it significantly easier to identify and update specific text areas should changes be required in the future.
The text area can be renamed for tracking form completeness, and the visible text prompt can be customized. Additionally, you can adjust the font size and select from three of the most commonly used font families to ensure the added text aligns with the original document's style.
If you require an alternative font, please contact your client liaison to determine if your request can be accommodated. Please be aware that such customizations may incur additional fees.
When adding new items, they will automatically populate at the top of the menu. To reorder them, you can select the Sort toggle to arrange the list from top-to-bottom in the order they were added.
Please note that adding a new item will not reset your existing list; however, the most recent addition will always appear at the top by default. It is recommended to toggle the sort order once the form has been completed to ensure a logical sequence.
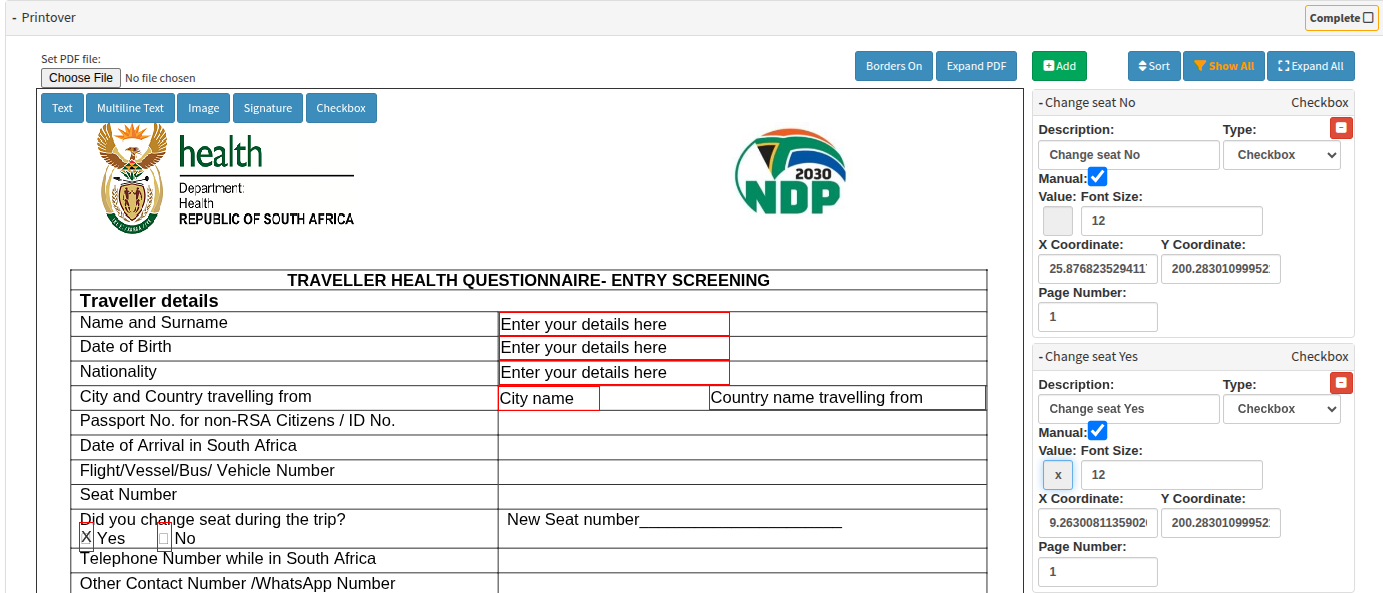
When adding a checkbox, the value defaults to a "Y." Clicking on the populated checkbox will toggle it between a blank state and an "X" value for the patient to complete. Please remember to toggle all checkboxes to a blank value if patient input is required.
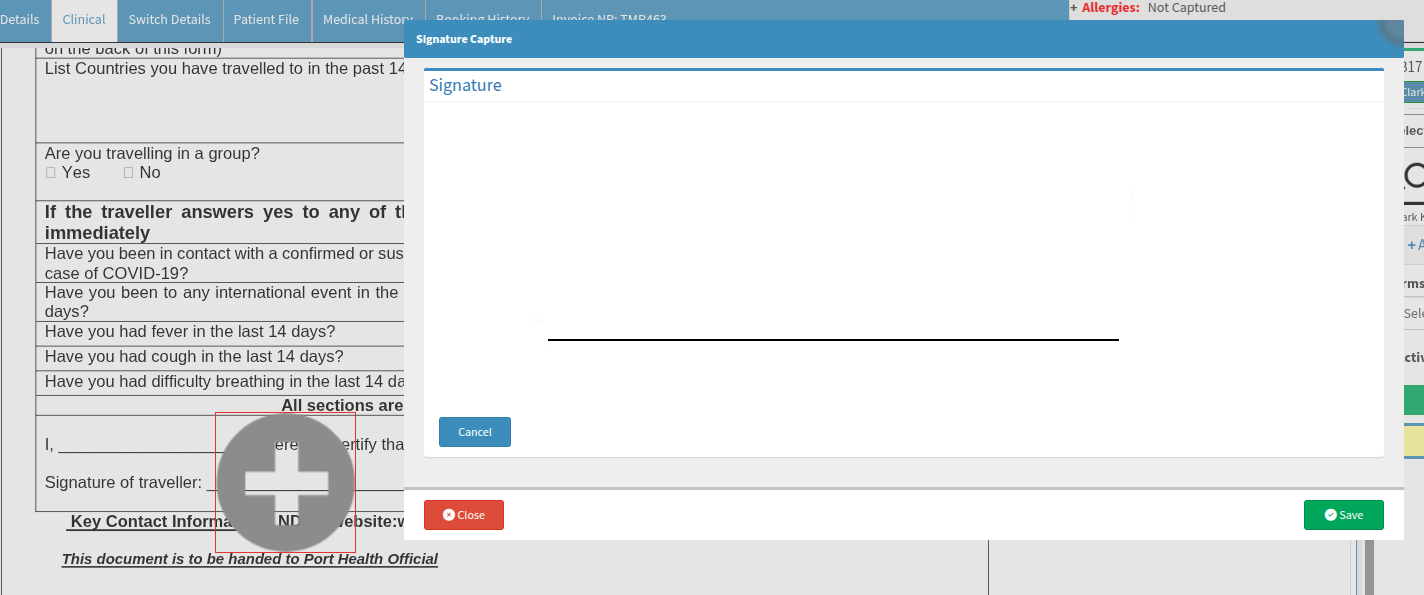
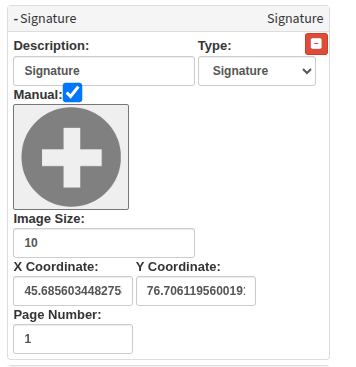
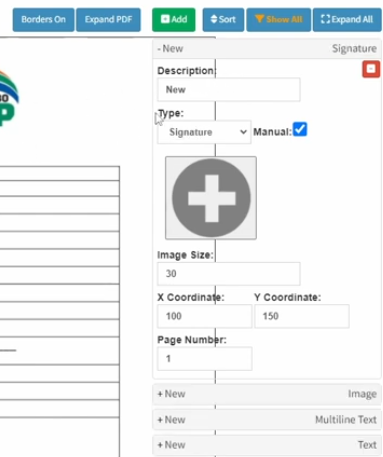
Where a signature is required, a default icon—appearing as a plus sign—will be visible. When selected by the patient, the system will prompt them to provide an electronic signature.
If the default signature icon or any added image appears too large for the document layout, you can adjust the dimensions via the side panel. This allows you to scale the element down to fit precisely within the designated signing area or form field.
![]()
The specific type of editor you have added will be clearly visible both in the side panel and on the individual item itself. This dual-visibility ensures you can easily distinguish between text fields, checkboxes, and signature prompts while managing your document layout.
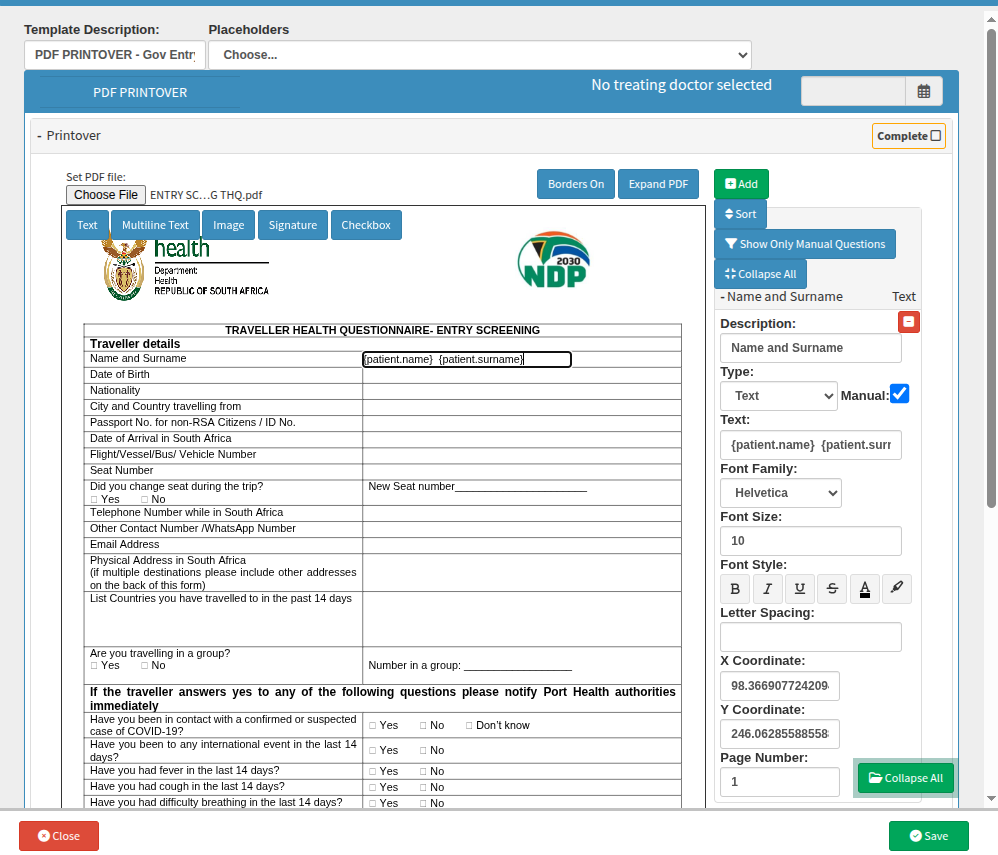
If your clinical documents already include PDF Printover files with predefined fields, selecting these documents will automatically populate those areas with the relevant patient or clinical information. This integration ensures that the required data is pulled through seamlessly, presenting you with a pre-filled form that minimizes manual entry and maintains clinical accuracy.
The automatic PDF Printover is set as automatically when the setup, edits and adjustments are performed within the Entities workflow event setup, rather than directly within a specific patient's clinical form area. It is important to note that modifications made at the patient level are temporary and do not persist beyond that specific instance. Conversely, customizations applied at the entity template level are permanent and will govern all future versions of that document. To ensure that any recent updates are reflected in the system, the template must be reselected from the PDF Printover dropdown options within the practitioner’s clinical form.
The process for configuring these templates and their associated functionality follows the same principles outlined in the preceding sections, "How do I add a new PDF Printover" and "How do I edit the once-off manual PDF Printover?". By applying these established methods, you can ensure that your permanent entity templates are correctly structured and ready for automated use across the practice.
As soon as the selected document is loaded, the relevant clinical fields will automatically populate with the available data. This automated process ensures that the form is instantly updated with the necessary information, streamlining the transition from document selection to final review.
Please ensure that these forms are always marked as completed, followed by selecting the "Save" and then the "Close" options. Adhering to this sequence guarantees that all captured data and clinical updates are successfully finalised and stored within the system.
From the clinical interface, once a practitioner has selected a PDF form, they have several options for distribution and management:
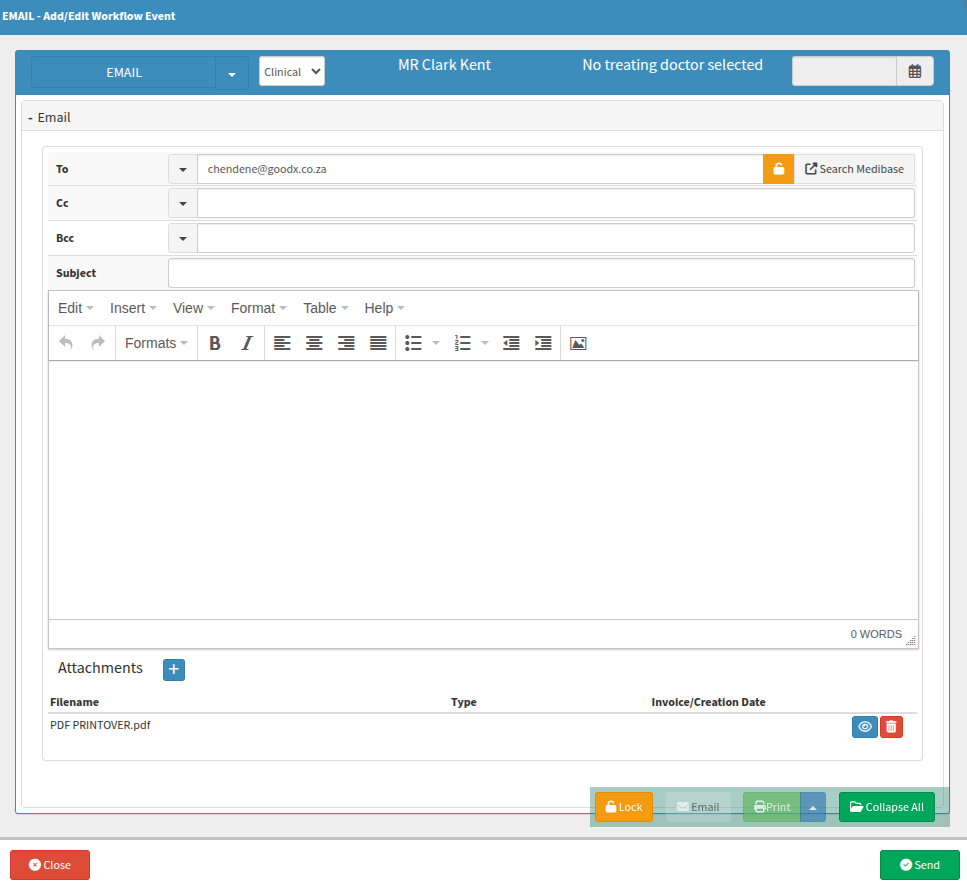
Email: Select the Email button to send the converted, editable form directly to the patient. You can include additional documents or forms via the Attachments feature. The system will automatically populate the message using your pre-configured email templates.
MyGC: Select the MyGC button to transmit the editable form to the patient’s MyGC dashboard, allowing them to access and complete it within their personal portal.
Save Locally: Access the Print drop-up menu to save a copy of the editable document directly to your local device.

Where else do I build an automatic PDF Printover?
To begin the setup, select "Configuration" from the navigation wheel and then navigate to the "Workflow Event Configuration" tab. This path allows you to access the necessary settings to manage and customize your clinical document workflows effectively.

Select "+Add new" to create a new PDF Printover and navigate to the required template. It is advisable to rename the template immediately to ensure it remains easily identifiable as your list expands, preventing the accidental selection of the incorrect form. Once you have selected the file, the edit menu will become available. Please be aware that the interface view is slightly constrained to facilitate the selection of placeholders, which ensure that patient details automatically populate when the file is opened within the clinical workspace.
When adding new text, the box will appear in the center of the screen, from where it must be dragged and dropped into the desired position.
If you select placeholders, they will automatically be inserted into the text box or area currently being edited. Should you require further clarification or encounter any uncertainty during this process, please contact your GoodX representative for additional assistance.
Once you have finalised the necessary pre-populated fields and specific requirements, the form can be saved for future selection. This ensures the template is readily available for ongoing use throughout your practice, maintaining consistency across your clinical documentation.
Scenario: The process of registering a PMB on behalf of the patient?
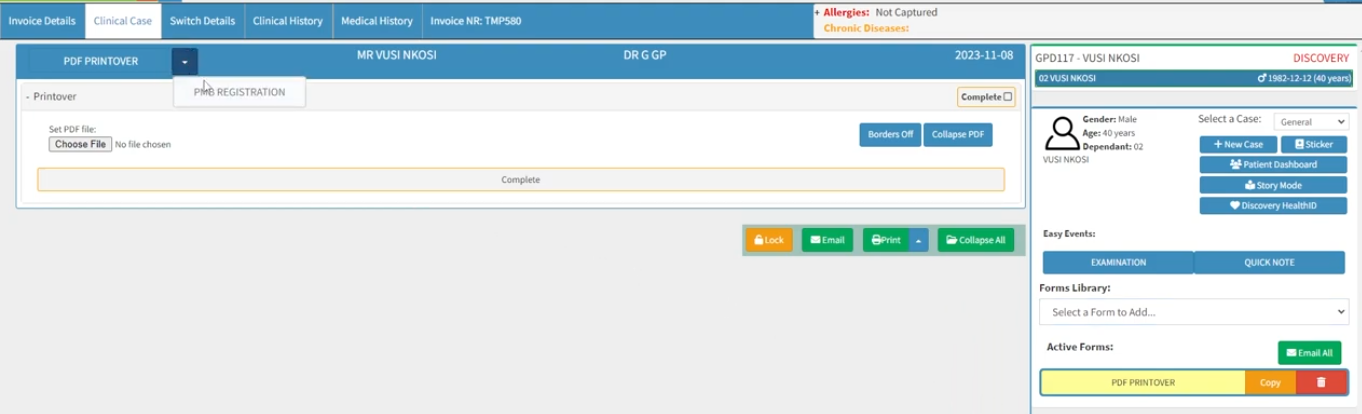
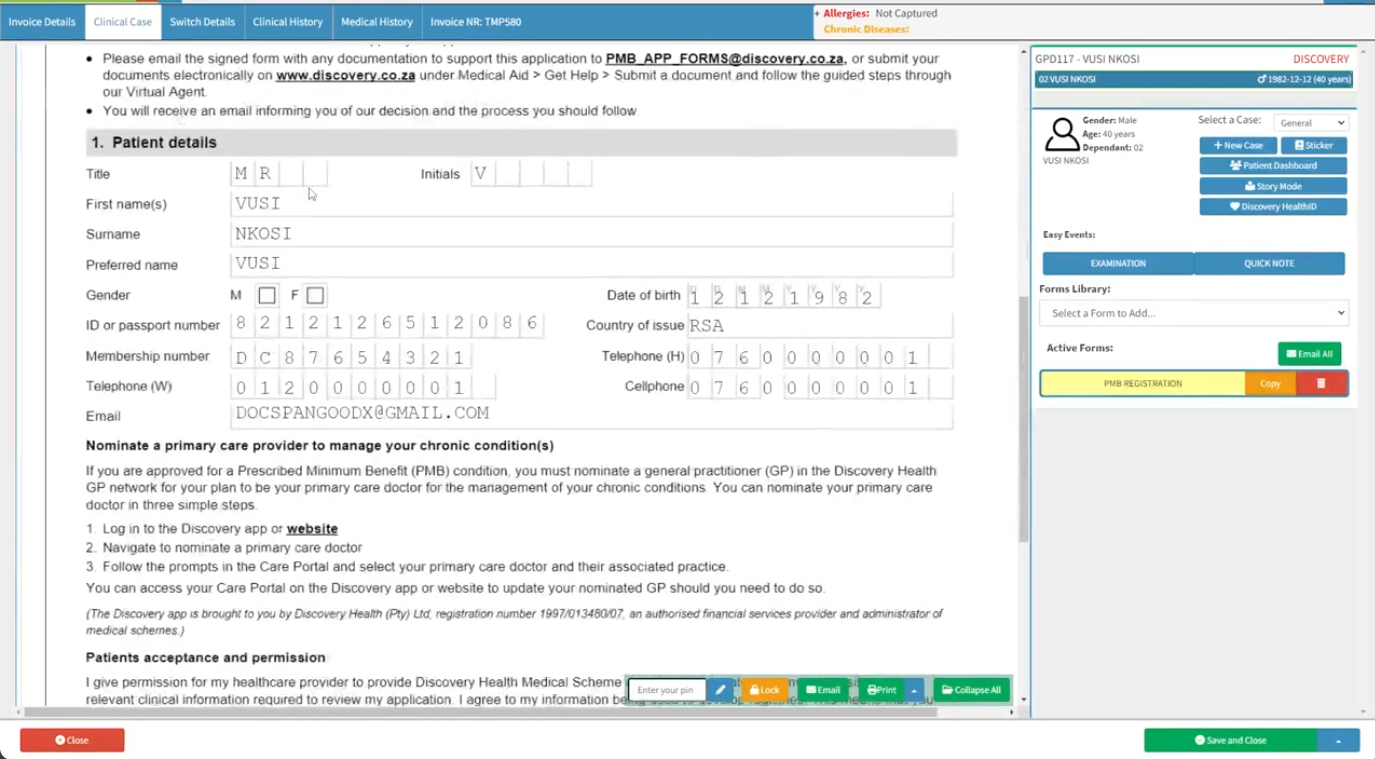
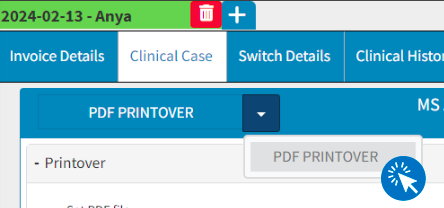
Prescribed Minimum Benefits (PMBs) are registered via the clinical module. To begin this process, select "Diary" from the navigation wheel and navigate to the "Diary" tab. Once you have identified and selected the relevant diary entry, click the "Clinical" button located in the side panel. From there, navigate to the "Clinical case" tab, where you can access the "Forms Library" in the side panel to select the specific form required for the PMB registration.
Because the PMB is a PDF Printover document, you must first select that specific form type from the library to access the necessary template. Once the PDF Printover type is active, you can use the dropdown menu to choose the customised template previously created for your practice.
It is recommended to rename each template according to its specific purpose—for example, "PDF Printover PMB Registration - SureMed"—to maintain an organised list. As the system does not provide a preview of the document prior to selection, clear and descriptive naming ensures you can quickly identify the correct form and prevents your library from becoming cluttered as more templates are added.
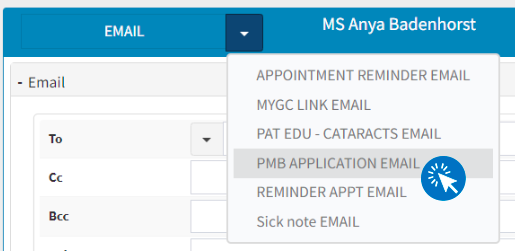
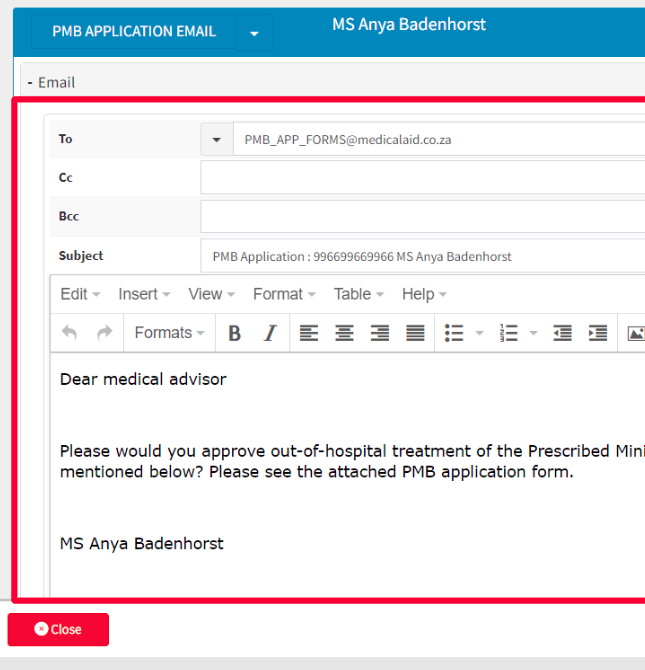
Similarly, if a corresponding email template has been created, it may be selected when sending the completed PMB registration form. Choosing the correct template will automatically populate the required fields and attach the finalised, signed document. Please ensure that the form is signed by the patient or applicant only before it is sent.
Upon completing these steps, always remember to save your progress and close the window to ensure the completed form is correctly updated and stored. This final action confirms that all captured information is finalised within the system record.

Where to learn more about PDF Printover within GoodX?
The GoodX Click&Learn Courses https://courses.goodx.co.za/
The GoodX YouTube Channel https://www.youtube.com/@GoodXSoftware
The GoodX Learning Centre https://learning.goodx.co.za/
Please note these courses are only modules and are different from the Click&Learn courses. To learn more about PDF Printover, you can apply these search terms:
| Date of Change | Changes | Editor |
| 2026 05 14 | Established Page | Chendene Barnard |