Text size
Line height
Text spacing

What is the “Diary Automation” feature?
The Diary serves as the foundation of an efficient patient journey. It offers deep customisation, including adjustable time slots, visual color-coding, and specialised booking types. By utilising integrated auto-events, the system triggers specific actions the moment a booking is selected, ensuring your practice's workflow remains automated and precise.
MyGC operates in conjunction with additional features that carry separate costs. While SMS fees are covered under your standard GoodX agreement, services such as VOIP calling and Payment Links are subject to additional charges. Please note that Payment Links require a formal sign-up process prior to activation.
What makes the “Diary Automation” service convenient
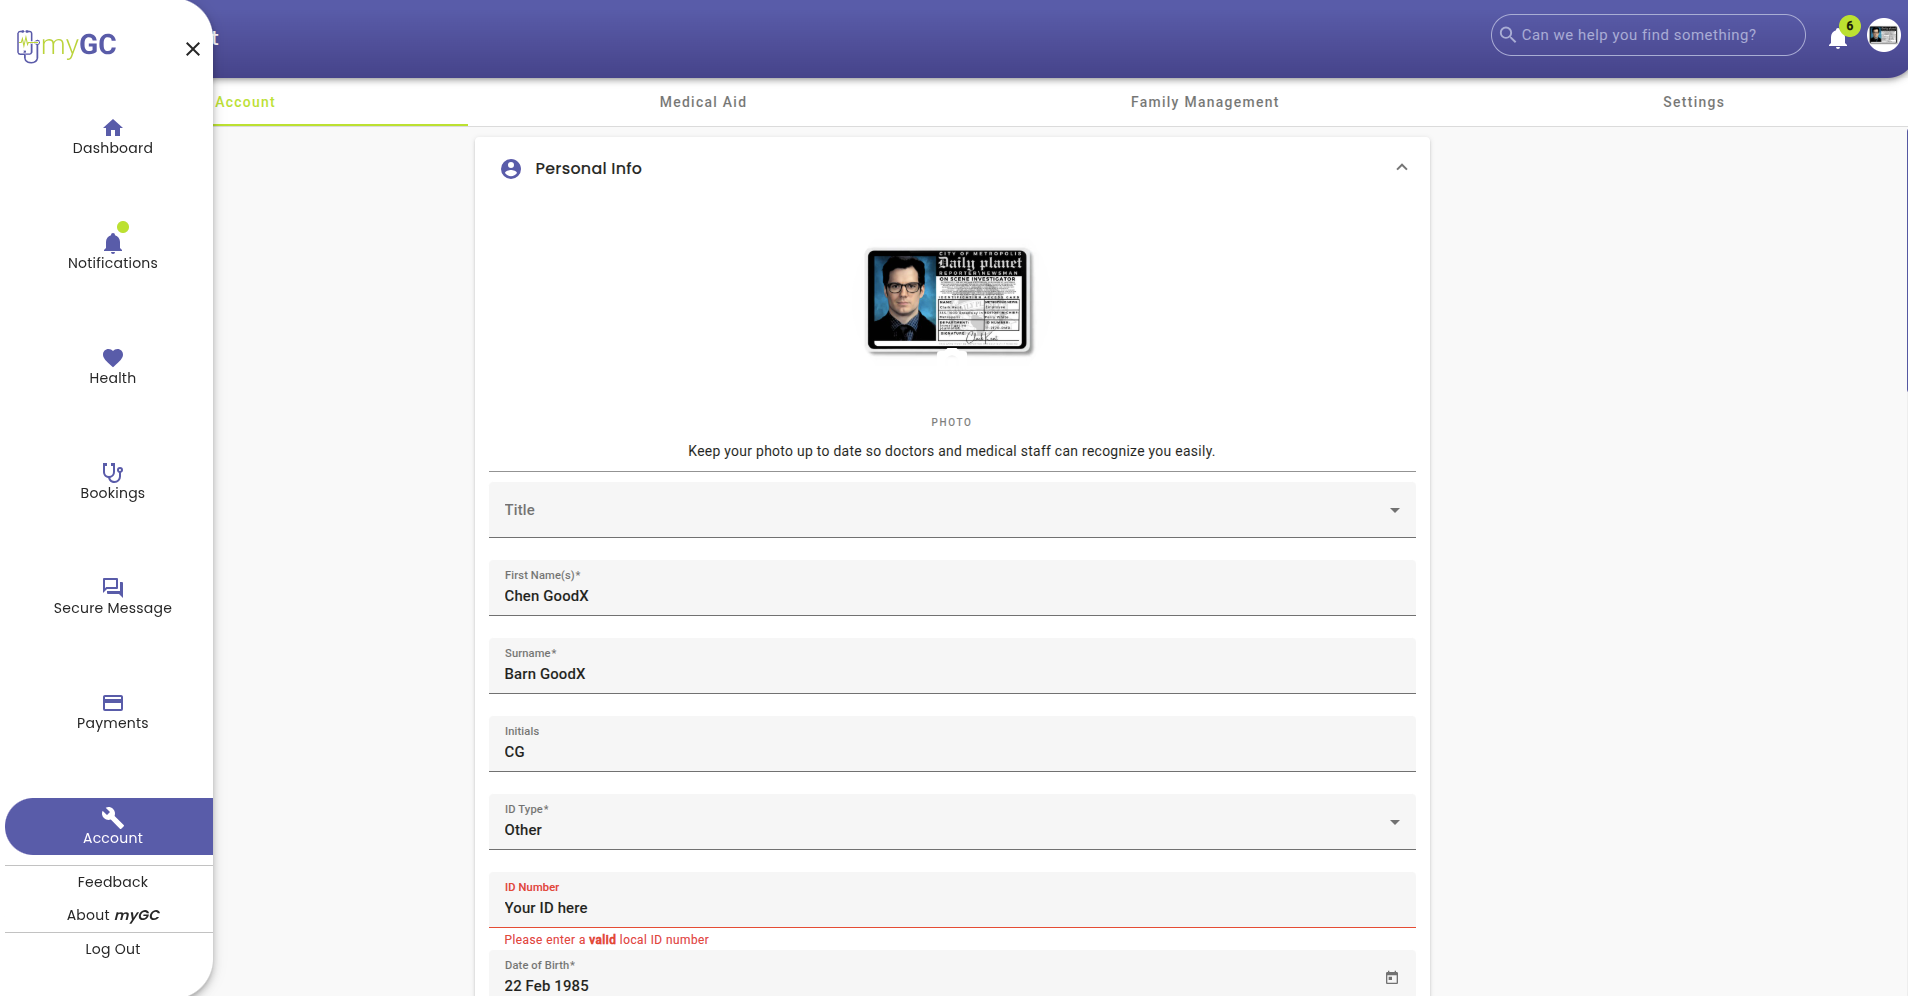
Maximize your Diary Automation by leveraging the MyGC patient portal. This secure, self-service application allows patients to take control of their medical journey by viewing past and current invoices, scripts, and clinical notes in real time. By activating your online presence, you enable patients to book appointments directly through the platform, creating a fully automated and synchronised scheduling ecosystem.
What are the “Diary Automation” applications within your practice?
The feature can be best defined through:
Diary automated actions set on booking types.
Face tag / hash (if added to the patient profiles).
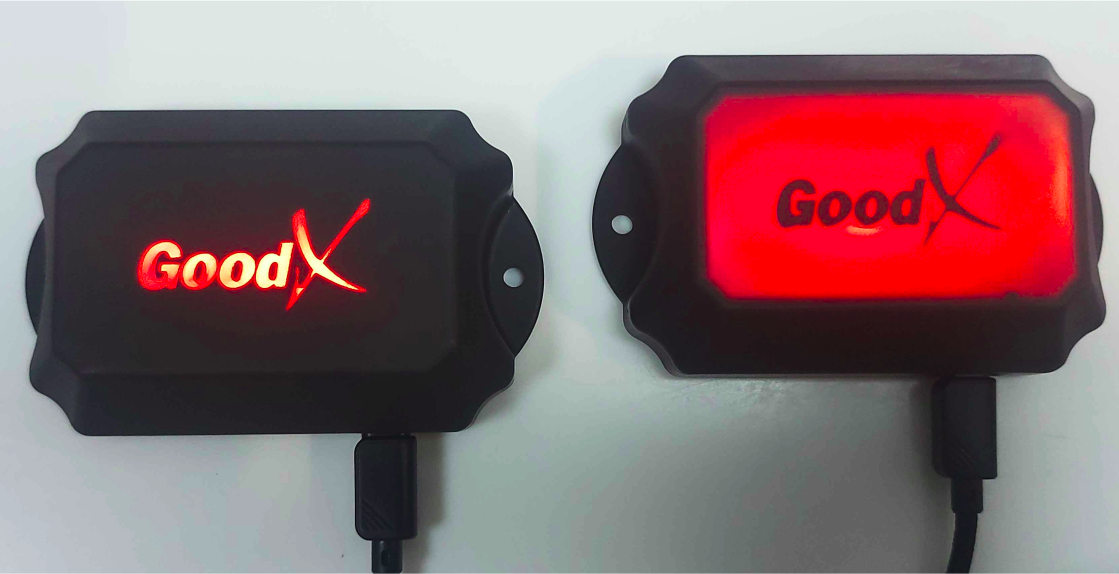
RF ID tags (if set up at the practice).
Left is the card reader.
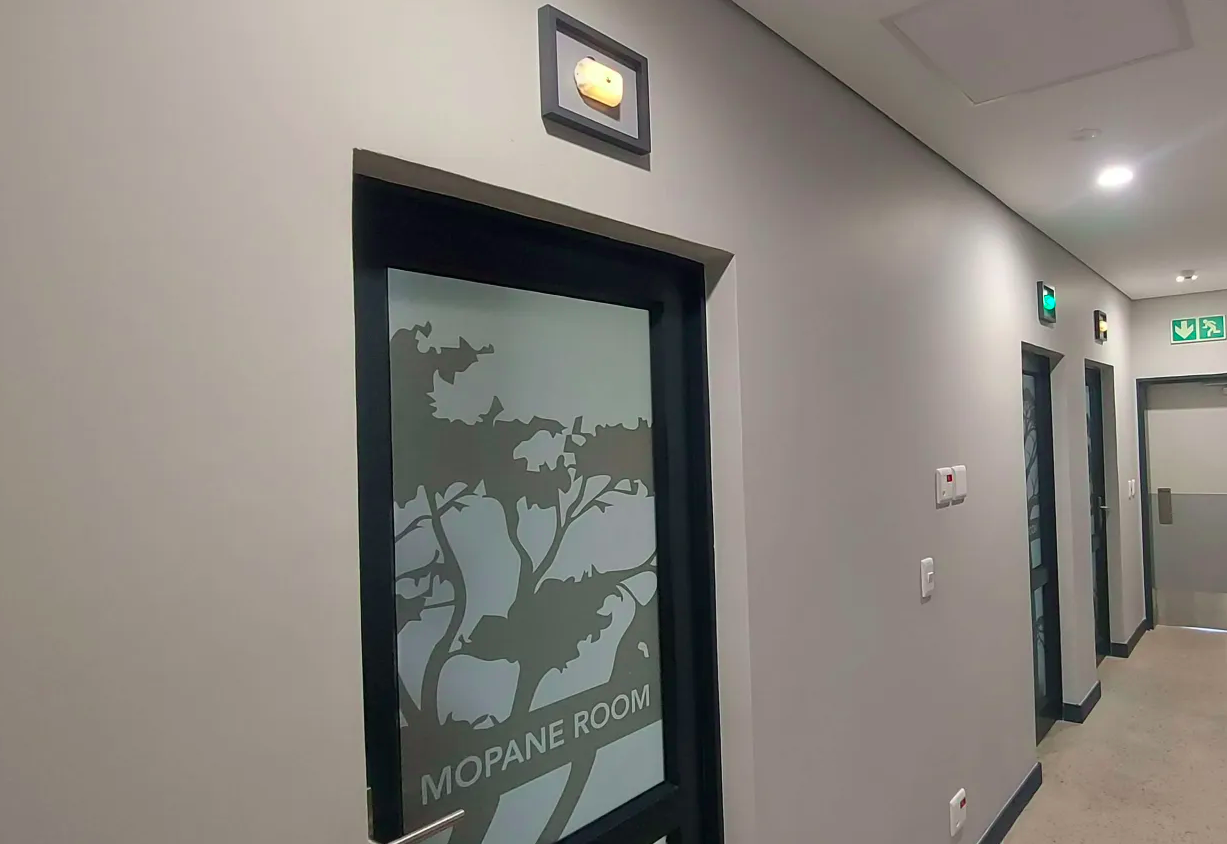
Right is the light box which is located above the rooms.
Below is an example of the Custom RF ID Tags used at Dr Dean Van Der Westhuizen’s room (Lowveld Eye Institute)

Automation can be applied to a wide range of practice functions. If your workflow requires specialised document linking or unique task automation beyond the examples provided, our team is available to assist. If you require specific documents or administrative tasks to be linked to your booking types, please contact your Client Liaison Officer for dedicated assistance in tailoring these automated workflows to your practice.
How is Mandatory Documentation set up as “Diary Automation”?
Transform every phone booking into a streamlined workflow. Once a booking is captured, the system utilises the designated Booking Type to trigger the delivery of relevant forms and questionnaires. Automated SMS and Email confirmations are sent immediately, providing your patients with all necessary information while simultaneously prepping your practice for their visit.
When scheduling a new patient, the system can automate a comprehensive onboarding protocol. This includes the immediate distribution of practice consent and privacy forms, alongside any custom documentation required for completion prior to the appointment. Furthermore, the system manages a multichannel communication sequence: sending instantaneous booking confirmations via SMS and Email, followed by scheduled reminders two days and one day before the event. These reminders include interactive links allowing patients to digitally confirm their attendance.
Support better clinical outcomes by integrating patient education directly into your workflow. You can map specific care instructions and educational documents to your Booking Types, triggering an automated send at the time of booking or as the appointment approaches. This feature ensures your patients are well-informed and properly prepared for their visit without requiring manual follow-up.
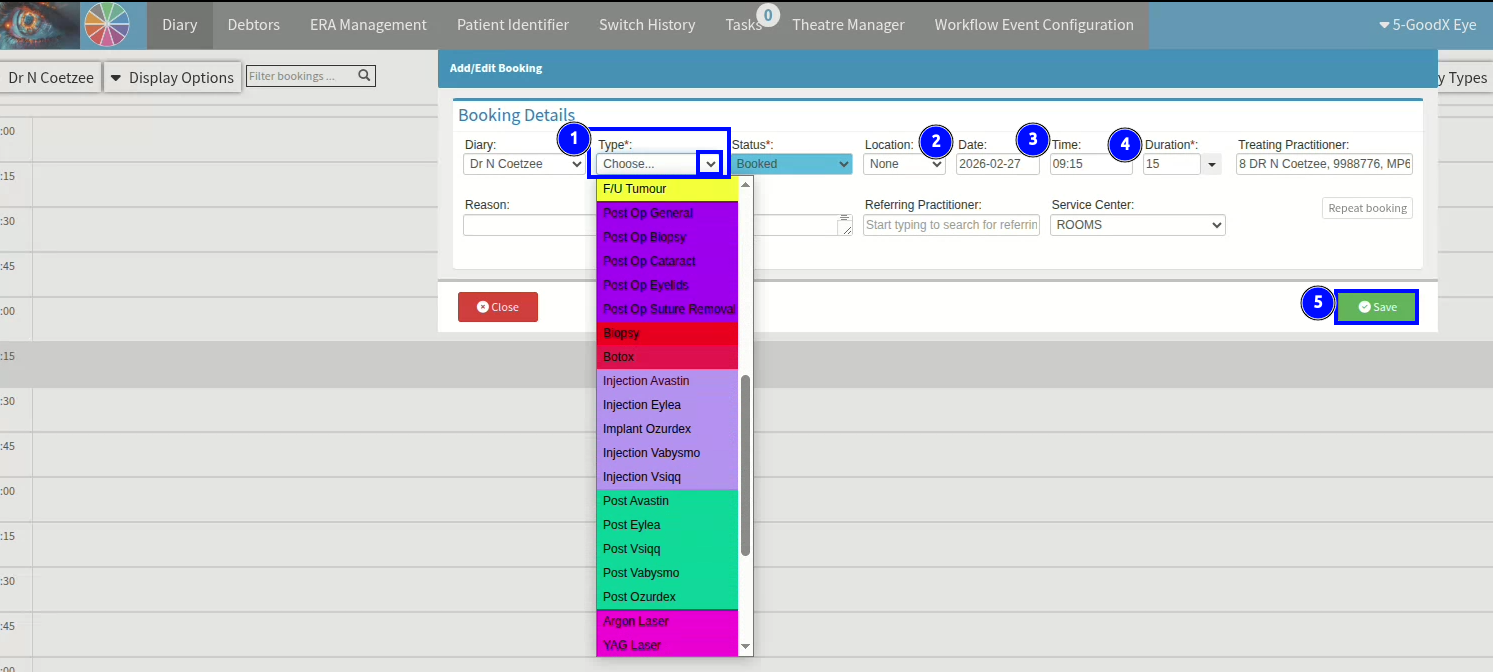
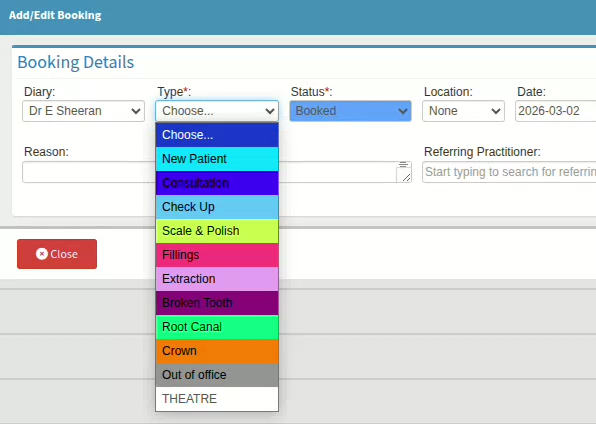
How is a diary booking made?
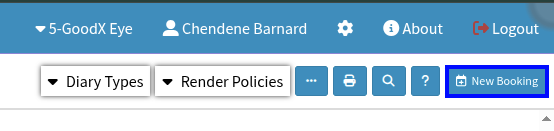
A booking can be made by selecting the button on your Diary tab called “New Booking”.
For rapid scheduling, you can generate a new booking directly within your preferred time slot by double-clicking any unallocated space in the Diary. This shortcut provides an efficient way to bypass standard menus while still ensuring all automated workflows and Booking Type triggers remain active.
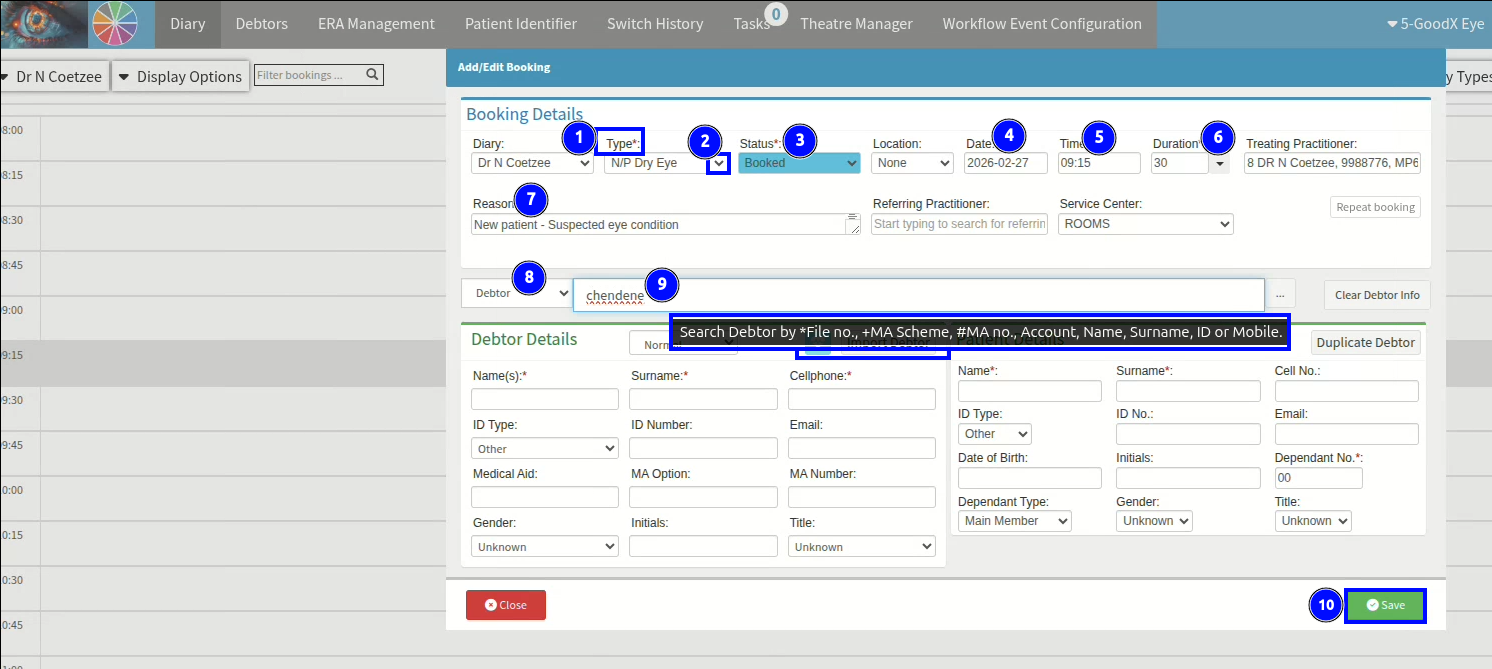
When finalising a booking, ensure the following critical data points are captured to maintain reporting integrity and clinical accuracy. Select the appropriate Booking Type via the dropdown menu, as this categorizes the encounter for future practice analytics. The Status field should reflect the patient’s current stage in the workflow—such as transitioning from "Booked" to "Arrived" upon their arrival at the practice.
Confirm that the Date, Time, and Duration accurately reflect the intended appointment, adjusting for multi-reason visits where necessary. Utilize the Comments/Notes section to record any telephonic or in-person details that will assist Practitioners or Quality Assurance during the examination. For patient identification, the system allows for comprehensive searches across multiple data points. If the patient is new to the practice, their profile can be created via the Import Debtor function, integrated MyGC data synchronization, or by utilizing AI Document Extraction to convert physical PDF/Image uploads into digital files.
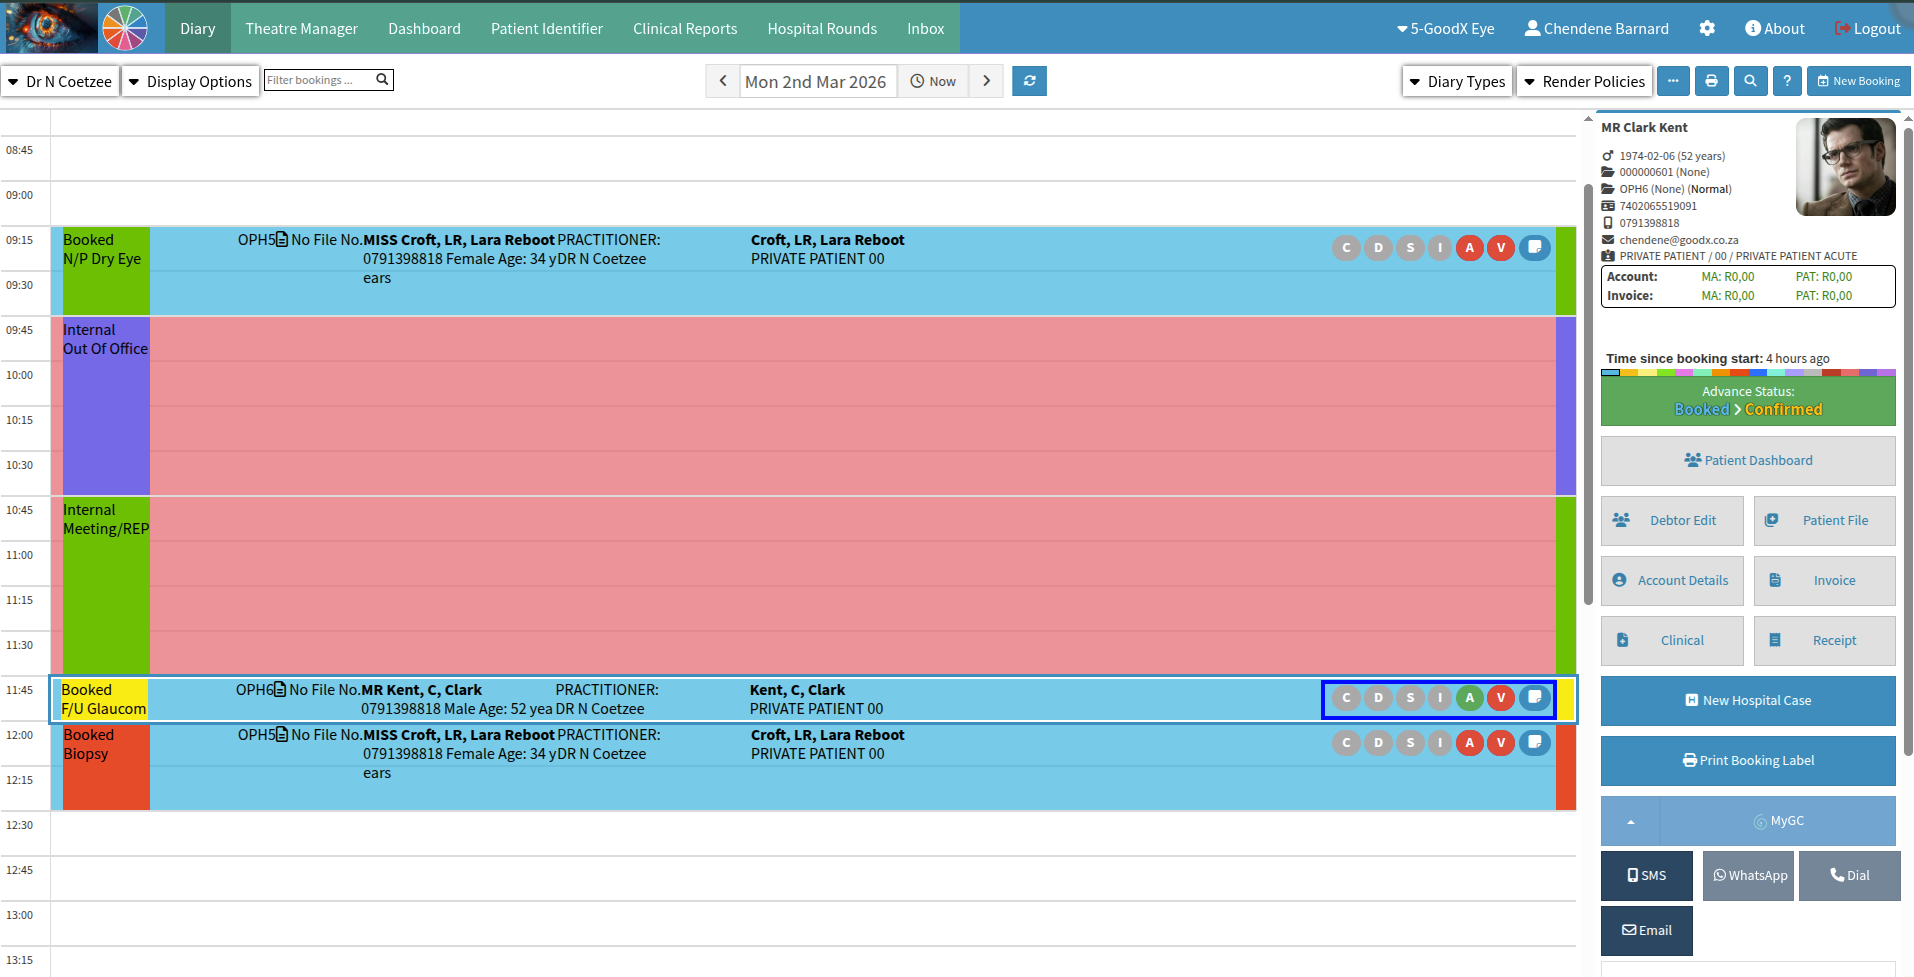
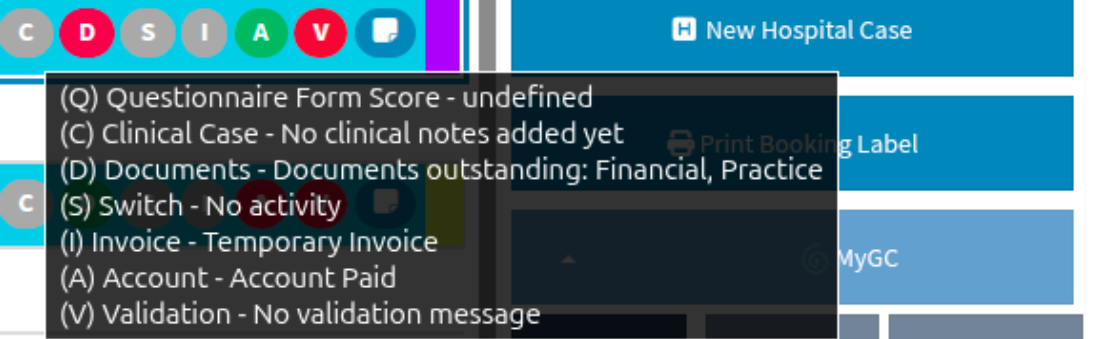
The Diary provides immediate visual feedback regarding the status of a patient's documentation. At a glance, you can monitor documentation compliance in real-time through the booking entry’s visual indicators. Active icons highlight outstanding requirements that need your attention, while greyed-out markers represent features or documents that are not required by your practice’s unique workflow settings.
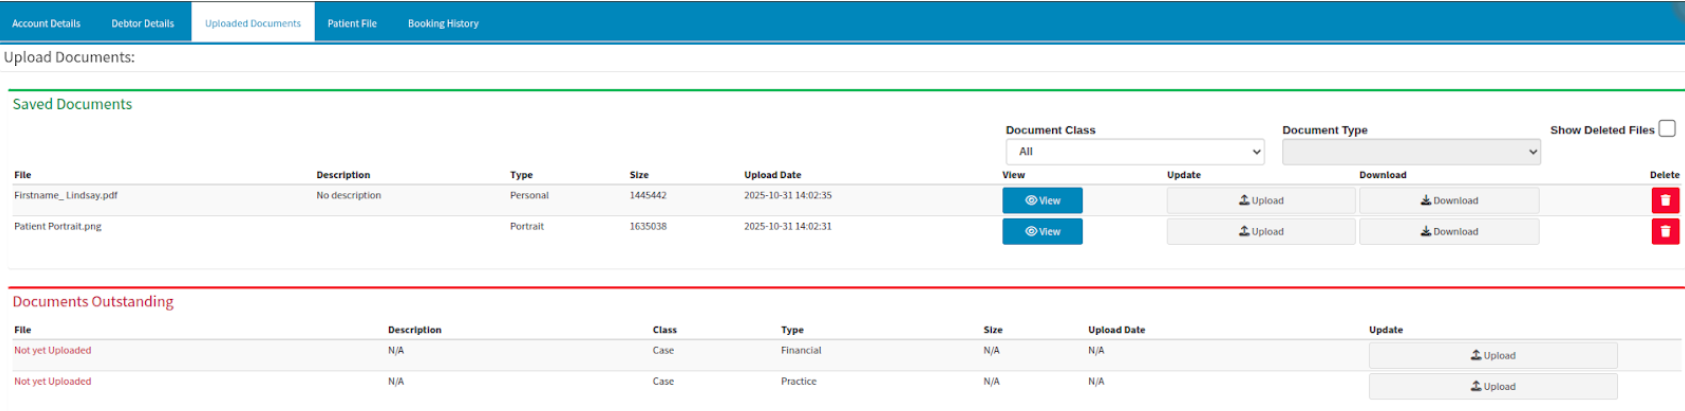
To ensure data integrity, the system allows you to designate specific documents as mandatory. You may utilise the pre-configured default templates or define bespoke document types tailored to your practice. These requirements can be enforced across four primary classifications: Case, Debtor, Patient, and Printouts. Setting these as mandatory ensures your team consistently collects the necessary information for a complete and compliant patient record.
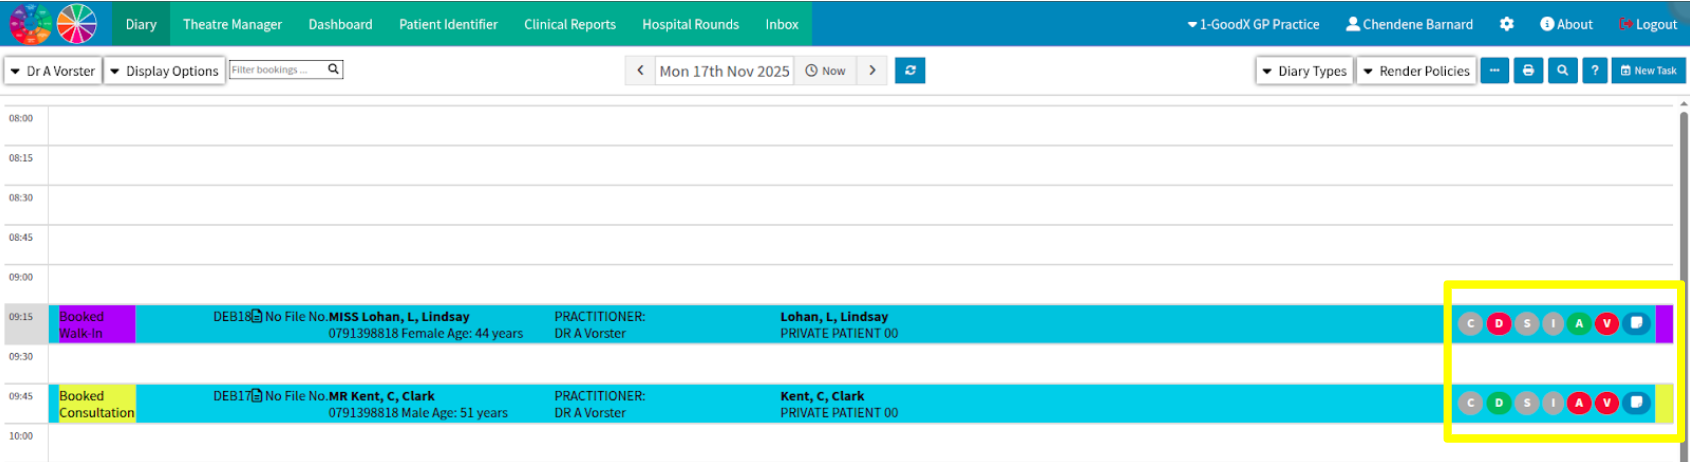
Hovering over the bubble icons activates a contextual tooltip providing a detailed overview of the booking. This dynamic description includes critical administrative notes and real-time status updates—such as "Account Paid"—allowing for immediate verification of the patient's standing without navigating away from the Diary view.
Use the View Notebook icon as a quick-access portal for document management. Once a booking is selected, this shortcut allows you to instantly view existing uploads or add outstanding documents to the file. It’s designed to streamline your workflow by keeping all patient-related documentation just one click away from the main Diary.
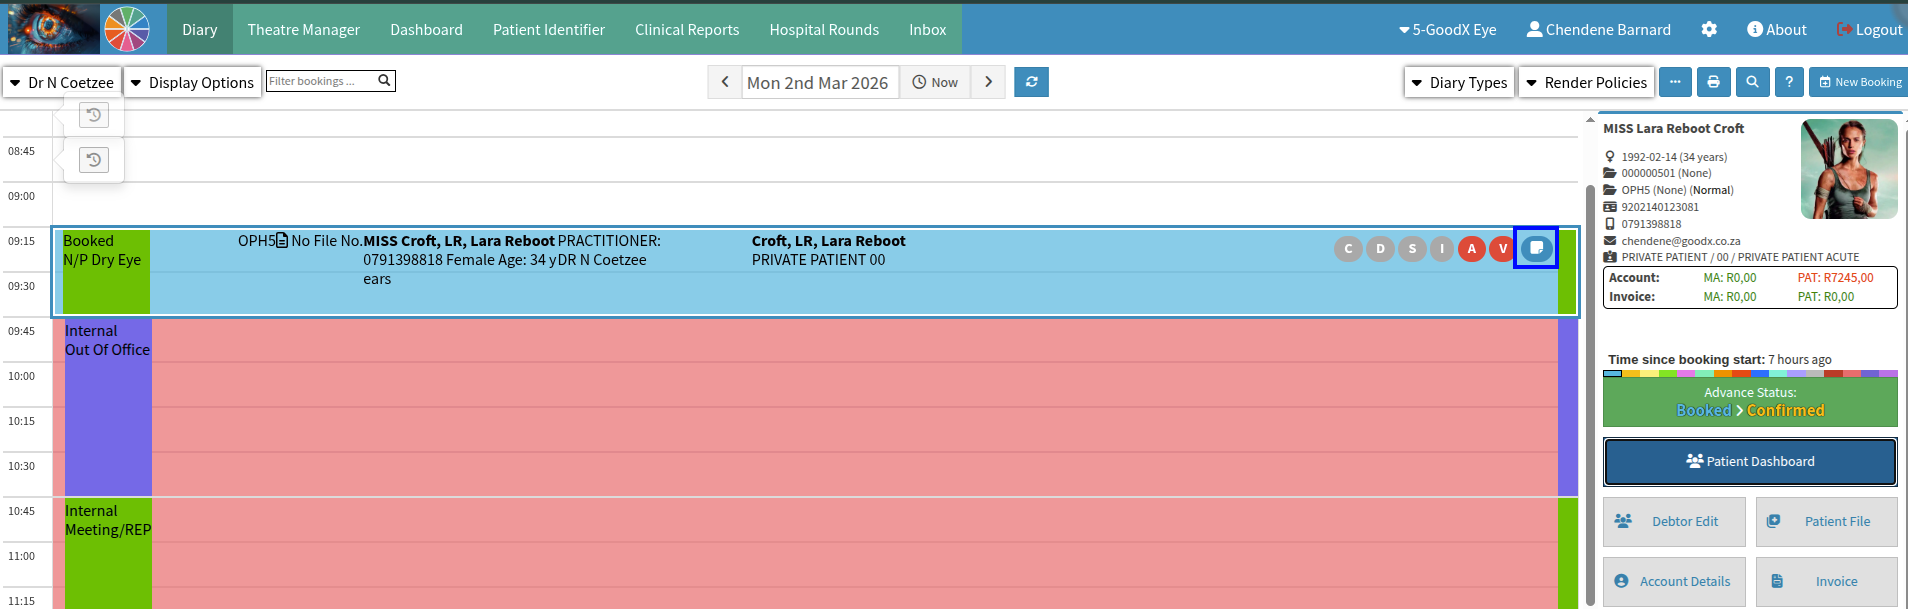
Selecting the Uploaded Documents option will navigate you to a dedicated management screen. This centralised interface allows for the comprehensive review, organization, and verification of all digital files associated with the selected patient or debtor.

How is Facial Recognition set up as “Diary Automation”?
Experience a touchless check-in with integrated Facial Recognition. By utilizing your practice camera, the system automatically identifies arriving patients who have a profile photo on file. It instantly matches the individual to their specific Diary booking, allowing you to confirm their arrival with a single click. This automated biometric identification ensures a sophisticated and efficient start to the patient journey.
Keeping patient photos up to date is simple. Use the Debtor Edit shortcut on the right side of your Diary to access the image management tools. From there, clicking on the current profile photo allows you to instantly update or clear the image, ensuring your automated check-in and identification features function optimally.

Utilising the Delete Face Hash option will permanently erase the biometric data associated with the patient’s profile. This function removes the encrypted mathematical representation used for facial recognition, ensuring all linked identification data is purged from the system. Please note that this action is immediate and irreversible.
When duplicating Debtor records across different entities, it is essential to follow a specific security protocol before finalising the transfer. Prior to saving the record in the new entity, you must manually clear both the Profile Image and the Face Hash. Once these biometric markers have been removed, you may proceed to save the record, successfully establishing the Debtor within the new entity's database.
Please ensure that the record is not assigned a Debtor Status that restricts or prohibits cross-entity transfers. Certain administrative flags may prevent the migration of data to maintain financial integrity. If you encounter an error during this process, your Client Liaison can assist by reviewing the Debtor Status List on your GoodX desktop to identify and resolve any active restrictions.
How is Automatic messages set within “Diary Automation”?
The system supports highly customisable automation for booking reminders, birthday greetings, and follow-up notifications. These are managed via Workflow Event Templates, which allow you to define specific triggers based on your practice's unique Booking Types. When configuring these templates, please prioritize legibility by ensuring high contrast between background colors and text. For instance, avoid using black text on dark backgrounds (such as purple or navy), as this significantly impairs readability for Diary users.
The system offers granular control over communication frequency, allowing templates to be triggered once per Debtor, once per Patient, or for every individual booking. To maintain high attendance rates and ensure patients are consistently informed, best practice is to set the trigger to "Every Booking." This ensures that even frequent visitors receive the necessary confirmations and pre-visit instructions for every scheduled encounter.

Refine your automated messages using the template selection menu. While the system pre-populates a script based on your triggers, the dropdown allows you to switch between any templates mapped to that event. This ensures the prepopulated script information is perfectly suited to the specific patient scenario or booking type.
The MyGC icon on the Diary serves as a real-time status indicator for digital patient intake. A Green icon signifies that the patient has successfully completed all automated forms or questionnaires. Conversely, the Standard Blue icon indicates that the documentation remains pending. If the MyGC icon appears inactive (greyed out), your practice has not yet been configured for an online presence, which is required to enable digital patient onboarding and web-based scheduling for preferred time slots.
Where to learn more about Diary Automation within GoodX:
The GoodX Click&Learn courses :
GoodX Web Implementation for New Client Onboarding https://courses.goodx.co.za/enrol/index.php?id=116
Course: Introducing GoodX Software and the Click & Learn Courses (Version 202412) https://courses.goodx.co.za/course/view.php?id=50
Course: Workflows for Receptionists in the Healthcare Practice (Version 202407) https://courses.goodx.co.za/course/view.php?id=105
The GoodX YouTube Channel: https://www.youtube.com/@GoodXSoftware
GoodX Web App - Search for a Debtor's Booking
GoodX Web Tutorial - How to Create a New Account Whilst Making a Booking
GoodX Web Tutorial - Navigating the myGC Dashboard
GoodX Web - How to Advance the Status of a Booking
GoodX Web App - How to Use Booking Events
GoodX Web App - How To Create Repeat Bookings
GoodX Web App - Copy Booking
GoodX Web App - Move and Copy an Appointment
GoodX Web Tutorial - How to Book a New Patient
GoodX Web App - Change Type of Appointment
GoodX Web - How to Edit a Booking's Information
GoodX Web App - Book Other Appointments
GoodX Web App - Emergency Appointments (Existing Patient)
How to create a Booking for a New Patient on an Existing Debtor
GoodX Web Tutorial - Last Visit Tab: Navigation and Use
GoodX Web App - Booking Icons Explained
GoodX Web - How to Setup Your Booking Types
GoodX Web - How to Setup Fields Displayed on Bookings
GoodX Web Tutorial - Booking Confirmation Status Trigger Setup
GoodX Web - How to View the History of a Booking
GoodX Web App - How To Create a New Express Booking
GoodX Web App - How To Book an Insurance Examination
GoodX Web App - How To Book a Walk-In Insurance Examination
GoodX Web App - How to Un-Arrive a Patient
GoodX Web App - Cancel an Appointment
GoodX Web Tutorial - Making a First Available Booking
The GoodX Learning Centre https://learning.goodx.co.za/
Please note these courses are only modules and are different from the Click&Learn courses. To learn more about Diary Automation, you can apply these search terms:
| Date of Change | Changes | Editor |
| 2026 April 01 | Established Page | Chendene Barnard |
| 2026 May 12 | Updated to formal British-style English, which is the standard used in South African English. | Chendene Barnard |