Theatre App: How to Create a Task from the Operation Booking
Completion requirements
A Task is an assignment that is allocated to a specific person, who will need to perform certain actions in order to get a specific job done. Creating Tasks helps delegate responsibilities across the Practice. Generating Tasks from the Operation Booking provides a convenient way to create Tasks in real-time, specifically tailored to the ongoing Operation, ensuring efficient Task Management during the procedure.
The contents of this user manual will consist of the following information:
Create Task
Feedback
Submit
Navigate to the GoodX Theatre App website by typing /app/gxtheatre/ at the end of the GoodXWeb App URL(Uniform Resource Locator) and press theEnter key on the keyboard.
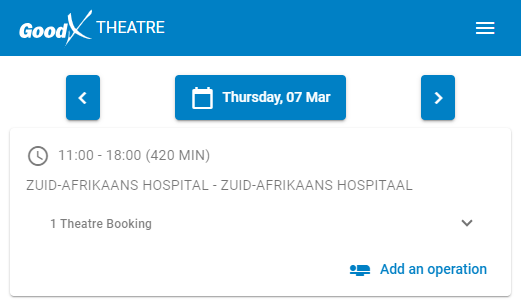
The Theatre List screen will open, indicating all the Theatre Lists scheduled for that day.
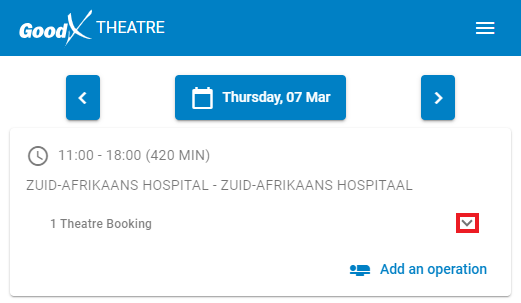
Click/Tap on the drop-down menu on the desired Theatre List.
The Theatre List drop-down menu will open, indicating the Operations scheduled for that specific day.
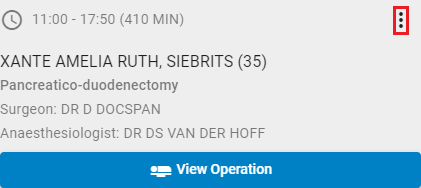
Click/Tap on the Kebab menu corresponding to the desired Operation Booking, located on the top right-hand side.
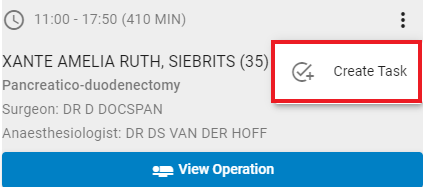
Click/Tap on the Create Task button.
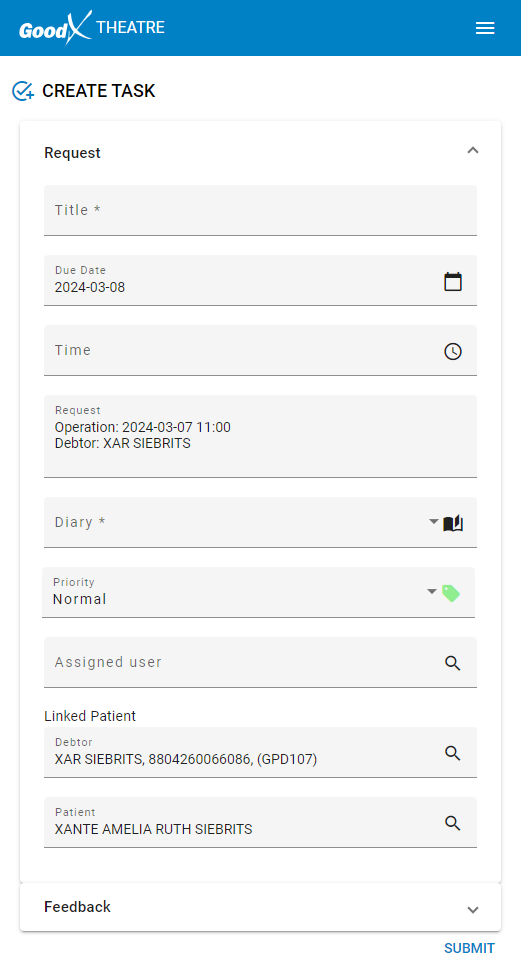
The Create Task screen will open.
Please Note: All Fields that are marked with an *(asterisk) are mandatory fields, which need to be completed in order to save the Task.
Create Task
Creating Tasks allows Users to delegate or communicate important duties to each other.
An explanation of each field will be given:
Title: A brief Description/Name for the Task that should be completed.
Click/Tap on the Title field to enter the desired information.
Due Date: The Date on which the Task should be completed.
Click/Tap on the Date field to enter the desired Date on which the Taskshould be completed.
Time: The Time at which the Task should be carried out.
Click/Tapon theTime field to enter the desiredTime on which the Task should be carried out.
Request: Information regarding which Operation and Patient the Task should be carried out for.
Diary:The Diary on which the Task will be created.
Click/Tap on the Diary drop-down menu to select the option from the List that will become available.
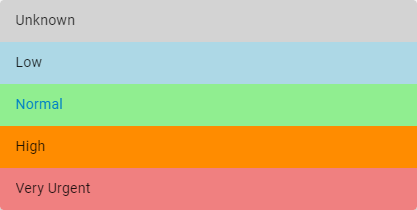
Priority: Refers to how Important the Task is.
Click/Tap on the Priority drop-down menu to set the Priority of the Task.
Unknown: No Priority has been allocated to the Task.
Low: The Task is Not Urgent.
Normal: The Task should be attended to as soon as the more critical Tasks have been attended to.
High: The Task is of Great Importance and should be attended to as soon as possible.
Very Urgent: The Task should be looked at Immediately and will take preference over all other Tasks.
Please Note: The default set Priority will always be Normal.
Assigned User:Name of the User to whom the Task is allocated.
Click/Tap on the Assigned User field to select a User from the drop-down List that becomes available.
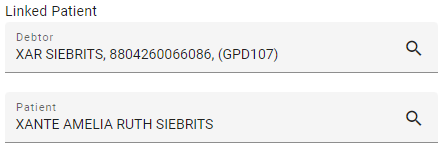
Linked Patient: Information of the Debtor and Patient that is Linked to the Operation.
Feedback: The Feedback section is where a Message can be created to submit with the Task.
Click/Tap on the Feedback panelto open the Feedback section.
The Feedback section will open.
Message: A Text field where more detailed Information regarding a Task can be inserted.
Click/Tap on the Message field to enter the relevant details.
Submit
After all relevant information regarding the Task has been created, the Task should be Submitted.
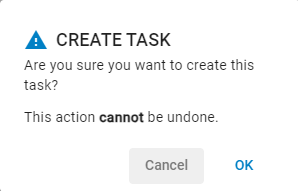
Click/Tap on the Submit button to Submit the Task.
A Create Task pop-up will appear.
Click/Tap on the OK button to Submit the Task.
A Notification will appear to advise that the Task has Successfully been Created.
Please Note: The Task has now been Created and can be found in the Notebook of the Patient whose Operation it was Created for, on the GoodX Web App. For more information on how to access the Notebook, please refer to the user manual: Notebook Screen: Use and Navigation.