Eye Eval 2: Eye Vitals
- Eye Vitals comprise of the following sections:
- Complaints: Indicates that there is an issue/regarding the Patients' Eye Vitals.
- Visual Acuity: The sharpness of vision, typically measured using a Snellen chart or a similar device. The distance (denominator) at which an optimally seeing eye can identify forms observed by an eye test at a standard distance (numerator).
- Colour Vision: An individual's ability to perceive and distinguish different colours. The test is used to detect colour vision deficiencies or colour blindness, which is a condition that affects the ability to see certain colours or shades of colour.
- Contrast Sensitivity: A diagnostic tool which measures an individual's ability to detect and distinguish variations in the contrast of visual images. Assesses the ability of the visual system to detect small differences in brightness between bordering areas of an image. The test typically uses a series of patterns or letters which gradually decrease in contrast, and the Patient is asked to identify them at different levels of contrast.
- Lensometry: Measures the power and curvature of the lens in the eye. The test is performed using a Lensometer which is used to determine the prescription for eyeglasses or contact lenses.
- Autorefraction: A diagnostic test which uses a machine to automatically measure the refractive error of the eye and determine the prescription for eyeglasses or contact lenses.
- Subjective Refraction: A diagnostic test which is performed using a Phoropter to determine the exact eyeglass or contact lens prescription for a Patient and is considered to be more accurate than an autorefraction test.
- Keratometry: A test that uses a Keratometer to measure the curvature of the cornea, the clear front surface of the eye. The test will determine the shape of the cornea and calculates the power of the eyeglass or contact lens prescription.
- Pupil: A black hole in the centre of the iris of the eye that allows light to strike the retina. The size of the pupil changes according to the amount of light that enters the eye. The pupil will decrease in size the brighter the light is and increases in size when the amount of light decreases.
- Intraocular Pressure (IOP): The pressure of the fluid inside the eye. The method used to determine intraocular pressure is Tonometry. IOP is an essential aspect in the evaluation of Patients at risk of Glaucoma.
- Click on the Eye Vitals panel.
![]()
- The Eye Vitals panel will expand.
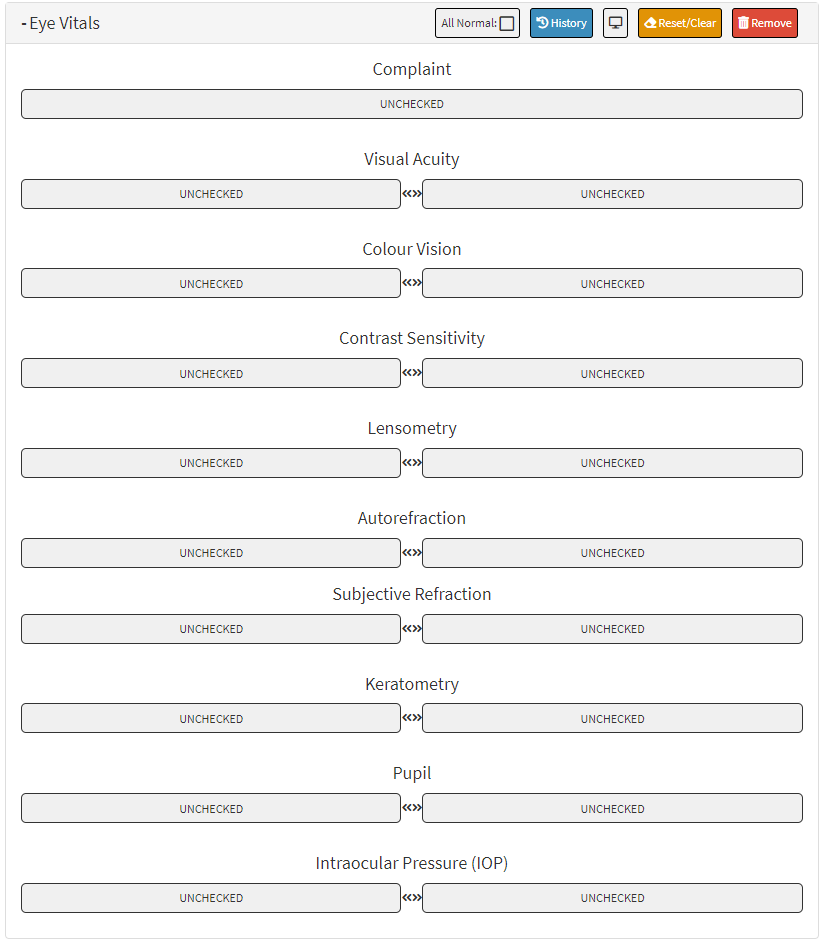
- An explanation will be given for each field and option on the Problem List panel.
Complaint
- Click on the Unchecked button to open the features of the Complaint section for the section to open, to be able to enter the desired findings.
![]()
- The Eye Vitals panel will be highlighted in red to show that findings have been added to the Eye Vitals panel.
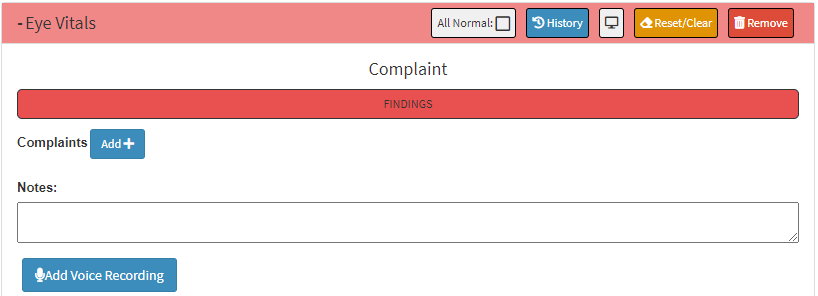
- An explanation will be given for each field and option in the Complaints section.
![]()
- Findings: Gives an indication that abnormal conclusions have been made.
- Click on the Findings button to indicate Normal findings in the Complaints section.
- The Findings button will change to green to show that the conclusion which has been made is Normal.
- Complaints: Why the Patient is consulting the Practitioner as well as any symptoms that are being experienced.
- Click on the Add + button to add the relevant information regarding the Patients symptoms.
![]()
- The Complaints screen will open.
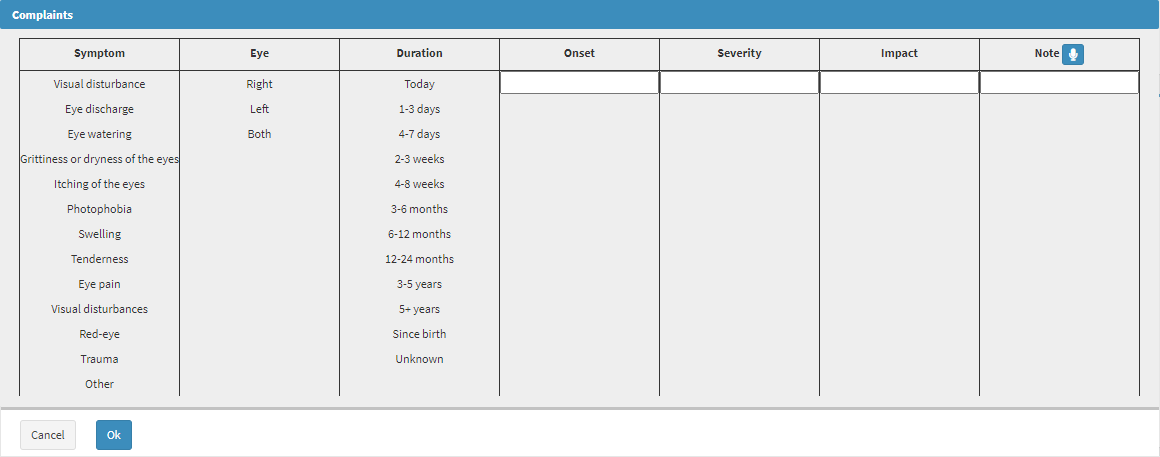
- An explanation will be given for each field and option on the Complaints screen.
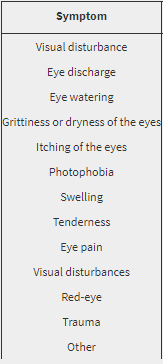
- Symptom: Signs or indications that a Patient is experiencing a particular medical condition or illness. Symptoms are the body's way of communicating that something is wrong.
- Click on the relevant option from the list in the Symptoms field to make a selection:
- Visual Disturbance: A disruption or change to being able to see normally. For example, blurred vision.
- Eye Discharge: Also known as Conjunctival Discharge or Ocular Discharge. A condition in which there is an abnormal secretion of fluid from the eyes. The fluid can be clear or have different colours such as yellow, green, brown, or white, and could possibly be accompanied by different symptoms such as eye redness, itching, burning, or pain.
- Eye Watering: Known as Epiphora, is a condition where there is an excessive tearing or overflow of tears from the eyes. There are a variety of factors that can cause Eye Watering such as irritation or inflammation, etc.
- Grittiness or Dryness of the eyes: A condition where the eyes feel scratchy, gritty, or dry. Can be caused by a lack of tears or by a change in the quality of the tears or for example when a Patient is subjected to wind, dust, or high altitudes.
- Itching of the eyes: Also known as Ocular Pruritus, is a common condition that refers to a sensation of discomfort or irritation in the eyes that causes a Patient to want to rub or scratch their eyes.
- Photophobia: An abnormal sensitivity to light. Patients with Photophobia experience discomfort, pain, or even migraine headaches when exposed to bright light.
- Swelling: Known as Eyelid Oedema, refers to the build-up of fluid in the tissue around the eyes, causing the eyelids to appear puffy or swollen.
- Tenderness: A feeling of discomfort or pain in the eyes or the surrounding area.
- Eye Pain: A discomfort felt in the area of the eyes, which can be caused by trauma or an infection of the eyes.
- Visual Disturbances: A disruption or change to being able to see normally. For example, blurred vision.
- Red-eye: The Sclera of the eye changes from white to red or bloodshot.
- Trauma: The Patient suffered serious injuries to the eyes, due to an accident or physical abuse.
- Other: Any additional findings that are observed.
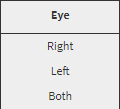
- Eye: The eye which is affected by the symptoms.
- Click on the relevant option which is available in the Eye field to make a selection:
- Right: The eye on the right side of the face is affected.
- Left: The eye on the left side of the face is affected.
- Both: The eye on the left and right side of the face are both affected.
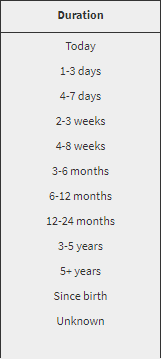
- Duration: How long the symptoms have been affecting the Patient.
- Click on the relevant option from the list in the Duration field to make a selection:
- Today: On the day that the Patient has consulted with the Practitioner.
- 1-3 days: The Patients' symptoms have transpired within 1-3 days before consulting with the Practitioner.
- 4-7 days: The Patients' symptoms have transpired within 4-7 days.
- 2-3 weeks: The Patients' symptoms have been an issue for 2-3 weeks.
- 4-8 weeks: The Patients' symptoms have been an issue for 4-8 weeks.
- 3-6 months: The symptoms of the Patient, have been affecting them for 3-6 months.
- 6-12 months: The symptoms of the Patient, have been affecting them for 6-12 months.
- 12-24 months: The symptoms of the Patient, have been affecting them for 12-24 months.
- 3-5 years: The Patient has been experiencing symptoms for the last 3-5 years.
- 5+ years: The Patient has been experiencing symptoms for 5 years or longer.
- Since Birth: The Patient has been affected by their symptoms since the day of their birth.
- Unknown: The Patient can not recall for how long their symptoms have been affecting them.
- Onset: When the Patient started to notice the symptoms which they are experiencing.
- Click on the Onset field to enter when the Patient started experiencing symptoms of the condition.

- Severity: How bad the condition is, which is affecting the Patient.
- Click on the Severity field to enter how badly the condition/symptoms have affected the Patient.

- Impact: The consequences of the condition for the Patient.
- Click on the Impact field to enter how the Patients' life has been affected.

- Phases: To what degree the condition has progressed.
- Click on the Phases field to enter the relevant information regarding what degree the patient has been affected.

- Note: Any extra information that relates to the particular condition of the Patients.
- Click on the Notes field to enter any relevant information.
- Click on the Microphone button to transcribe an audio note to the Notes field.
![]()
- For more information regarding how to transcribe voice notes, please refer to the user manual: Add Voice Recording.
- Click on the Cancel button to close the Ophthalmic History screen without saving and return to the Eye Eval 2 screen.
![]()
- Click on the Ok button to save the changes which have been made.
![]()
- The fields that have been completed will now appear in the Ophthalmic History section. The Ophthalmic History section is a persistent section which remembers the information which has been added to the field even if the screen has been saved and closed, allowing the Practioner to see the information every time the form is opened.

- Click on the Delete button to remove the entry from the list.
![]()
Please Note: The Practitioner is able to add as many lines as desired to the Eye Vitals section as desired/necessary, following the steps as explained above.

- Notes: Any information regarding the Patients symptoms and conditions.
- Click on the Notes field to enter the relevant information.
- Click on the Add Voice Recording button to capture audio notes regarding the Patients symptoms and conditions.
![]()
- The Voice Record screen will open where the Practitioner can record the relevant and desired notes.
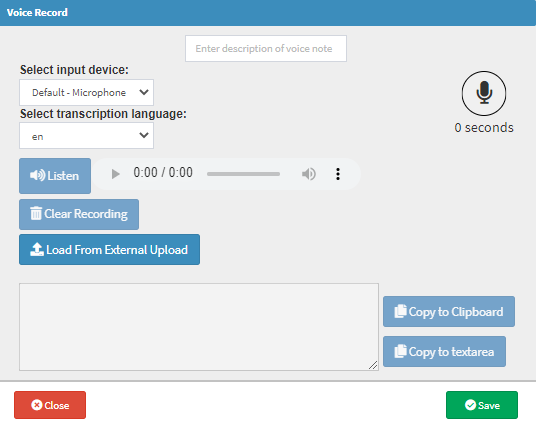
- For more information regarding how to make voice notes, please refer to the user manual: Add Voice Recording.
Please Note: Once the voice recording has been recorded and saved the voice note will be added to the Problem List panel.

Visual Acuity

- Click on the Unchecked button of the desired side to open the features of the Visual Acuity section, to be able to enter the desired findings.
![]()
- The Visual Acuity section will open.
- Click on the <<>> button.
![]()
- The Visual Acuity sections for both eyes will open.
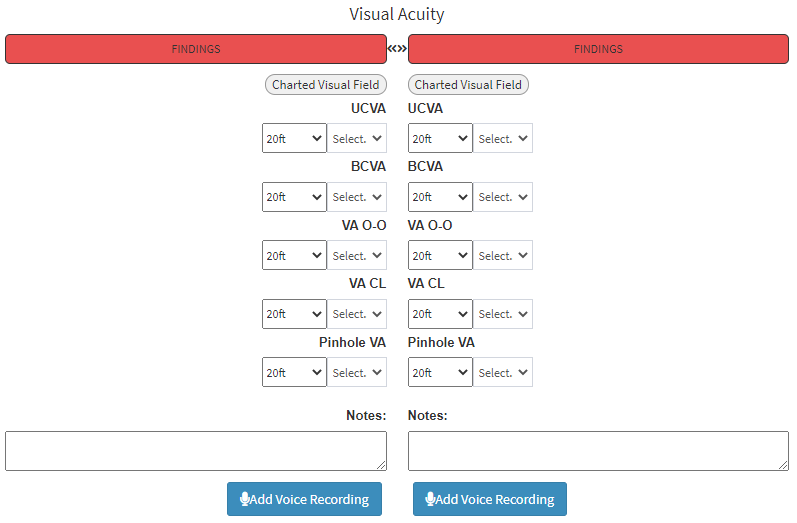
Please Note: The <<>> button can be used to switch to the other eye when only one side has been opened.
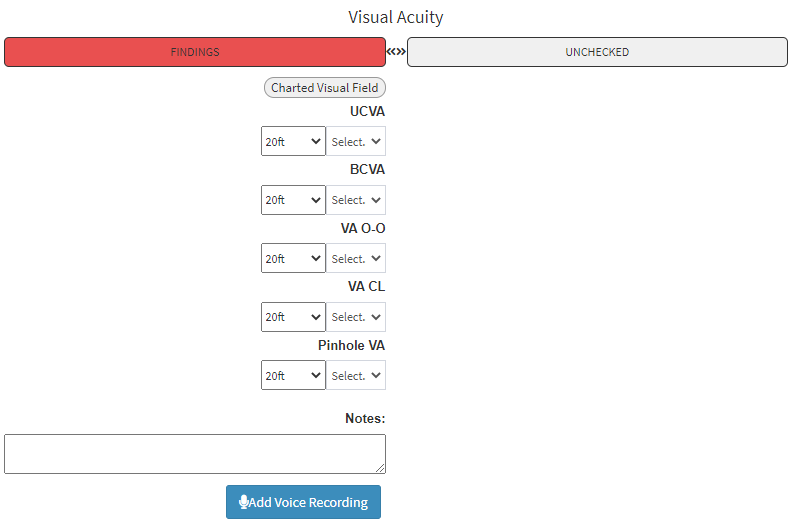
- An explanation will be given for each field and option in the Visual Acuity section:
![]()
- Findings: Gives an indication that abnormal conclusions have been made.
- Click on the Findings button to indicate Normal findings in the Visual Acuity section.
- The Findings button will change to green to show that the conclusion which has been made is Normal.
![]()
Please Note: When the user clicks on the Normal button all the extra options on the Visual Acuity section will close and the section of the eye which has been marked as Normal will be marked as Unchecked.
![]()
- Charted Visual Field:

- UCVA: Uncorrected Visual Acuity -The ability to see clearly without corrective lenses. Typically measured using a standard eye chart, such as the Snellen chart, at a distance of 20 feet/6 meters.
- Click on the 20 ft. drop-down menu to change the distance measurement at which the test was done.
![]()
- Select the appropriate option from the list which has become available:

- 20 ft: The test was done at a distance of 20 feet (imperial).
- 6 m: The test was done at a distance of 6 meters (metric).
- Decimal: The test that was done is measured at a decimal equivalent.
- Click on the Select field to choose the most accurate result for the test which was performed.
![]()
Please Note: When the distance is changed, all tests in the Visual Acuity sections' distance will be updated. Also, the options in the Select field will update according to the measurement method that has been selected.

- BCVA: Best Corrected Visual Acuity - A Patient's best possible vision after the use of corrective lenses or other treatment.Used to determine the effectiveness of a particular treatment or the need for additional treatment. It is also used to monitor the progression of certain eye diseases, such as age-related macular degeneration or glaucoma, which can cause a gradual decline in vision over time.

- VA O-O: Visual Acuity with glasses - The distance (denominator) at which the Patient can identify forms observed by an eye test at a standard distance (numerator), which is typically 6 meters with glasses or contact lenses.

- VA CL: Visual Acuity with contact lenses - The distance (denominator) at which the Patient can identify forms observed by an eye test at a standard distance (numerator), which is typically 6 meters with glasses or contact lenses.

- Pinhole VA: A measurement of a Patients vision that uses a small aperture/pinhole to test their visual acuity. The pinhole blocks out any peripheral light, which can be spread out or warped by certain eye conditions such as cataracts or irregular corneal shape, thus allowing the person to see more clearly.

- Notes: Any extra information that relates to the particular condition of the Patients' family member.
- Click on the Notes field to enter any relevant information.

- Click on the Add Voice Recording button to capture audio notes regarding the Patients symptoms and conditions.
![]()
- The Voice Record screen will open where the Practitioner can record the relevant and desired notes.
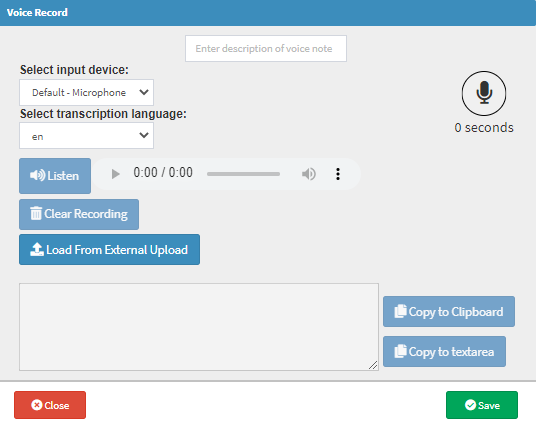
- For more information regarding how to make voice notes, please refer to the user manual: Add Voice Recording.
Please Note: Once the voice recording has been recorded and saved the voice note will be added to the Colour Vision section.

Colour Vision

- Click on the Unchecked button of the desired side to open the features of the Colour Vision section, to be able to enter the desired findings.
![]()
- The Colour Vision section will open.

- Click on the <<>> button.
![]()
- The Colour Vision sections for both eyes will open.

Please Note: The <<>> button can be used to switch to the other eye when only one side has been opened.
- An explanation will be given for each field and option in the Colour Vision section:
![]()
- Findings: Gives an indication that abnormal conclusions have been made.
- Click on the Findings button to indicate Normal findings in the Colour Vision section.
- The Findings button will change to green to show that the conclusion which has been made is Normal.
![]()
- Click on the + Add Image button to upload/draw/take a picture which will be added to the Colour Vision section as a visual indication.
![]()
- The Video Capture screen will open.
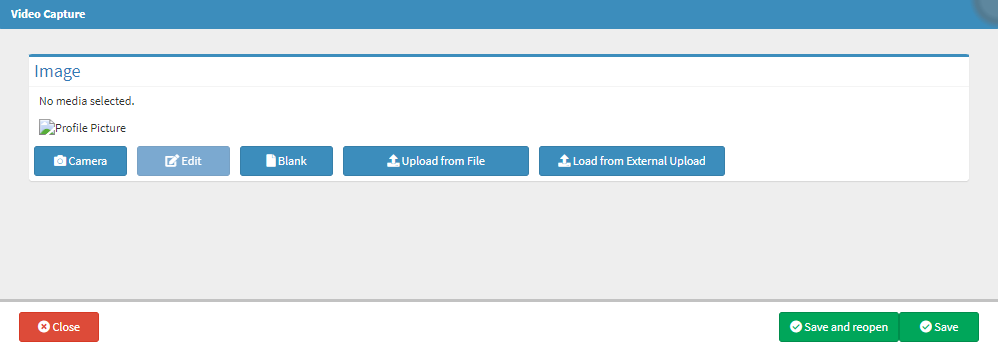
- For more information regarding how to upload/draw/take a picture, please refer to the user manual: How to Upload an Image/Photo.

- Notes: Any extra information that relates to the test which has been performed.
- Click on the Notes field to enter any relevant information.

- Click on the Add Voice Recording button to capture audio notes regarding the Patients symptoms and conditions.
![]()
- The Voice Record screen will open where the Practitioner can record the relevant and desired notes.
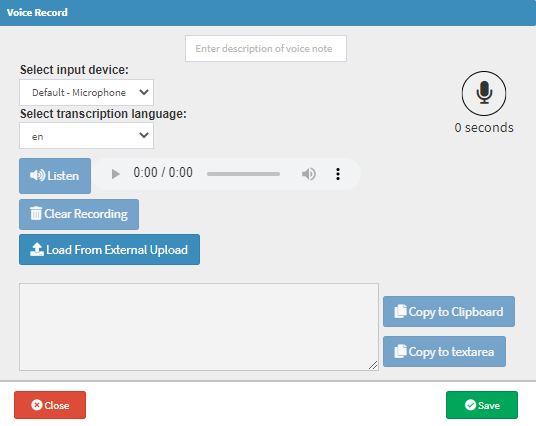
- For more information regarding how to make voice notes, please refer to the user manual: Add Voice Recording.
Please Note: Once the voice recording has been recorded and saved the voice note will be added to the Visual Acuity section.

Contrast Sensitivity

- Click on the Unchecked button of the desired side to open the features of the Contrast Sensitivity section, to be able to enter the desired findings.
![]()
- The Contrast Sensitivity section will open.

- Click on the <<>> button.
![]()
- The Contrast Sensitivity sections for both eyes will open.

Please Note: The <<>> button can be used to switch to the other eye when only one side has been opened.
- An explanation will be given for each field and option in the Contrast Sensitivity section:
![]()
- Findings: Gives an indication that abnormal conclusions have been made.
- Click on the Findings button to indicate Normal findings in the Contrast Sensitivity section.
- The Findings button will change to green to show that the conclusion which has been made is Normal.
![]()
- Click on the + Add Image button to upload/draw/take a picture which will be added to the Contrast Sensitivity section as a visual indication.
![]()
- The Video Capture screen will open.

- For more information regarding how to upload/draw/take a picture, please refer to the user manual: How to Upload an Image/Photo.

- Notes: Any extra information that relates to the test which has been performed.
- Click on the Notes field to enter any relevant information.

- Click on the Add Voice Recording button to capture audio notes regarding the Patients symptoms and conditions.
![]()
- The Voice Record screen will open where the Practitioner can record the relevant and desired notes.

- For more information regarding how to make voice notes, please refer to the user manual: Add Voice Recording.
Please Note: Once the voice recording has been recorded and saved the voice note will be added to the Contrast Sensitivity section.

Lensometry

- Click on the Unchecked button of the desired side to open the features of the Lensometery section, to be able to enter the desired findings.
![]()
- The Lensometry section will open.
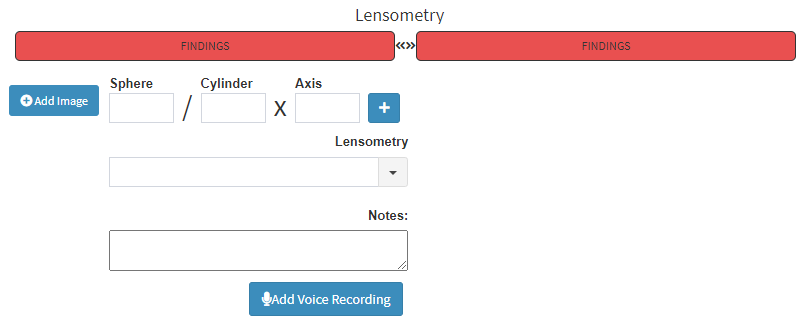
- Click on the <<>> button.
![]()
- The Lensometry sections for both eyes will open.
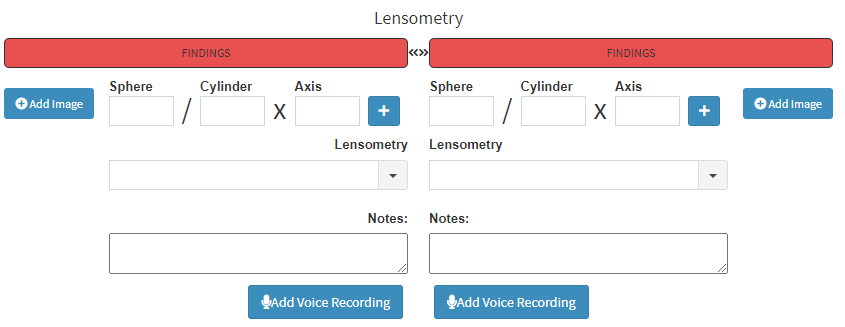
Please Note: The <<>> button can be used to switch to the other eye when only one side has been opened.
- An explanation will be given for each field and option in the Lensometry section:
![]()
- Findings: Gives an indication that abnormal conclusions have been made.
- Click on the Findings button to indicate Normal findings in the Lensometry section.
- The Findings button will change to green to show that the conclusion which has been made is Normal.
![]()
- Click on the + Add Image button to upload/draw/take a picture which will be added to the Lensometry section as a visual indication.
![]()
- The Video Capture screen will open.
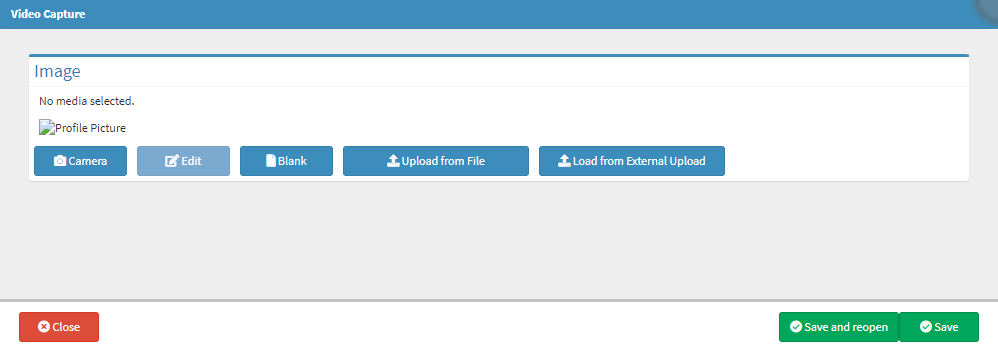
- For more information regarding how to upload/draw/take a picture, please refer to the user manual: How to Upload an Image/Photo.

- Sphere: A lens that has the same curvature in all directions, for example, a ball.
- Click on the Sphere field to manually enter the results of the findings.

- Cylinder: A lens which has several different curvatures in different directions, similar to a can.
- Click on the Cylinder field to manually enter the results of the findings.

- Axis: The line that runs through the centre of the lens that separates the two different curvatures. Measured in degrees and is used and is used to specify the orientation of the cylinder. The axis is used to align the lens with the Patient's eye for proper correction of astigmatism.
- Click on the Axis field to manually enter the results of the findings.
- Click on the + button to select the measurements from a chart.
![]()
- The Measurement screen will open.

- Click on the desired measurement in each column to make a selection.
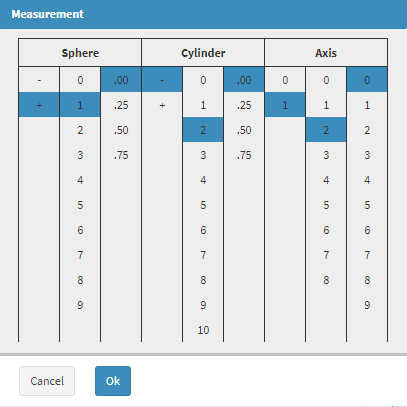
- Click on the Cancel button to close the Measurement screen and return to the Eye Eval 2 screen.
![]()
- Click on the Ok button to close the Measurement screen and return to the Eye Eval 2 screen.
![]()
- The measurements which have been selected will be pulled through to the relevant fields in the Lensometry section.


- Lensometry:

- Notes: Any extra information that relates to the particular test which has been performed.
- Click on the Notes field to enter any relevant information.
- Click on the Add Voice Recording button to capture audio notes regarding the Patients symptoms and conditions.
![]()
- The Voice Record screen will open where the Practitioner can record the relevant and desired notes.

- For more information regarding how to make voice notes, please refer to the user manual: Add Voice Recording.
Please Note: Once the voice recording has been recorded and saved the voice note will be added to the Lensometry section.

Autorefraction

- Click on the Unchecked button of the desired side to open the features of the Autorefraction section, to be able to enter the desired findings.
![]()
- The Autorefraction section will open.

- Click on the <<>> button.
![]()
- The Autorefraction sections for both eyes will open.

Please Note: The <<>> button can be used to switch to the other eye when only one side has been opened.
- An explanation will be given for each field and option in the Autorefraction section:
![]()
- Findings: Gives an indication that abnormal conclusions have been made.
- Click on the Findings button to indicate Normal findings in the Autorefraction section.
- The Findings button will change to green to show that the conclusion which has been made is Normal.
![]()

- Sphere: The spherical power of a corrective lens, which is measured in diopters and is used to correct nearsightedness or farsightedness. The sphere correction determines the amount of correction needed to bring light into focus on the retina.
- Click on the Sphere field to manually enter the results of the findings.

- Cylinder: Cylindrical correction is used to correct astigmatism, which is an irregular curvature of the cornea or lens that distorts the retinal image. The cylinder correction determines the amount of correction needed to correct astigmatism and align the light entering the eye so that it focuses clearly on the retina.
- Click on the Cylinder field to manually enter the results of the findings.

- Axis: The axis is measured in degrees and indicates the orientation of the cylinder correction relative to the horizontal meridian of the eye. The axis is important for the correct placement of the cylindrical correction in a corrective lens, as the orientation of the cylinder correction must be aligned with the axis of astigmatism in the eye to effectively correct the visual problem.
- Click on the Axis field to manually enter the results of the findings.
- Click on the + button to select the measurements from a chart.
![]()
- The Measurement screen will open.

- Click on the desired measurement in each column to make a selection.
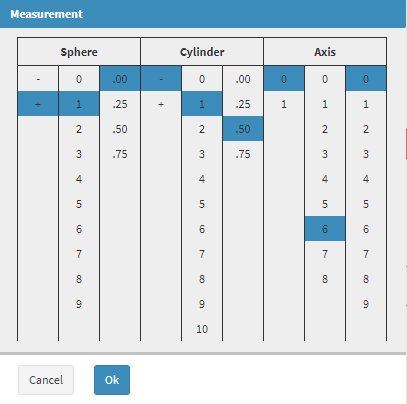
- Click on the Cancel button to close the Measurement screen and return to the Eye Eval 2 screen.
![]()
- Click on the Ok button to close the Measurement screen and return to the Eye Eval 2 screen.
![]()
- The measurements which have been selected will be pulled through to the relevant fields in the Autorefraction section.


- Notes: Any extra information that relates to the particular test which has been performed.
- Click on the Notes field to enter any relevant information.
- Click on the Add Voice Recording button to capture audio notes regarding the Patients symptoms and conditions.
![]()
- The Voice Record screen will open where the Practitioner can record the relevant and desired notes.

- For more information regarding how to make voice notes, please refer to the user manual: Add Voice Recording.
Please Note: Once the voice recording has been recorded and saved the voice note will be added to the Autorefraction section.

Subjective Refraction

- Click on the Unchecked button of the desired side to open the features of the Autorefraction section, to be able to enter the desired findings.
![]()
- The Autorefraction section will open.

- Click on the <<>> button.
![]()
- The Subjective Refraction sections for both eyes will open.

Please Note: The <<>> button can be used to switch to the other eye when only one side has been opened.
- An explanation will be given for each field and option in the Subjective Refraction section:
![]()
- Findings: Gives an indication that abnormal conclusions have been made.
- Click on the Findings button to indicate Normal findings in the Subjective Refraction section.
- The Findings button will change to green to show that the conclusion which has been made is Normal.
![]()

- Sphere: The spherical power of a corrective lens, which is measured in diopters and is used to correct nearsightedness or farsightedness. The Practitioner will use a phoropter, which contains a range of lens powers, to determine the spherical correction that provides the clearest vision for the patient. The sphere correction determines the amount of correction needed to bring light into focus on the retina.
- Click on the Sphere field to manually enter the results of the findings.

- Cylinder: Cylindrical correction is used to correct astigmatism, which is an irregular curvature of the cornea or lens that distorts the retinal image. The cylinder correction determines the amount of correction needed to correct astigmatism and align the light entering the eye so that it focuses clearly on the retina.
- Click on the Cylinder field to manually enter the results of the findings.

- Axis: The axis is measured in degrees and indicates the orientation of the cylinder correction relative to the horizontal meridian of the eye. The axis is important for the correct placement of the cylindrical correction in a corrective lens, as the orientation of the cylinder correction must be aligned with the axis of astigmatism in the eye to effectively correct the visual problem.
- Click on the Axis field to manually enter the results of the findings.
- Click on the + button to select the measurements from a chart.
![]()
- The Measurement screen will open.

- Click on the desired measurement in each column to make a selection.

- Click on the Cancel button to close the Measurement screen and return to the Eye Eval 2 screen.
![]()
- Click on the Ok button to close the Measurement screen and return to the Eye Eval 2 screen.
![]()
- The measurements which have been selected will be pulled through to the relevant fields in the Autorefraction section.


- Notes: Any extra information that relates to the particular test which has been performed.
- Click on the Notes field to enter any relevant information.
- Click on the Add Voice Recording button to capture audio notes regarding the Patients symptoms and conditions.
![]()
- The Voice Record screen will open where the Practitioner can record the relevant and desired notes.

- For more information regarding how to make voice notes, please refer to the user manual: Add Voice Recording.
Please Note: Once the voice recording has been recorded and saved the voice note will be added to the Subjective Refraction section.

Keratometry

- Click on the Unchecked button of the desired side to open the features of the Keratometry section, to be able to enter the desired findings.
- The Keratometry section will open.

- Click on the <<>> button.
![]()
- The Keratometry sections for both eyes will open.

Please Note: The <<>> button can be used to switch to the other eye when only one side has been opened.
- An explanation will be given for each field and option in the Keratometry section:
![]()
- Findings: Gives an indication that abnormal conclusions have been made.
- Click on the Findings button to indicate Normal findings in the Keratometry section.
- The Findings button will change to green to show that the conclusion which has been made is Normal.
![]()
- Keratometry Measured:
- Click on the Keratometry Measured to ....

- K1: The flat meridian of the anterior corneal surface. The K1 value is important for determining the correct prescription for contact lenses or for planning refractive surgical procedures, such as LASIK.
- Click on the K1 field to manually enter the results of the findings.

- K1 Axis: The orientation of the K1 value, which represents the power of the cornea in the first principal meridian. The K1 Axis is measured in degrees and indicates the orientation of the K1 value comparable to a reference point, such as the horizontal meridian of the eye.
- Click on the K1 Axis field to manually enter the results of the findings.
- Click on the K1 Axis field to manually enter the results of the findings.

- K2: The steep meridian of the anterior corneal surface. The K2 value represents the power of the cornea in the second principal meridian, which is used to calculate the corneal power and the corneal astigmatism.
- Click on the K2 field to manually enter the results of the findings.
- Click on the K2 field to manually enter the results of the findings.

- K2 Axis: Refers to the orientation of the K2 value, which symbolises the power of the cornea in the second principal meridian. The orientation of the correction must be aligned with the axis of the astigmatism in the eye to effectively correct the visual problem.
- Click on the K2 Axis field to manually enter the results of the findings.

- Corneal Astigmatism: A type of refractive error in which the cornea has an irregular curvature. Measures the curvature of the cornea and determines the amount and orientation of the astigmatism. The value of Corneal Astigmatism is important for determining the correct prescription for corrective lenses or for planning refractive surgical procedures.

- Average K's: The average of the K1 and K2 values, which are the measurements of the cornea's curvature in the two principle meridians. The Average K value is used to calculate the corneal power, which is a measure of the cornea's ability to focus light onto the retina.
x K1 Axis/K2 x K2 Axis)
- Click on the + button to select the measurements from a chart.
![]()
- The Measurement screen will open.
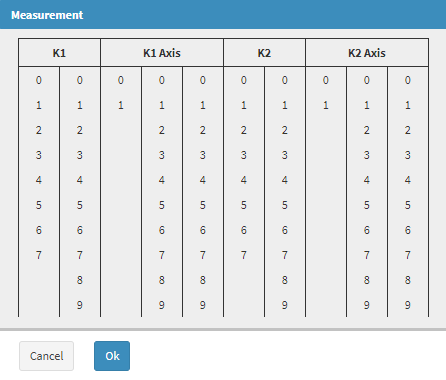
- Click on the desired measurement in each column to make a selection.
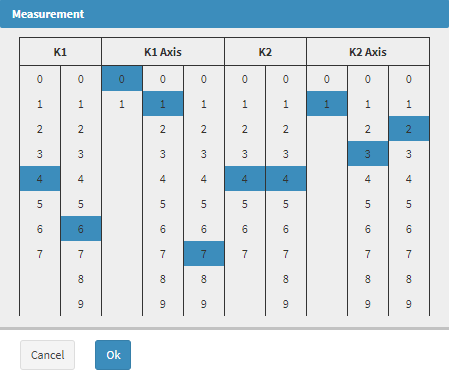
- Click on the Cancel button to close the Measurement screen and return to the Eye Eval 2 screen.
- Click on the Ok button to close the Measurement screen and return to the Eye Eval 2 screen.
![]()
- The measurements which have been selected will be pulled through to the relevant fields in the Keratometery section.


- Notes: Any extra information that relates to the particular test which has been performed.
- Click on the Notes field to enter any relevant information.
- Click on the Add Voice Recording button to capture audio notes regarding the Patients symptoms and conditions.
![]()
- The Voice Record screen will open where the Practitioner can record the relevant and desired notes.

- For more information regarding how to make voice notes, please refer to the user manual: Add Voice Recording.
Please Note: Once the voice recording has been recorded and saved the voice note will be added to the Autorefraction section.
