Debtor Transactions
Debtor Transactions are all transactions that are done and that relate directly to the Debtor. The Debtor Transactions tab allows the user to set up and manage the specific settings that relate directly to the Debtor. For example, Annual Interest Rates, Descriptions on Statements, Estimates, Over Payments, Cash Register, Credit Control, Billing Groups, Service Dates, Markups etc.
System Options is the configuration of how the system operates and allow the user to set up the system to suit the needs of the Practice and activates/deactivates certain functions in the system. Debtor Transactions and Billing setup allows the Practice to customise the way that billing is done in the Practice.
- The contents of this user manual will consist of the following information:
- Debtor Transaction Toggles
- Log in to the GoodX Desktop as the Supervisor.
- From the Navigator, Double Click on the Options Module.

- An Authorisation/Password Necessary pop-up will appear.

- Select the user from the User Name drop-down menu.
- Enter the password in the Password field.
- Click on the OK button to proceed.

Please Note: Only users with Supervisor access will be allowed to access the System Options.
- The System Options screen will open.

- Click on the System options button in the toolbar.

- The Entity Setup screen will open.
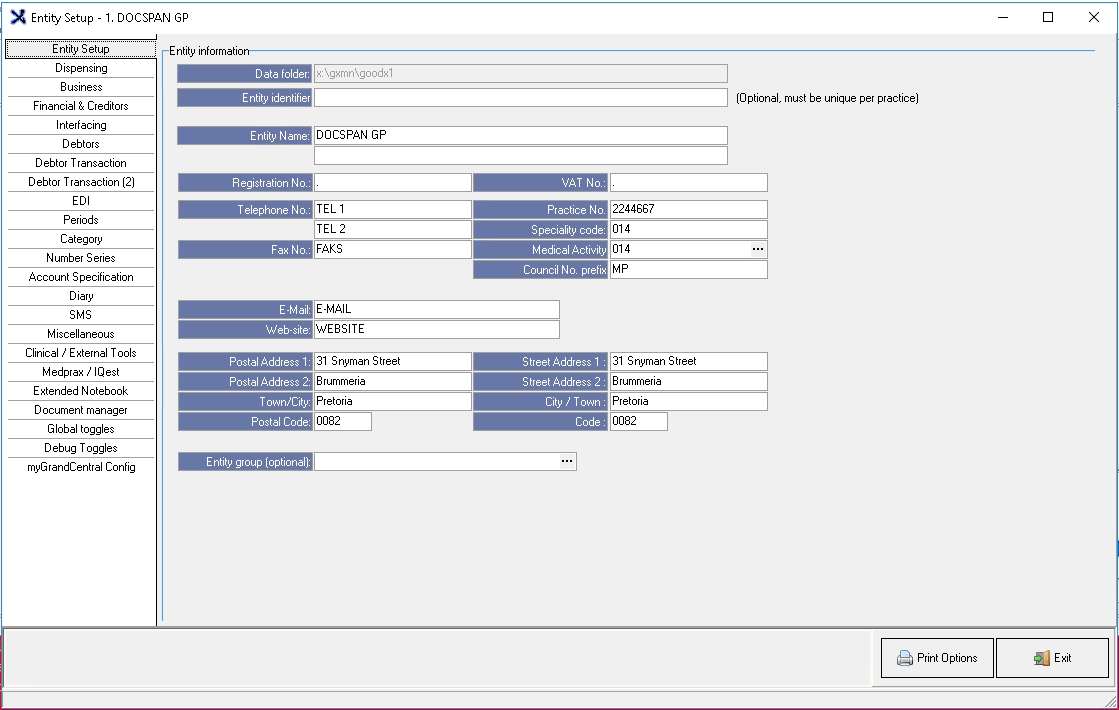
- Click on the Debtor Transaction tab on the left side of the screen.

- The Debtor Transaction screen will open.

Debtor Transaction Toggles
All the settings that relate to transactions that involve a Debtor.
- An explanation will be given for each field and option:
- Raise interest (annual %): The amount will be generated according to 30 days, 60 days, 90 days etc.

- The interest rate values will be the default rates that will be charged by the Practice.
- To calculate the interest, please refer to the user manual: Calculate Interest.

- Default Interest Button: Will set the interest rate to the values set up on all the Debtors.
- Default value for interest checkbox on debtor input: The default value interest that the system will add to outstanding amounts every month. A check box will appear on the Debtor Input screen to allow the Practioner to indicate that the Debtor will be charged interest.
- Description on Statement: The description of the journal that will display on the Statement, depending on the type of transaction, where journal transactions are used:

- Settlement Discount: Afrikaans/English description for the Settlement Discount transaction description.
- Write-offs: Afrikaans/English description for the Write-offs transaction description.
- Estimates: A quotation for a procedure that needs to be done, which allows the Patient to see what the procedure/treatment, that the Practitioner has suggested, will cost.

- Estimates: Print Medical Aid/Patient Outstanding: Shows the full outstanding amount and not just the Patient or Medical Aid outstanding amount. The Patient and Medical Aid outstanding amounts can be split and displayed separately.
- Use Invoice report format for Estimates: Allows the Estimates to look the same as the invoice report.
- Use own header for Estimates: The descriptions that the Practioner would like to display, by default, on their Estimate printout. Allows the Practitioner to customise the name of the Estimate header to a description of their preference, for example, Quotation.

- Afrikaans: A description for the header of the estimate in Afrikaans.
- English: A description for the header of the estimate in English.
Please Note: If own headers are not used, the header descriptions will by default be, Estimate.
![]()
- Estimate E-Mail: If preferred, the user will add the details of the e-mail address from which Estimates are sent. By default, the system will use the email address that has been set up on the entity profile.
- Over-payments: When a Patient has paid more than what is owed to the Practice, the Patient will be in credit. Whenever the Patient pays the Medical Aid portion before the Medical pays, and the Medical Aid makes a payment, the Patient will be in a credit as well. The setup of Overpayments allows the Practice to select what will happen to the credit amounts that are owed to the Patient.

- Move to outstanding (Overpayment Jnl)(Ignore Medical Credits): Recommended for Medical Practices. When a Patient is billed on the Medical Aid side and pays the account, the account is actually a Patient's outstanding balance that is applied to a Medical Aid outstanding balance. If the Medical Aid overpays, the funds must remain in the Medical Aid column and not be transferred to the Patient; instead the funds will need to be recorded as a credit on the Medical Aid, which will be done using an automatic journal. Until the money is manually shifted, whatever the Medical Aid paid will remain their money.
- Manual process: The allocation of an overpayment will need to be done manually. The practice will decide what process they would like to follow with each incident.
- ALWAYS do over-payment Journal- Will attempt to balance out Med/Patient split incl MedAid credits (NOT Recommended): Monies are not allowed to be moved from Medical Aid to Patient. If Medical Aid monies are shifted to the Patient and the Medical Aid decides to withdraw the monies owed to them the Practice or Patient will be liable. The system will do a journal to try and balance out the difference between the Patient and the Medical Aid, which is risky and not recommended.
- Cash Register: Enables the cash register. The Cash Register is a pay point station where a till slip can be printed for a Patient. The Cash Register is used to cash up every day to reconcile payments per user or at the end of every day.
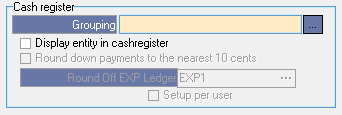
- Grouping: Allows the user to add the cash register to a group, for example, if there is more than 1 cash register at reception the user can add each cash register to that specific cash register group
- Click on the ... (ellipse) button to add the cash register to a group.
- The Cashregister Groups Set up screen will open.
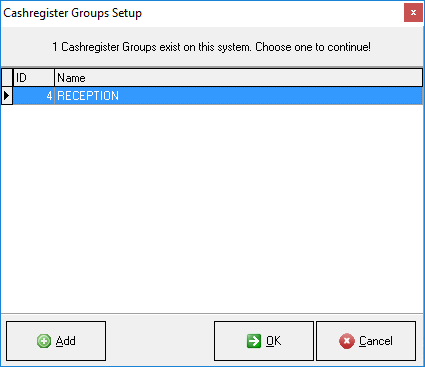
- Double Click on the desired group to add the cash register to that specific group.
![]()
- Display entity in cash register: Will display the entity name on the cash register to advise which entity the cash register is open for.

- Round down payments to the nearest 10 cents: Will automatically round off payments to the nearest 10 cents, as smaller denominations are no longer in use.
- Round off EXP Ledger: Select the ledger that will be used to round off payments to the nearest 10 cents.
- Setup per user: The cash register session is set up per user, each user will have their own cash register session.
- If the setting has not been selected, a global cash register session will be used where all transactions from all users will be done in the same session.
- Credit control: Interface with Lexpro (Debt collecting agency), if switched on, the Debtor will be handed over and the system will automatically do a journal, close the file in GoodX and export the file to the debt collecting company. Lexpro will then import the file and have access to all the data to process for handover.

- None: Bad debt handovers will not be used.
- Local Entity: A handover flag will appear in the current entity, to advise that the account on the specific entity has been handed over.
- EDC: Estimated date of confinement. Developed specifically for EBMAA (Estelle Bouwer Medical Accounts Administrators). When the account is handed over the account and the Debtor notes will be exported in a .txt file which will then be imported to the EDC system for collection.
- Quant: To allow Quant Solutions/GXQ Financial to handle the handovers on behalf of the Practice. (Still in development).
- Internal: A second entity can be set up specifically for handovers, and the handovers can be transferred to that entity.
- Click on the Invoice types per medical aid descriptions button to access the options available. The options allow the user to add custom descriptions on their invoices, for the different invoice types.

- The Custom invoice type descriptions pop-up will open.
- Enter an Afrikaans and English description for each option.
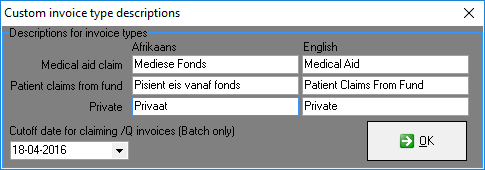
- Medical aid claim: The invoice will be claimed directly from the Medical Aid.
- Patient claims from fund: The Patient will pay, and later claim from the Medical Aid or Medical insurance company.
- Private: The Patient has no Medical Aid or insurance, or their funds are depleted and will be liable for their own account.
- Cut off date for claiming /Q invoices (Batch Only): Allows the user to set a cutoff date for claiming on Patient Liable invoices that were posted in a batch.
- Select a date on the date picker to set a cut-off date for claiming these kinds of invoices.
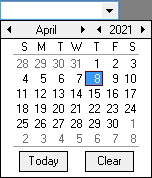
- Click on the Today button to revert to today's date.
![]()
- Click on the Clear button to clear the Date field.
![]()
- Click on the OK button to save the changes that have been made and close the pop-up.

- Invoice/Treatment Time: Allocates a time to a procedure, item or the entire invoice in order for the Medical Aid to pay for the same item or procedure multiple times on the same day. Physios and Treatment Clinics will typically use the Invoice/Treatment Time feature.

- None: No treatment time will be shown.
- AM/PM: Indicates whether the invoice, procedure or item was billed for the morning (AM) or afternoon (PM)
- From/To Time: Allows a specific time frame to be added to a procedure for eg. 10:23-10:45.
![]()
- Free format signata: Signata is also known as Prescription Codes. The Signata can be set up with a shortcut and a description. GoodX has a default list that can be used. For example: When "1B14" is typed in the following will display in the signata column - Take one in the morning and one at 14:00.
![]()
- Deletion of a modified item removes all modified items (Multi Invoice only): If an item is deleted that has modifiers, all items that have been modified will also be deleted.
![]()
- Allow billing of tariff at zero amount: When selected, zero amount items/procedures will show on the invoice such as non-charge items/procedures. Shows that items were used or procedures that have been done and included in a global amount, which is also used for stock tracking purposes.
![]()
- Use Payment Plan (Requires Episode Management): A payment plan that generates every month. Typically used by Orthodontists.
![]()
- Warn if duplicate Invoices on patient on same day: A warning screen will pop up if there's an Invoice posted on the same day for the same Patient.
![]()
- Minimum ICD-10 Validation for this Practice: Validates the ICD-10 Code in the Billing ICD-10 selection screen to whether the code is relevant to the specific Patient.
- Medicine/0201: Medicine or Material Items.

- Calculate sales price using mark up: The sales price will be calculated using a markup % to determine the sales price.
- Calculate markup using sales price: When the sales prices are entered the system will automatically calculate the markup % according to the difference between the purchase price and sales price.
- Apply Medical Aid Formularies: Applies specific Medical Aid rules from the Medical Aid on specific plans (Exclusion Rules) - with Hospitals always off.

- Billing group linking: Must always be on Medical Aid.

- Medical Aid: Which billing group will be used to determine which tariffs to charge.
- Debtor: Debtor Billing Groups will be created, which will then determine the pricelists to be used.
- Always use default printer: Will automatically select the default operating systems printer and will not ask which printer the user would like to use.

- Allow changing of Service date: Allows the user to change the service date of the posted Invoice.

- Auto shift linked receipts when re-doing invoices: Automatically shifts the receipt to the new invoice.

- Use correction Transaction Reason Codes: Forces the user to select a reason when making corrections on transactions such as journal transactions, only necessary for Practices that use journals.

- Autocorrect Medical Aid/Patient split when posting Debtor credit notes: Overrides the function of all transactions where the user was asked to split the payment to the Patient if the Medical Aid paid too much or vice versa. Any split that was done between Medical Aid and the Patient will be written back no matter where the amount is.

- Block Billing if Debtors is linked to an inactive Doctor: If set, the system will block invoices on Debtors where the linked Practitioner has been marked as inactive. Typically used in situations where the Practitioner lists are strictly managed.

- Enable shift journals on ZERO amounts: Enables the movement of journals between invoices or lines of which the amount is zero.

- Do not apply custom nappi prices for private items: The user will not be able to charge custom Nappi prices on private items, when a custom Nappi code is billed and marked as a private item the prices will revert to the list as loaded on the original price list.
- Click on the Print Options button to print the setup of all System Options Tabs.

- Click on the Save button to save the changes that have been made. The save button will only appear if changes have been made to the settings.

Please Note: The Save button will only appear if changes have been made to the settings.
- The Confirm Changes screen will open.

- Click on the Please specify a reason for the changes made text box to give a reason as to why the changes have been made.

- Click on the Cancel button to return to the EDI screen with saving any changes that have been made.
![]()
- Click on the OK button to save changes that have been made.
- Click on the Exit button to close the Entity Setup screen and return back to System Options main screen.
